2022 TOYOTA RAV4 HYBRID spare wheel
[x] Cancel search: spare wheelPage 643 of 752

6438-2. Steps to take in an emergency
8
When trouble arises
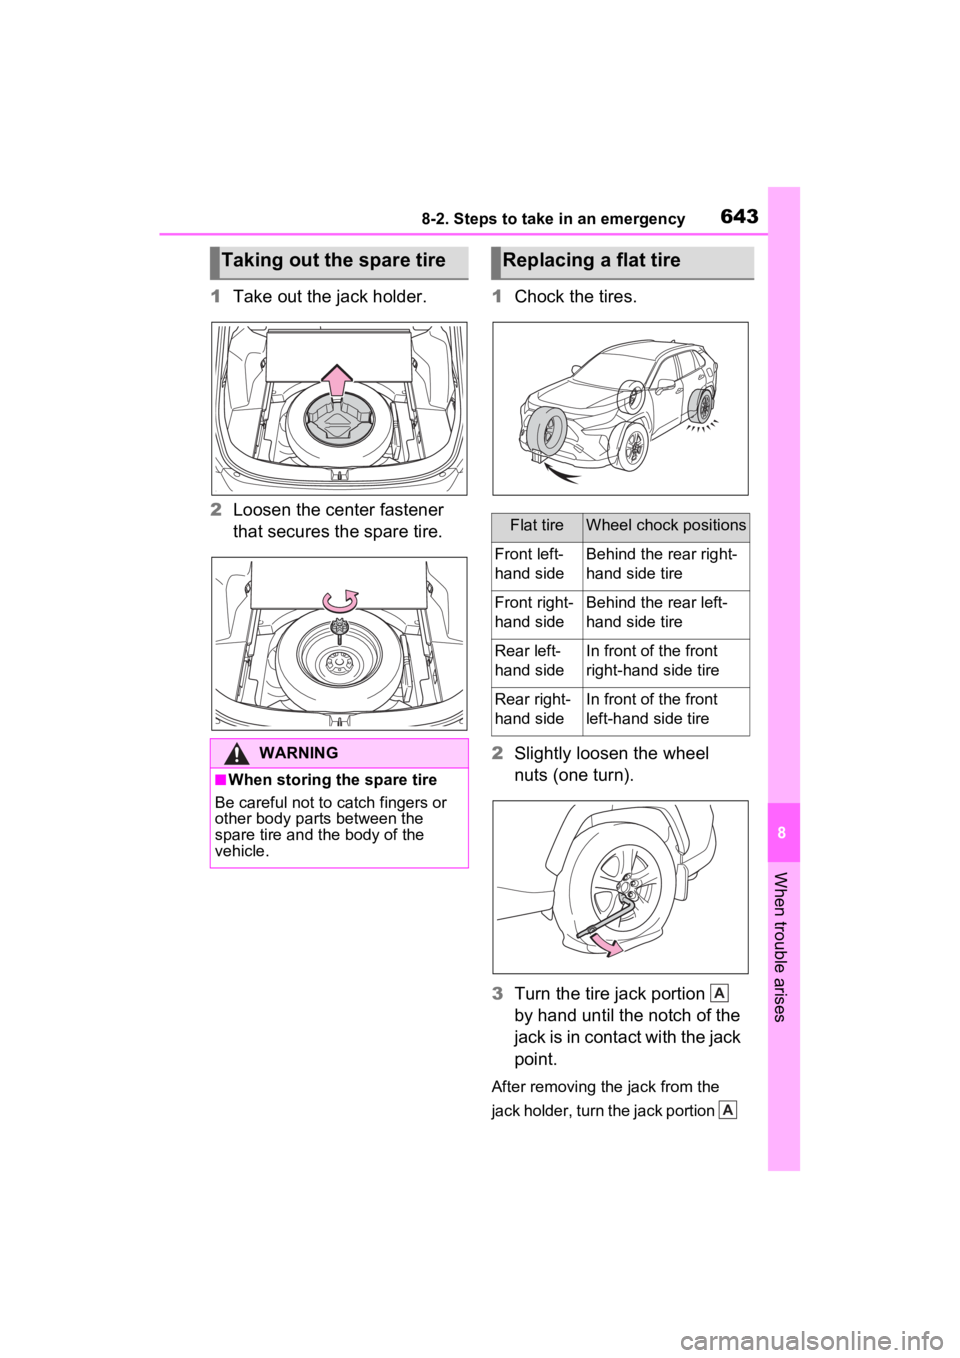
1Take out the jack holder.
2 Loosen the center fastener
that secures the spare tire. 1
Chock the tires.
2 Slightly loosen the wheel
nuts (one turn).
3 Turn the tire jack portion
by hand until the notch of the
jack is in contact with the jack
point.
After removing the jack from the
jack holder, turn the jack portion
Taking out the spare tire
WARNING
■When storing the spare tire
Be careful not to catch fingers or
other body parts between the
spare tire and the body of the
vehicle.
Replacing a flat tire
Flat tireWheel chock positions
Front left-
hand sideBehind the rear right-
hand side tire
Front right-
hand sideBehind the rear left-
hand side tire
Rear left-
hand sideIn front of the front
right-hand side tire
Rear right-
hand sideIn front of the front
left-hand side tire
A
A
Page 645 of 752

6458-2. Steps to take in an emergency
8
When trouble arises
1Remove any dirt or foreign
matter from the wheel con-
tact surface.
If foreign matter is on the wheel
contact surface, the wheel nuts
may loosen while the vehicle is in
motion, causing the tire to come off.
2 Install the spare tire and
loosely tighten each wheel
nut by hand by approximately
the same amount.
When replacing an aluminum wheel
with a steel whee l, tighten the
wheel nuts until the tapered portion
( ) comes into loose contact with
the disc wheel seat ( ).
When replacing an aluminum wheel
with an aluminum wheel, turn the
wheel nuts until the washers ( )
come into contact with the disc
WARNING
■Replacing a flat tire
●Do not touch the disc wheels or
the area around the brakes
immediately after the vehicle
has been driven.
After the vehicle has been
driven the disc wheels and the
area around the brakes will be
extremely hot. Touching these
areas with hands , feet or other
body parts while changing a tire,
etc. may result in burns.
●Failure to follow these precau-
tions could cause the wheel
nuts to loosen and the tire to fall
off, resulting in death or serious
injury.
• Have the wheel nuts tightened with a torque wrench to 76 ft•lbf
(103 N•m, 10.5 kgf•m) as soon
as possible after changing
wheels.
• When installing a tire, only use wheel nuts that have been spe-
cifically designed for that wheel.
• If there are any cracks or defor- mations in the bolt screws, nut
threads or bolt holes of the
wheel, have the vehicle
inspected by your Toyota
dealer.
• When installing the wheel nuts,
be sure to install them with the
tapered ends facing inward.
●For vehicles with power back
door: In cases such as when
replacing tires, make sure to
turn off the power back door
system ( P.142). Failure to do
so may cause the back door to
operate unintentionally if the
power back door switch is acci-
dentally touched, resulting in
hands and fingers being caught
and injured.
Installing the spare tire
A
B
A
Page 646 of 752

6468-2. Steps to take in an emergency
wheel ( ).
3Lower the vehicle.
4 Firmly tighten each wheel nut
two or three times in the
order shown in the illustra-
tion.
Tightening torque:
76 ft•lbf (103 N•m, 10.5 kgf•m)
5Stow the flat tire, tire jack and
all tools.
■The compact spare tire
●The compact spare tire is identi-
fied by the label “TEMPORARY USE ONLY” on the tire sidewall.
Use the compact spare tire tem-
porarily, and only in an emer-
gency.
●Make sure to check the tire infla-
tion pressure of the compact
spare tire. (
P.672)
■When using the compact spare
tire
As the compact spare tire is not
equipped with a tire pressure warn-
ing valve and transmitter (if
equipped), low inflation pressure of
the spare tire will not be indicated by
the tire pressure warning system.
Also, if you replace the compact
spare tire after the tire pressure
warning light com es on, the light
remains on.
■When the compact spare tire is
attached
The vehicle height may become
lower when driving with the compact
spare tire compared to when driving
with standard tires.
■If you have a flat front tire on a
road covered with snow or ice
Install the compact spare tire on one
of the rear wheels of the vehicle.
Perform the following steps and fit
tire chains to the front tires:
1 Replace a rear tire with the com-
pact spare tire.
2 Replace the flat front tire with the
tire removed from the rear of the
vehicle.
3 Fit tire chains to the front tires.
■When stowing the jack
Before storing the jack, adjust the
height of the ja ck to match the
shape of the jack holder.
The storage direction of the jack dif-
fers depending on the type, so make
sure to store the ja ck in the correct
direction.
Except for models made in Japan
*:
B
Page 648 of 752

6488-2. Steps to take in an emergency
WARNING
■Speed limit when using the
compact spare tire
Do not drive at speeds in excess
of 50 mph (80 km/h) when a com-
pact spare tire is installed on the
vehicle.
The compact spare tire is not
designed for driving at high
speeds. Failure to observe this
precaution may lead to an acci-
dent causing death or serious
injury.
■After using the tools and jack
Before driving, make sure all the
tools and jack are securely in
place in their storage location to
reduce the possibility of personal
injury during a co llision or sudden
braking.
NOTICE
■Be careful when driving over
bumps with the compact
spare tire installed on the
vehicle
The vehicle height may become
lower when driving with the com-
pact spare tire compared to when
driving with standard tires. Be
careful when driving over uneven
road surfaces.
■Driving with tire chains and
the compact spare tire
Do not fit tire chains to the com-
pact spare tire.
Tire chains may damage the vehi-
cle body and adversely affect driv-
ing performance.
■When replacing the tires
(vehicles with tire pressure
warning system)
When removing or fitting the
wheels, tires or th e tire pressure
warning valve and transmitter,
contact your Toyota dealer as the
tire pressure warning valve and
transmitter may be damaged if not
handled correctly.
Page 672 of 752

6729-1. Specifications
Vehicles with 17-inch wheels (type A)
Vehicles with 17-inch wheels (type B)
Steering
Free playLess than 1.2 in. (30 mm)
Tires and wheels
Tire size225/65R17 102H, T165/80R17 104M
(spare)
Tire inflation pressure
(Recommended cold tire infla-
tion pressure)
Front:
36 psi (250 kPa, 2.5 kgf/cm
2 or bar)
Rear:
36 psi (250 kPa, 2.5 kgf/cm
2 or bar)
Spare:
60 psi (420 kPa, 4.2 kgf/cm
2 or bar)
Wheel size17 x 7J, 17 x 4T (spare)
Wheel nut torque76 ft•lbf (103 N•m, 10.5 kgf•m)
Tire size225/65R17 102H, T165/80D17 104M
(spare)
Tire inflation pressure
(Recommended cold tire infla-
tion pressure)
Front:
33 psi (230 kPa, 2.3 kgf/cm
2 or bar)
Rear
33 psi (230 kPa, 2.3 kgf/cm
2 or bar)
Spare:
60 psi (420 kPa, 4.2 kgf/cm
2 or bar)
Wheel size17 x 7J, 17 x 4T (spare)
Wheel nut torque76 ft•lbf (103 N•m, 10.5 kgf•m)
Page 673 of 752

6739-1. Specifications
9
Vehicle specifications
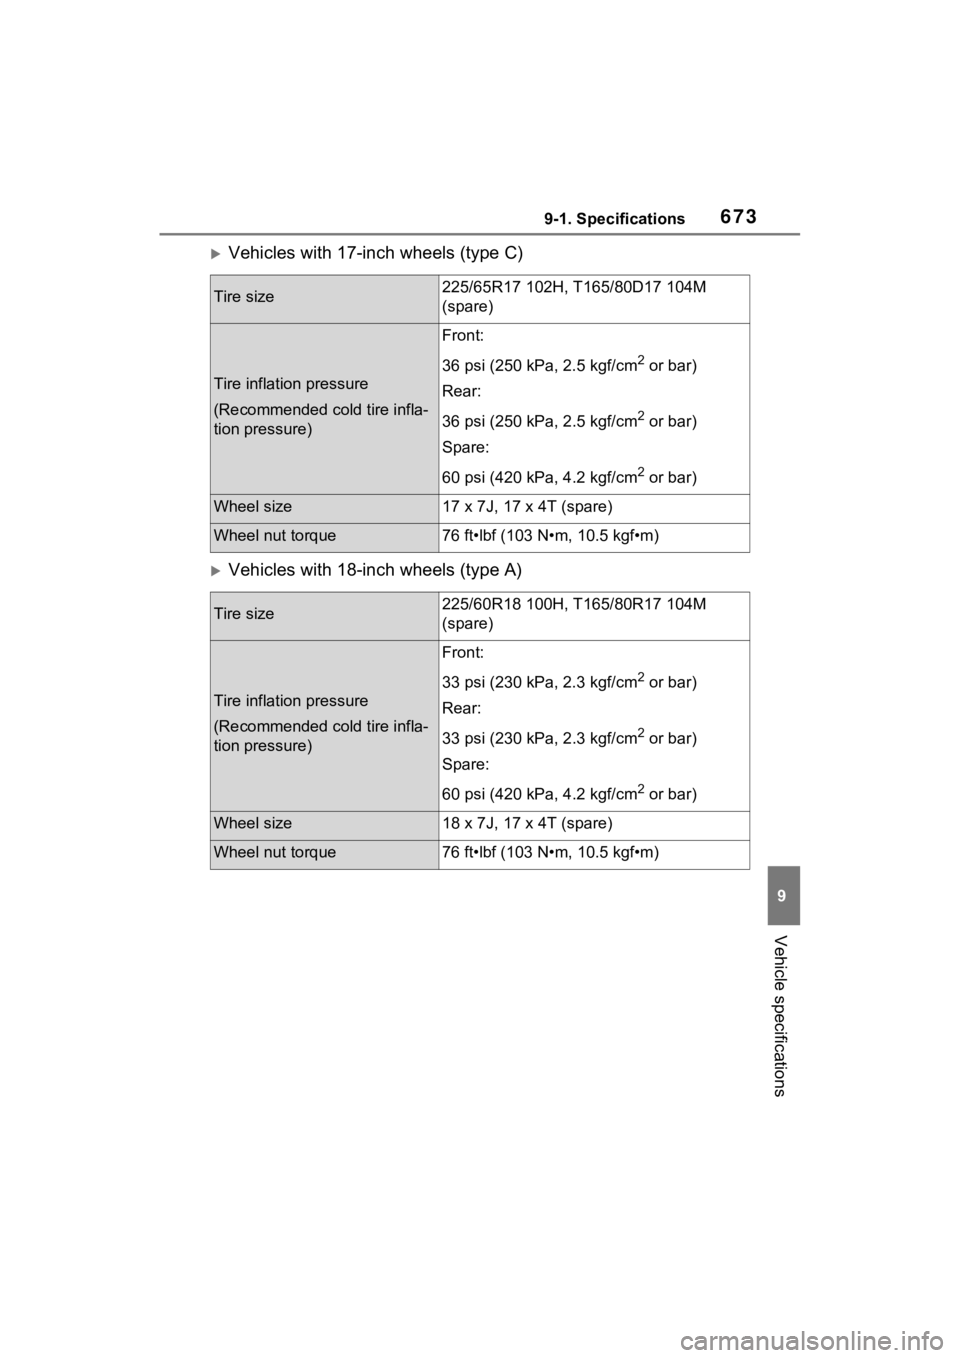
Vehicles with 17-inch wheels (type C)
Vehicles with 18-inch wheels (type A)
Tire size225/65R17 102H, T165/80D17 104M
(spare)
Tire inflation pressure
(Recommended cold tire infla-
tion pressure)
Front:
36 psi (250 kPa, 2.5 kgf/cm
2 or bar)
Rear:
36 psi (250 kPa, 2.5 kgf/cm
2 or bar)
Spare:
60 psi (420 kPa, 4.2 kgf/cm
2 or bar)
Wheel size17 x 7J, 17 x 4T (spare)
Wheel nut torque76 ft•lbf (103 N•m, 10.5 kgf•m)
Tire size225/60R18 100H, T165/80R17 104M
(spare)
Tire inflation pressure
(Recommended cold tire infla-
tion pressure)
Front:
33 psi (230 kPa, 2.3 kgf/cm
2 or bar)
Rear:
33 psi (230 kPa, 2.3 kgf/cm
2 or bar)
Spare:
60 psi (420 kPa, 4.2 kgf/cm
2 or bar)
Wheel size18 x 7J, 17 x 4T (spare)
Wheel nut torque76 ft•lbf (103 N•m, 10.5 kgf•m)
Page 674 of 752

6749-1. Specifications
Vehicles with 18-inch wheels (type B)
A: Wedge base bulbs (clear)
B: Wedge base bulbs (amber)
*1: If equipped
*2: The 28/8 W bulb is used. Howev er, only the 28 W filament illuminates.
Tire size225/60R18 100H, T165/80D17 104M
(spare)
Tire inflation pressure
(Recommended cold tire infla-
tion pressure)
Front:
33 psi (230 kPa, 2.3 kgf/cm
2 or bar)
Rear:
33 psi (230 kPa, 2.3 kgf/cm
2 or bar)
Spare:
60 psi (420 kPa, 4.2 kgf/cm
2 or bar)
Wheel size18 x 7J, 17 x 4T (spare)
Wheel nut torque76 ft•lbf (103 N•m, 10.5 kgf•m)
Light bulbs
Light bulbsBulb No.WType
Front side marker lights (bulb type)W5W5A
Front turn signal/parking lights (type A:
P.607)7444NA28/8B
Front turn signal lights (type B: P.607) (bulb
type)7444NA28/8*2B
Rear turn signal lightsWY21W21B
Back-up lightsW16W16A
Outer foot lights*15A
Page 731 of 752

Alphabetical Index731
Service Connect ..................... 507
Service plug .............................. 76
Service reminder message .... 561
Setup button (Menu screen) 379, 382
Setup screen ........................... 382
Shift lever ................................ 213 If the shift lever cannot be shifted from P................................. 215
Shift lock system .................... 215
Side airbags .............................. 35
Side auxiliary box ................... 533
Side doors ............................... 123
Side marker lights Light switch .......................... 224
Replacing light bulbs ............ 607
Wattage ................................ 674
Side mirrors ............................ 169 Adjustment ........................... 169
BSM (Blind Spot Monitor)..... 277
Folding ................................. 169
Heaters................................. 516
Side turn signal lights Replacing light bulbs ............ 607
Turn signal lever................... 217
Side windows ...... ................... 171
Smart key system ................... 143 Antenna location .................. 143
Entry functions ............. 123, 130
Starting the hybrid system.... 206
Warning message ................ 635
Snow tires ............................... 369
Spare tire Storage location ................... 641
Specifications ......................... 666
Speedometer ...................... 92, 96
Sport mode ............................. 358
Status icon .............................. 380 Status icon explanation ........ 380
Steering lock Column lock release............. 204
Steering switch ............... 444, 473 Audio switch .........................444
Steering wheel Adjustment ...........................157
Heated steering wheel..........521
Meter control switches..........102
Stop lights Replacing light bulbs ............607
Storage feature .. .....................527
Storage precaution s ...............527
Stuck If the vehicle becomes stuck 662
Sunglass holder.... ..................529
Sunshade ........................174, 177
Sun visors ...............................536
Switches “ODO TRIP” switch ...........94, 99
“SOS” button ..........................67
Automatic High Beam switch 227
Brake hold switch .................221
BSM (Blind Spot M onitor) .....277
Digital Rear-view Mirror control switches..............................160
Door lock switch ...................127
Driving mode select switch ...358
Driving position memory switches..............................151
Dynamic radar cruise control with full-speed range ..........266
Electronic sunshade switch ..177
Emergency flashers switch...616
EV drive mode switch ...........211
Fog light switch .....................231
Garage door opener switches ...........................................546
Heated steering wheel..........521
Ignition switch (power switch) ...................................204, 206
Intuitive parking assist ..........288
Light switch...........................224
LTA switch ............................257
Meter control switches..........102
Moon roof switches ..............174