2022 TOYOTA RAV4 HYBRID change wheel
[x] Cancel search: change wheelPage 162 of 752

1623-4. Adjusting the steering wheel and mirrors
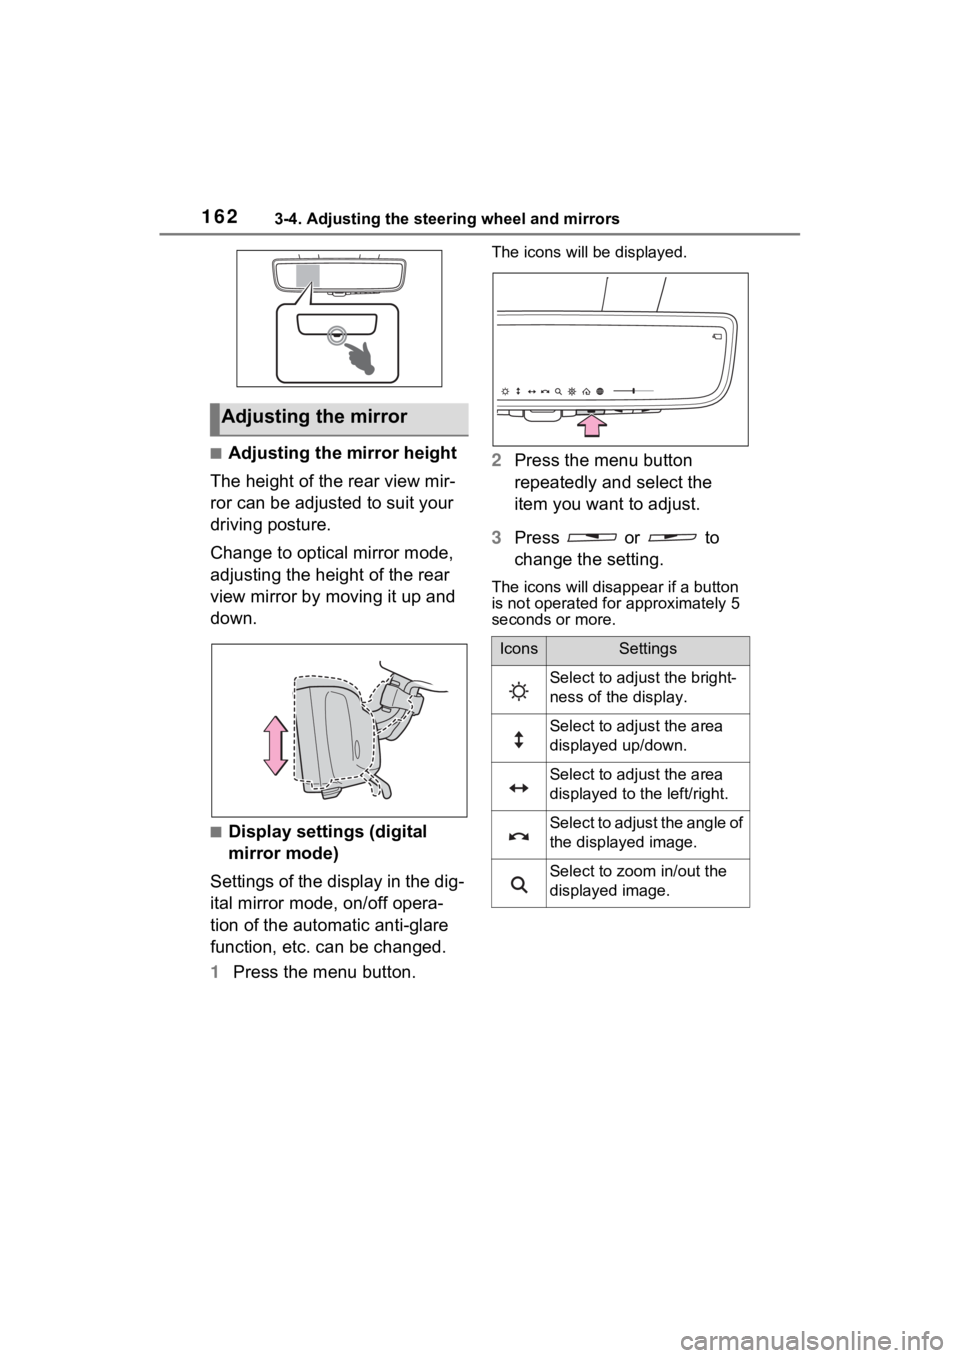
■Adjusting the mirror height
The height of the rear view mir-
ror can be adjusted to suit your
driving posture.
Change to optical mirror mode,
adjusting the height of the rear
view mirror by moving it up and
down.
■Display settings (digital
mirror mode)
Settings of the display in the dig-
ital mirror mode, on/off opera-
tion of the automatic anti-glare
function, etc. can be changed.
1 Press the menu button.
The icons will be displayed.
2Press the menu button
repeatedly and select the
item you want to adjust.
3 Press or to
change the setting.
The icons will disappear if a button
is not operated fo r approximately 5
seconds or more.
Adjusting the mirror
IconsSettings
Select to adjust the bright-
ness of the display.
Select to adjust the area
displayed up/down.
Select to adjust the area
displayed to the left/right.
Select to adjust the angle of
the displayed image.
Select to zoom in/out the
displayed image.
Page 163 of 752

1633-4. Adjusting the steering wheel and mirrors
3
Before driving
*: This is a function for the optical
mirror mode, however, the setting
can also be changed while using
the digital mirror mode.
■Enabling/disabling the
automatic anti-glare func-
tion (optical mirror mode)
The automatic anti-glare func-
tion in the optical mirror mode
can be enabled/disabled. The
setting can be changed in both
the digital mirror mode and the
optical mirror mode.
When using the digital mirror
mode
P.162
When using the optical mirror
mode
1 Press the menu button.
The icons will be displayed.
2Press the menu button
repeatedly and select .
The setting display will be dis-
played.
3Press or to
enable (ON)/disable (OFF)
the automatic anti-glare func-
tion.
The icons will disappear if a button
is not operated fo r approximately 5
seconds or more.
■Adjusting the display (digital
mirror mode)
●If the displayed image is adjusted,
it may appear distorted. This is not
a malfunction.
●If the brightness of the Digital
Rear-view Mirror is set too high, it
may cause eye strain. Adjust the
Digital Rear-view Mirror to an
appropriate brightness. If your
eyes become tired, change to
optical mirror mode.
●The brightness of the Digital Rear-
view Mirror will change automati-
cally according to the brightness
of the area in front of your vehicle.
Select to enable/disable the
automatic anti-glare func-
tion.
*
Responding to the bright-
ness of the headlights of
vehicles behind, the
reflected light is automati-
cally adjusted.
The automatic anti-glare
function is enabled each
time the power switch is
changed to ON.
Select to display
HomeLink
® Training Tuto-
rial to assist c ustomers to
train their Garage Door
Opener System. ( P.546)
Select to change the lan-
guage of the Homelink
®
Training Tutorial.
IconsSettings
Page 165 of 752

1653-4. Adjusting the steering wheel and mirrors
3
Before driving
If you notice any of the following symptoms, refer to the following
table for the likely cause and the solution.
NOTICE
■To prevent the Digital Rear-
view Mirror from malfunction-
ing
●Do not use detergents, such as
thinner, benzene, and alcohol to
clean the mirror. They may dis-
color, deteriorate or damage the
mirror surface.
●Do not smoke, use matches,
use cigarette lighters or allow
open flames near the mirror. It
may damage the mirror or
cause a fire.
●Do not remove, disassemble or
modify the mirror.
■To prevent the camera from
malfunctioning
●Observe the following precau-
tions, otherwise the Digital
Rear-view Mirror may not oper-
ate properly.
• Do not strike or hit the camera
or subject it to a strong impact,
as the camera installation posi-
tion and angle may be changed.
• Do not remove, disassemble or modify the camera.
• Do not allow an organic solvent, car wax, window cleaner or
glass coating to adhere to the
camera. If this happens, wipe it
off as soon as possible.
• When cleaning the camera lens, wipe the camera lens with a
damp soft cloth.
Do not strongly rub the camera
lens, as it may be scratched and
will not be able to transmit a
clear image.
• When applying colored film (including transparent film) to
the rear window glass, do not
apply it to the area in front of the
camera.
If film is applied to the area in
front of the camera, the image
from the camera may not dis-
play properly.
●Do not subject the camera to a
strong impact as this could
cause a malfunction.
If this happens, have the vehicle
inspected by your Toyota dealer
as soon as possible.
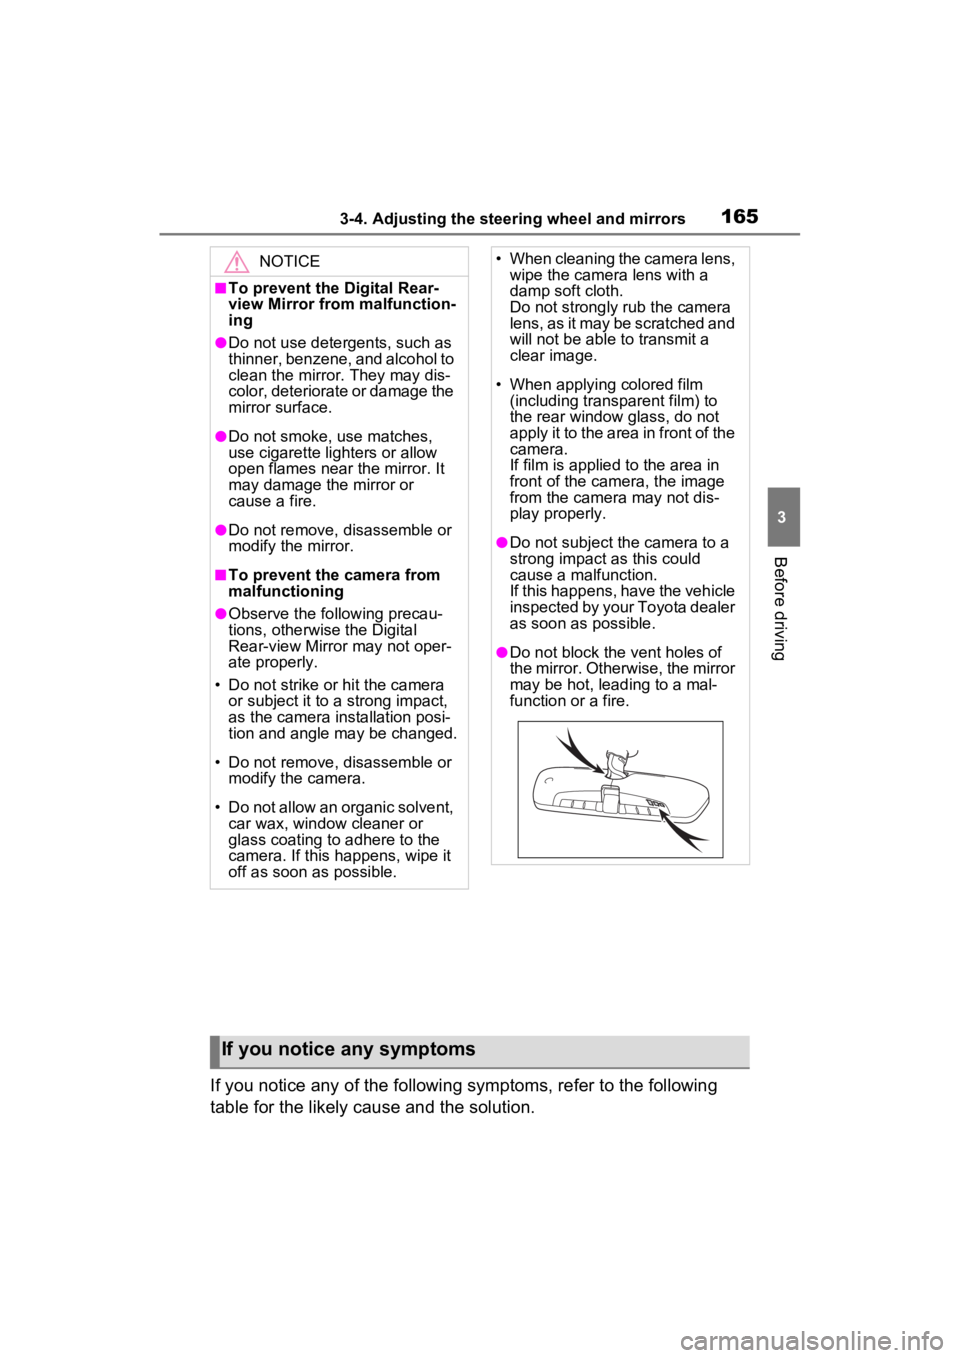
●Do not block the vent holes of
the mirror. Otherwise, the mirror
may be hot, leading to a mal-
function or a fire.
If you notice any symptoms
Page 166 of 752

1663-4. Adjusting the steering wheel and mirrors
If the symptom is not resolved by the solution, have the vehicle
inspected by your Toyota dealer.
SymptomLikely causeSolution
The image is
difficult to see.
The mirror surface is dirty.
Clean the mirror surface
gently, using a soft dry
cloth.
Sunlight or headlights are shin-
ing directly into the Digital Rear-
view Mirror.
Change to optical mirror
mode.
(If the light is coming
through the moon roof [if
equipped] or panoramic
moon roof [if equipped],
close the sunshade or
electronic sunshade.)
• The vehicle is in a dark area.
• The vehicle is near a TV tower, broadcasting station,
electric power plant, or other
location where strong radio
waves or electrical noise may
be present.
• The temperature around the camera is extremely high/low.
• The ambient te mperature is
extremely low.
• It is raining or humid.
• Sunlight or headlights are shining directly into the cam-
era lens.
• The vehicle is under fluores- cent lights, sodium lights,
mercury lights, etc.
• Exhaust gas is obstructing the camera.
Change to optical mirror
mode.
(Change back to digital
mirror mode when the
conditions have
improved.)
Foreign matters such as water
droplets or dust is on the cam-
era lens.Wipe the camera lens
with a damp soft cloth.
Page 167 of 752

1673-4. Adjusting the steering wheel and mirrors
3
Before driving
The image is
difficult to see.
The luggage in the luggage
compartment is reflected off the
rear window glass and obstruct-
ing the camera.
• Change to optical mirror mode.
• Move the luggage to a position where it does
not obstruct the cam-
era or cover it with a
black cloth to reduce
the amount it is
reflected off the rear
window glass.
The rear window glass is
fogged up.
Change to optical mirror
mode.
After defogging the rear
window using the rear
window defogger
( P.516), use the digital
mirror mode again.
The outside of the rear window
glass is dirty.Use the rear window
wiper to remove dirt.
The inside of the rear window
glass is dirty.Wipe the inside of rear
window glass with a damp
soft cloth.
The image is
out of align-
ment.
The back door is not fully
closed.Fully close the back door.
The camera or its surrounding
area has received a strong
impact.Change to optical mirror
mode and have the vehi-
cle inspected by your
Toyota dealer.
The display is
dim and is
displayed.
The system may be malfunc-
tioning.
Change to optical mirror
mode and have the vehi-
cle inspected by your
Toyota dealer.
goes off.
SymptomLikely causeSolution
Page 168 of 752

1683-4. Adjusting the steering wheel and mirrors
is dis-
played.
The Digital Rear-view Mirror is
extremely hot.
(The display will gradually
become more dim. If the tem-
perature continues to increase,
the Digital Rear-view Mirror will
turn off.)
Reducing the cabin tem-
perature is recom-
mended to reduce the
temperature of the mirror.
( will disappear when
the mirror becomes cool.)
If does not disappear
even though the mirror is
cool, have the vehicle
inspected by your Toyota
dealer.
The lever can-
not be oper-
ated properly.The lever may be malfunction-
ing.
Change to optical mirror
mode and have the vehi-
cle inspected by your
Toyota dealer.
(To change to optical mir-
ror mode, press and hold
the menu button for
approximately 10 sec-
onds.)
SymptomLikely causeSolution
Page 245 of 752

2454-5. Using the driving support systems
4
Driving
WARNING
■Limitations of the pre-colli-
sion system
●The driver is solely responsible
for safe driving. Always drive
safely, taking care to observe
your surroundings.
Do not use the pre-collision sys-
tem instead of normal braking
operations under any circum-
stances. This system will not
prevent collisions or lessen col-
lision damage or injury in every
situation. Do not overly rely on
this system. Failure to do so
may lead to an accident, result-
ing in death or serious injury.
●Although this system is
designed to help avoid a colli-
sion or help reduce the impact
of the collision, its effectiveness
may change according to vari-
ous conditions, therefore the
system may not always be able
to achieve the same level of
performance.
Read the following conditions
carefully. Do not overly rely on
this system and always drive
carefully.
• Conditions under which the sys- tem may operate even if there is
no possibility of a collision:
P.248
• Conditions under which the sys- tem may not operate properly:
P.250
●Do not attempt to test the oper-
ation of the pre-collision system
yourself.
Depending on the objects used
for testing (dummies, card-
board objects imitating detect-
able objects, etc.), the system
may not operate properly, pos-
sibly leading to an accident.
■Pre-collision braking
●When the pre-collision braking
function is operating, a large
amount of braking force will be
applied.
●If the vehicle is stopped by the
operation of the pre-collision
braking function, the pre-colli-
sion braking function operation
will be canceled after approxi-
mately 2 seconds. Depress the
brake pedal as necessary.
●The pre-collision braking func-
tion may not operate if certain
operations are performed by the
driver. If the accelerator pedal is
being depressed strongly or the
steering wheel is being turned,
the system may determine that
the driver is taking evasive
action and possibly prevent the
pre-collision braking function
from operating.
●In some situations, while the
pre-collision brak ing function is
operating, operation of the func-
tion may be canceled if the
accelerator pedal is depressed
strongly or the steering wheel is
turned and the system deter-
mines that the driver is taking
evasive action.
●If the brake pedal is being
depressed, the system may
determine that t he driver is tak-
ing evasive action and possibly
delay the operation timing of the
pre-collision braking function.
■When to disable the pre-colli-
sion system
In the following situations, disable
the system, as it may not operate
properly, possibly leading to an
accident resulting in death or seri-
ous injury:
●When the vehicle is being towed
Page 246 of 752

2464-5. Using the driving support systems
■Enabling/disabling the pre-
collision system
The pre-collision system can be
enabled/disabled on the
screen ( P.107) of the multi-
information display.
The system is automatically
enabled each time the power
switch is turned to ON.
If the system is disabled, the
PCS warning light will turn on
and a message will be displayed
on the multi-information display.
■Changing the pre-collision
warning timing
The pre-collision warning timing
can be changed on the
screen ( P.107) of the multi-
information display.
The warning timing setting is
retained when the power switch is
turned to OFF. However, if the pre-
collision system is disabled and re-
enabled, the operation timing will
return to the default setting (mid-
dle).
WARNING
●When your vehicle is towing
another vehicle
●When transporting the vehicle
via truck, boat, train or similar
means of transportation
●When the vehicle is raised on a
lift with the hybrid system on
and the tires are allowed to
rotate freely
●When inspecting the vehicle
using a drum tester such as a
chassis dynamometer or speed-
ometer tester, or when using an
on vehicle wheel balancer
●When a strong impact is applied
to the front bumper or front
grille, due to a n accident or
other reasons
●If the vehicle cannot be driven in
a stable manner, such as when
the vehicle has been in an acci-
dent or is malfunctioning
●When the vehicle is driven in a
sporty manner or off-road
●When the tires are not properly
inflated
●When the tires are very worn
●When tires of a size other than
specified are installed
●When tire chains are installed
●When a compact spare tire or
an emergency tire puncture
repair kit is used
●If equipment (snow plow, etc.)
that may obstruct the radar sen-
sor or front camera is temporar-
ily installed to the vehicle
Changing settings of the
pre-collision system