2022 TOYOTA PROACE VERSO EV ECU
[x] Cancel search: ECUPage 4 of 360

4
Presentation
Instruments and controls
NOTIC E
These illustrations and descriptions are intended as a guide. The presence and location of some components varies according to the version, trim level and country of sale.
1.Glove boxDeactivation of the front passenger airbag
2.12 V (120 W) accessory sockets
3.USB socket
4.Electric parking brake
5.Instrument panel
6.StorageCup/can holder
7.Storage compartment
8.Upper storage compartment
9.220 V (120 W) accessory socket
10.Horn
11 .Courtesy lampWarning lamps display for seat belts and front passenger airbagInterior rear view mirrorEmergency and assistance call button
12.Heating/Air conditioningFront demisting – de-icingRear screen demisting – de-icing
13."START/STOP" button
14.Gearbox or drive selectorChoice of driving mode
15.Monochrome screen with audio systemTouch screen with TOYOTA Pro Touch or TOYOTA Pro Touch with navigation system
16.Bonnet release
17.Dashboard fuses
18.Head-up display
NOTIC E
Depending on the vehicle's equipment, the storage compartments may be open or closed. This configuration is shown as an example.
Page 15 of 360

15
Instruments
1
► Hold the control lever pressed in the release direction for between 10 and 15 seconds.► Release the control lever.► Depress and hold the brake pedal.► Hold the control lever in the “Application” direction for 2 seconds.► Release the control lever and the brake pedal.
Malfunction (with electric parking brake)
Fixed, accompanied by the message "Parking brake fault".The vehicle cannot be immobilised with the engine running.If manual application and release commands are not working, the electric parking brake control lever is faulty.The automatic functions must be used at all times and are automatically re-enabled in the event of a control lever fault.Carry out (2).Fixed, accompanied by the message "Parking brake fault".The parking brake is faulty: manual and automatic functions may not be working.When stationary, to immobilise the vehicle:► Pull and hold the control lever for approximately 7 to 15 seconds, until the indicator lamp comes on on the instrument panel.If this procedure does not work, secure the vehicle:► Park on a level surface.► With a manual gearbox, engage a gear.
► With an automatic gearbox or drive selector, select P, then place the supplied chock against one of the wheels.Then carry out (2).
BrakingFixed.A minor fault with the braking system has been detected.Drive carefully.
Carry out (3).
Collision Risk Alert/Active Safety BrakeFlashing.The system activates and brakes the vehicle momentarily to reduce the speed of collision with the vehicle in front.Fixed, accompanied by a message and an audible signal.The system has a fault.Carry out (3).Fixed, accompanied by the display of a message.The system has been deactivated via the vehicle configuration menu.For more information, refer to the Driving section.
Dynamic stability control (DSC) and anti-slip regulation (ASR)Flashing.DSC/ASR regulation is activated in the event of a loss of grip or trajectory.Fixed.The DSC/ASR system has a fault.
Carry out (3).
Emergency brake malfunction (with electric parking brake)Fixed, accompanied by the message "Parking brake fault".Emergency braking does not deliver optimal performance.If automatic release is not available, use manual release or carry out (3).
Hill start assistFixed, accompanied by the message "Anti roll-back system fault".The system has a fault.Carry out (3).
Dynamic stability control (DSC) and anti-slip regulation (ASR)Fixed.The system is deactivated.Press the button to reactivate it.The DSC/ASR system is activated automatically when the vehicle is started, and from around 50 km/h (30 mph).
Under-inflationFixed, accompanied by an audible signal and a message.The pressure in one or more wheels is too low.Check the pressure of the tyres as soon as possible.Reinitialise the detection system after adjusting the pressure.
Page 33 of 360

33
Access
2
Unlocking/Complete or
selective unlocking
What is the purpose of total
or selective unlocking?
Complete unlocking unlocks all the vehicle’s doors (front, side and rear).
Selective unlocking unlocks either the cabin doors, or the doors of the loading area (side and rear).
NOTIC E
The separation of the cabin and loading area unlocking is a security measure.It is used to lock out access to the part of the vehicle in which you are not present.
Activation/Deactivation
► To activateselective unlocking between the cab and the loading area or to deactivate selective unlocking and return to total unlocking mode, switch on the ignition and press this button for more than two
seconds.An audible signal and, depending on equipment, a display message, confirm that the request has been acknowledged.
NOTIC E
Selective unlocking between cab and loading area is activated by default.
Unlocking/Complete
unlocking
NOTIC E
Unlocking is signalled by rapid flashing of the direction indicators for a few seconds.Depending on version, the door mirrors unfold and the alarm is deactivated.
With the key
► To unlock the vehicle fully, turn the key in the front left-hand door lock towards the front of the vehicle.If the vehicle has an alarm, it will not be deactivated. Opening a door will trigger the alarm, which can be stopped by switching the ignition on.
With the remote control
► Depending on equipment, press one of these buttons to unlock the vehicle.
Using the remote control with electric
sliding side door(s)
► To fully unlock the vehicle and open the side door, press and hold this button until the door has opened.
Page 41 of 360
41
Access
2
NOTIC E
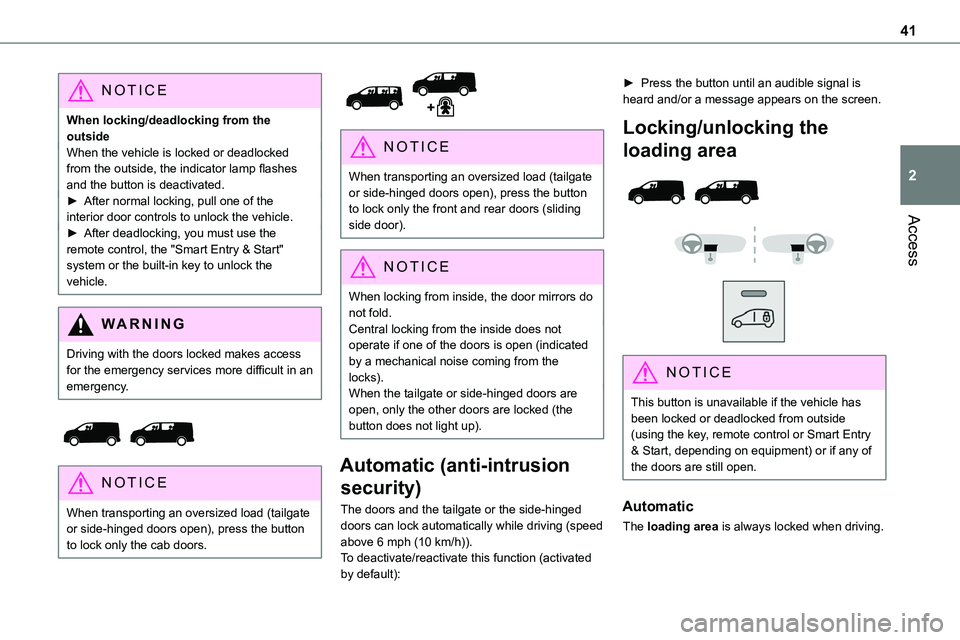
When locking/deadlocking from the outsideWhen the vehicle is locked or deadlocked from the outside, the indicator lamp flashes and the button is deactivated.► After normal locking, pull one of the interior door controls to unlock the vehicle.
► After deadlocking, you must use the remote control, the "Smart Entry & Start" system or the built-in key to unlock the vehicle.
WARNI NG
Driving with the doors locked makes access for the emergency services more difficult in an emergency.
NOTIC E
When transporting an oversized load (tailgate or side-hinged doors open), press the button to lock only the cab doors.
NOTIC E
When transporting an oversized load (tailgate or side-hinged doors open), press the button to lock only the front and rear doors (sliding side door).
NOTIC E
When locking from inside, the door mirrors do not fold.Central locking from the inside does not operate if one of the doors is open (indicated by a mechanical noise coming from the locks).When the tailgate or side-hinged doors are open, only the other doors are locked (the button does not light up).
Automatic (anti-intrusion
security)
The doors and the tailgate or the side-hinged doors can lock automatically while driving (speed
above 6 mph (10 km/h)).To deactivate/reactivate this function (activated by default):
► Press the button until an audible signal is heard and/or a message appears on the screen.
Locking/unlocking the
loading area
NOTIC E
This button is unavailable if the vehicle has been locked or deadlocked from outside (using the key, remote control or Smart Entry & Start, depending on equipment) or if any of the doors are still open.
Automatic
The loading area is always locked when driving.
Page 60 of 360
60
Smart Cargo
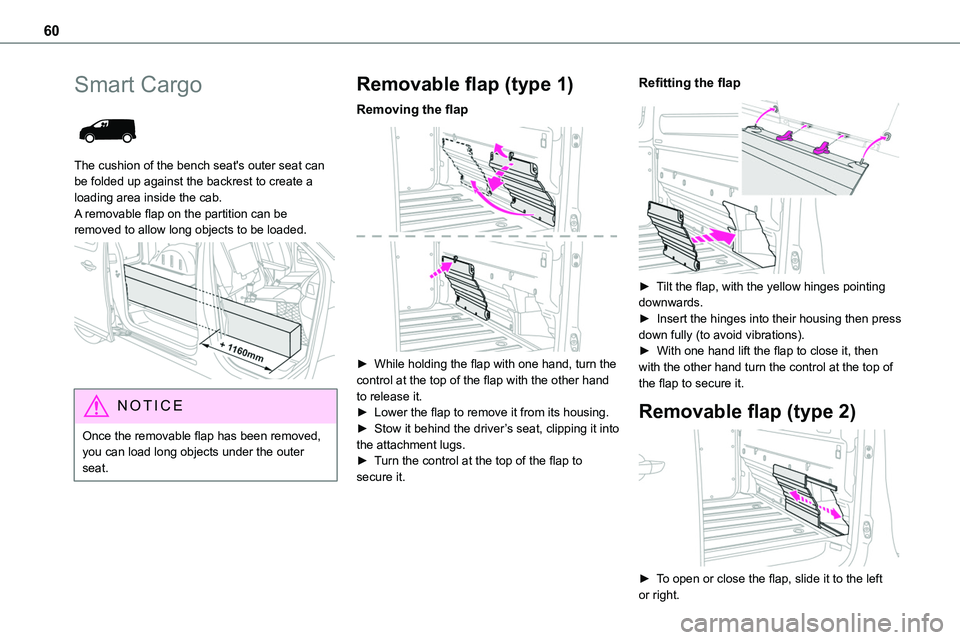
The cushion of the bench seat's outer seat can be folded up against the backrest to create a loading area inside the cab. A removable flap on the partition can be
removed to allow long objects to be loaded.
NOTIC E
Once the removable flap has been removed, you can load long objects under the outer seat.
Removable flap (type 1)
Removing the flap
► While holding the flap with one hand, turn the control at the top of the flap with the other hand to release it.► Lower the flap to remove it from its housing.► Stow it behind the driver’s seat, clipping it into
the attachment lugs.► Turn the control at the top of the flap to secure it.
Refitting the flap
► Tilt the flap, with the yellow hinges pointing downwards.► Insert the hinges into their housing then press down fully (to avoid vibrations).► With one hand lift the flap to close it, then with the other hand turn the control at the top of the flap to secure it.
Removable flap (type 2)
► To open or close the flap, slide it to the left or right.
Page 62 of 360
62
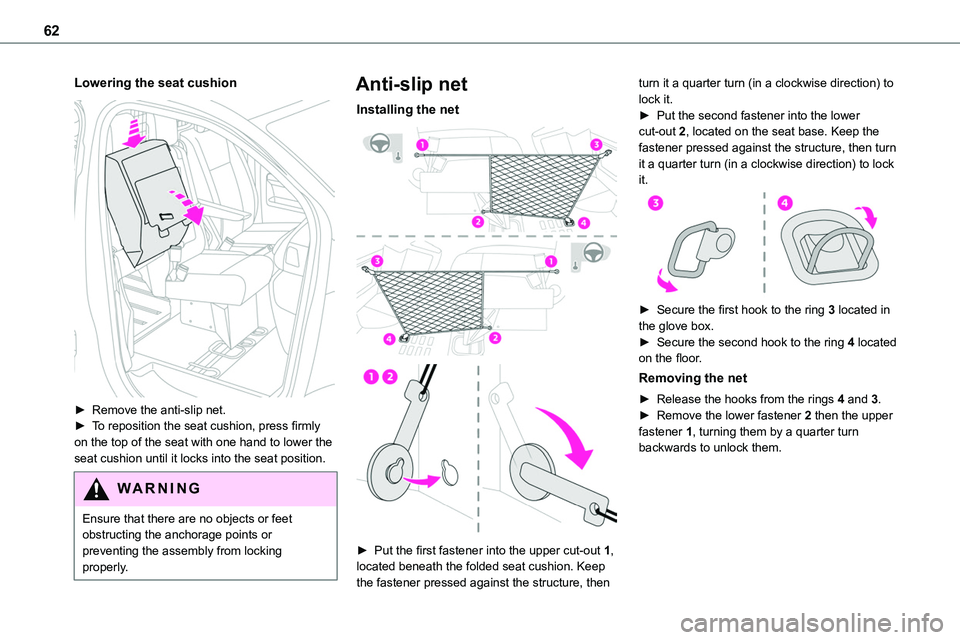
Lowering the seat cushion
► Remove the anti-slip net.► To reposition the seat cushion, press firmly on the top of the seat with one hand to lower the seat cushion until it locks into the seat position.
WARNI NG
Ensure that there are no objects or feet obstructing the anchorage points or preventing the assembly from locking properly.
Anti-slip net
Installing the net
► Put the first fastener into the upper cut-out 1, located beneath the folded seat cushion. Keep the fastener pressed against the structure, then
turn it a quarter turn (in a clockwise direction) to lock it.► Put the second fastener into the lower cut-out 2, located on the seat base. Keep the fastener pressed against the structure, then turn it a quarter turn (in a clockwise direction) to lock it.
► Secure the first hook to the ring 3 located in the glove box.► Secure the second hook to the ring 4 located on the floor.
Removing the net
► Release the hooks from the rings 4 and 3.► Remove the lower fastener 2 then the upper
fastener 1, turning them by a quarter turn backwards to unlock them.
Page 63 of 360
63
Ease of use and comfort
3
WARNI NG
Make sure that the size, shape and volume of the loads carried are compatible with the highway code and safety regulations and do not impair the driver’s field of vision.All loads must be appropriately secured to prevent or minimise displacement and prevent injury.
Install the anti-slip net (supplied with the vehicle) every time that the seat is raised and the partition flap removed.Never use the net for any other purposes.Regularly check the condition of the anti-slip net. As soon as signs of wear or tear appear, contact any authorized Toyota retailer or Toyota authorized repairer, or any reliable repairer to have it replaced by an anti-slip net that meets the specifications required by TOYOTA for the vehicle.Always fit the removable flap back into place when you are not carrying any long loads.
"Rotating writing table"
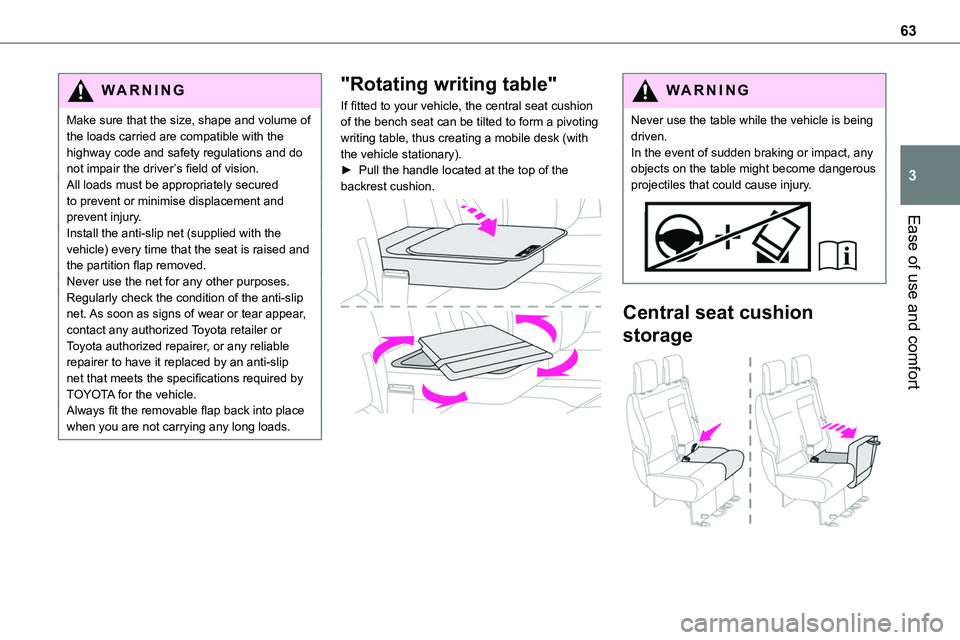
If fitted to your vehicle, the central seat cushion of the bench seat can be tilted to form a pivoting writing table, thus creating a mobile desk (with the vehicle stationary).► Pull the handle located at the top of the backrest cushion.
WARNI NG
Never use the table while the vehicle is being driven.In the event of sudden braking or impact, any objects on the table might become dangerous projectiles that could cause injury.
Central seat cushion
storage
Page 64 of 360
64
Precautions for the seats
and bench seats
Do not remove a head restraint without storing it and securing it to a support.Ensure that the passengers can always access the seat belts and fasten them easily.A passenger must not take their seat without adjusting the seat's head restraint correctly and
adjusting and fastening their seat belt.
WARNI NG
Ensure that no object or passenger feet could obstruct the anchorage points or prevent the correct latching of the assembly.
NOTIC E
If removing and storing seats and bench seats out of the vehicle, ensure that they are placed in a clean area, so as to avoid introducing any foreign bodies into the mechanisms.
NOTIC E
The seats and bench seats are not designed for any other use than in the vehicle. They are equipped with mechanisms and features that may be damaged if used improperly or if dropped.
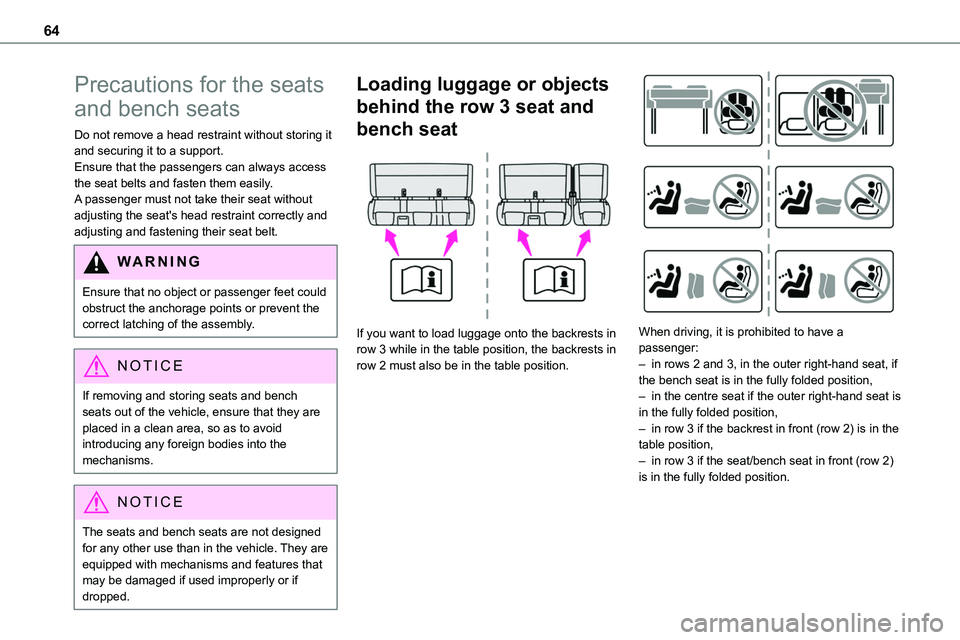
Loading luggage or objects
behind the row 3 seat and
bench seat
If you want to load luggage onto the backrests in row 3 while in the table position, the backrests in row 2 must also be in the table position.
When driving, it is prohibited to have a passenger:– in rows 2 and 3, in the outer right-hand seat, if the bench seat is in the fully folded position,– in the centre seat if the outer right-hand seat is in the fully folded position,– in row 3 if the backrest in front (row 2) is in the table position,– in row 3 if the seat/bench seat in front (row 2) is in the fully folded position.