2022 TOYOTA PROACE VERSO EV child lock
[x] Cancel search: child lockPage 43 of 360
43
Access
2
► With total unlocking activated and the child lock deactivated, to unlock the vehicle and start opening a door, press the button corresponding to the door you wish to open.► With selective unlocking activated, to unlock only the loading area and start opening a door, press the button corresponding to the door you wish to open.► In both cases, pressing the button again
reverses the direction of the door's movement.
Closing
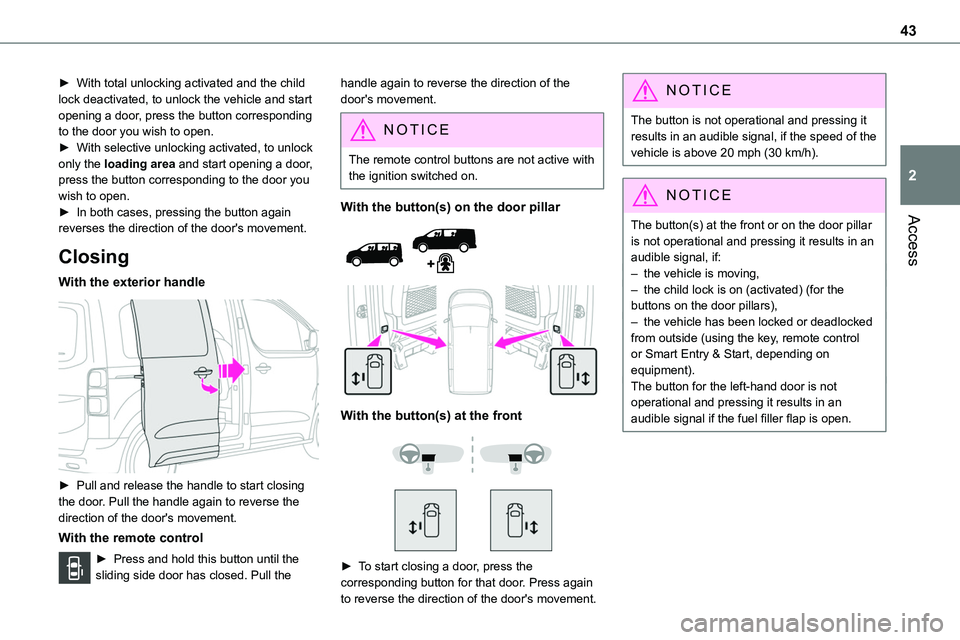
With the exterior handle
► Pull and release the handle to start closing the door. Pull the handle again to reverse the direction of the door's movement.
With the remote control
► Press and hold this button until the sliding side door has closed. Pull the
handle again to reverse the direction of the door's movement.
NOTIC E
The remote control buttons are not active with the ignition switched on.
With the button(s) on the door pillar
With the button(s) at the front
► To start closing a door, press the corresponding button for that door. Press again
to reverse the direction of the door's movement.
NOTIC E
The button is not operational and pressing it results in an audible signal, if the speed of the vehicle is above 20 mph (30 km/h).
NOTIC E
The button(s) at the front or on the door pillar is not operational and pressing it results in an audible signal, if:– the vehicle is moving,– the child lock is on (activated) (for the buttons on the door pillars),– the vehicle has been locked or deadlocked from outside (using the key, remote control or Smart Entry & Start, depending on equipment).The button for the left-hand door is not operational and pressing it results in an audible signal if the fuel filler flap is open.
Page 44 of 360

44
General
recommendations for the
sliding side doors
WARNI NG
Doors must only be operated when the vehicle is stationary.
For your safety and that of your passengers, as well as for correct operation of the doors, you are strongly advised not to drive with a door open.Always check that it is safe to operate the door and in particular, be sure not to leave children or animals near the door controls without supervision.The audible warning, the lighting of the "door open" warning lamp and the message on the screen are there to remind you. Contact any authorized Toyota retailer or Toyota authorized repairer, or any reliable repairer if you want to deactivate this warning.Lock the vehicle when you use an automatic car wash.
WARNI NG
Before opening or closing and while moving doors, ensure that no person, animal or object is in the door frame or any other position that
would block the desired movement, inside or outside the vehicle.If this advice is not followed, injuries or damage may occur if any part of a person or an object is trapped or caught.Electrical door opening is disabled at speeds above 2 mph (3 km/h):– However, if the vehicle started moving while the doors were open, the speed must
be reduced below 19 mph (30 km/h) before they can be closed.– Any attempt to open a door electrically using the interior handle while driving results in it only being possible to open the door manually.– This situation is accompanied by the audible warning, the lighting of the "door open" warning lamp and the message on the screen. To release the door and be able to operate it again, it is necessary to stop the vehicle.
WARNI NG
Take care not to block the guide space on the floor so that the door can slide correctly.For safety and functional reasons, do not drive with the sliding side door open.
NOTIC E
The electric controls are disabled in the event of an impact. Manual opening and closing remain possible.
NOTIC E
While starting the engine, door movements are paused, resuming when the engine is running.
NOTIC E
Depending on the engine fitted, if the door is closed and an opening request is issued in Stop mode of Stop & Start, the door will open slightly and then stop. In Start mode, the door will resume its movement when the engine re-starts.
NOTIC E
To hold the sliding side door in the open position, open the door fully to engage the latch (located at the bottom of the door).
Page 52 of 360

52
Have it checked by any authorized Toyota retailer or Toyota authorized repairer, or any reliable repairer.
Automatic activation
(Depending on the country of sale)The system is activated automatically 2 minutes after the last door or the boot is closed.► To avoid triggering the alarm on entering the
vehicle, first press the unlocking button on the remote control or unlock the vehicle using the “Smart Entry & Start” system.
Electric windows
1.Left-hand electric window control.
2.Right-hand electric window control.
Operation
► To open/close the window manually, press/pull the switch without passing the point of resistance; the window stops as soon as the switch is released.► To open/close the window automatically, press/pull the switch fully, beyond the point of resistance; the window opens/closes completely when the switch is released (pressing the switch
again stops the movement of the window).
NOTIC E
The electric window controls remain operational for about 45 seconds after the ignition is switched off if the front doors are not open.After that time, the controls are disabled. To reactivate them, switch the ignition on again.
Safety anti-pinch
If your vehicle is fitted with the safety anti-pinch function, when the window rises and meets an obstacle, it stops and partially lowers.In the event of unwanted opening of the window on closing, press the control until the window opens completely. Within 4 seconds, pull the control until the window closes.The safety anti-pinch does not operate while doing this.
Reinitialising the electric
windows
After reconnecting the battery, or in the event of abnormal window movement, the anti-pinch function must be reinitialised.The anti-pinch function is disabled during the following sequence of operations.For each window:► Lower the window fully, then raise it; it will rise in steps of a few centimetres each time the
control is pressed. Repeat the operation until the window is fully closed.► Continue to pull the control for at least one second after the window reaches the closed position.
WARNI NG
If an electric window meets an obstacle during operation, the movement of the window must be reversed. To do this, press the relevant switch.When the driver operates the passenger electric window switch, it is important to ensure that nothing can prevent the window from closing properly.Pay particular attention to children when operating windows.
Page 83 of 360
83
Ease of use and comfort
3
Place them as close as possible to the end of the rail.
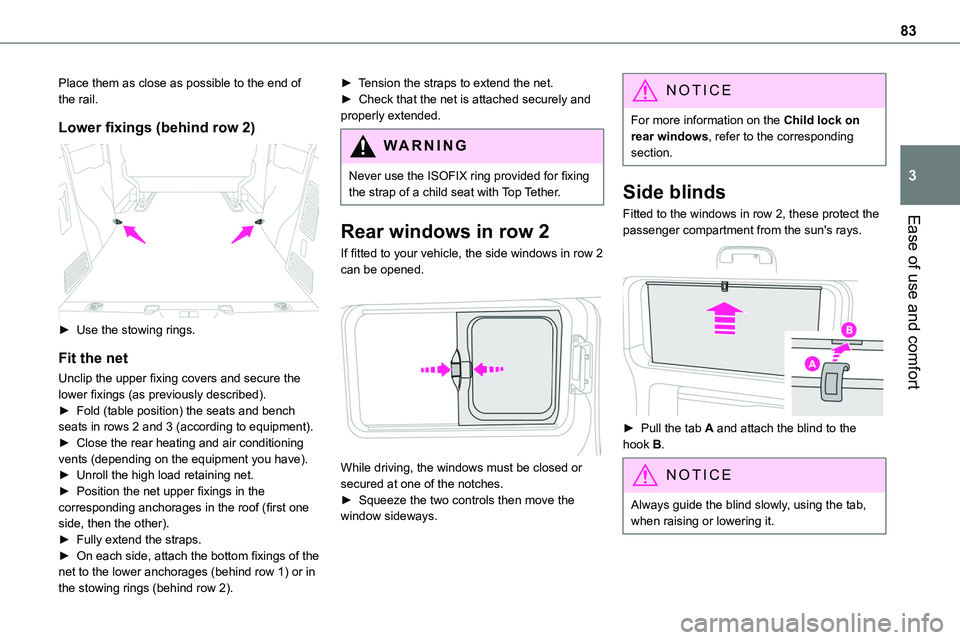
Lower fixings (behind row 2)
► Use the stowing rings.
Fit the net
Unclip the upper fixing covers and secure the lower fixings (as previously described).► Fold (table position) the seats and bench seats in rows 2 and 3 (according to equipment).► Close the rear heating and air conditioning vents (depending on the equipment you have).► Unroll the high load retaining net.► Position the net upper fixings in the corresponding anchorages in the roof (first one side, then the other).
► Fully extend the straps.► On each side, attach the bottom fixings of the net to the lower anchorages (behind row 1) or in the stowing rings (behind row 2).
► Tension the straps to extend the net.► Check that the net is attached securely and properly extended.
WARNI NG
Never use the ISOFIX ring provided for fixing the strap of a child seat with Top Tether.
Rear windows in row 2
If fitted to your vehicle, the side windows in row 2 can be opened.
While driving, the windows must be closed or secured at one of the notches.► Squeeze the two controls then move the window sideways.
NOTIC E
For more information on the Child lock on rear windows, refer to the corresponding section.
Side blinds
Fitted to the windows in row 2, these protect the
passenger compartment from the sun's rays.
► Pull the tab A and attach the blind to the hook B.
NOTIC E
Always guide the blind slowly, using the tab, when raising or lowering it.
Page 126 of 360
126
WARNI NG
Additional protectionsTo prevent accidental opening of the doors and rear windows, use the "Child lock".Take care not to open the rear windows by more than one third.To protect young children from the rays of the sun, fit side blinds on the rear windows.
As a safety precaution, do not leave:– a child alone and unattended in a vehicle,– a child or an animal in a vehicle which is exposed to the sun, with the windows closed,– the keys within reach of children inside the vehicle.
Child seat at the rear
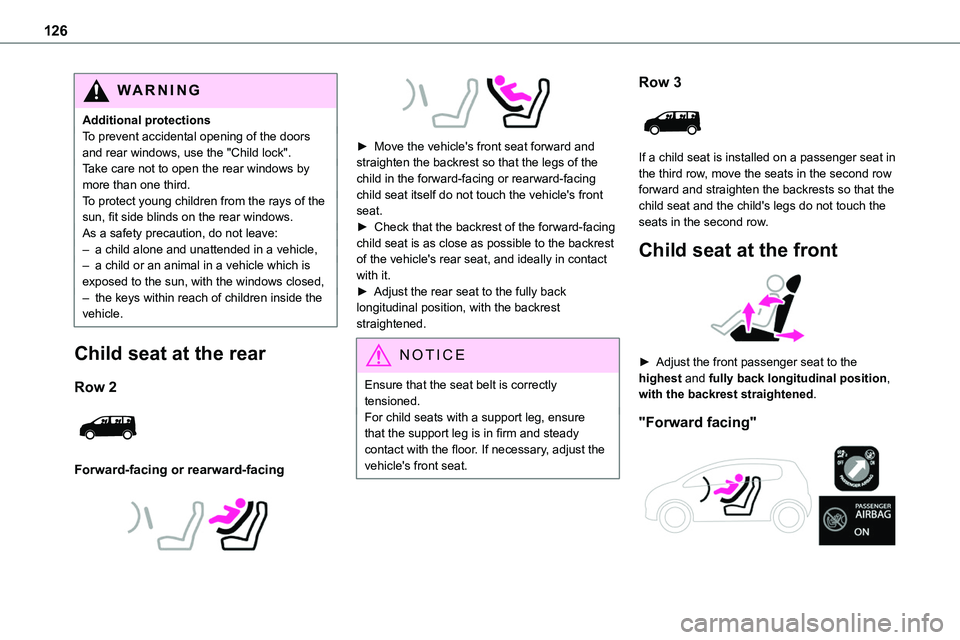
Row 2
Forward-facing or rearward-facing
► Move the vehicle's front seat forward and straighten the backrest so that the legs of the child in the forward-facing or rearward-facing child seat itself do not touch the vehicle's front seat.► Check that the backrest of the forward-facing child seat is as close as possible to the backrest of the vehicle's rear seat, and ideally in contact with it.► Adjust the rear seat to the fully back longitudinal position, with the backrest straightened.
NOTIC E
Ensure that the seat belt is correctly tensioned.For child seats with a support leg, ensure
that the support leg is in firm and steady contact with the floor. If necessary, adjust the vehicle's front seat.
Row 3
If a child seat is installed on a passenger seat in the third row, move the seats in the second row forward and straighten the backrests so that the child seat and the child's legs do not touch the seats in the second row.
Child seat at the front
► Adjust the front passenger seat to the highest and fully back longitudinal position, with the backrest straightened.
"Forward facing"
Page 148 of 360
148
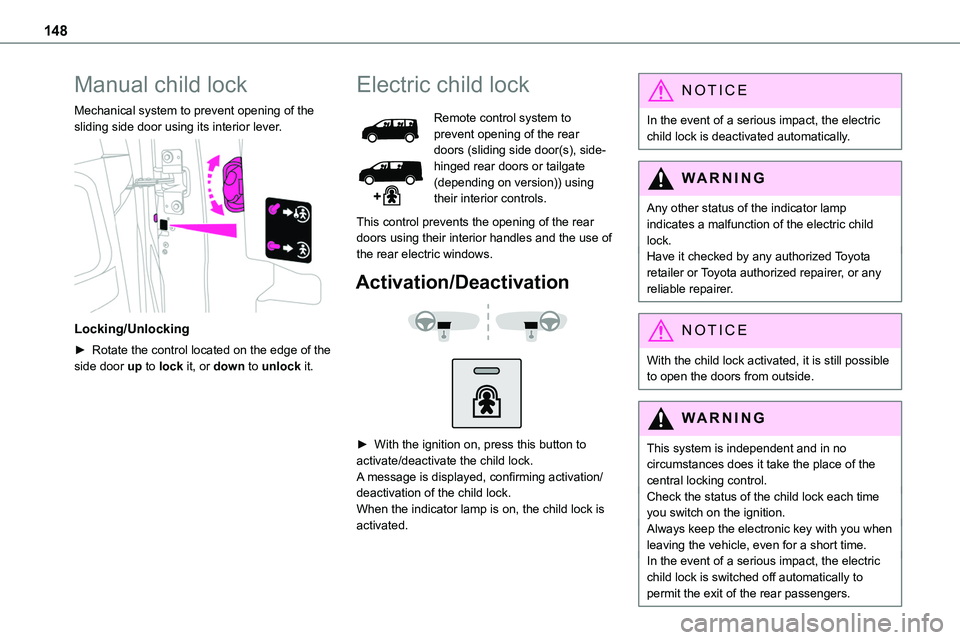
Manual child lock
Mechanical system to prevent opening of the sliding side door using its interior lever.
Locking/Unlocking
► Rotate the control located on the edge of the side door up to lock it, or down to unlock it.
Electric child lock
Remote control system to prevent opening of the rear doors (sliding side door(s), side-hinged rear doors or tailgate (depending on version)) using their interior controls.
This control prevents the opening of the rear
doors using their interior handles and the use of the rear electric windows.
Activation/Deactivation
► With the ignition on, press this button to activate/deactivate the child lock.A message is displayed, confirming activation/deactivation of the child lock.When the indicator lamp is on, the child lock is activated.
NOTIC E
In the event of a serious impact, the electric child lock is deactivated automatically.
WARNI NG
Any other status of the indicator lamp indicates a malfunction of the electric child lock.Have it checked by any authorized Toyota retailer or Toyota authorized repairer, or any reliable repairer.
NOTIC E
With the child lock activated, it is still possible to open the doors from outside.
WARNI NG
This system is independent and in no circumstances does it take the place of the central locking control.Check the status of the child lock each time you switch on the ignition.Always keep the electronic key with you when leaving the vehicle, even for a short time.In the event of a serious impact, the electric child lock is switched off automatically to permit the exit of the rear passengers.
Page 149 of 360
149
Safety
5
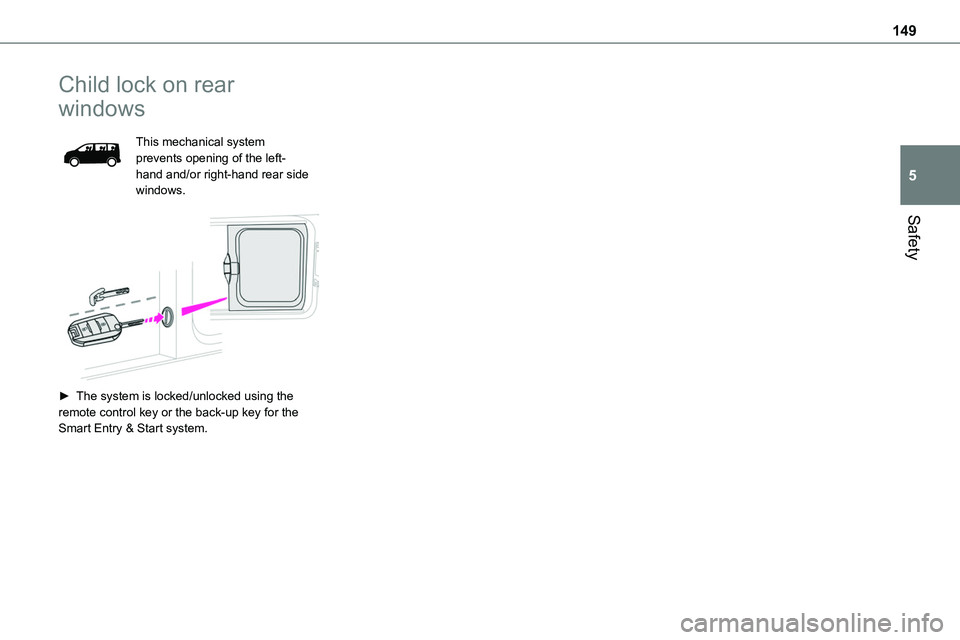
Child lock on rear
windows
This mechanical system prevents opening of the left-hand and/or right-hand rear side windows.
► The system is locked/unlocked using the remote control key or the back-up key for the Smart Entry & Start system.
Page 324 of 360
324
Changing the remote control battery 39Changing to free-wheeling 225, 252Charge level indicator (Electric) 22Charging cable 204Charging cable (Electric) 203Charging connector (Electric) 202, 208–209, 2 11Charging flap (Electric) 202, 208–209, 2 11
Charging system (Electric) 5, 9, 27, 200, 217Charging the traction battery (Electric) 21, 200, 208–209, 2 11Checking the engine oil level 19Checking the levels 217–219Checking tyre pressures (using the kit) 231–234Checks 216, 219–222Checks, routine 219–221Child lock 148–149Child lock on rear windows 149Children 121, 129, 135–136, 144, 144–145, 144–145Children (safety) 148Child seats 121, 125–126, 128–132, 145Child seats, conventional 128–132Child seats, i-Size 144–145Child seats, ISOFIX 135–136, 144, 144–145, 144–145Cleaning (advice) 201, 226–228Closing the boot 49Closing the doors 30, 36, 48Collision Risk Alert 186–187Compressor, tyre inflation 231
Configuration, vehicle 26–27Connected applications 306Connection, Bluetooth 273, 287–288, 307, 312–313Connection, Wi-Fi network 307–308Connectivity 306Consumption figures 27Container, AdBlue® 223
Control, emergency boot release 39Control, emergency door 31, 38–39Control, heated seats 57Control stalk, lighting 101Control stalk, wipers 106, 108Control unit 203–204Courtesy lamp 99Courtesy lamp, front 99–100, 244Courtesy lamp, rear 99–100, 244Courtesy lamps 99–100, 244Cover, load space 80Crew cab, fixed 74–75Crew cab, folding 75Cruise control 174, 176–177, 179–182Cruise control, adaptive 177, 182, 184–186Cruise control by speed limit recognition 176–177Cruise control, dynamic with Stop function 176–177Cup holder 76
D
DAB (Digital Audio Broadcasting) - Digital radio 269, 284, 310Date (setting) 29, 290, 316Daytime running lamps 103, 240–242Deactivating the passenger airbag 122, 127Deactivation of DSC (ESC) 11 5
Deadlocking 37Deferred charging 27, 210Deferred charging (Electric) 27–28, 202, 208Defrosting 59, 93Demisting 93Demisting, rear 93Demisting, rear screen 93Dimensions 261Dipstick 19, 217Direction indicators 102, 240–241, 243, 245Display, head-up 173–174Domestic charging 204Domestic charging (Electric) 209, 2 11, 259Door pockets 77Doors, rear 48Doors, side 44Doors, side-hinged 36–37, 48, 243Driver’s attention warning 190Drive selector (Electric) 166, 221Driving 150–151Driving aids camera (warnings) 172Driving aids (recommendations) 171Driving economically 8Driving modes 167