2022 TOYOTA PROACE ECU
[x] Cancel search: ECUPage 237 of 360

237
In the event of a breakdown
8
Original tyre sizeCompact-MediumLong
215/65 R16Placing a 225 wheel in the carrier is prohibited.
There is no restriction.215/60 R17
215/60 R17 M&S
225/55 R17Placing a 215 wheel in the carrier is not recommended (risk of noise).
NOTIC E
A punctured tyre of size 215 or 225 can be placed in the carrier.
Removing a wheel
WARNI NG
Parking the vehicleImmobilise the vehicle where it does not obstruct traffic: the ground must be level, stable and non-slippery.With a manual gearbox, engage first gear
then switch off the ignition to block the wheels.With an automatic gearbox, place the gear selector in position P then switch off the ignition to block the wheels. With a drive selector, place the gear selector in position P then switch off the ignition to block the wheels.Apply the parking brake, unless it is programmed to automatic mode (for an electric parking brake), and check that the indicator lamp lights up on the instrument panel.Ensure that the occupants have left the vehicle and are located in a safe place.Never go underneath a vehicle raised using a jack; use an axle stand.With an electric parking brake, place a chock against the wheel diagonally opposite to the one being replaced.
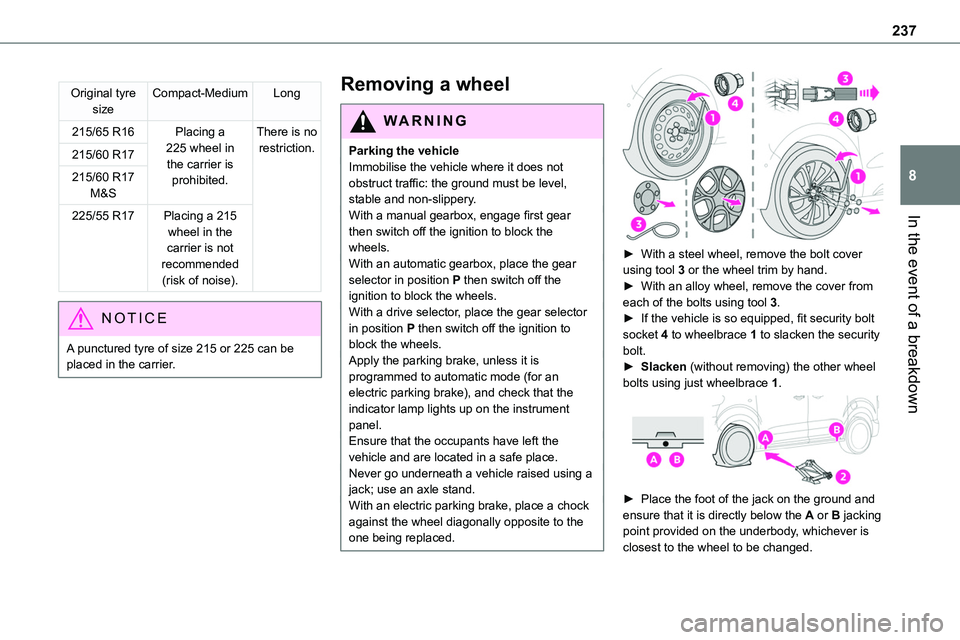
► With a steel wheel, remove the bolt cover using tool 3 or the wheel trim by hand.► With an alloy wheel, remove the cover from each of the bolts using tool 3.► If the vehicle is so equipped, fit security bolt socket 4 to wheelbrace 1 to slacken the security bolt.► Slacken (without removing) the other wheel bolts using just wheelbrace 1.
► Place the foot of the jack on the ground and ensure that it is directly below the A or B jacking point provided on the underbody, whichever is closest to the wheel to be changed.
Page 244 of 360

244
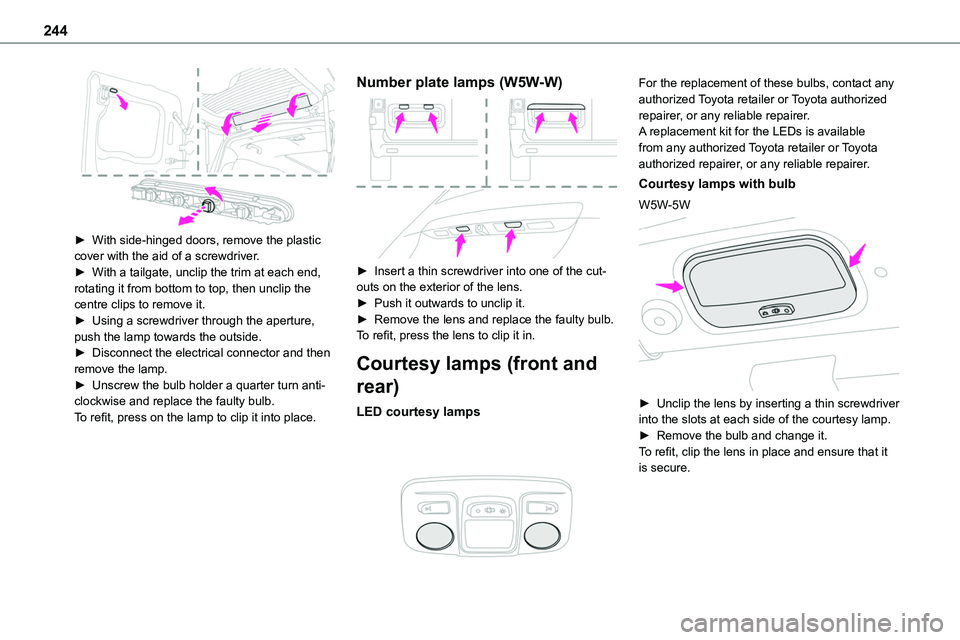
► With side-hinged doors, remove the plastic cover with the aid of a screwdriver.► With a tailgate, unclip the trim at each end, rotating it from bottom to top, then unclip the centre clips to remove it.► Using a screwdriver through the aperture, push the lamp towards the outside.► Disconnect the electrical connector and then remove the lamp.► Unscrew the bulb holder a quarter turn anti-clockwise and replace the faulty bulb.To refit, press on the lamp to clip it into place.
Number plate lamps (W5W-W)
► Insert a thin screwdriver into one of the cut-outs on the exterior of the lens.► Push it outwards to unclip it.► Remove the lens and replace the faulty bulb.To refit, press the lens to clip it in.
Courtesy lamps (front and
rear)
LED courtesy lamps
For the replacement of these bulbs, contact any authorized Toyota retailer or Toyota authorized repairer, or any reliable repairer.A replacement kit for the LEDs is available from any authorized Toyota retailer or Toyota authorized repairer, or any reliable repairer.
Courtesy lamps with bulb
W5W-5W
► Unclip the lens by inserting a thin screwdriver into the slots at each side of the courtesy lamp.► Remove the bulb and change it.To refit, clip the lens in place and ensure that it is secure.
Page 245 of 360

245
In the event of a breakdown
8
Platform cab (rear lamps)
1.Direction indicators (P21W-21W).
2.Brake lamps (P21W-21W).
3.Sidelamps (R10W-10W).
4.Reversing lamps (P21W-21W).
5.Foglamps (P21W-21W).
► Locate the faulty bulb.► Unscrew the 4 fixing screws from the lens unit and remove it.► Remove the faulty bulb by pressing lightly on it, then turning it a quarter turn clockwise.► Change the bulb.
Changing a fuse
Access to tools and to the
dashboard fusebox
The extraction tweezers and the fuses are located behind the fusebox cover.► Unclip the cover by pulling at the top left, then right.
► Remove the cover completely.
Changing a fuse
Before changing a fuse:► Identify the cause of the fault and fix it.► Switch off all power consumption.► Immobilise the vehicle and switch off the ignition.► Identify the defective fuse using the current allocation tables and diagrams.To replace a fuse, it is essential to:
► Use the special tweezers to extract the fuse from its housing and check the condition of its filament.► Always replace the failed fuse with a fuse of the same rating (same colour); use of a different rating may cause malfunctions - risk of fire!If the fault recurs soon after replacing a fuse, have the electrical system checked by any authorized Toyota retailer or Toyota authorized repairer, or any reliable repairer.
NOTIC E
Complete fuse allocation tables and corresponding diagramsFor more information, contact a any authorized Toyota retailer or Toyota authorized repairer, or any reliable repairer.
Page 248 of 360

248
Fuse N°Rating(Amps)Functions
F2215Horn.
F2315Right-hand main beam headlamp.
F2415Left-hand
main beam headlamp.
12 V battery / Accessory
battery
Procedure for starting the engine using another battery or charging a discharged battery.
Lead-acid starter batteries
ECO
Batteries contain harmful substances such as sulphuric acid and lead.They must be disposed of in accordance with regulations and must not, in any circumstances, be discarded with household waste.Take used remote control batteries and vehicle batteries to a special collection point.
WARNI NG
Protect your eyes and face before handling the battery.All operations on the battery must be carried out in a well ventilated area and away from naked flames and sources of sparks, so as to avoid the risk of explosion or fire.Wash your hands afterwards.
Electric motor
NOTIC E
Flat accessory batteryIt is no longer possible to start the motor or recharge the traction battery.
WARNI NG
Precautions before working on the accessory batterySelect mode P, switch off the ignition, check that the instrument panel is off and that the vehicle is not plugged in.
WARNI NG
Jump-starting another vehicleDo not use the accessory battery to jump-start another vehicle or to charge another vehicle's battery.
WARNI NG
Always replace the battery with one of equivalent specification.
Access to the battery
The battery is located under the bonnet.► Open the bonnet using the interior release
lever, then the exterior safety catch.► Secure the bonnet stay.
► Remove the plastic cover to access the (+) terminal, if your vehicle has one.The battery (-) terminal is not accessible.There is a remote earth point near the battery.
NOTIC E
For more information on the Bonnet and the Engine, refer to the corresponding sections.
Page 303 of 360

303
TOYOTA Pro Touch with navigation system
12
Connected navigation
Connected navigation
connection
Network connection provided by the
user
NOTIC E
For the list of compatible smartphones, visit the Brand's website in your country.
Activate and enter settings for sharing the smartphone connection.
NOTIC E
As processes and standards are constantly changing, we recommend you update the smartphone operating system as well as the date and time on the smartphone and system, to ensure that the communication process between the smartphone and the system functions correctly.
USB connectionConnect the USB cable.The smartphone charges when connected
by the USB cable.
Bluetooth connectionActivate the Bluetooth function on the telephone and ensure that it is visible to all (see the "Connect-App" section).Wi-Fi connectionSelect a Wi-Fi network detected by the system and connect to it.
NOTIC E
This function is only available if it has been activated either via the "Notifications" or via the "Applications" menu.
Press "Notifications".
Select Wi-Fi to activate it.
ORPress Connect-App to display the main page.Press the "OPTIONS" button to access the secondary page.Select "Wi-Fi network connection".
Select the "Secured", "Not secured" or "Stored” tab.Select a network.
Using the virtual keypad, enter the "Key" network Wi-Fi and the "Password".
Press "OK" to establish a connection between the smartphone and the vehicle’s system.
NOTIC E
Usage restrictions:With CarPlay®, connection sharing is only available with a Wi-Fi connection.The quality of services depends on the quality of the network connection.
Authorize sending
information
Press Settings to display the main page.
Press the "OPTIONS" button to access the secondary page.Select "System configuration".
Select the "Private mode" tab.
ORPress "Notifications".
Press "Private mode".
THENActivate or deactivate:
– "No data sharing except for company vehicles".
Page 308 of 360

308
Press the "OPTIONS" button to access the secondary page.Select "Wi-Fi network connection".
Select the "Secured", "Not secured" or "Stored” tab.Select a network.
Using the virtual keypad , enter the Wi-Fi
network "Key" and "Password".Press "OK" to establish the connection.
NOTIC E
The Wi-Fi connection and Wi-Fi connection sharing are exclusive.
Wi-Fi connection sharing
Creation of a local Wi-Fi network by the system.Press Connect-App to display the main page.Press the "OPTIONS" button to access the secondary page.Select "Share Wi-Fi connection".
Select the "Activation" tab to activate or deactivate Wi-Fi connection sharing.
And/orSelect the "Settings" tab to change the system’s network name and password.
Press "OK" to confirm.
NOTIC E
To protect against unauthorised access and to make all systems as secure as possible, the use of a security code or a complex password is recommended.
Managing connections
Press Connect-App to display the main page.Press the "OPTIONS" button to access the secondary page.Select "Manage connection".
With this function, you can view the access to connected services, the availability of connected services and modify the connection mode.
Radio
Selecting a station
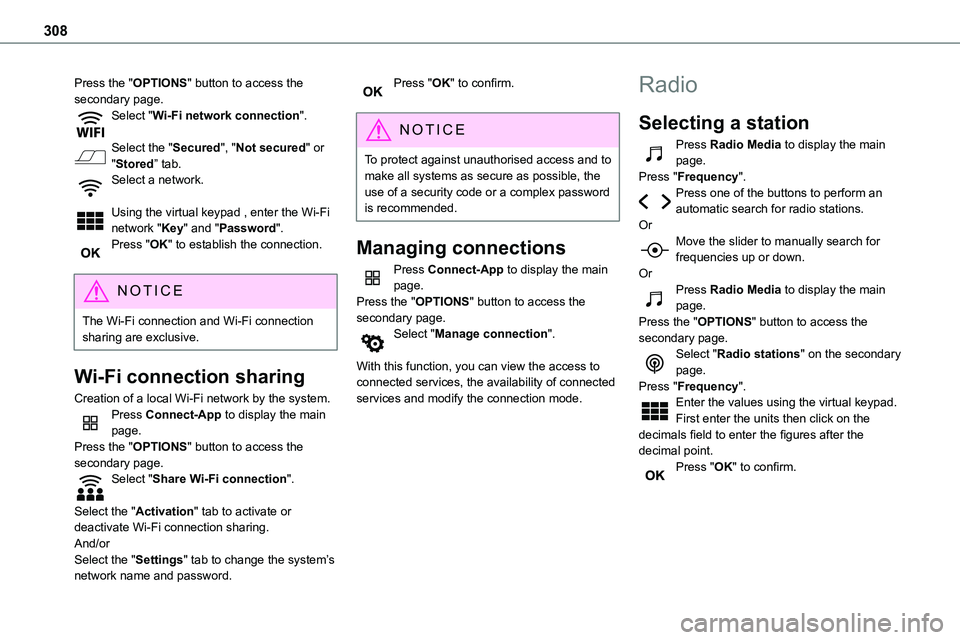
Press Radio Media to display the main page.Press "Frequency".Press one of the buttons to perform an automatic search for radio stations.
OrMove the slider to manually search for frequencies up or down.OrPress Radio Media to display the main page.Press the "OPTIONS" button to access the secondary page.Select "Radio stations" on the secondary page.Press "Frequency".Enter the values using the virtual keypad.First enter the units then click on the decimals field to enter the figures after the decimal point.Press "OK" to confirm.
Page 321 of 360

321
Event data recorders
13
customer's warranty and any claims made under warranty. Any malfunctions stored in the vehicle may be reset by an after-sales service company during servicing or repair work, or at your request.
Comfort and infotainment
functions
Comfort settings and personalised settings
may be saved in the vehicle and modified or reinitialised at any time. Depending on the vehicle's equipment level, this may include: – Seat and steering wheel position settings. – Chassis and air conditioning settings. – Personalised settings such as the interior lighting. You can enter your own data into the functions of your vehicle's audio and telematic system, as part of the selected functionalities. Depending on the vehicle's equipment level, this may include: – Multimedia data such as music, videos or photos to be read by an integrated multimedia system. – Address book data to be used with an integrated hands-free system or with an integrated navigation system. – Entered destinations. – Data regarding the use of online services. This data for the comfort and infotainment functions may be stored locally in the vehicle
or saved to a device that you have connected to the vehicle (e.g. smartphone, USB memory stick or MP3 player). Data that you have entered yourself may be deleted at any time. This data may also be transmitted outside the vehicle at your request, particularly when using online services in line with the settings that you have selected.
Smartphone integration
(e.g. Android Auto® or
Apple®CarPlay®)
If your vehicle is equipped accordingly, you can connect your smartphone or another mobile device to the vehicle in order to operate it using the vehicle's integrated controls. Images and sounds from the smartphone can be transmitted through the audio and telematics system. Specific information is simultaneously sent to your smartphone. Depending on the type of integration, this includes data such as location, day/night mode and other general information about the vehicle. For more information, please refer to the user instructions for the vehicle or the audio and telematics system.Integrating a smartphone allows you to use its applications, such as a navigation app or music player. No other integration between the smartphone and the vehicle is possible, in particular active access to vehicle data. How the data is processed subsequently is determined by the supplier of the application being used.
The ability the change settings depends on the application in question and on the operating system installed on your smartphone.
Online services
If your vehicle is connected to a wireless network, data can be exchanged between your vehicle and other systems. Connection to a wireless network is made possible via a
transmitter located in your vehicle or a mobile device that you have provided (e.g. smartphone). The online services can be used via this wireless connection. These include online services and applications (apps) provided to you by the Manufacturer or other suppliers.
Exclusive services
As regards the Manufacturer's online services, the corresponding functions are described by the Manufacturer in an appropriate medium (e.g. handbook, Manufacturer's website) and the information about data protection is provided. Personal data may be used for online services. The exchange of data for this purpose takes place over a secure connection, using for example the Manufacturer's dedicated computer systems. The collection, processing and use of personal data for the development of services are carried out solely on the basis of a legal authorisation, for example in the case of a legal emergency call system or a contractual agreement or else under a consent agreement.