2022 TOYOTA PROACE steering
[x] Cancel search: steeringPage 171 of 360

171
Driving
6
values read by the wheel's speed sensors can take several minutes.The alert may be delayed at speeds below 25 mph (40 km/h), or when adopting a sporty driving mode.
NOTIC E
The alert is kept active until the system is reinitialised.
Reinitialisation
Reinitialise the system after adjusting one or more tyre pressures and after changing one or more wheels.
WARNI NG
Before reinitialising the system, make sure that the pressures of the four tyres are correct for the conditions of use of the vehicle and conform to the values written on the tyre pressure label.Check the pressures of the four tyres before performing the reinitialisation.The system does not advise if a pressure is incorrect at the time of reinitialisation.
With button
► With the vehicle stationary, press this button for 3 to 10 seconds then release it. Reinitialisation is confirmed by anaudible signal.
With audio system or touch screen
With the vehicle stationary, the system is reinitialised via the vehicle configuration menu.
Malfunction
In the event of a malfunction, these warning lamps light up on the
instrument panel.In this case, the tyre under-inflation monitoring function is no longer performed.Have it checked by any authorized Toyota retailer or Toyota authorized repairer, or any reliable repairer.
Driving and manoeuvring
aids - General
recommendations
NOTIC E
Driving and manoeuvring aids cannot, in any circumstances, replace the need for vigilance
on the part of the driver.The driver must comply with the Highway Code, must remain in control of the vehicle in all circumstances and must be able to retake control of it at all times. The driver must adapt the speed to climactic conditions, traffic and the state of the road.It is the driver's responsibility to constantly check the traffic, to assess the relative distances and speeds of other vehicles and to anticipate their movements before indicating and changing lane.The systems cannot exceed the limits of the laws of physics.
NOTIC E
Driving aids
You should hold the steering wheel with both hands, always use the interior and exterior rear view mirrors, always keep the feet close to the pedals and take a break every two hours.
Page 176 of 360

176
Speed display
The system is active but is not detecting speed limit information.
On detection of speed limit information, the system displays the value.
The driver can, if desired, adjust the speed of the vehicle according to the information given by the system.
Operating limits
The system does not take account of reduced speed limits, especially those imposed in the following cases:– Poor weather (rain, snow).– Atmospheric pollution.– Towing.– Driving with a space-saver type spare wheel or snow chains fitted.
– Tyre repaired using the temporary puncture repair kit.– Young drivers.The system may not display the speed limit if it does not detect a speed limit sign within a preset period and in the following situations:– Road signs that are obstructed, non-standard, damaged or bent.– Obsolete or incorrect maps.
Storing the speed setting
In addition to Speed Limit Recognition and Recommendation, the driver can select the speed displayed as a speed setting for the speed limiter or cruise control using the speed limiter or cruise control 'store' button.
NOTIC E
For more information on the Speed limiter, Cruise control or Adaptive cruise control, refer to the corresponding sections.
Steering mounted controls
1.Speed limiter/cruise control mode selection
2.Memorise the speed setting
Page 178 of 360

178
NOTIC E
For more information on Speed limit recognition and memorising the speed limit in particular, refer to the corresponding section.
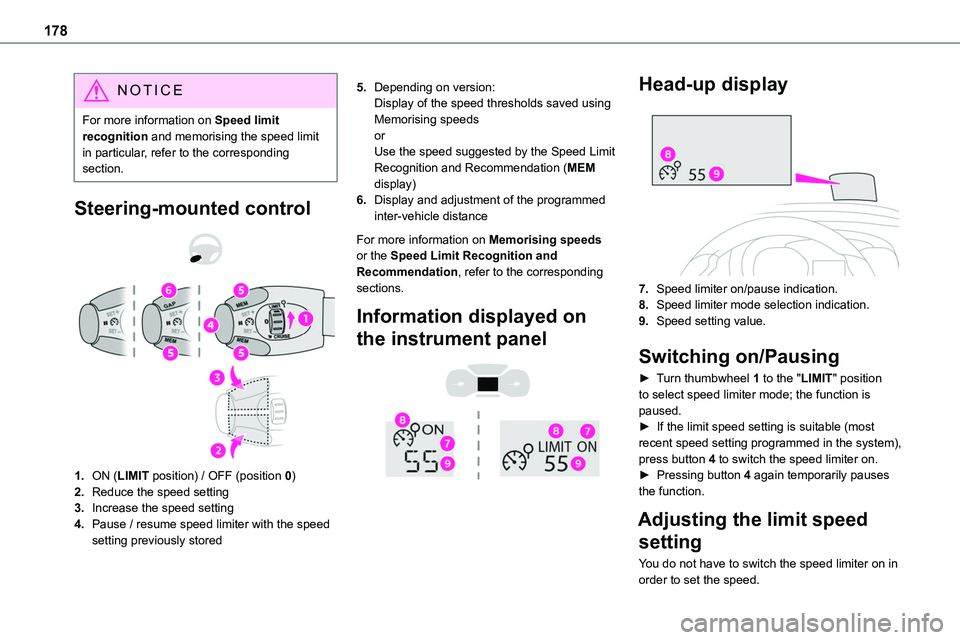
Steering-mounted control
1.ON (LIMIT position) / OFF (position 0)
2.Reduce the speed setting
3.Increase the speed setting
4.Pause / resume speed limiter with the speed setting previously stored
5.Depending on version:Display of the speed thresholds saved using Memorising speedsorUse the speed suggested by the Speed Limit Recognition and Recommendation (MEM display)
6.Display and adjustment of the programmed inter-vehicle distance
For more information on Memorising speeds or the Speed Limit Recognition and Recommendation, refer to the corresponding sections.
Information displayed on
the instrument panel
Head-up display
7.Speed limiter on/pause indication.
8.Speed limiter mode selection indication.
9.Speed setting value.
Switching on/Pausing
► Turn thumbwheel 1 to the "LIMIT" position to select speed limiter mode; the function is paused.► If the limit speed setting is suitable (most recent speed setting programmed in the system), press button 4 to switch the speed limiter on.► Pressing button 4 again temporarily pauses the function.
Adjusting the limit speed
setting
You do not have to switch the speed limiter on in order to set the speed.
Page 180 of 360

180
WARNI NG
Operating limitsNever use the system in the following situations:– In an urban area with the risk of pedestrians crossing the road.– In heavy traffic (except versions with the Stop & Go function).
– On winding or steep roads.– On slippery or flooded roads.– In poor weather conditions.– Driving on a speed circuit.– Driving on a rolling road.– When using snow chains, non-slip covers or studded tyres.
Cruise control
WARNI NG
Refer to the General recommendations on the use of driving and manoeuvring aids and to Cruise control - particular recommendations.
This system automatically maintains the vehicle’s speed at the value programmed by the driver (speed setting), without the use of the accelerator pedal.Cruise control is switched on manually.It requires a minimum vehicle speed of 25 mph (40 km/h).With a manual gearbox, third gear or higher must be engaged.With an automatic gearbox, mode D or second gear or higher in mode M must be engaged.With a drive selector, mode D or B must be engaged.
NOTIC E
Cruise control remains active after changing gear, regardless of the gearbox type, on engines fitted with Stop & Start.
NOTIC E
Switching off the ignition cancels any speed setting.
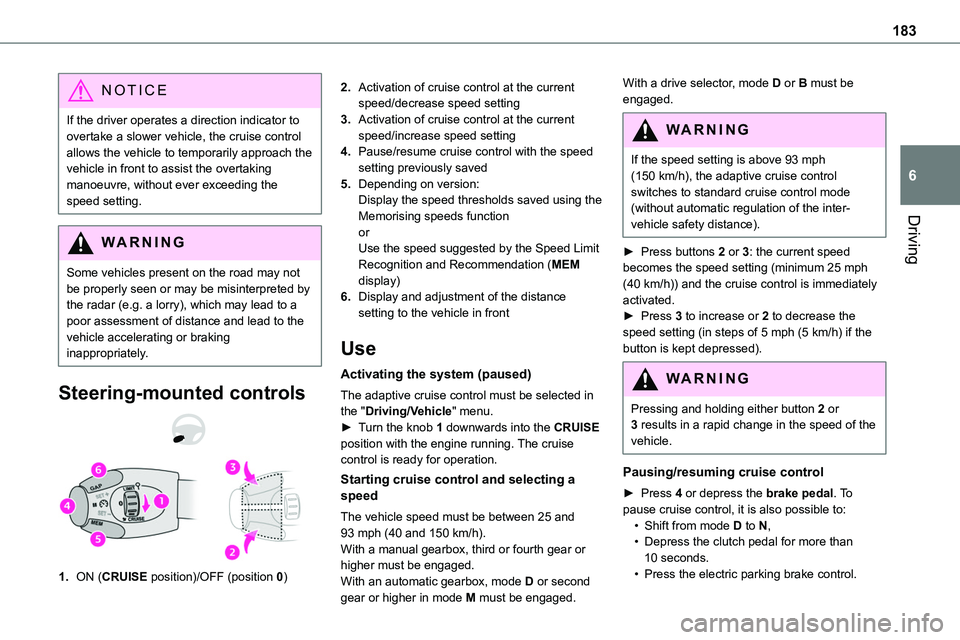
Steering mounted control
1.ON (CRUISE position) / OFF (position 0)
2.Activate cruise control at the current speed / decrease speed setting
3.Activate cruise control at the current speed / increase speed setting
4.Pause / resume cruise control with the speed setting previously saved
5.Depending on version:Display the speed thresholds saved using the Memorising speeds functionor
Use the speed suggested by the Speed Limit Recognition and Recommendation (MEM display)
Page 183 of 360

183
Driving
6
NOTIC E
If the driver operates a direction indicator to overtake a slower vehicle, the cruise control allows the vehicle to temporarily approach the vehicle in front to assist the overtaking manoeuvre, without ever exceeding the speed setting.
WARNI NG
Some vehicles present on the road may not be properly seen or may be misinterpreted by the radar (e.g. a lorry), which may lead to a poor assessment of distance and lead to the vehicle accelerating or braking inappropriately.
Steering-mounted controls
1.ON (CRUISE position)/OFF (position 0)
2.Activation of cruise control at the current speed/decrease speed setting
3.Activation of cruise control at the current speed/increase speed setting
4.Pause/resume cruise control with the speed setting previously saved
5.Depending on version:Display the speed thresholds saved using the Memorising speeds function
orUse the speed suggested by the Speed Limit Recognition and Recommendation (MEM display)
6.Display and adjustment of the distance setting to the vehicle in front
Use
Activating the system (paused)
The adaptive cruise control must be selected in the "Driving/Vehicle" menu.► Turn the knob 1 downwards into the CRUISE position with the engine running. The cruise control is ready for operation.
Starting cruise control and selecting a speed
The vehicle speed must be between 25 and 93 mph (40 and 150 km/h).With a manual gearbox, third or fourth gear or higher must be engaged.With an automatic gearbox, mode D or second gear or higher in mode M must be engaged.
With a drive selector, mode D or B must be engaged.
WARNI NG
If the speed setting is above 93 mph (150 km/h), the adaptive cruise control switches to standard cruise control mode (without automatic regulation of the inter-vehicle safety distance).
► Press buttons 2 or 3: the current speed becomes the speed setting (minimum 25 mph (40 km/h)) and the cruise control is immediately activated.► Press 3 to increase or 2 to decrease the speed setting (in steps of 5 mph (5 km/h) if the button is kept depressed).
WARNI NG
Pressing and holding either button 2 or 3 results in a rapid change in the speed of the vehicle.
Pausing/resuming cruise control
► Press 4 or depress the brake pedal. To pause cruise control, it is also possible to:• Shift from mode D to N,• Depress the clutch pedal for more than 10 seconds.• Press the electric parking brake control.
Page 187 of 360

187
Driving
6
WARNI NG
It is possible that warnings are not given, are given too late or seem unjustified.The driver must always stay in control of the vehicle and be prepared to react at any time to avoid an accident.
WARNI NG
Following an impact, the system is automatically deactivated.Have it checked by any authorized Toyota retailer or Toyota authorized repairer, or any reliable repairer.
Collision Risk Alert
This function warns the driver that their vehicle is at risk of a collision with the vehicle in front, or with a pedestrian or cyclist present in their traffic lane.
Modifying the alert trigger threshold
This trigger threshold determines the sensitivity with which the function warns of the risk of collision.The threshold is set via the vehicle
configuration menu with the audio system or touch screen.► Select one of the three pre-defined thresholds: "Far", "Normal" or "Close".
The last threshold selected is memorised when the ignition is switched off.
Operation
Depending on the degree of risk of collision detected by the system and the alert trigger threshold chosen by the driver, several different levels of alert may be triggered and displayed on the instrument panel.
The system takes account of the vehicle dynamics, the speed of your vehicle and the one in front, the environmental conditions and the operation of the vehicle (actions on the pedals, steering wheel, etc.) to trigger the alert at the most relevant moment.Level 1 (orange): visual alert only, warning that the vehicle in front is very close.The message "Vehicle close" is displayed.Level 2 (red): visual and audible alert, warning that a collision is imminent.The message "Brake!" is displayed.
NOTIC E
Where the speed of your vehicle is too high approaching another vehicle, the first level of alert may not be displayed: the level 2 alert may be displayed directly.
Important: the level 1 alert is not displayed when there is a stationary obstacle or when the "Near" trigger threshold has been selected.
Intelligent emergency
braking assistance (iEBA)
If the driver brakes, but not sufficiently to avoid a collision, this system will provide additional braking, within the limits of the laws of physics.This assistance will only be provided if the driver presses the brake pedal.
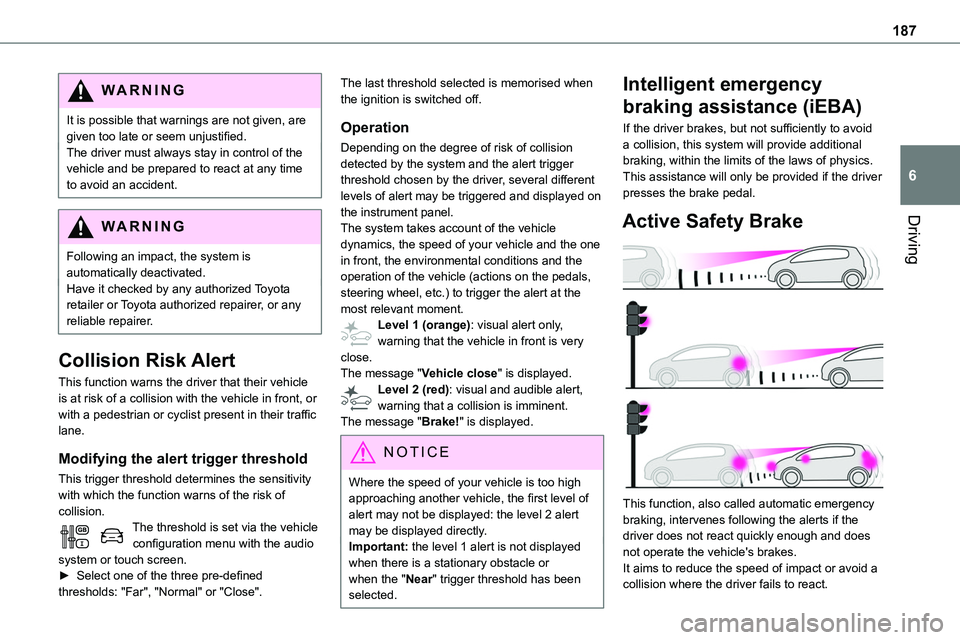
Active Safety Brake
This function, also called automatic emergency braking, intervenes following the alerts if the driver does not react quickly enough and does not operate the vehicle's brakes.It aims to reduce the speed of impact or avoid a collision where the driver fails to react.
Page 188 of 360

188
Operation
The system operates subject to the following conditions:– The vehicle's speed does not exceed 37 mph (60 km/h) when a pedestrian is detected.– The vehicle's speed does not exceed 50 mph (80 km/h) when a stationary vehicle or a cyclist is detected.– The vehicle's speed is between 6 mph and
53 mph (10 km/h and 85 km/h) (versions with camera only) or 87 mph (140 km/h) (versions with camera and radar) when a moving vehicle is detected.This warning lamp flashes (for approximately 10 seconds) as soon as the function applies the vehicle’s brakes.With an automatic gearbox, in the event of automatic emergency braking bringing the vehicle to a complete stop, keep the brake pedal depressed to prevent the vehicle from moving off again.With a manual gearbox, in the event of automatic emergency braking bringing the vehicle to a complete stop, the engine may stall.
NOTIC E
The driver can maintain control of the vehicle
at any time by firmly turning the steering wheel and/or firmly depressing the accelerator pedal.
NOTIC E
Operation of the function may be felt by slight vibration in the brake pedal.If the vehicle comes to a complete stop, automatic braking is maintained for 1 to 2 seconds.
Deactivation/Activation
By default, the system is automatically activated at every engine start.It is set via the vehicle configuration menu.Deactivation of the system is signalled by the illumination of this warning lamp, accompanied by the display of a message.
Malfunction
In the event of a malfunction, this warning lamp comes on on the instrument panel, accompanied by the display of a message and an audible signal.Have it checked by any authorized Toyota retailer or Toyota authorized repairer, or any reliable repairer.If these warning lamps come on after the engine has been switched off and then restarted, contact any authorized Toyota retailer or Toyota authorized repairer, or any reliable repairer to have the system checked.
These warning lamps light up on the instrument panel to indicate that the driver's and/or front passenger's seat belt is not fastened (depending on version).
Lane departure warning
system
WARNI NG
Refer to the General recommendations on the use of driving and manoeuvring aids.
System that uses a camera to recognise continuous or broken lines on traffic lanes and triggers an alert if the vehicle wanders off line. If the direction indicator is not used at speeds above 50 mph (80 km/h) and there is a risk of one of these lines on the road surface being crossed, the system triggers the alert.This system is particularly useful on motorways and main roads.
Page 196 of 360

196
NOTIC E
The function will be deactivated:– If a trailer is attached or a bicycle carrier is fitted on a towing device (vehicle fitted with a towing device installed in line with the manufacturer's recommendations).– Above about 6 mph (10 km/h).– When the boot is opened.
– Upon changing out of reverse gear (the image remains displayed for 7 seconds).– By pressing the white arrow in the upper-left corner of the touch screen.
AUTO mode
This mode is activated by default.Using sensors in the rear bumper, the automatic view changes from the rear view (standard) to the view from above (zoom) as an obstacle is approached at the level of the red line (less than 30 cm) during a manoeuvre.
Standard view
The area behind the vehicle is displayed on the screen.The blue lines 1 represent the width of your vehicle, with the mirrors unfolded; their direction changes depending on the position of the steering wheel.The red line 2 represents a distance of 30 cm (0 ft 11") from the rear bumper; the two blue lines 3 and 4 represent 1 m and 2 m (3 ft 3" and 6 ft 6"), respectively.This view is available with AUTO mode or in the view selection menu.