2022 TOYOTA PROACE reset
[x] Cancel search: resetPage 190 of 360
190
Coffee Break Alert
The system triggers an alert as soon as it detects that the driver has not taken a break after two hours of driving at a speed above 65 km/h (40 mph).This alert is issued via the display of a message encouraging you to take a break, accompanied by an audible signal.If the driver does not follow this advice, the alert
is repeated hourly until the vehicle is stopped.The system resets itself if one of the following conditions is met:– engine running, the vehicle has been stationary for more than 15 minutes,– the ignition has been switched off for a few minutes,– the driver's seat belt is unfastened and their door is opened.
NOTIC E
As soon as the speed of the vehicle drops below 65 km/h (40 mph), the system goes into standby.The driving time is counted again once the speed is above 65 km/h (40 mph).
Driver Attention Warning
Depending on version, the "Coffee Break Alert" system is combined with the "Driver Attention Warning" system.
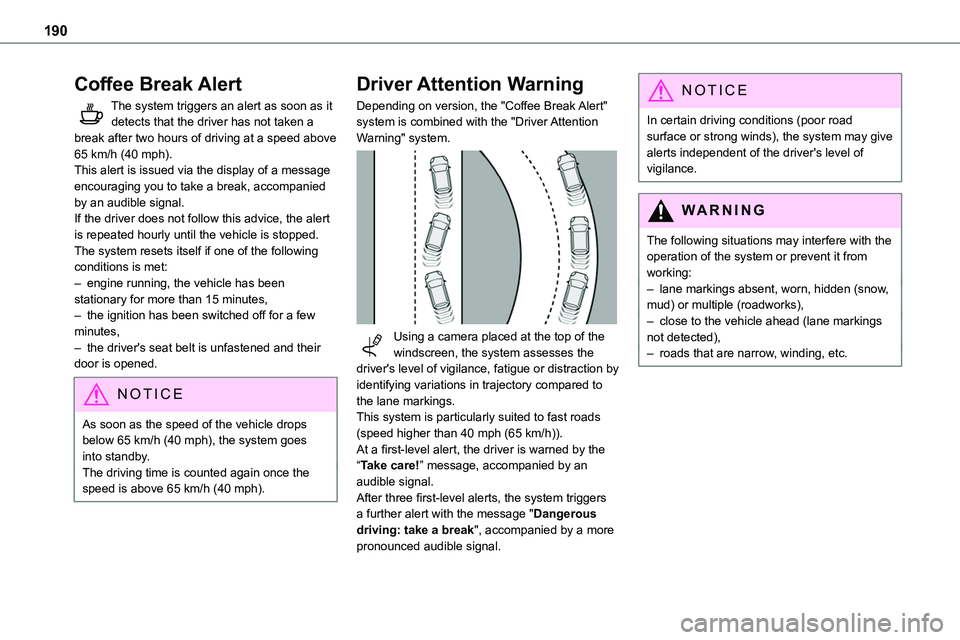
Using a camera placed at the top of the windscreen, the system assesses the driver's level of vigilance, fatigue or distraction by identifying variations in trajectory compared to the lane markings.This system is particularly suited to fast roads (speed higher than 40 mph (65 km/h)).At a first-level alert, the driver is warned by the “Take care!” message, accompanied by an audible signal.After three first-level alerts, the system triggers a further alert with the message "Dangerous driving: take a break", accompanied by a more
pronounced audible signal.
NOTIC E
In certain driving conditions (poor road surface or strong winds), the system may give alerts independent of the driver's level of vigilance.
WARNI NG
The following situations may interfere with the operation of the system or prevent it from working:– lane markings absent, worn, hidden (snow, mud) or multiple (roadworks),– close to the vehicle ahead (lane markings not detected),– roads that are narrow, winding, etc.
Page 206 of 360
206
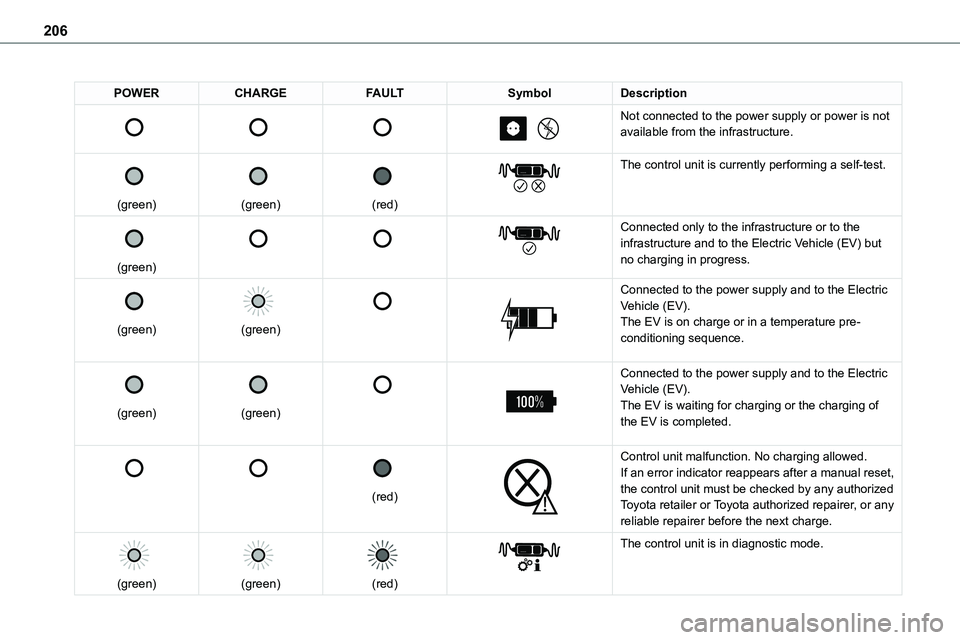
POWERCHARGEFAULTSymbolDescription
Not connected to the power supply or power is not available from the infrastructure.
(green)
(green)
(red)
The control unit is currently performing a self-test.
(green)
Connected only to the infrastructure or to the infrastructure and to the Electric Vehicle (EV) but no charging in progress.
(green)
(green)
Connected to the power supply and to the Electric Vehicle (EV).The EV is on charge or in a temperature pre-conditioning sequence.
(green)
(green)
Connected to the power supply and to the Electric Vehicle (EV).The EV is waiting for charging or the charging of the EV is completed.
(red)
Control unit malfunction. No charging allowed.If an error indicator reappears after a manual reset, the control unit must be checked by any authorized Toyota retailer or Toyota authorized repairer, or any reliable repairer before the next charge.
(green)
(green)
(red)
The control unit is in diagnostic mode.
Page 207 of 360
207
Practical information
7
Manual reset procedureThe control unit can be reset by simultaneously disconnecting the chargi\
ng connector and the wall socket.Then, reconnect the wall socket first. For more information, refer to the handbook.
Accelerated charging, mode 3
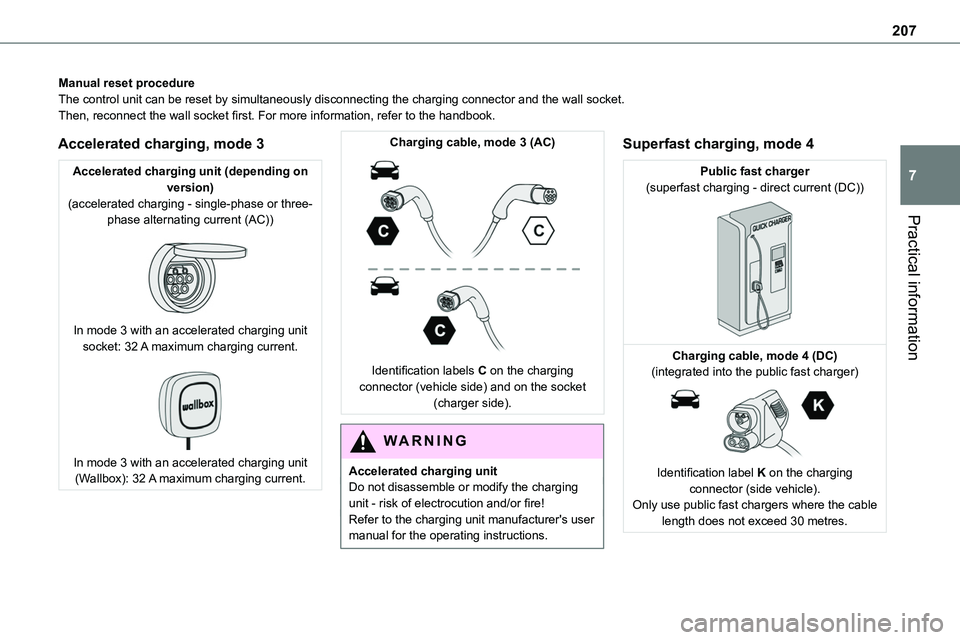
Accelerated charging unit (depending on version)(accelerated charging - single-phase or three-phase alternating current (AC))
In mode 3 with an accelerated charging unit socket: 32 A maximum charging current.
In mode 3 with an accelerated charging unit (Wallbox): 32 A maximum charging current.
Charging cable, mode 3 (AC)
Identification labels C on the charging connector (vehicle side) and on the socket (charger side).
WARNI NG
Accelerated charging unitDo not disassemble or modify the charging unit - risk of electrocution and/or fire!Refer to the charging unit manufacturer's user
manual for the operating instructions.
Superfast charging, mode 4
Public fast charger(superfast charging - direct current (DC))
Charging cable, mode 4 (DC)(integrated into the public fast charger)
Identification label K on the charging connector (side vehicle).Only use public fast chargers where the cable length does not exceed 30 metres.
Page 251 of 360

251
In the event of a breakdown
8
Disconnecting the battery
In order to maintain an adequate state of charge for starting the engine, we recommend disconnecting the battery if the vehicle is to be unused for an extended period.Before disconnecting the battery:► Close all openings (doors, tailgate, windows).► Switch off all electricity-consuming devices (audio system, wipers, lamps, etc.).
► Switch off the ignition and wait for 4 minutes.After accessing the battery, it is only necessary to disconnect the (+) terminal.
Quick-release terminal clamp
Disconnecting the (+) terminal
► Depending on equipment, lift the plastic cover
on the (+) terminal.► Raise lever A fully to release clamp B.► Remove clamp B by lifting it off.
Reconnecting the (+) terminal
► Raise lever A fully.► Refit open clamp B on the (+) terminal.► Push clamp B fully down.► Lower lever A to lock clamp B.► Depending on equipment, lower the plastic cover on the (+) terminal.
WARNI NG
Do not force the lever, as it will not lock in place if the clamp is not positioned correctly; start the procedure again.
Following reconnection
After reconnecting the battery, turn on the ignition and wait 1 minute before starting the engine, to enable the electronic systems to initialise.If minor problems nevertheless persist following this operation, contact any authorized Toyota retailer or Toyota authorized repairer, or any reliable repairer.
Referring to the relevant section, reinitialise certain equipment:– Remote control key or electronic key (depending on version).– Electric windows.– Electric doors,– Date and time.– Preset radio stations.
NOTIC E
The Stop & Start system may not be operational during the trip following the first engine start.In this case, the system will only be available again after a continuous period of immobilisation of the vehicle, a period which depends on the exterior temperature and the state of charge of the battery (up to about 8 hours).
Page 265 of 360

265
Bluetooth® audio system
10
Bluetooth® audio system
NOTIC E
The different functions and settings described vary according to the version and configuration of your vehicle.
WARNI NG
As a safety measure and because it requires sustained attention by the driver, the pairing of a Bluetooth mobile telephone with the Bluetooth hands-free system of your audio system must be done with the vehicle stationary and the ignition on.
WARNI NG
Your audio system is coded in such a way that it will only operate in your vehicle.All work on the system must be carried out exclusively by a dealer or qualified workshop, to avoid any risk of electrocution, fire or mechanical faults.
NOTIC E
To avoid discharging the battery, the audio system may switch off after a few minutes if the engine is not running.
First steps
Press: On/Off.Rotate: adjust volume.Short press: change audio source (radio; USB; AUX (if equipment connected); CD; streaming).Long press: display the Telephone menu (if a telephone is connected).
Adjust audio settings:Front/rear fader; left/right balance; bass/treble; loudness; audio ambience.Activate/Deactivate automatic volume adjustment (based on the vehicle’s speed).Radio :Short press: display the list of radio stations.Long press: update the list.Media :Short press: display the list of folders.Long press: display the available sorting options.Select the screen display mode, between:Date; Audio functions; Trip computer; Telephone.Confirm or display contextual menu.
Buttons 1 to 6.Short press: select the preset radio station.Long press: preset a radio station.Radio:Automatic step by step search up/down for radio stations.
Page 266 of 360
266
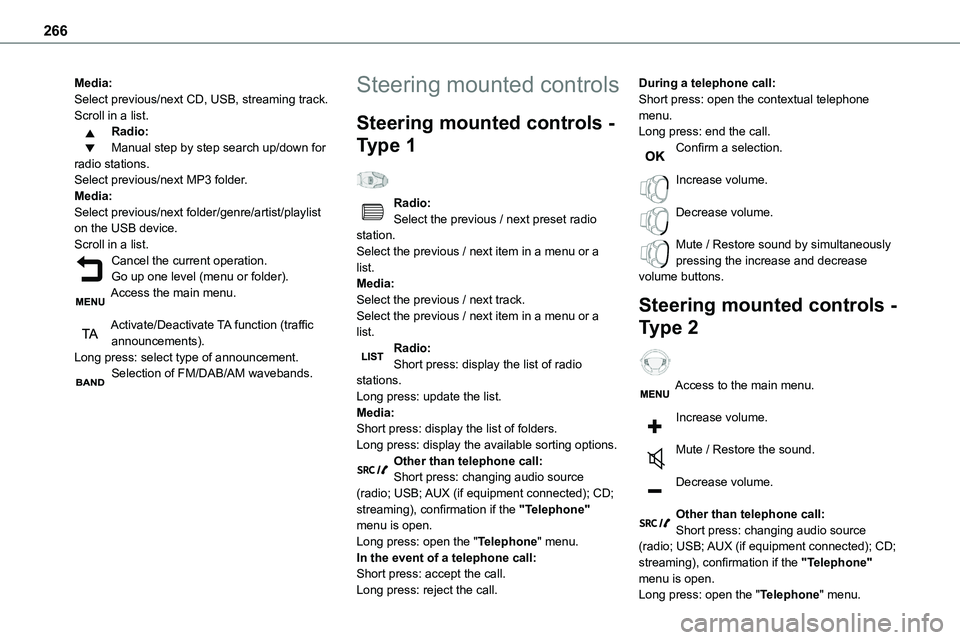
Media:Select previous/next CD, USB, streaming track.Scroll in a list.Radio:Manual step by step search up/down for radio stations.Select previous/next MP3 folder.Media:Select previous/next folder/genre/artist/playlist
on the USB device.Scroll in a list.Cancel the current operation.Go up one level (menu or folder).Access the main menu.
Activate/Deactivate TA function (traffic announcements).Long press: select type of announcement.Selection of FM/DAB/AM wavebands.
Steering mounted controls
Steering mounted controls -
Type 1
Radio:Select the previous / next preset radio
station.Select the previous / next item in a menu or a list.Media:Select the previous / next track.Select the previous / next item in a menu or a list.Radio:Short press: display the list of radio stations.Long press: update the list.Media:Short press: display the list of folders.Long press: display the available sorting options.Other than telephone call:Short press: changing audio source (radio; USB; AUX (if equipment connected); CD; streaming), confirmation if the "Telephone" menu is open.Long press: open the "Telephone" menu.In the event of a telephone call:Short press: accept the call.Long press: reject the call.
During a telephone call:Short press: open the contextual telephone menu.Long press: end the call.Confirm a selection.
Increase volume.
Decrease volume.
Mute / Restore sound by simultaneously pressing the increase and decrease volume buttons.
Steering mounted controls -
Type 2
Access to the main menu.
Increase volume.
Mute / Restore the sound.
Decrease volume.
Other than telephone call:Short press: changing audio source (radio; USB; AUX (if equipment connected); CD; streaming), confirmation if the "Telephone" menu is open.Long press: open the "Telephone" menu.
Page 267 of 360

267
Bluetooth® audio system
10
In the event of a telephone call:Short press: accept the call.Long press: reject the call.During a telephone call:Short press: open the contextual telephone menu.Long press: end the call.Start voice recognition on your smartphone via the system.
Radio:Short press: display the list of radio stations.Long press: update the list.Media:Short press: display the list of folders.Long press: display the available sorting options.Radio:Select the previous / next preset radio station.Select the previous / next item in a menu or a list.Media:Select the previous / next track.Select the previous / next item in a menu or a list.Press the thumbwheel: confirm.
Menus
Depending on version."Multimedia": Media settings, Radio settings."Telephone": Call, Directory management, Telephone management, Hang up."Trip computer".
"Maintenance": Diagnosis, Warning log, etc."Connections": Manage connections, search for devices."Personalisation-configuration": Define the vehicle parameters, Choice of language, Display configuration, Choice of units, Date and time adjustment.Press the "MENU" button.
Move from one menu to another.
Enter a menu.
Radio
Selecting a station
Press the SOURCE button repeatedly and select the radio.Press this button to select a waveband (FM / AM / DAB).Press one of the buttons for an automatic
search for radio stations.Press one of the buttons to carry out a manual search up / down for radio frequencies.Press this button to display the list of stations received locally.To update this list, press for more than two seconds. The sound is cut while updating.
RDS
NOTIC E
The external environment (hills, buildings, tunnels, basement car parks, etc.) may block reception, including in RDS mode. This is a normal effect of the way in which radio waves are transmitted and does not indicate any failure of the audio equipment.
NOTIC E
If RDS is not available, the RDS symbol appears struck out in the screen.
Page 269 of 360
269
Bluetooth® audio system
10
Select "RadioText (TXT) display" and confirm OK to save.
DAB (Digital Audio
Broadcasting) radio
Terrestrial Digital Radio
Depending on version
NOTIC E
If the current DAB radio station is not available on FM, "DAB FM" is struck out.
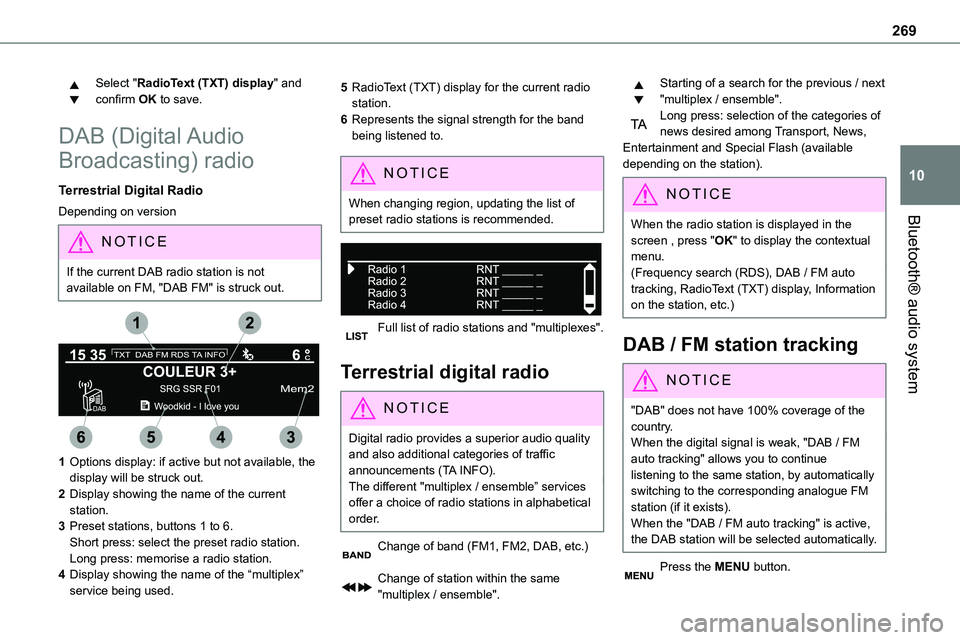
1Options display: if active but not available, the display will be struck out.
2Display showing the name of the current station.
3Preset stations, buttons 1 to 6.Short press: select the preset radio station.Long press: memorise a radio station.
4Display showing the name of the “multiplex” service being used.
5RadioText (TXT) display for the current radio station.
6Represents the signal strength for the band being listened to.
NOTIC E
When changing region, updating the list of preset radio stations is recommended.
Full list of radio stations and "multiplexes".
Terrestrial digital radio
NOTIC E
Digital radio provides a superior audio quality and also additional categories of traffic announcements (TA INFO).The different "multiplex / ensemble” services offer a choice of radio stations in alphabetical order.
Change of band (FM1, FM2, DAB, etc.)
Change of station within the same "multiplex / ensemble".
Starting of a search for the previous / next "multiplex / ensemble".Long press: selection of the categories of news desired among Transport, News, Entertainment and Special Flash (available depending on the station).
NOTIC E
When the radio station is displayed in the screen , press "OK" to display the contextual menu.(Frequency search (RDS), DAB / FM auto tracking, RadioText (TXT) display, Information on the station, etc.)
DAB / FM station tracking
NOTIC E
"DAB" does not have 100% coverage of the country.When the digital signal is weak, "DAB / FM auto tracking" allows you to continue listening to the same station, by automatically switching to the corresponding analogue FM station (if it exists).When the "DAB / FM auto tracking" is active, the DAB station will be selected automatically.
Press the MENU button.