2022 TOYOTA PROACE buttons
[x] Cancel search: buttonsPage 33 of 360

33
Access
2
Unlocking/Complete or
selective unlocking
What is the purpose of total
or selective unlocking?
Complete unlocking unlocks all the vehicle’s doors (front, side and rear).
Selective unlocking unlocks either the cabin doors, or the doors of the loading area (side and rear).
NOTIC E
The separation of the cabin and loading area unlocking is a security measure.It is used to lock out access to the part of the vehicle in which you are not present.
Activation/Deactivation
► To activateselective unlocking between the cab and the loading area or to deactivate selective unlocking and return to total unlocking mode, switch on the ignition and press this button for more than two
seconds.An audible signal and, depending on equipment, a display message, confirm that the request has been acknowledged.
NOTIC E
Selective unlocking between cab and loading area is activated by default.
Unlocking/Complete
unlocking
NOTIC E
Unlocking is signalled by rapid flashing of the direction indicators for a few seconds.Depending on version, the door mirrors unfold and the alarm is deactivated.
With the key
► To unlock the vehicle fully, turn the key in the front left-hand door lock towards the front of the vehicle.If the vehicle has an alarm, it will not be deactivated. Opening a door will trigger the alarm, which can be stopped by switching the ignition on.
With the remote control
► Depending on equipment, press one of these buttons to unlock the vehicle.
Using the remote control with electric
sliding side door(s)
► To fully unlock the vehicle and open the side door, press and hold this button until the door has opened.
Page 42 of 360

42
NOTIC E
To deactivate this automatic locking, go to any authorized Toyota retailer or Toyota authorized repairer, or any reliable repairer.
Manual
► With complete unlocking activated,
press this button to lock (indicator lamp comes on)/unlock (indicator lamp goes off) the vehicle.► With selective unlocking activated, press this button to lock (indicator lamp comes on)/unlock (indicator lamp goes off) the loading area.
WARNI NG
Driving with the doors locked could make it more difficult for the emergency services to enter the vehicle in an emergency.
NOTIC E
The indicator lamp goes off when unlocking one or more doors of the loading area.With the ignition off and the vehicle fully locked, the indicator lamp goes off for energy economy reasons.
Electric sliding side
door(s)
The exterior and interior door handles and the interior buttons allow the electrically powered movement of the door to be started.Opening and closing of the doors is accompanied by an audible signal.
Opening
With the exterior or interior handle
► With the door unlocked, pull and release the handle to start opening the door. Pull the handle again to reverse the direction of the door's movement.
With the remote control
► With the door unlocked, press and hold this button until the corresponding sliding side door has opened. ► Press this button again to reverse the direction of the door's movement.
NOTIC E
The remote control buttons are not active with the ignition switched on.
With the button(s) on the door pillar
With the button(s) at the front
Page 43 of 360
43
Access
2
► With total unlocking activated and the child lock deactivated, to unlock the vehicle and start opening a door, press the button corresponding to the door you wish to open.► With selective unlocking activated, to unlock only the loading area and start opening a door, press the button corresponding to the door you wish to open.► In both cases, pressing the button again
reverses the direction of the door's movement.
Closing
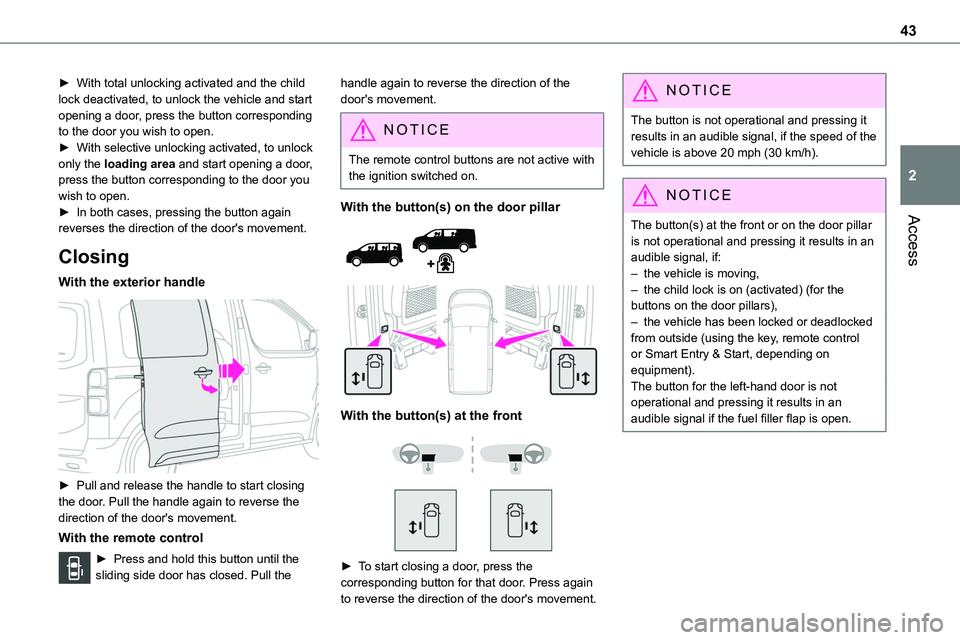
With the exterior handle
► Pull and release the handle to start closing the door. Pull the handle again to reverse the direction of the door's movement.
With the remote control
► Press and hold this button until the sliding side door has closed. Pull the
handle again to reverse the direction of the door's movement.
NOTIC E
The remote control buttons are not active with the ignition switched on.
With the button(s) on the door pillar
With the button(s) at the front
► To start closing a door, press the corresponding button for that door. Press again
to reverse the direction of the door's movement.
NOTIC E
The button is not operational and pressing it results in an audible signal, if the speed of the vehicle is above 20 mph (30 km/h).
NOTIC E
The button(s) at the front or on the door pillar is not operational and pressing it results in an audible signal, if:– the vehicle is moving,– the child lock is on (activated) (for the buttons on the door pillars),– the vehicle has been locked or deadlocked from outside (using the key, remote control or Smart Entry & Start, depending on equipment).The button for the left-hand door is not operational and pressing it results in an audible signal if the fuel filler flap is open.
Page 92 of 360
92
NOTIC E
For more information, refer to the Rear heating - air conditioning section.
Visibility programme
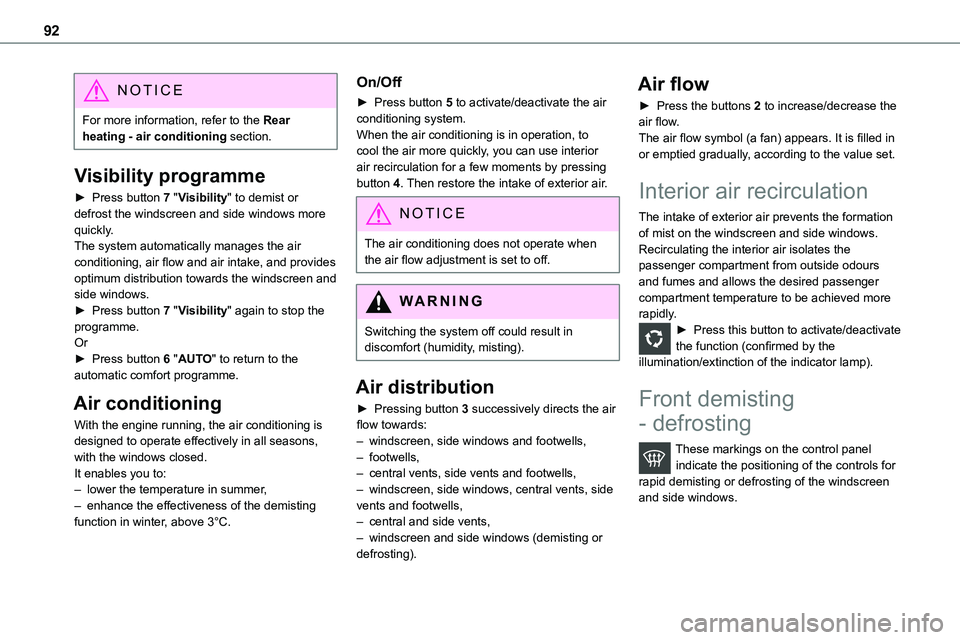
► Press button 7 "Visibility" to demist or defrost the windscreen and side windows more
quickly.The system automatically manages the air conditioning, air flow and air intake, and provides optimum distribution towards the windscreen and side windows.► Press button 7 "Visibility" again to stop the programme.Or► Press button 6 "AUTO" to return to the automatic comfort programme.
Air conditioning
With the engine running, the air conditioning is designed to operate effectively in all seasons, with the windows closed.It enables you to:– lower the temperature in summer,– enhance the effectiveness of the demisting function in winter, above 3°C.
On/Off
► Press button 5 to activate/deactivate the air conditioning system.When the air conditioning is in operation, to cool the air more quickly, you can use interior air recirculation for a few moments by pressing button 4. Then restore the intake of exterior air.
NOTIC E
The air conditioning does not operate when the air flow adjustment is set to off.
WARNI NG
Switching the system off could result in discomfort (humidity, misting).
Air distribution
► Pressing button 3 successively directs the air flow towards:– windscreen, side windows and footwells, – footwells,– central vents, side vents and footwells,– windscreen, side windows, central vents, side vents and footwells,– central and side vents, – windscreen and side windows (demisting or defrosting).
Air flow
► Press the buttons 2 to increase/decrease the air flow.The air flow symbol (a fan) appears. It is filled in or emptied gradually, according to the value set.
Interior air recirculation
The intake of exterior air prevents the formation
of mist on the windscreen and side windows.Recirculating the interior air isolates the passenger compartment from outside odours and fumes and allows the desired passenger compartment temperature to be achieved more rapidly.► Press this button to activate/deactivate the function (confirmed by the illumination/extinction of the indicator lamp).
Front demisting
- defrosting
These markings on the control panel indicate the positioning of the controls for rapid demisting or defrosting of the windscreen and side windows.
Page 174 of 360
174
Activation/Deactivation
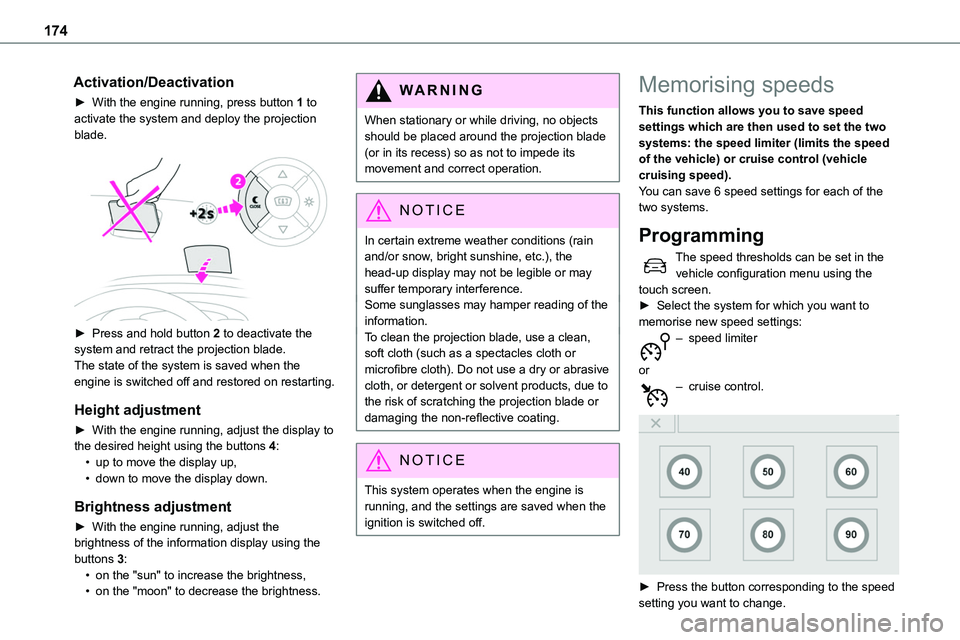
► With the engine running, press button 1 to activate the system and deploy the projection blade.
► Press and hold button 2 to deactivate the system and retract the projection blade.The state of the system is saved when the engine is switched off and restored on restarting.
Height adjustment
► With the engine running, adjust the display to the desired height using the buttons 4:• up to move the display up,• down to move the display down.
Brightness adjustment
► With the engine running, adjust the
brightness of the information display using the buttons 3:• on the "sun" to increase the brightness,• on the "moon" to decrease the brightness.
W ARNI NG
When stationary or while driving, no objects should be placed around the projection blade (or in its recess) so as not to impede its movement and correct operation.
NOTIC E
In certain extreme weather conditions (rain and/or snow, bright sunshine, etc.), the head-up display may not be legible or may suffer temporary interference.Some sunglasses may hamper reading of the information.To clean the projection blade, use a clean, soft cloth (such as a spectacles cloth or microfibre cloth). Do not use a dry or abrasive cloth, or detergent or solvent products, due to the risk of scratching the projection blade or damaging the non-reflective coating.
NOTIC E
This system operates when the engine is running, and the settings are saved when the ignition is switched off.
Memorising speeds
This function allows you to save speed settings which are then used to set the two systems: the speed limiter (limits the speed of the vehicle) or cruise control (vehicle cruising speed).You can save 6 speed settings for each of the two systems.
Programming
The speed thresholds can be set in the vehicle configuration menu using the touch screen.► Select the system for which you want to memorise new speed settings:– speed limiter
or– cruise control.
► Press the button corresponding to the speed setting you want to change.
Page 179 of 360
179
Driving
6
To modify the limit speed setting based on the vehicle’s current speed:► Briefly press button 2 or 3 to change the value in steps of + or - 1 mph (1.6 km/h).► Press and hold button 2 or 3 to change the value in steps of + or - 5 mph (8 km/h).To change the limit speed setting using memorised speeds, via the touch screen:► Press button 5 to display the memorised
speed settings.► Press the touch screen button for the desired speed setting.The selection screen closes after a few moments.This setting becomes the new limit speed.To modify the cruise speed setting based on the speed suggested by the Speed Limit Recognition and Recommendation, as shown on the instrument panel:► Press button 5 once; a message is displayed to confirm the memorisation request.► Press button 5 again to save the suggested speed.The speed is immediately shown on the instrument panel as the new speed setting.
Temporarily exceeding the
programmed speed
► To temporarily exceed the programmed speed threshold, fully depress the accelerator pedal.
The speed limiter is deactivated temporarily and the displayed programmed speed flashes.If it is exceeded for a prolonged period of time, an audible warning is triggered.Simply release the accelerator pedal to return to below the programmed speed.When the limit speed is exceeded but this is not due to action by the driver (in case of a steep slope, for example), an audible signal triggers
immediately.Once the speed of the vehicle returns to the programmed setting, the speed limiter functions again: the display of the programmed speed setting becomes fixed again.
Switching off
► Turn the thumbwheel 1 to the "0" position: the display of information on the speed limiter disappears.
Malfunction
Dashes are displayed (flashing, initially, then fixed) in the event of a speed limiter malfunction.Have it checked by any authorized Toyota retailer or Toyota authorized repairer, or any
reliable repairer.
Cruise control - particular
recommendations
WARNI NG
For the safety of everyone, only use the cruise control where the driving conditions allow running at a constant speed and keeping an adequate safety distance.Remain vigilant when the cruise control is activated. If you hold one of the speed setting modification buttons, a very rapid change in the speed of your vehicle may occur.When descending a steep hill, the cruise control system cannot prevent the vehicle from exceeding the set speed. Brake if necessary to control the speed of your vehicle.On steep climbs or when towing, the set speed may not be reached or maintained.
NOTIC E
Exceeding the programmed speed settingYou can temporarily exceed the speed setting by pressing the accelerator pedal (the programmed speed flashes).
To return to the speed setting, release the accelerator pedal (when the set speed is reached again, the displayed speed stops flashing).
Page 183 of 360
183
Driving
6
NOTIC E
If the driver operates a direction indicator to overtake a slower vehicle, the cruise control allows the vehicle to temporarily approach the vehicle in front to assist the overtaking manoeuvre, without ever exceeding the speed setting.
WARNI NG
Some vehicles present on the road may not be properly seen or may be misinterpreted by the radar (e.g. a lorry), which may lead to a poor assessment of distance and lead to the vehicle accelerating or braking inappropriately.
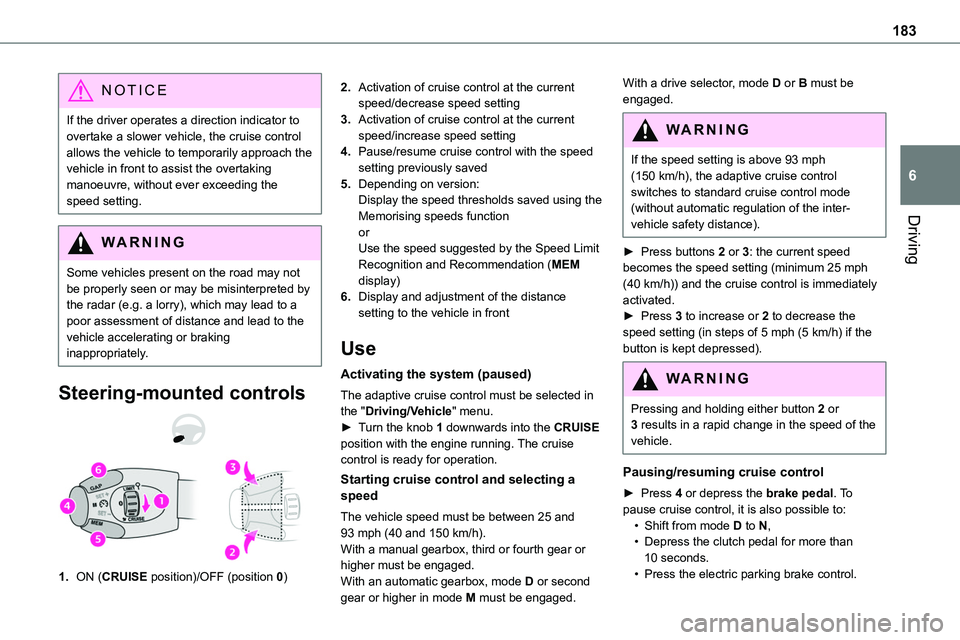
Steering-mounted controls
1.ON (CRUISE position)/OFF (position 0)
2.Activation of cruise control at the current speed/decrease speed setting
3.Activation of cruise control at the current speed/increase speed setting
4.Pause/resume cruise control with the speed setting previously saved
5.Depending on version:Display the speed thresholds saved using the Memorising speeds function
orUse the speed suggested by the Speed Limit Recognition and Recommendation (MEM display)
6.Display and adjustment of the distance setting to the vehicle in front
Use
Activating the system (paused)
The adaptive cruise control must be selected in the "Driving/Vehicle" menu.► Turn the knob 1 downwards into the CRUISE position with the engine running. The cruise control is ready for operation.
Starting cruise control and selecting a speed
The vehicle speed must be between 25 and 93 mph (40 and 150 km/h).With a manual gearbox, third or fourth gear or higher must be engaged.With an automatic gearbox, mode D or second gear or higher in mode M must be engaged.
With a drive selector, mode D or B must be engaged.
WARNI NG
If the speed setting is above 93 mph (150 km/h), the adaptive cruise control switches to standard cruise control mode (without automatic regulation of the inter-vehicle safety distance).
► Press buttons 2 or 3: the current speed becomes the speed setting (minimum 25 mph (40 km/h)) and the cruise control is immediately activated.► Press 3 to increase or 2 to decrease the speed setting (in steps of 5 mph (5 km/h) if the button is kept depressed).
WARNI NG
Pressing and holding either button 2 or 3 results in a rapid change in the speed of the vehicle.
Pausing/resuming cruise control
► Press 4 or depress the brake pedal. To pause cruise control, it is also possible to:• Shift from mode D to N,• Depress the clutch pedal for more than 10 seconds.• Press the electric parking brake control.
Page 265 of 360

265
Bluetooth® audio system
10
Bluetooth® audio system
NOTIC E
The different functions and settings described vary according to the version and configuration of your vehicle.
WARNI NG
As a safety measure and because it requires sustained attention by the driver, the pairing of a Bluetooth mobile telephone with the Bluetooth hands-free system of your audio system must be done with the vehicle stationary and the ignition on.
WARNI NG
Your audio system is coded in such a way that it will only operate in your vehicle.All work on the system must be carried out exclusively by a dealer or qualified workshop, to avoid any risk of electrocution, fire or mechanical faults.
NOTIC E
To avoid discharging the battery, the audio system may switch off after a few minutes if the engine is not running.
First steps
Press: On/Off.Rotate: adjust volume.Short press: change audio source (radio; USB; AUX (if equipment connected); CD; streaming).Long press: display the Telephone menu (if a telephone is connected).
Adjust audio settings:Front/rear fader; left/right balance; bass/treble; loudness; audio ambience.Activate/Deactivate automatic volume adjustment (based on the vehicle’s speed).Radio :Short press: display the list of radio stations.Long press: update the list.Media :Short press: display the list of folders.Long press: display the available sorting options.Select the screen display mode, between:Date; Audio functions; Trip computer; Telephone.Confirm or display contextual menu.
Buttons 1 to 6.Short press: select the preset radio station.Long press: preset a radio station.Radio:Automatic step by step search up/down for radio stations.