2022 TOYOTA PROACE CITY VERSO brake
[x] Cancel search: brakePage 172 of 320
172
NOTIC E
The speed will be reduced by a maximum of 16 mph (25 km/h) for versions with camera only, or by a maximum of 31 mph (50 km/h) for versions with camera and radar.
Operation
The system operates subject to the following conditions:– At reduced speed in an urban environment, when a pedestrian is detected.– At reduced speed in an urban environment, when a stationary vehicle is detected.– The vehicle's speed is between 10 km/h and 85 km/h (6 mph and 53 mph) when a moving vehicle is detected.This warning lamp flashes (for approximately 10 seconds) as soon as the function applies the vehicle’s brakes.With an automatic gearbox, in the event of automatic emergency braking bringing the
vehicle to a complete stop, keep the brake pedal depressed to prevent the vehicle from moving off again.With a manual gearbox, in the event of automatic emergency braking bringing the vehicle to a complete stop, the engine may stall.
NOTIC E
The driver can maintain control of the vehicle at any time by firmly turning the steering wheel and/or firmly depressing the accelerator pedal.
NOTIC E
The brake pedal may vibrate slightly while the function is operating.If the vehicle comes to a complete stop, automatic braking is maintained for 1 to 2 seconds.
Deactivation/Activation
By default, the system is automatically activated at every engine start.The settings are changed via the Driving / Vehicle touch screen menu.Deactivation of the system is signalled by the illumination of this warning lamp, accompanied by the display of a message.
Malfunction
In the event of a malfunction, this warning lamp comes on on the instrument panel, accompanied by the display of a message and an audible signal.Have it checked by any authorized Toyota retailer or Toyota authorized repairer, or any reliable repairer.If these warning lamps come on after the engine has been switched off and then restarted, contact any authorized Toyota retailer or Toyota authorized repairer, or any reliable repairer to have the system checked.These warning lamps light up on the instrument panel to indicate that the driver's and/or front passenger's seat belt is not fastened (depending on version). The automatic braking system is deactivated until the seat belts are fastened.
Page 173 of 320
173
Driving
6
Active Lane Departure
Warning System
WARNI NG
For more information, refer to the General recommendations on the use of driving and manoeuvring aids.
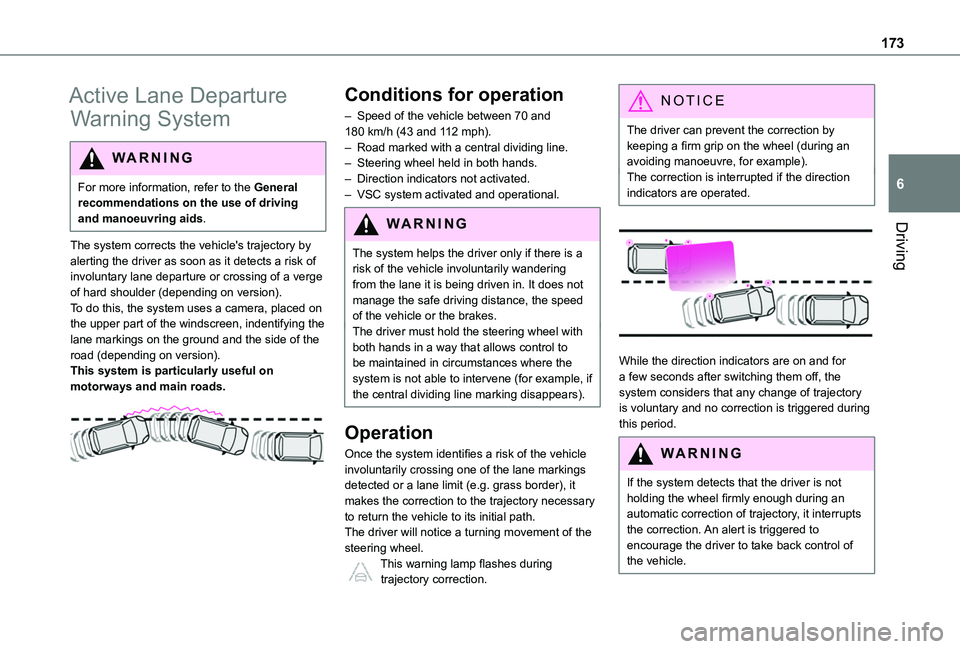
The system corrects the vehicle's trajectory by alerting the driver as soon as it detects a risk of involuntary lane departure or crossing of a verge of hard shoulder (depending on version).To do this, the system uses a camera, placed on the upper part of the windscreen, indentifying the lane markings on the ground and the side of the road (depending on version).This system is particularly useful on motorways and main roads.
Conditions for operation
– Speed of the vehicle between 70 and 180 km/h (43 and 112 mph).– Road marked with a central dividing line.– Steering wheel held in both hands.– Direction indicators not activated.– VSC system activated and operational.
WARNI NG
The system helps the driver only if there is a risk of the vehicle involuntarily wandering from the lane it is being driven in. It does not manage the safe driving distance, the speed of the vehicle or the brakes.The driver must hold the steering wheel with both hands in a way that allows control to be maintained in circumstances where the system is not able to intervene (for example, if the central dividing line marking disappears).
Operation
Once the system identifies a risk of the vehicle involuntarily crossing one of the lane markings detected or a lane limit (e.g. grass border), it makes the correction to the trajectory necessary to return the vehicle to its initial path.The driver will notice a turning movement of the steering wheel.This warning lamp flashes during trajectory correction.
NOTIC E
The driver can prevent the correction by keeping a firm grip on the wheel (during an avoiding manoeuvre, for example).The correction is interrupted if the direction indicators are operated.
While the direction indicators are on and for a few seconds after switching them off, the system considers that any change of trajectory is voluntary and no correction is triggered during this period.
WARNI NG
If the system detects that the driver is not holding the wheel firmly enough during an automatic correction of trajectory, it interrupts the correction. An alert is triggered to
encourage the driver to take back control of the vehicle.
Page 175 of 320
175
Driving
6
Function statusIndicator lampDisplay and/or associated message (with matrix instrument panel and/or head-up display)
Comments
ON
(orange)/(green)"Hold the wheel"
– If, while correcting the trajectory, the system detects that the driver has not held the steering wheel for a few seconds, it interrupts the correction and returns control to the driver.– If, while correcting the trajectory, the system determines
that the correction will not be enough and that a solid line will be crossed (orange line): the driver is warned that they must provide additional trajectory adjustment.The duration of audible warnings will increase if multiple corrections are performed in quick succession. The warning will become continuous, persisting until the driver responds.This message may also be displayed if you have your hands on the steering wheel.
Operating limits
The system goes into standby automatically in the following cases:– VSC deactivated or operation triggered.– Speed below 70 km/h (43 mph) or greater than 180 km/h (112 mph).– Electrical connection of a trailer.– Use of the "space-saver" spare wheel detected (as detection is not immediate, deactivation of the system is recommended).– Dynamic driving style detected, pressure on the brake or accelerator pedal.
– Driving over lane markings.– Activation of the direction indicators.– Crossing the inside line on a bend.– Driving in a tight bend.– Inactivity by the driver detected during correction.
NOTIC E
During a correction, if the driver is inactive
(not holding the steering wheel for 10 seconds), a warning message appears.If the driver remains inactive (not holding the steering wheel for 2 more seconds), the correction is interrupted.
Page 182 of 320
182
Reversing camera
WARNI NG
For more information, refer to the General recommendations on the use of driving and manoeuvring aids.
With the ignition on, this system uses a camera located near the third brake lamp to display a view of the rear of your vehicle on the reproduction screen (if it is a panel van or has a solid partition).The reversing camera is activated automatically when reverse gear is engaged. The image is displayed on the reproduction screen. The reproduction screen switches off when the gearbox is in neutral or in a forward gear.
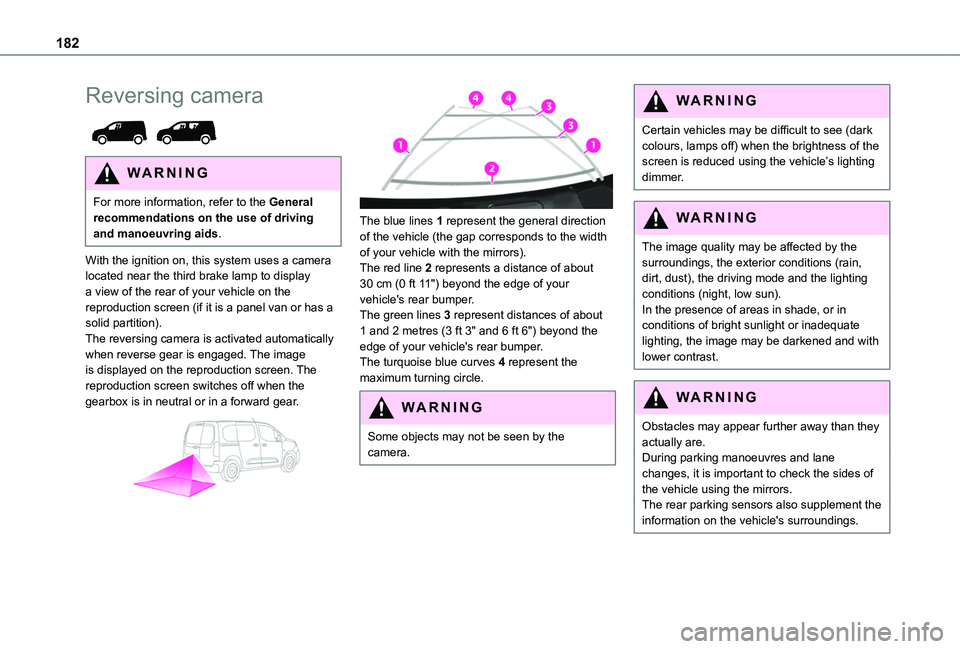
The blue lines 1 represent the general direction of the vehicle (the gap corresponds to the width of your vehicle with the mirrors).The red line 2 represents a distance of about 30 cm (0 ft 11") beyond the edge of your vehicle's rear bumper.The green lines 3 represent distances of about 1 and 2 metres (3 ft 3" and 6 ft 6") beyond the edge of your vehicle's rear bumper.The turquoise blue curves 4 represent the maximum turning circle.
WARNI NG
Some objects may not be seen by the camera.
WARNI NG
Certain vehicles may be difficult to see (dark colours, lamps off) when the brightness of the screen is reduced using the vehicle’s lighting dimmer.
WARNI NG
The image quality may be affected by the surroundings, the exterior conditions (rain, dirt, dust), the driving mode and the lighting conditions (night, low sun).In the presence of areas in shade, or in conditions of bright sunlight or inadequate lighting, the image may be darkened and with lower contrast.
WARNI NG
Obstacles may appear further away than they actually are.During parking manoeuvres and lane changes, it is important to check the sides of the vehicle using the mirrors.The rear parking sensors also supplement the information on the vehicle's surroundings.
Page 207 of 320
207
Practical information
7
For more information, contact a TOYOTA dealer or a qualified workshop.
Installation tips
► If you have to fit the chains during a journey, stop the vehicle on a flat surface on the side of the road.► Apply the parking brake and position any wheel chocks under the wheels to prevent movement of your vehicle.► Fit the chains following the instructions provided by the manufacturer.► Move off gently and drive for a few moments, without exceeding 50 km/h (31 mph).► Stop your vehicle and check that the snow chains are correctly tightened.
NOTIC E
It is strongly recommended that before you leave, you practise fitting the snow chains on a level and dry surface.
WARNI NG
Avoid driving with snow chains on roads that have been cleared of snow to avoid damaging your vehicle's tyres and the road surface. If your vehicle is fitted with alloy wheels, check
that no part of the chain or its fixings is in contact with the wheel rim.
Very cold climate screen
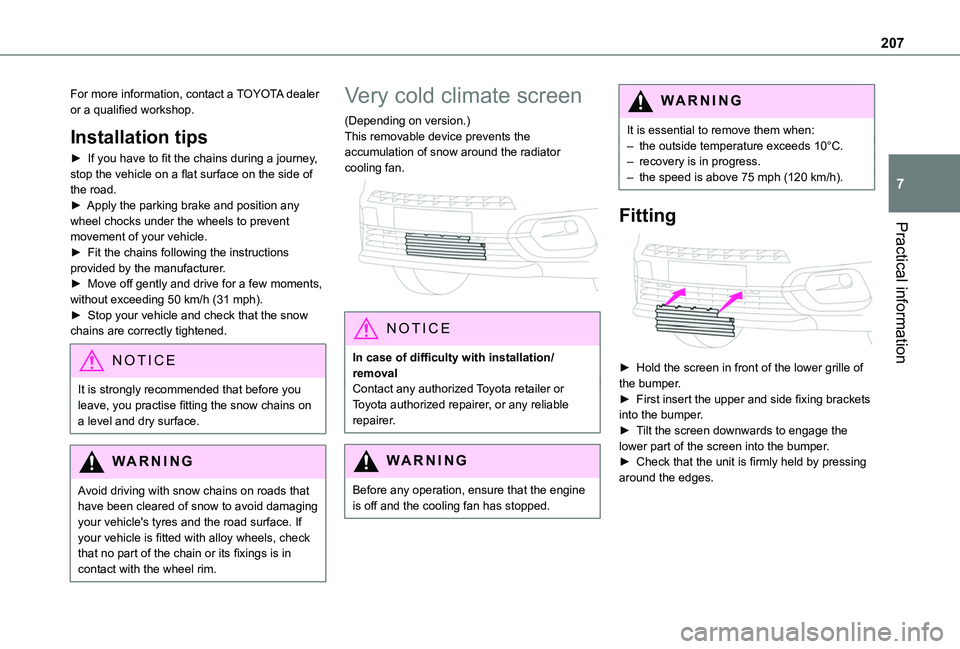
(Depending on version.)This removable device prevents the accumulation of snow around the radiator cooling fan.
NOTIC E
In case of difficulty with installation/removalContact any authorized Toyota retailer or Toyota authorized repairer, or any reliable repairer.
WARNI NG
Before any operation, ensure that the engine is off and the cooling fan has stopped.
WARNI NG
It is essential to remove them when:– the outside temperature exceeds 10°C.– recovery is in progress.– the speed is above 75 mph (120 km/h).
Fitting
► Hold the screen in front of the lower grille of the bumper.► First insert the upper and side fixing brackets into the bumper.► Tilt the screen downwards to engage the lower part of the screen into the bumper.► Check that the unit is firmly held by pressing around the edges.
Page 212 of 320
212
► Unclip the stay from its housing and place it in the support slot to hold the bonnet open.
Closing
► Hold the bonnet and pull out the stay from the support slot.► Clip the stay in its housing.► Lower the bonnet and release it near the end of its travel.► Pull on the bonnet to check that it is locked correctly.
WARNI NG
Because of the presence of electrical equipment under the bonnet, it is recommended that exposure to water (rain, washing, etc.) be limited.
Engine compartment
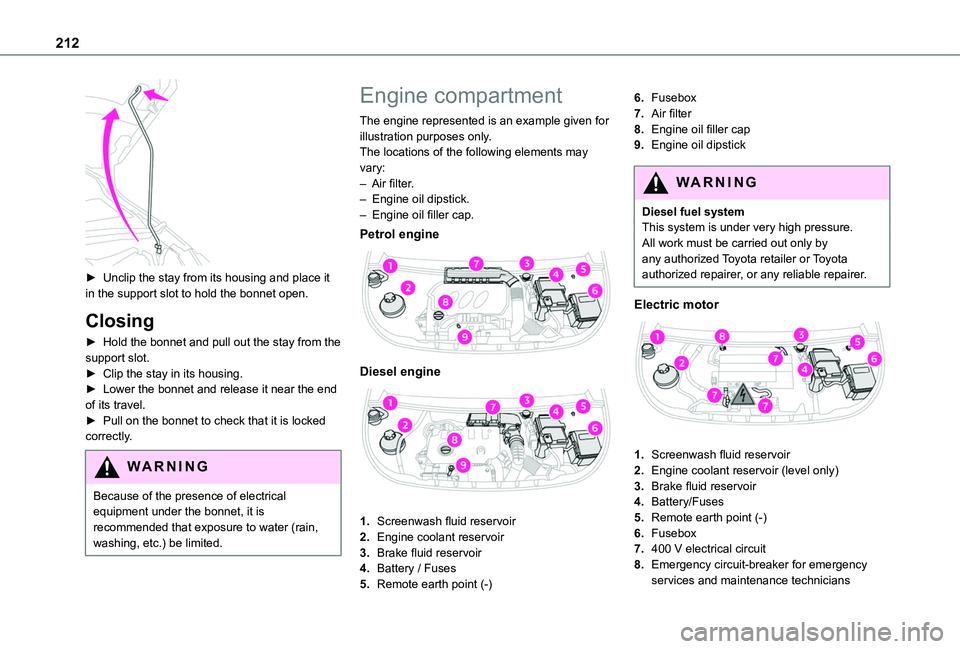
The engine represented is an example given for illustration purposes only.The locations of the following elements may vary:– Air filter.– Engine oil dipstick.– Engine oil filler cap.
Petrol engine
Diesel engine
1.Screenwash fluid reservoir
2.Engine coolant reservoir
3.Brake fluid reservoir
4.Battery / Fuses
5.Remote earth point (-)
6.Fusebox
7.Air filter
8.Engine oil filler cap
9.Engine oil dipstick
WARNI NG
Diesel fuel systemThis system is under very high pressure.All work must be carried out only by any authorized Toyota retailer or Toyota authorized repairer, or any reliable repairer.
Electric motor
1.Screenwash fluid reservoir
2.Engine coolant reservoir (level only)
3.Brake fluid reservoir
4.Battery/Fuses
5.Remote earth point (-)
6.Fusebox
7.400 V electrical circuit
8.Emergency circuit-breaker for emergency services and maintenance technicians
Page 214 of 320
214
WARNI NG
Oil gradeBefore topping up or changing the engine oil, check that the oil is suitable for the engine and complies with the recommendations in the service schedule supplied with the vehicle (or available from your TOYOTA dealer and qualified workshops).Use of non-recommended oil may invalidate the contractual warranty in the event of engine failure.
Topping up the engine oil level
The location of the oil filler cap is shown in the corresponding underbonnet layout view.► Add oil in small quantities, avoiding any spills on engine components (risk of fire).► Wait a few minutes before checking the level again using the dipstick.► Add more oil if necessary.► After checking the level, carefully refit the oil
filler cap and the dipstick in its tube.
NOTIC E
During the 30 minutes after topping up the oil, the check performed with the oil level indicator in the instrument panel when the ignition is switched on is not valid.
Brake fluid
The level of this fluid should be close to the "MAX" mark. If not, check the brake pad wear.To know how often the brake fluid should be replaced, refer to the manufacturer's servicing schedule.
WARNI NG
If topping up, clean the cap before replacing it. Use only DOT4 brake fluid from a sealed canister.
Engine coolant
It is normal to top up this fluid between two services.The check and top-up must only be done with the engine cold.A level of coolant that is too low risks causing major damage to the engine; the coolant level must be close to the "MAX" mark without ever going above it.If the level is close to or below the "MIN" mark, it is essential to top it up.When the engine is hot, the temperature of the coolant is regulated by the fan.As the cooling system is pressurised, wait at least one hour after switching off the engine before carrying out any work.In order to avoid the risk of scalding if you need to top up in an emergency, wrap a cloth around
the cap and unscrew the cap by two turns to allow the pressure to drop.Once the pressure has dropped, remove the cap and top up to the required level.
WARNI NG
Vehicle with electric motorDo not top up the coolant.
If the level is close to or below the "MIN" mark, it is essential to contact any authorized Toyota retailer or Toyota authorized repairer, or any reliable repairer.
Screenwash fluid
Top up to the required level when necessary.Capacity of the tank:– 5.3 litres for "very cold climate" versions.– 2.2 litres for other versions.
Fluid specification
The fluid must be topped up with a ready-to-use
mixture.In winter (temperatures below zero), a liquid containing an agent to prevent freezing must
Page 216 of 320
216
Air filter
Depending on the environment and the use of the vehicle (e.g. dusty atmosphere, city driving), change it twice as often, if necessary.
Oil filter
Change the oil filter each time the engine oil is changed.
Particle filter (Diesel)
The start of clogging of the particle filter is indicated by the temporary lighting of this warning lamp, accompanied by an alert message.As soon as the traffic conditions permit, regenerate the filter by driving at a speed of at least 37 mph (60 km/h), with an engine speed above 2,500 rpm, for about 15 minutes (until the warning lamp goes off).If it is not possible to reach 37 mph (60 km/h), leave the engine running at idle for about
15 minutes, then drive with an engine speed above 2,500 rpm for 15 minutes.
NOTIC E
Do not switch off the engine until the filter is fully regenerated; repeated intervals can degrade the engine oil prematurely.Regenerating the filter while the vehicle is stationary is not recommended.
NOTIC E
If the warning lamp stays on, this indicates a low Diesel additive level.For more information on Checking levels, refer to the corresponding section.
NOTIC E
Following prolonged operation of the vehicle at very low speed or at idle, you may, in exceptional circumstances, notice water vapour coming from the exhaust while accelerating. These emissions have no impact on the vehicle’s behaviour and the environment.
NOTIC E
New vehicleDuring the first few particle filter regeneration operations, you may notice a "burning" smell. This is perfectly normal.
Manual gearbox
The gearbox does not require any maintenance (no oil change).
Automatic gearbox
The gearbox does not require any maintenance (no oil change).
Drive selector
The drive selector does not require any maintenance.
Brake pads
Brake wear depends on the style of driving, particularly in the case of vehicles used in town, over short distances. It may be necessary to have the condition of the brakes checked, even between vehicle services.Unless there is a leak in the circuit, a drop in the brake fluid level indicates that the brake pads are worn.
NOTIC E
After washing the vehicle, moisture, or in wintry conditions, ice can form on the brake discs and pads: braking efficiency may be reduced. Gently dab the brakes to dry and defrost them.