2022 TOYOTA PROACE CITY VERSO headlamp
[x] Cancel search: headlampPage 179 of 320
179
Driving
6
Driver Attention Alert
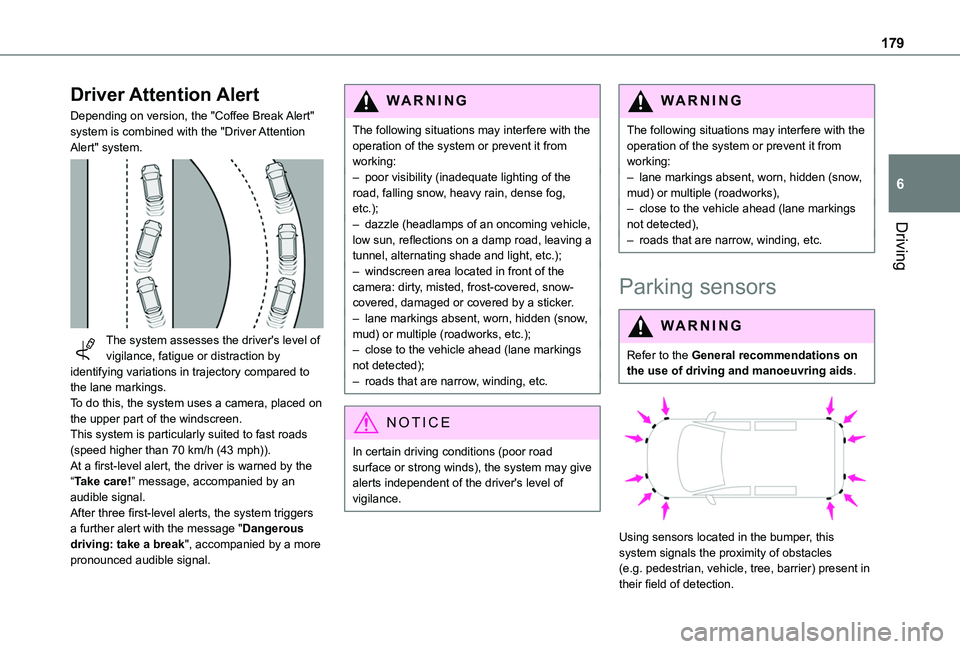
Depending on version, the "Coffee Break Alert" system is combined with the "Driver Attention Alert" system.
The system assesses the driver's level of vigilance, fatigue or distraction by identifying variations in trajectory compared to the lane markings.To do this, the system uses a camera, placed on the upper part of the windscreen.This system is particularly suited to fast roads
(speed higher than 70 km/h (43 mph)).At a first-level alert, the driver is warned by the “Take care!” message, accompanied by an audible signal.After three first-level alerts, the system triggers a further alert with the message "Dangerous driving: take a break", accompanied by a more pronounced audible signal.
WARNI NG
The following situations may interfere with the operation of the system or prevent it from working:– poor visibility (inadequate lighting of the road, falling snow, heavy rain, dense fog, etc.);– dazzle (headlamps of an oncoming vehicle, low sun, reflections on a damp road, leaving a tunnel, alternating shade and light, etc.);– windscreen area located in front of the camera: dirty, misted, frost-covered, snow-covered, damaged or covered by a sticker.– lane markings absent, worn, hidden (snow, mud) or multiple (roadworks, etc.);– close to the vehicle ahead (lane markings not detected);– roads that are narrow, winding, etc.
NOTIC E
In certain driving conditions (poor road surface or strong winds), the system may give alerts independent of the driver's level of vigilance.
WARNI NG
The following situations may interfere with the operation of the system or prevent it from working:– lane markings absent, worn, hidden (snow, mud) or multiple (roadworks),– close to the vehicle ahead (lane markings not detected),– roads that are narrow, winding, etc.
Parking sensors
WARNI NG
Refer to the General recommendations on the use of driving and manoeuvring aids.
Using sensors located in the bumper, this
system signals the proximity of obstacles (e.g. pedestrian, vehicle, tree, barrier) present in their field of detection.
Page 206 of 320
206
Energy economy mode
This system manages the duration of use of certain functions, in order to conserve a sufficient level of charge in the battery with the ignition off.After switching off the engine and for a maximum cumulative period of around 30 minutes, you can continue to use functions such as the audio and telematic system, dipped beam headlamps or courtesy lamps.
Selecting the mode
A confirmation message is displayed when energy economy mode is entered, and the active functions are placed on standby.
NOTIC E
If a telephone call is in progress at the time, it will be maintained for around 10 minutes via the audio system’s hands-free system.
Exiting the mode
These functions are automatically reactivated the next time the vehicle is used.To restore the use of these functions immediately, start the engine and let it run:– For less than 10 minutes, to use the equipment for approximately 5 minutes.– For more than 10 minutes, to use the equipment for approximately 30 minutes.
Let the engine run for the specified duration to ensure that the battery charge is sufficient.To recharge the battery, avoid repeatedly or continuously restarting the engine.
WARNI NG
A flat battery prevents the engine from starting.For more information on the 12 V battery,
refer to the corresponding section.
Load reduction mode
This system manages the use of certain functions according to the level of charge remaining in the battery.When the vehicle is being driven, the load reduction function temporarily deactivates certain functions, such as the air conditioning and the heated rear screen.The deactivated functions are reactivated automatically as soon as conditions permit.
Snow chains
In wintry conditions, snow chains improve traction as well as the behaviour of the vehicle when braking.
WARNI NG
The snow chains must be fitted only to the front wheels. They must never be fitted to "space-saver" type spare wheels.
NOTIC E
Take account of the legislation specific to each country on the use of snow chains and the maximum authorised speed.
Use only the chains designed to be fitted to the type of wheel fitted to your vehicle:
Original tyre sizeMaximum link size (mm)
195/65 R159
205/60 R16
205/55 R17
215/65 R16
215/60 R17cannot be fitted with chains
You can also use snow socks.
Page 230 of 320
230
After changing a wheel
Stow the punctured wheel in the carrier.
WARNI NG
With a non-standard spare wheel
Deactivate certain driving aid functions (Active Safety Brake, Adaptative cruise control, etc.).Do not exceed the maximum authorised speed of 50 mph (80 km/h) or the maximum distance of 50 miles (80 km).Driving with more than one spare wheel of this type is prohibited.The wheel trim from the replaced wheel must not be refitted.
WARNI NG
Visit a Toyota dealer or a qualified workshop.Have the tightening of the spare wheel's bolts and its tyre pressure checked.Have the punctured tyre examined. After inspection, the technician will advice you on whether the tyre can be repaired or if it must be replaced.
NOTIC E
Wheel with wheel trimWhen refitting the wheel, refit the wheel trim, starting by aligning the cutout with the valve and then pushing the trim into place all round its edge with the palm of your hand.
NOTIC E
Tyre inflation pressures are indicated on this label.For more information on Identification markings, particularly this label, refer to the corresponding section.
Changing a bulb
NOTIC E
In some weather conditions (e.g. low temperature or humidity), misting on the internal surface of the glass of the headlamps and rear lamps is normal, and will disappear after the lamps have been on for a few minutes.
WARNI NG
The headlamps have polycarbonate lenses with a protective coating:– Do not clean them with a dry or abrasive cloth, nor with detergent or solvent products.– Use a sponge and soapy water or a pH neutral product.– When using a high-pressure washer on persistent marks, do not keep the lance directed towards the headlamps, lamps or their edges for too long, so as not to damage their protective coating and seals.
WARNI NG
Changing a bulb must only be done with the ignition off and after the headlamp / lamp has been switched off for several minutes - risk of serious burns!Do not touch the bulb directly with your fingers; use a lint-free cloth.It is essential only to use anti-ultraviolet (UV) type bulbs, so as not to damage the headlamp.Always replace a failed bulb with a new bulb of the same type and specification. To avoid lighting imbalance, replace the bulbs in pairs.
Page 231 of 320
231
In the event of a breakdown
8
WARNI NG
Opening the bonnet/Accessing the bulbsProceed with caution when the engine is hot - risk of burns!Take care with objects or clothing that could be caught in the blades of the cooling fan - risk of strangulation!
NOTIC E
Halogen bulbs (Hx)To ensure good quality lighting, check that the bulb is correctly positioned in its housing.
WARNI NG
After changing a bulbTo refit, carry out the fitting operations in reverse order.Close the protective cover very carefully to guarantee the sealing of the lamps.
Light-emitting diode (LED)
headlamps and lamps
Depending on version, the affected types of headlamps / lamps are:– Daytime running lamps / sidelamps.
WARNI NG
For the replacement of this type of bulb, you must contact a TOYOTA dealer or a qualified workshop.
Types of bulb
Various types of bulb are fitted on the vehicle. To remove them:
Type AAll-glass bulb: pull gently as it is fitted by pressure.
Type BBayonet bulb: press on the bulb then turn it anti-clockwise.
Type CHalogen bulb: release the retaining spring from its housing.
Type DHalogen bulb: turn the bulb anti-clockwise.
NOTIC E
When each operation has been completed, check the operation of the lighting.
Front lamps
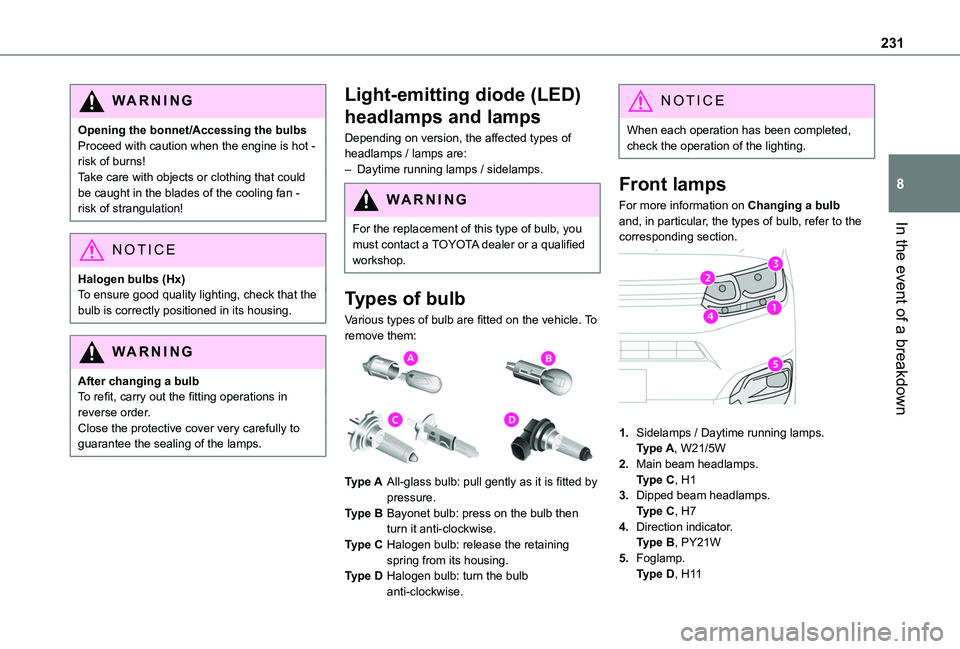
For more information on Changing a bulb and, in particular, the types of bulb, refer to the corresponding section.
1.Sidelamps / Daytime running lamps.
Type A, W21/5W
2.Main beam headlamps.Type C, H1
3.Dipped beam headlamps.Type C, H7
4.Direction indicator.Type B, PY21W
5.Foglamp.Type D, H11
Page 232 of 320
232
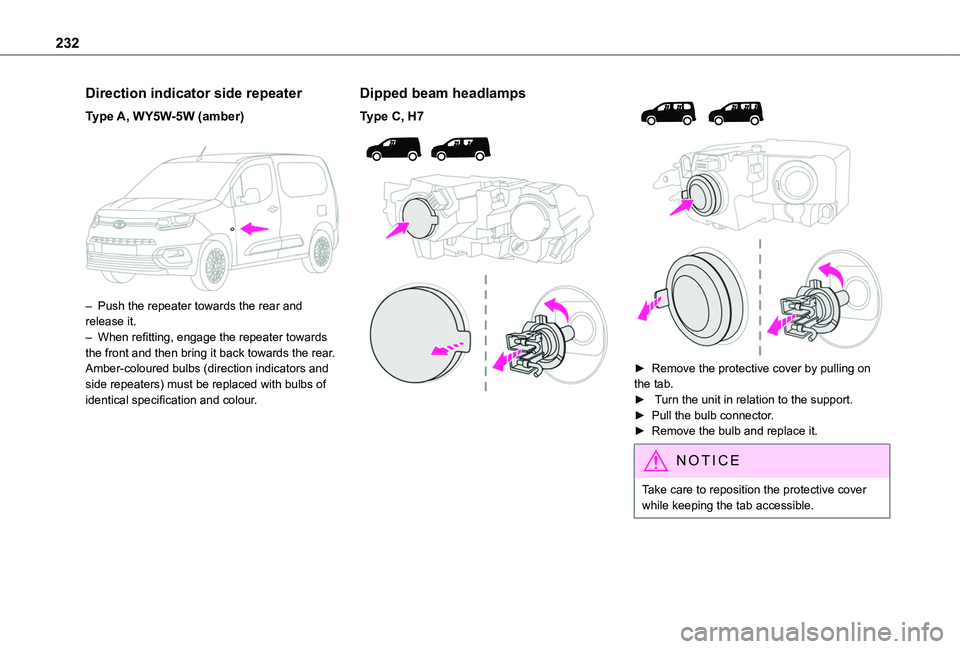
Direction indicator side repeater
Type A, WY5W-5W (amber)
– Push the repeater towards the rear and release it.– When refitting, engage the repeater towards the front and then bring it back towards the rear.Amber-coloured bulbs (direction indicators and side repeaters) must be replaced with bulbs of identical specification and colour.
Dipped beam headlamps
Type C, H7
► Remove the protective cover by pulling on the tab. ► Turn the unit in relation to the support.► Pull the bulb connector.► Remove the bulb and replace it.
NOTIC E
Take care to reposition the protective cover while keeping the tab accessible.
Page 233 of 320
233
In the event of a breakdown
8
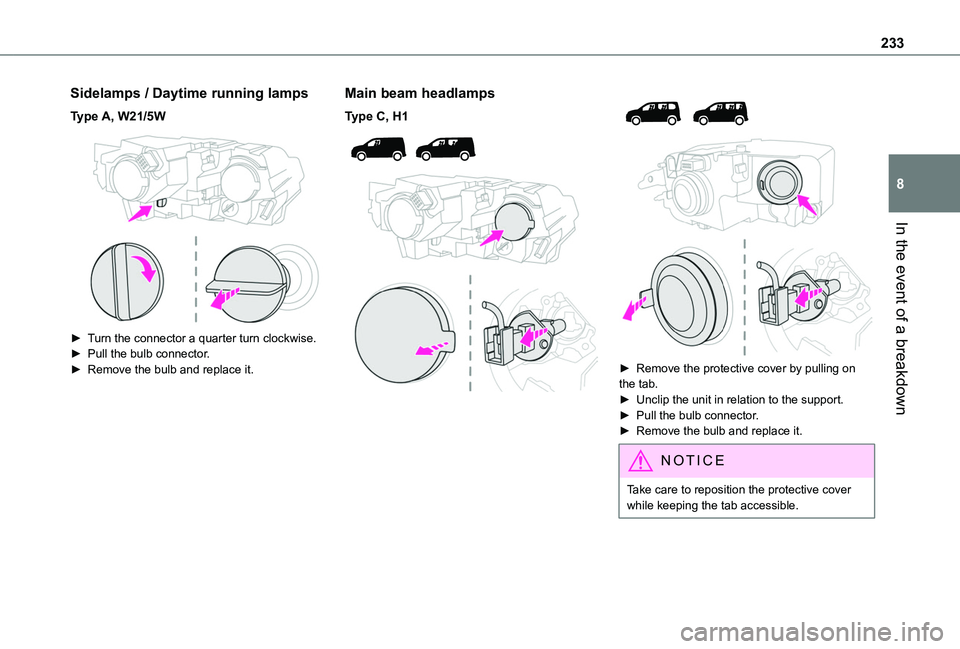
Sidelamps / Daytime running lamps
Type A, W21/5W
► Turn the connector a quarter turn clockwise.► Pull the bulb connector.► Remove the bulb and replace it.
Main beam headlamps
Type C, H1
► Remove the protective cover by pulling on the tab.► Unclip the unit in relation to the support.► Pull the bulb connector.► Remove the bulb and replace it.
NOTIC E
Take care to reposition the protective cover while keeping the tab accessible.
Page 306 of 320
306
A
ABS 103Accelerated charging unit (Wallbox) 195Accessories 99Access to the 3rd row 61Access to the spare wheel 225Active Safety Brake 167–170AdBlue® 215AdBlue® tank 217Additive, Diesel 213–214Adjusting headlamps 95Adjusting head restraints 62Adjusting seat 53, 61Adjusting the air distribution 81Adjusting the air flow 81Adjusting the date 275, 300Adjusting the height and reach of the steering wheel 55Adjusting the lumbar support 53Adjusting the temperature 81Adjusting the time 261, 274, 300
Advice on care and maintenance 193, 219Advice on driving 6, 127–128Airbags 11 2, 11 4–11 5, 11 7Airbags, curtain 11 3–11 5Airbags, front 11 2–11 4, 11 8Airbags, lateral 11 3–11 4Air conditioning 78, 82, 85Air conditioning, digital 83Air conditioning, dual-zone automatic 81
Air conditioning, electronic (with display screen) 85Air conditioning, manual 79–80Air intake 81Air vents 78Alarm 47–48Alarm, volumetric 47Android Auto connection 271, 289Anti-lock braking system (ABS) 103Antitheft / Immobiliser 33Apple CarPlay connection 270, 289Applications 290Area, loading 33–34, 43, 71Armrest 53Armrest, front 63Assistance call 100Assistance, emergency braking 169Audible warning 102Audio streaming (Bluetooth) 257–258, 269, 294
B
Battery 235Battery, 12 V 204, 213, 235–238Battery, ancillaries 235Battery, charging 237Battery, remote control 40–41, 87Bench seat, one-piece, fixed 61Blind spot sensors 174
Bluetooth (hands-free) 259, 271–272, 295–296Bluetooth (telephone) 259–260, 271–272, 295–296Bodywork 220Bonnet 209–210Boot lid 37–38, 40Bottle holder 63Brake discs 214–215Brake lamps 233Brakes 214–215Braking 146Braking assistance system 103Braking, automatic emergency 167–170Braking, dynamic emergency 135–137Brightness 260, 273Bulbs 229Bulbs (changing) 228–229Bulbs (changing, type) 229
C
Cable, audio 294Cable, Jack 294Capacity, fuel tank 190–192Cap, fuel filler 191–192Care of the bodywork 220CD 257CD, MP3 257Central locking 31, 37–38Changing a bulb 228–229
Page 308 of 320
308
ECO mode 146Economy mode 204Electric motor 5, 7, 29, 193, 206, 2 11, 235, 239, 251Electric windows 50Electronic brake force distribution (EBFD) 103Emergency braking assistance (EBA) 103Emergency call 100Emergency warning lamps 71, 102Emissions control system, SCR 215Energy economy mode 204Energy flows 29Energy recovery 146Engine compartment 210Engine, Diesel 190, 210, 221, 249–250Engine, petrol 210, 247Engines 246–247, 249–250Environment 6, 41, 87, 128Expanded traffic sign recognition 157
F
Fatigue detection 176–177Filling the AdBlue® tank 213, 217Filling the fuel tank 191–192Filter, air 214Filter, oil 214Filter, particle 213–214Filter, passenger compartment 78, 213Finisher 228Fitting a wheel 226–227
Fitting roof bars 208–209Fittings, interior 63, 67–68Flap, charging 202Flap, fuel filler 191–192Flap, removable 73Flashing indicators 91, 233Fluid, brake 212Fluid, engine coolant 212Foglamp, rear 90, 233Foglamps 232Foglamps, front 90, 229Foglamps, rear 90Folding the rear seats 59–60Frequency (radio) 292–293Fuel 6, 190Fuel consumption 6Fuel tank 190, 192Fuses 234
G
Gauge, fuel 190–192Gearbox, automatic 137, 139–145, 148, 214, 236Gearbox, manual 137–138, 148, 214Gear lever, automatic gearbox 139–142Gear lever, manual gearbox 138Gear shift indicator ~ Gear efficiency indicator 147Glove box 63G.P.S. 285
H
Hazard warning lamps 71, 102headlamp adjustment 95Headlamp adjustment 95Headlamps, automatic dipping 94–95, 175Headlamps, automatic illumination 92–93Headlamps, dipped beam 90, 229–230Headlamps, halogen 229Headlamps, main beam 90, 229, 231Head restraints, front 62Head restraints, rear 59Head-up display 151–152Heating 78–80, 85–86Heating, additional 47, 85–86Heating, programmable 47, 85–87High voltage 193Hill Assist Descent Control (HADC) 106–107Hill Descent Control 106–107Hill start assist 137–138Histogramme, fuel consumption 29Horn 102
I
Ignition 132–133, 297Ignition on 133Immobiliser, electronic 129Indicator, coolant temperature 18Indicator lamps, operation 90Indicators, direction 91