2022 TOYOTA PROACE CITY VERSO child lock
[x] Cancel search: child lockPage 52 of 320
52
Electric windows
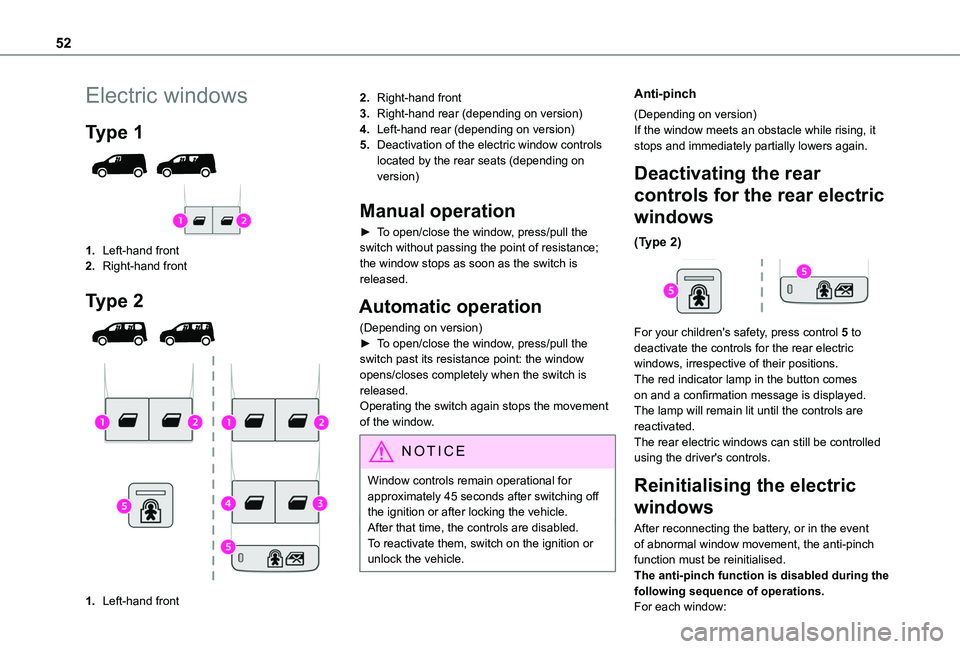
Type 1
1.Left-hand front
2.Right-hand front
Type 2
1.Left-hand front
2.Right-hand front
3.Right-hand rear (depending on version)
4.Left-hand rear (depending on version)
5.Deactivation of the electric window controls located by the rear seats (depending on version)
Manual operation
► To open/close the window, press/pull the switch without passing the point of resistance; the window stops as soon as the switch is released.
Automatic operation
(Depending on version)► To open/close the window, press/pull the switch past its resistance point: the window opens/closes completely when the switch is released.Operating the switch again stops the movement of the window.
NOTIC E
Window controls remain operational for approximately 45 seconds after switching off the ignition or after locking the vehicle.After that time, the controls are disabled. To reactivate them, switch on the ignition or unlock the vehicle.
Anti-pinch
(Depending on version)If the window meets an obstacle while rising, it stops and immediately partially lowers again.
Deactivating the rear
controls for the rear electric
windows
(Type 2)
For your children's safety, press control 5 to deactivate the controls for the rear electric windows, irrespective of their positions.The red indicator lamp in the button comes on and a confirmation message is displayed. The lamp will remain lit until the controls are reactivated.The rear electric windows can still be controlled using the driver's controls.
Reinitialising the electric
windows
After reconnecting the battery, or in the event of abnormal window movement, the anti-pinch function must be reinitialised.The anti-pinch function is disabled during the following sequence of operations.For each window:
Page 78 of 320
78
WARNI NG
The partition must not be moved with the latches extended - risk of scratches or damage to the plastic trims!
WARNI NG
The partition must never be removed to
convert the vehicle from a commercial vehicle to a passenger vehicle.This would pose a risk to the safety of users due to the absence of a child lock on the tailgate (mandatory on passenger vehicles).
WARNI NG
Pay attention to the loading height behind the partition and the size of the long load in the protective cover: the driver must keep a good field of vision.
WARNI NG
Do not place loads between the partition and the bench seat backrest.
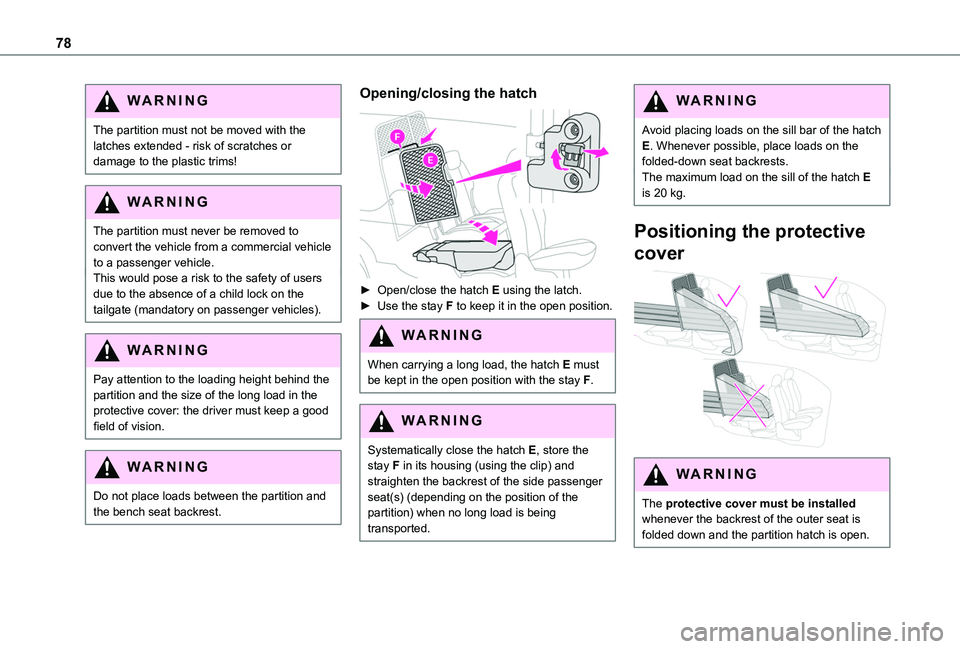
Opening/closing the hatch
► Open/close the hatch E using the latch.► Use the stay F to keep it in the open position.
WARNI NG
When carrying a long load, the hatch E must be kept in the open position with the stay F.
WARNI NG
Systematically close the hatch E, store the stay F in its housing (using the clip) and straighten the backrest of the side passenger seat(s) (depending on the position of the partition) when no long load is being transported.
WARNI NG
Avoid placing loads on the sill bar of the hatch E. Whenever possible, place loads on the folded-down seat backrests.The maximum load on the sill of the hatch E is 20 kg.
Positioning the protective
cover
WARNI NG
The protective cover must be installed whenever the backrest of the outer seat is folded down and the partition hatch is open.
Page 118 of 320
11 8
WARNI NG
Installing a booster seatThe chest part of the seat belt must be positioned on the child's shoulder without touching the neck.Ensure that the lap part of the seat belt passes correctly over the child's thighs.Use a booster seat with backrest, equipped with a belt guide at shoulder level.
WARNI NG
Additional protectionsTo prevent accidental opening of the doors and rear windows, use the "Child lock".Take care not to open the rear windows by more than one third.To protect young children from the rays of the sun, fit side blinds on the rear windows.As a safety precaution, do not leave:– A child alone and unattended in a vehicle.– A child or an animal in a vehicle which is exposed to the sun, with the windows closed.– The keys within reach of children inside the vehicle.
Child seat at the rear
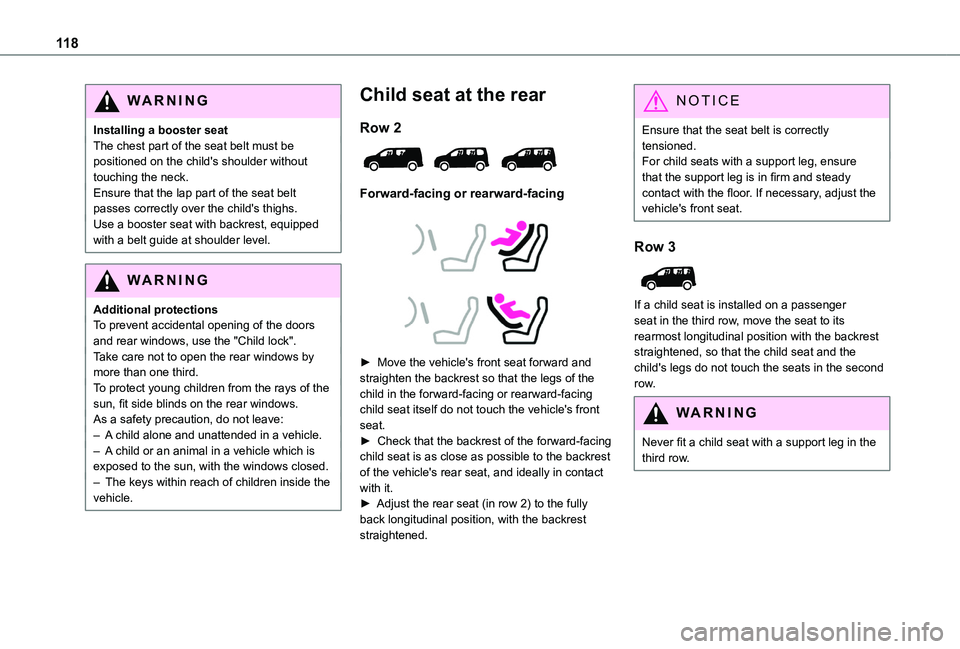
Row 2
Forward-facing or rearward-facing
► Move the vehicle's front seat forward and straighten the backrest so that the legs of the child in the forward-facing or rearward-facing child seat itself do not touch the vehicle's front seat.► Check that the backrest of the forward-facing child seat is as close as possible to the backrest of the vehicle's rear seat, and ideally in contact with it.► Adjust the rear seat (in row 2) to the fully back longitudinal position, with the backrest straightened.
NOTIC E
Ensure that the seat belt is correctly tensioned.For child seats with a support leg, ensure that the support leg is in firm and steady contact with the floor. If necessary, adjust the vehicle's front seat.
Row 3
If a child seat is installed on a passenger seat in the third row, move the seat to its rearmost longitudinal position with the backrest straightened, so that the child seat and the child's legs do not touch the seats in the second row.
WARNI NG
Never fit a child seat with a support leg in the
third row.
Page 128 of 320
128
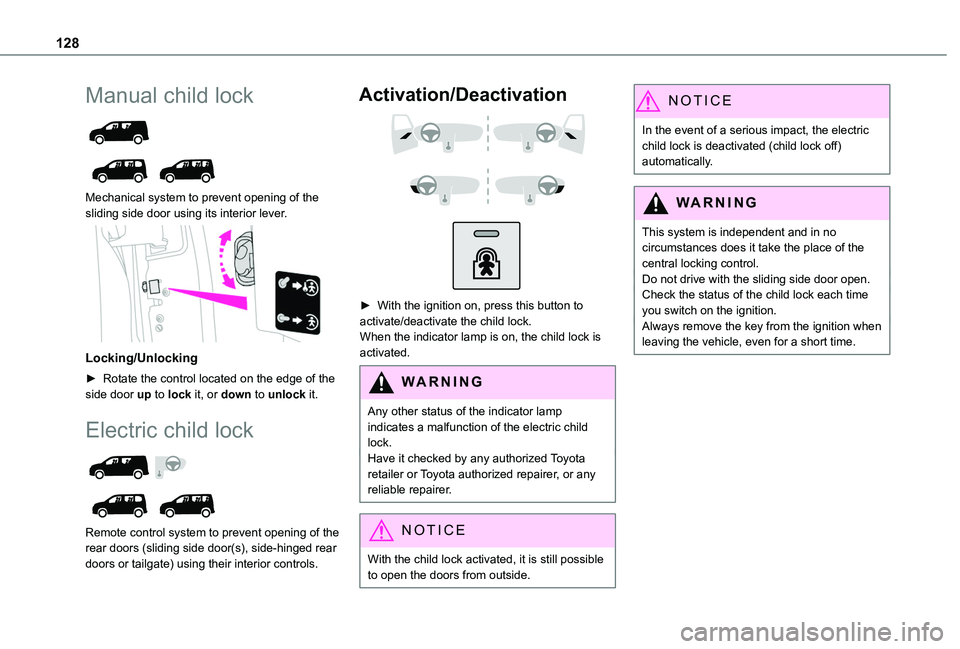
Manual child lock
Mechanical system to prevent opening of the sliding side door using its interior lever.
Locking/Unlocking
► Rotate the control located on the edge of the side door up to lock it, or down to unlock it.
Electric child lock
Remote control system to prevent opening of the rear doors (sliding side door(s), side-hinged rear doors or tailgate) using their interior controls.
Activation/Deactivation
► With the ignition on, press this button to activate/deactivate the child lock.When the indicator lamp is on, the child lock is activated.
WARNI NG
Any other status of the indicator lamp indicates a malfunction of the electric child lock.Have it checked by any authorized Toyota retailer or Toyota authorized repairer, or any reliable repairer.
NOTIC E
With the child lock activated, it is still possible to open the doors from outside.
NOTIC E
In the event of a serious impact, the electric child lock is deactivated (child lock off) automatically.
WARNI NG
This system is independent and in no circumstances does it take the place of the central locking control.Do not drive with the sliding side door open.Check the status of the child lock each time you switch on the ignition.Always remove the key from the ignition when leaving the vehicle, even for a short time.
Page 219 of 320
219
Practical information
7
If swallowed, immediately wash out the mouth with clean water and then drink plenty of water.In certain conditions (high temperature, for example), the risk of release of ammonia cannot be excluded: do not inhale the fluid. Ammonia vapours have an irritant effect on mucous membranes (eyes, nose and throat).
WARNI NG
Store AdBlue® out of the reach of children, in
its original container.
Precautions for use
AdBlue® is a urea-based solution. This fluid is non-flammable, colourless and odourless (when kept in a cool place).In the event of contact with the skin, wash the affected area with soap and running water. In the event of contact with the eyes, immediately rinse the eyes with large amounts of water or with an eye wash solution for at least 15 minutes. Seek medical attention if you feel a persistent burning sensation or irritation.If swallowed, immediately wash out the mouth with clean water and then drink plenty of water.In certain conditions (high temperature, for example), the risk of release of ammonia cannot be excluded: do not inhale the fluid. Ammonia vapours have an irritant effect on mucous membranes (eyes, nose and throat).
WARNI NG
Store AdBlue® out of the reach of children, in its original container.
Procedure
Before starting the top-up procedure, ensure that the vehicle is parked on a flat and level surface.In wintry conditions, ensure that the temperature of the vehicle is above -11°C. Otherwise the AdBlue® may be frozen and so cannot be poured into the tank. Park the vehicle in a warmer area for a few hours to allow the top-up to be carried out.
WARNI NG
Never pour the AdBlue® into the Diesel fuel tank.
WARNI NG
If any AdBlue® is splashed, or if there are any spillages on the bodywork, rinse immediately with cold water or wipe with a damp cloth.If the fluid has crystallised, clean it off using a sponge and hot water.
WARNI NG
Important: in the event of a top-up after a breakdown because of a lack of AdBlue, it is essential to wait around 5 minutes before switching on the ignition, without opening the driver’s door, unlocking the vehicle, inserting the key into the ignition switch, or bringing the key for the "Keyless Entry and Starting" system into the passenger compartment.Switch on the ignition, then wait for 10 seconds before starting the engine.
► Switch off the ignition and remove the key from the switch to switch off the engine.or► With Keyless Entry and Starting, press the "START/STOP" button to switch off the engine.
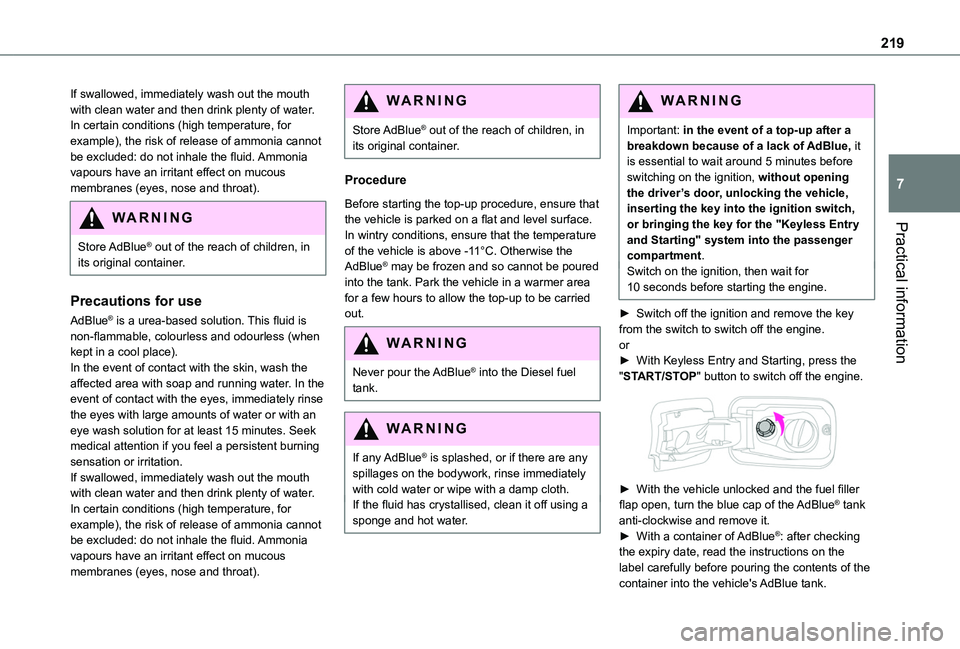
► With the vehicle unlocked and the fuel filler flap open, turn the blue cap of the AdBlue® tank anti-clockwise and remove it.► With a container of AdBlue®: after checking the expiry date, read the instructions on the label carefully before pouring the contents of the container into the vehicle's AdBlue tank.
Page 307 of 320
307
Alphabetical index
Changing a fuse 234Changing a wheel 222, 225Changing a wiper blade 97Changing the remote control battery 40Changing to free-wheeling 239Charger, induction 66Charger, wireless 66Charging cable 196Charging cable (Electric) 195Charging connector (Electric) 194, 200–201, 203Charging flap (Electric) 194, 200–201, 203Charging system (Electric) 5, 7, 29, 193, 2 11Charging the traction battery (Electric) 193, 200–201, 203Checking the levels 2 11–212Checking tyre pressures (using the kit) 223–224Checks 210, 213–215Checks, routine 213–215Child lock 126Children 111, 120, 124–126
Children (safety) 126Child seats 111, 11 5–11 7, 11 9–121, 124–125Child seats, conventional 11 9Child seats, i-Size 125Child seats, ISOFIX 124–126Cleaning (advice) 193, 219–220Closing the doors 31, 37–38Collision Risk Alert 167–169Configuration, vehicle 28–29Connected applications 290
Connection, Bluetooth 259–260, 271–272, 290–291, 295–296Connection, Wi-Fi network 291Connectivity 289Consumption figures 29Container, AdBlue® 216–217Control, emergency boot release 40Control, emergency door 32, 39Control, heated seats 55Control stalk, lighting 90–91Control stalk, wipers 95–98Control unit 195–196Courtesy lamp 88Courtesy lamp, front 89Courtesy lamp, rear 89Courtesy lamps 89Cover, load space 69Cruise control 156–157, 160–163, 167Cruise control, adaptive 163Cruise control by speed limit recognition 156–157Cruise control, dynamic
with Stop function 156–157Cup holder 63
D
DAB (Digital Audio Broadcasting) - Digital radio 257, 268, 293Date (setting) 275, 300Daytime running lamps 92, 229, 231
Deactivating the passenger airbag 11 3, 11 7–11 8Deactivation of DSC (ESC) 104Deadlocking 38Deferred charging 29, 202Deferred charging (Electric) 29, 194, 200Defrosting 56, 83Demisting 83Demisting, rear 56, 84Demisting, rear screen 56, 84Dimensions 241Dipstick 2 11Direction indicators 91, 229, 232–233Display, head-up 151–152Domestic charging 196Domestic charging (Electric) 201, 203, 251Doors, side 45Doors, side-hinged 37–38Driver’s attention warning 176–177Drive selector (Electric) 145, 214Driving 127–128Driving aids camera (warnings) 153
Driving aids (recommendations) 152Driving economically 6Driving modes 146Dynamic stability control (DSC) 103, 105–106
E
EBFD 103Eco-driving (advice) 6
Page 309 of 320
309
Alphabetical index
Inflating tyres 215, 252Inflating tyres and accessories (using the kit) 223–224Infrared camera 153Instrument panel 8, 10, 154Internet browser 286, 290ISOFIX 124
J
Jack 225, 294Jump starting 236
K
Key 31, 33–35, 37, 39Key, electronic 31, 133Keyless Entry and Starting 32–38, 130, 132–133Key not recognised 133
Key with remote control 37–38Kit, hands-free 259, 271–272, 295–296Kit, puncture repair 221Kit, temporary puncture repair 221, 223–225
L
Labels 6, 61Labels, identification 252
Lamps, parking 91Lamps, rear 233Lane departure warning active 171LEDs - Light-emitting diodes 92, 229Level, AdBlue® 213Level, brake fluid 212Level, Diesel additive 213–214Level, engine coolant 18, 212Level, engine oil 2 11Level, headlamp wash 96Levels and checks 210–212Level, screenwash fluid 96, 212Light-emitting diodes - LEDs 92, 229Lighting 90Lighting, exterior 90, 93Lighting, guide-me home 93Lighting, welcome 93Loading 71, 208Load reduction mode 204Load restraint 70Locating your vehicle 32Locking 32–33, 37–38
Locking from the inside 42–43Long load support bar 46Low fuel level 190–192Lumbar 53
M
Mains socket (domestic network) 195Maintenance (advice) 193, 219
Maintenance, routine 18, 154, 213Manoeuvring aids (recommendations) 152Markings, identification 252Mat 63, 154Memorising a speed 167Menu 270Menu, main 28Menus (audio) 254–255, 265–266, 278–279Menu short cuts 28Messages 297Messages, quick 298Mirror, child surveillance 57Mirror, rear view 57Mirrors, door 56, 84, 174Misfuel prevention 192Mobile application 29, 87, 202Motor, electric 132, 2 11, 251Mountings, ISOFIX 122
N
Navigation 284–286Navigation, connected 286–288Net 69–70Net, high load retaining 68Number plate lamps 234
O
Obstacle detection 177