2022 TOYOTA PROACE CITY VERSO EV mirror
[x] Cancel search: mirrorPage 177 of 320
177
Driving
6
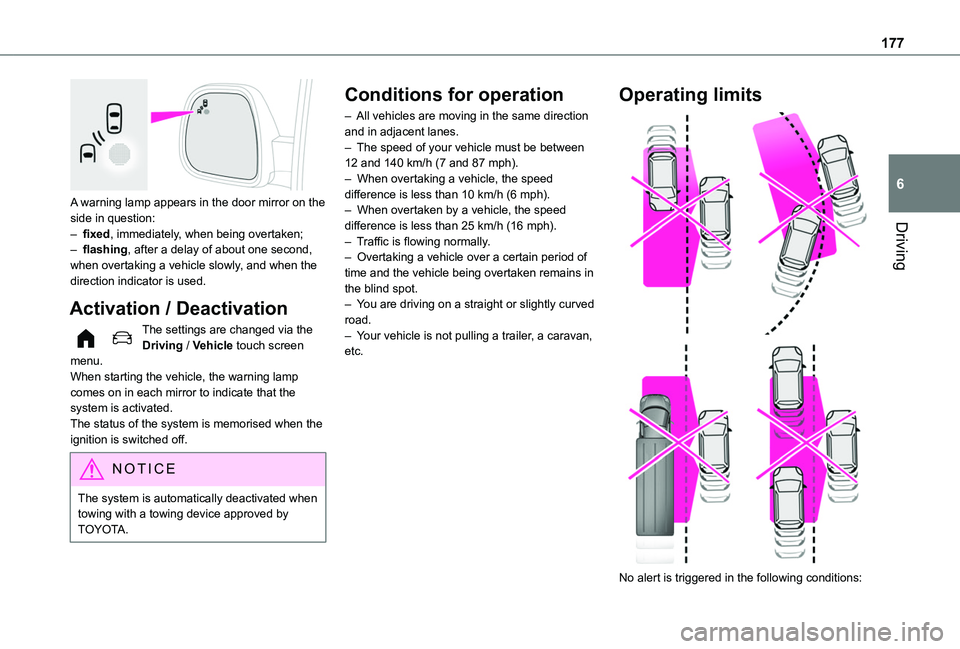
A warning lamp appears in the door mirror on the side in question:– fixed, immediately, when being overtaken;– flashing, after a delay of about one second, when overtaking a vehicle slowly, and when the direction indicator is used.
Activation / Deactivation
The settings are changed via the Driving / Vehicle touch screen menu.When starting the vehicle, the warning lamp comes on in each mirror to indicate that the system is activated.The status of the system is memorised when the ignition is switched off.
NOTIC E
The system is automatically deactivated when towing with a towing device approved by TOYOTA.
Conditions for operation
– All vehicles are moving in the same direction and in adjacent lanes.– The speed of your vehicle must be between 12 and 140 km/h (7 and 87 mph).– When overtaking a vehicle, the speed difference is less than 10 km/h (6 mph).– When overtaken by a vehicle, the speed difference is less than 25 km/h (16 mph).– Traffic is flowing normally.– Overtaking a vehicle over a certain period of time and the vehicle being overtaken remains in the blind spot.– You are driving on a straight or slightly curved road.– Your vehicle is not pulling a trailer, a caravan, etc.
Operating limits
No alert is triggered in the following conditions:
Page 178 of 320
178
– In the presence of non-moving objects (parked vehicles, barriers, street lamps, road signs, etc.).– Oncoming traffic.– Driving on a winding road or a sharp corner.– When overtaking or being overtaken by a very long vehicle (lorry, bus, etc.) that is detected in the rear blind spot but is also present in the driver’s front field of vision.– When overtaking quickly.– In very heavy traffic: vehicles detected in front and behind are confused with a lorry or a stationary object.
Malfunction
If the event of malfunction, this warning lamp comes on in the instrument panel, accompanied by the display of a message.Contact a TOYOTA dealer or a qualified workshop to have the system checked.
NOTIC E
The system may suffer temporary interference in certain weather conditions (rain, hail, etc.).In particular, driving on a wet surface or moving from a dry area to a wet area can cause false alerts (for example, the presence of a fog of water droplets in the blind spot angle is interpreted as a vehicle).
In bad or wintry weather, ensure that the sensors are not covered by mud, ice or snow.Take care not to cover the warning zone in the door mirrors or the detection zones on the front and rear bumpers with adhesive labels or other objects; they may hamper correct operation of the system.
Distraction detection
WARNI NG
Refer to the General recommendations on the use of driving and manoeuvring aids.
Depending on version, the function consists of either the "Coffee Break Alert" system alone or combined with the "Driver Attention Alert" system.
WARNI NG
These systems are in no way designed to keep the driver awake or to prevent the driver from falling asleep at the wheel. It is the driver’s responsibility to stop if feeling tired.Take a break if you are feeling tired or at least
every 2 hours.
Activation/Deactivation
The settings are changed via the Driving / Vehicle touch screen menu.The state of the system is memorised when the ignition is switched off.
Coffee Break Alert
The system triggers an alert as soon as it detects that the driver has not taken a break after two hours of driving at a speed above 43 mph (70 km/h).This alert is issued via the display of a message encouraging the driver to take a break, accompanied by an audible signal.If the driver does not follow this advice, the alert is repeated hourly until the vehicle is stopped.The system resets itself if one of the following conditions is met:– With the engine running, the vehicle has been stationary for more than 15 minutes.– The ignition has been switched off for a few
minutes.– The driver's seat belt is unfastened and their door is opened.
NOTIC E
As soon as the speed of the vehicle drops below 43 mph (70 km/h), the system goes into standby.The driving time is counted again once the speed is above 43 mph (70 km/h).
Page 182 of 320
182
Reversing camera
WARNI NG
For more information, refer to the General recommendations on the use of driving and manoeuvring aids.
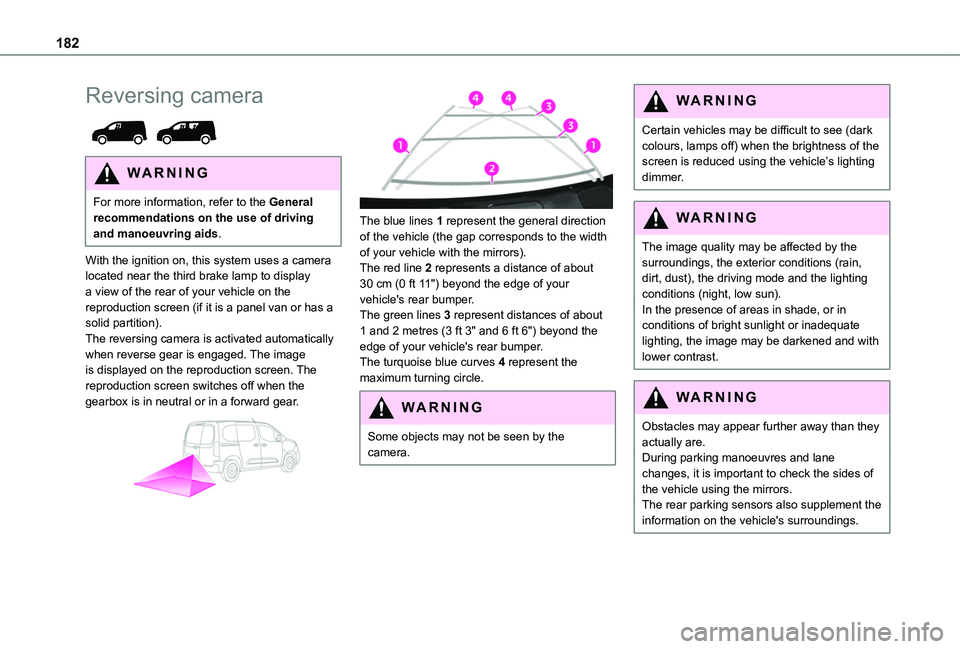
With the ignition on, this system uses a camera located near the third brake lamp to display a view of the rear of your vehicle on the reproduction screen (if it is a panel van or has a solid partition).The reversing camera is activated automatically when reverse gear is engaged. The image is displayed on the reproduction screen. The reproduction screen switches off when the gearbox is in neutral or in a forward gear.
The blue lines 1 represent the general direction of the vehicle (the gap corresponds to the width of your vehicle with the mirrors).The red line 2 represents a distance of about 30 cm (0 ft 11") beyond the edge of your vehicle's rear bumper.The green lines 3 represent distances of about 1 and 2 metres (3 ft 3" and 6 ft 6") beyond the edge of your vehicle's rear bumper.The turquoise blue curves 4 represent the maximum turning circle.
WARNI NG
Some objects may not be seen by the camera.
WARNI NG
Certain vehicles may be difficult to see (dark colours, lamps off) when the brightness of the screen is reduced using the vehicle’s lighting dimmer.
WARNI NG
The image quality may be affected by the surroundings, the exterior conditions (rain, dirt, dust), the driving mode and the lighting conditions (night, low sun).In the presence of areas in shade, or in conditions of bright sunlight or inadequate lighting, the image may be darkened and with lower contrast.
WARNI NG
Obstacles may appear further away than they actually are.During parking manoeuvres and lane changes, it is important to check the sides of the vehicle using the mirrors.The rear parking sensors also supplement the information on the vehicle's surroundings.
Page 184 of 320
184
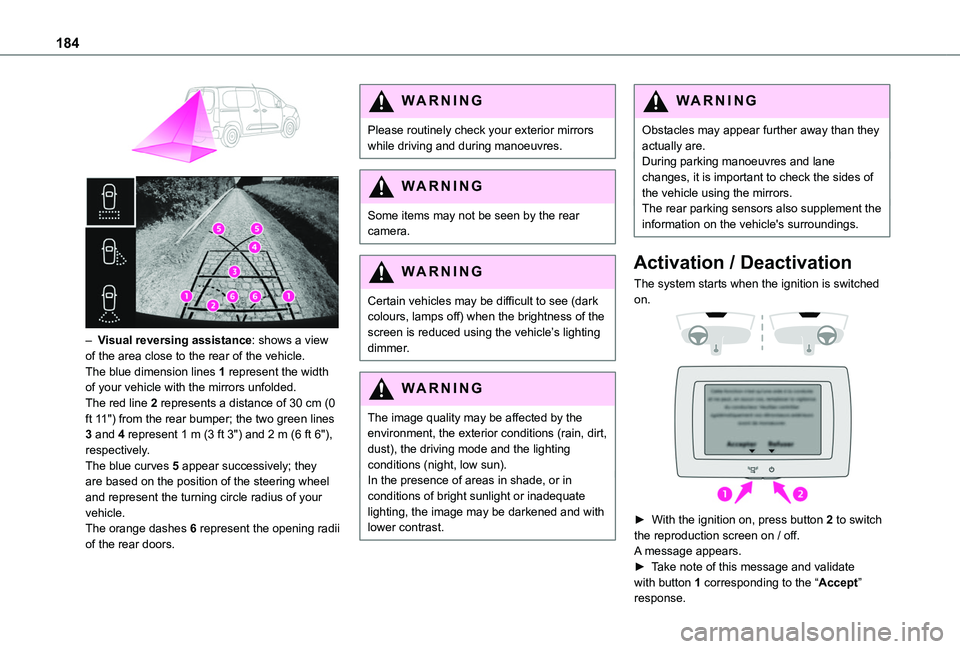
– Visual reversing assistance: shows a view of the area close to the rear of the vehicle.The blue dimension lines 1 represent the width of your vehicle with the mirrors unfolded.The red line 2 represents a distance of 30 cm (0 ft 11") from the rear bumper; the two green lines 3 and 4 represent 1 m (3 ft 3") and 2 m (6 ft 6"), respectively.The blue curves 5 appear successively; they are based on the position of the steering wheel and represent the turning circle radius of your vehicle.The orange dashes 6 represent the opening radii of the rear doors.
WARNI NG
Please routinely check your exterior mirrors while driving and during manoeuvres.
WARNI NG
Some items may not be seen by the rear camera.
WARNI NG
Certain vehicles may be difficult to see (dark colours, lamps off) when the brightness of the screen is reduced using the vehicle’s lighting dimmer.
WARNI NG
The image quality may be affected by the environment, the exterior conditions (rain, dirt, dust), the driving mode and the lighting conditions (night, low sun).In the presence of areas in shade, or in conditions of bright sunlight or inadequate lighting, the image may be darkened and with lower contrast.
WARNI NG
Obstacles may appear further away than they actually are.During parking manoeuvres and lane changes, it is important to check the sides of the vehicle using the mirrors.The rear parking sensors also supplement the information on the vehicle's surroundings.
Activation / Deactivation
The system starts when the ignition is switched on.
► With the ignition on, press button 2 to switch the reproduction screen on / off.
A message appears.► Take note of this message and validate with button 1 corresponding to the “Accept” response.
Page 187 of 320
187
Driving
6
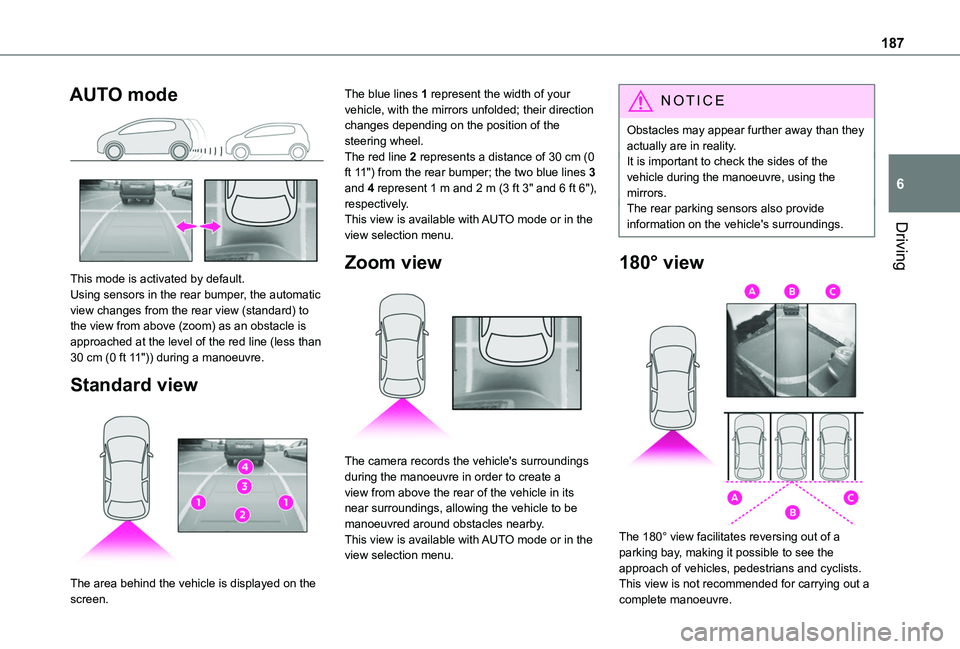
AUTO mode
This mode is activated by default.Using sensors in the rear bumper, the automatic view changes from the rear view (standard) to the view from above (zoom) as an obstacle is approached at the level of the red line (less than 30 cm (0 ft 11")) during a manoeuvre.
Standard view
The area behind the vehicle is displayed on the
screen.
The blue lines 1 represent the width of your vehicle, with the mirrors unfolded; their direction changes depending on the position of the steering wheel.The red line 2 represents a distance of 30 cm (0 ft 11") from the rear bumper; the two blue lines 3 and 4 represent 1 m and 2 m (3 ft 3" and 6 ft 6"), respectively.This view is available with AUTO mode or in the view selection menu.
Zoom view
The camera records the vehicle's surroundings during the manoeuvre in order to create a view from above the rear of the vehicle in its near surroundings, allowing the vehicle to be manoeuvred around obstacles nearby.This view is available with AUTO mode or in the view selection menu.
NOTIC E
Obstacles may appear further away than they actually are in reality.It is important to check the sides of the vehicle during the manoeuvre, using the mirrors.The rear parking sensors also provide information on the vehicle's surroundings.
180° view
The 180° view facilitates reversing out of a parking bay, making it possible to see the approach of vehicles, pedestrians and cyclists.This view is not recommended for carrying out a
complete manoeuvre.
Page 244 of 320
244
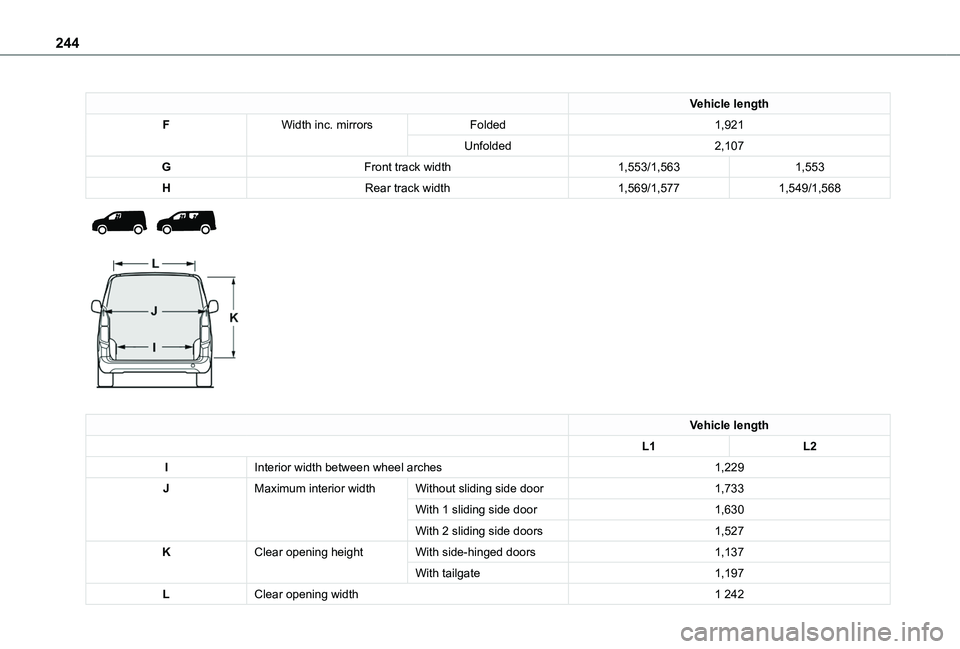
Vehicle length
FWidth inc. mirrorsFolded1,921
Unfolded2,107
GFront track width1,553/1,5631,553
HRear track width1,569/1,5771,549/1,568
Vehicle length
L1L2
IInterior width between wheel arches1,229
JMaximum interior widthWithout sliding side door1,733
With 1 sliding side door1,630
With 2 sliding side doors1,527
KClear opening heightWith side-hinged doors1,137
With tailgate1,197
LClear opening width1 242
Page 247 of 320
247
Technical data
9
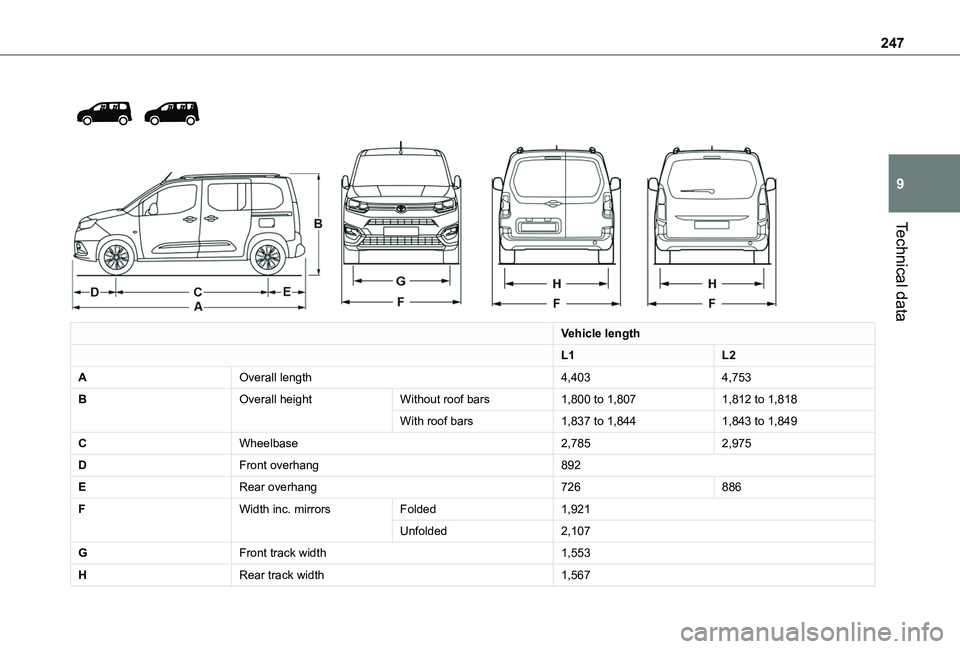
Vehicle length
L1L2
AOverall length4,4034,753
BOverall heightWithout roof bars1,800 to 1,8071,812 to 1,818
With roof bars1,837 to 1,8441,843 to 1,849
CWheelbase2,7852,975
DFront overhang892
ERear overhang726886
FWidth inc. mirrorsFolded1,921
Unfolded2,107
GFront track width1,553
HRear track width1,567
Page 280 of 320
280
– Media player connected via the auxiliary socket (depending on equipment).– Video (depending on equipment).
NOTIC E
In the "Settings" menu, it is possible to create a profile for an individual or for a group of people with shared interests, and configure a wide range of settings (radio presets, audio settings, navigation history, favourite contacts, etc.). Settings are applied automatically.
NOTIC E
In very hot conditions, the volume may be limited to protect the system. It may enter standby mode (with the screen and sound off) for 5 minutes or more.
The system will resume normal operation when the temperature in the passenger compartment has dropped.
Steering mounted controls
Voice control:This control is located on the steering wheel or at the end of the lighting control lever (depending on equipment).Short press, system voice control.Long press, voice control for smartphone or CarPlay®, MirrorLinkTM (availability depending on country), Android Auto via the system.Increase volume.
Decrease volume.Mute by pressing the volume increase and decrease buttons simultaneously (depending on equipment).Restore the sound by pressing one of the two volume buttons.Media (short press): change the multimedia source.Telephone (short press): start telephone call.Call in progress (short press): access
telephone menu.Telephone (long press): reject an incoming call, end call; when no call is in progress, access telephone menu.Radio (rotate): automatic search for the previous / next station.Media (rotate): previous / next track, move in a list.Short press: confirm a selection; if nothing selected, access to presets.
Radio: display the list of stations.Media: display the list of tracks.Radio (press and hold): update the list of stations received.
Menus
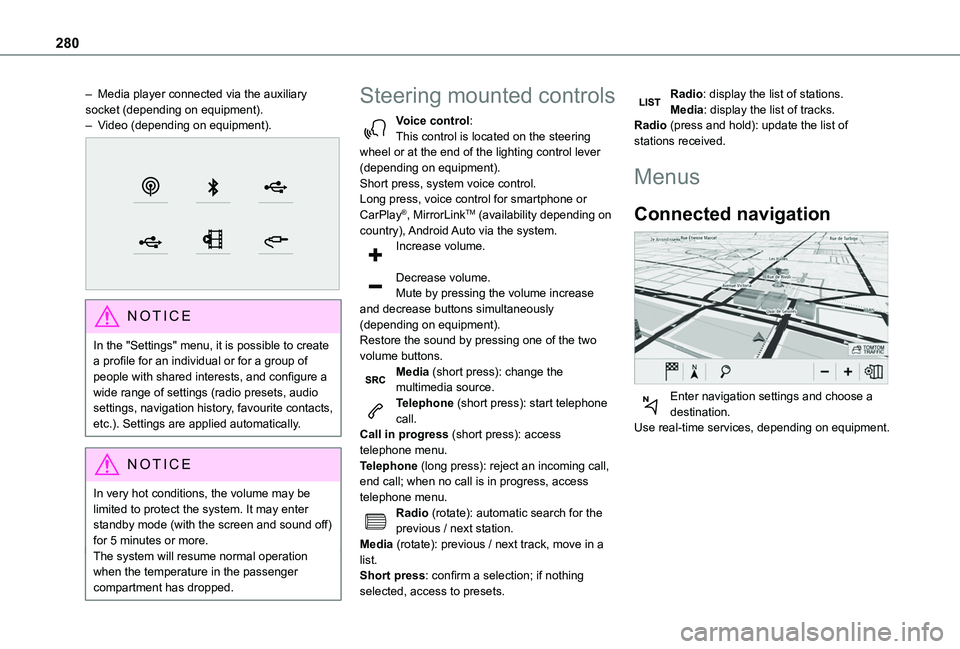
Connected navigation
Enter navigation settings and choose a destination.Use real-time services, depending on equipment.