2022 TOYOTA PROACE CITY parking sensors
[x] Cancel search: parking sensorsPage 186 of 320
186
Top Rear Vision
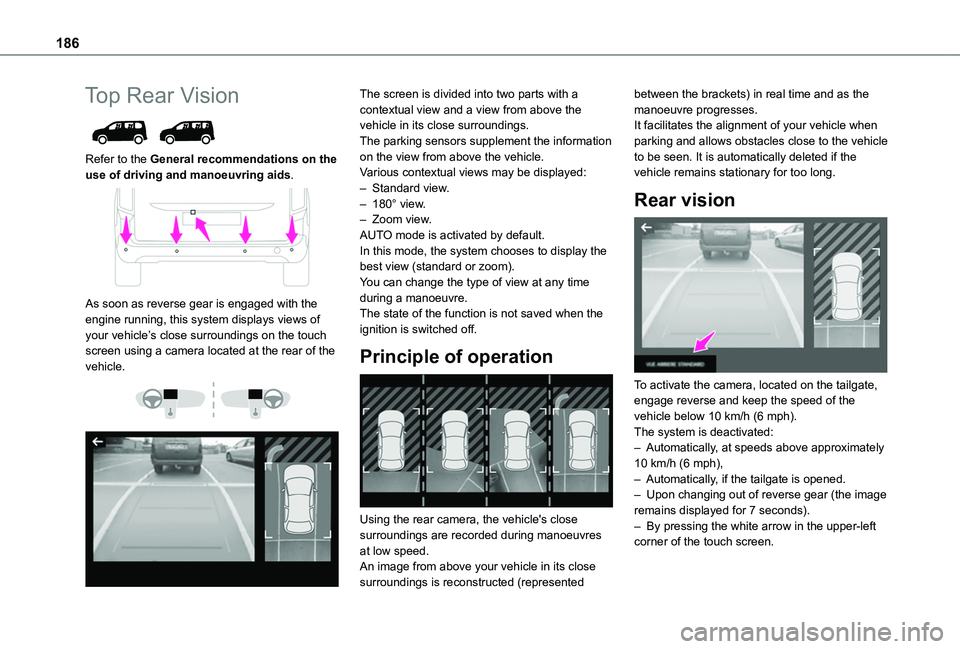
Refer to the General recommendations on the use of driving and manoeuvring aids.
As soon as reverse gear is engaged with the engine running, this system displays views of your vehicle’s close surroundings on the touch screen using a camera located at the rear of the vehicle.
The screen is divided into two parts with a contextual view and a view from above the vehicle in its close surroundings.The parking sensors supplement the information on the view from above the vehicle.Various contextual views may be displayed:– Standard view.– 180° view.– Zoom view.AUTO mode is activated by default.In this mode, the system chooses to display the best view (standard or zoom).You can change the type of view at any time during a manoeuvre.The state of the function is not saved when the ignition is switched off.
Principle of operation
Using the rear camera, the vehicle's close surroundings are recorded during manoeuvres
at low speed.An image from above your vehicle in its close surroundings is reconstructed (represented
between the brackets) in real time and as the manoeuvre progresses.It facilitates the alignment of your vehicle when parking and allows obstacles close to the vehicle to be seen. It is automatically deleted if the vehicle remains stationary for too long.
Rear vision
To activate the camera, located on the tailgate, engage reverse and keep the speed of the vehicle below 10 km/h (6 mph).The system is deactivated:– Automatically, at speeds above approximately 10 km/h (6 mph),– Automatically, if the tailgate is opened.– Upon changing out of reverse gear (the image remains displayed for 7 seconds).– By pressing the white arrow in the upper-left corner of the touch screen.
Page 187 of 320
187
Driving
6
AUTO mode
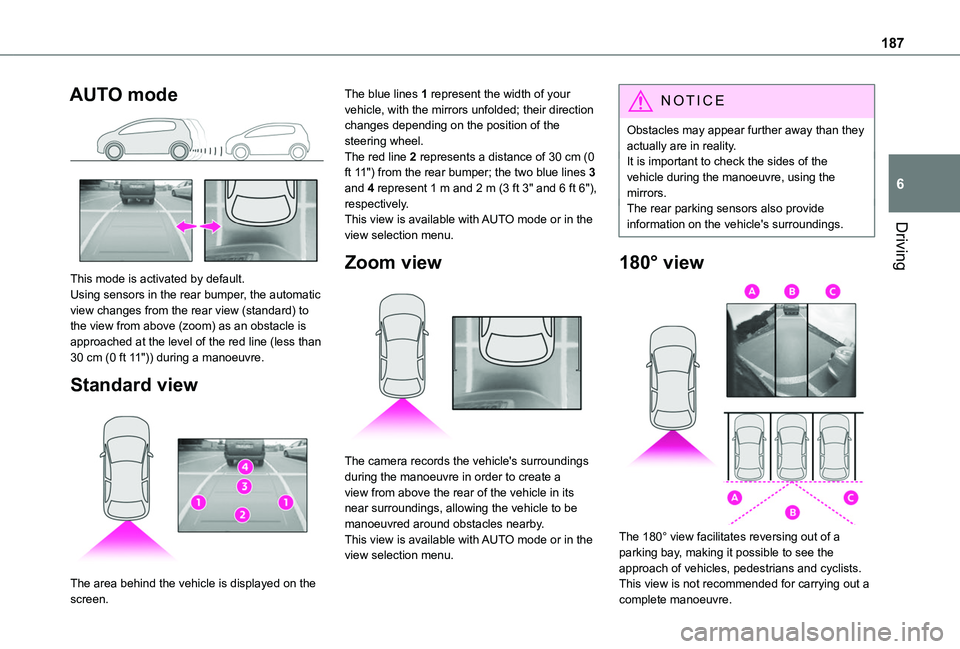
This mode is activated by default.Using sensors in the rear bumper, the automatic view changes from the rear view (standard) to the view from above (zoom) as an obstacle is approached at the level of the red line (less than 30 cm (0 ft 11")) during a manoeuvre.
Standard view
The area behind the vehicle is displayed on the
screen.
The blue lines 1 represent the width of your vehicle, with the mirrors unfolded; their direction changes depending on the position of the steering wheel.The red line 2 represents a distance of 30 cm (0 ft 11") from the rear bumper; the two blue lines 3 and 4 represent 1 m and 2 m (3 ft 3" and 6 ft 6"), respectively.This view is available with AUTO mode or in the view selection menu.
Zoom view
The camera records the vehicle's surroundings during the manoeuvre in order to create a view from above the rear of the vehicle in its near surroundings, allowing the vehicle to be manoeuvred around obstacles nearby.This view is available with AUTO mode or in the view selection menu.
NOTIC E
Obstacles may appear further away than they actually are in reality.It is important to check the sides of the vehicle during the manoeuvre, using the mirrors.The rear parking sensors also provide information on the vehicle's surroundings.
180° view
The 180° view facilitates reversing out of a parking bay, making it possible to see the approach of vehicles, pedestrians and cyclists.This view is not recommended for carrying out a
complete manoeuvre.
Page 188 of 320
188
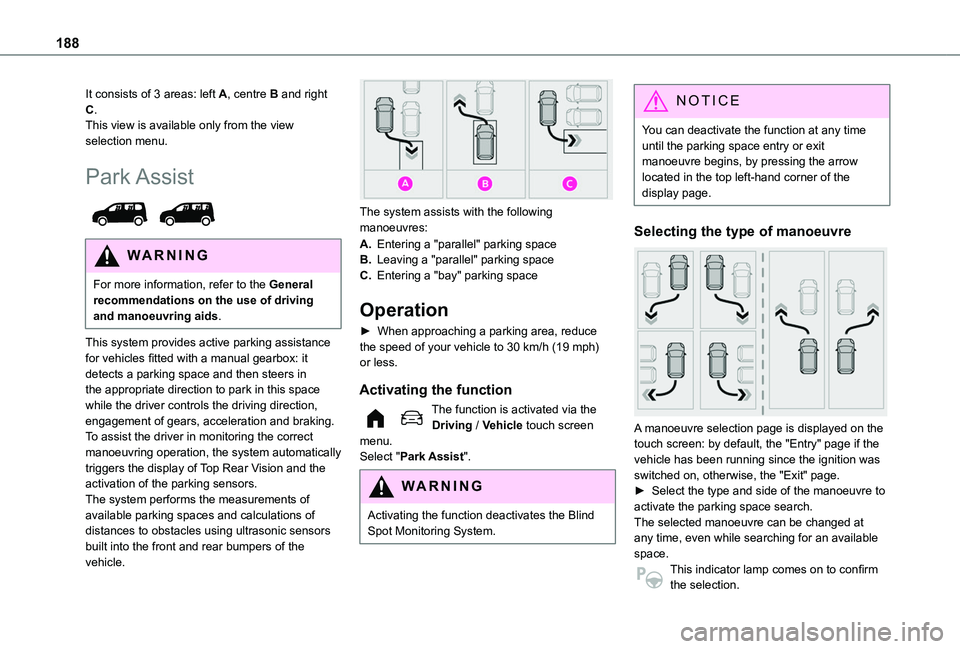
It consists of 3 areas: left A, centre B and right C.This view is available only from the view selection menu.
Park Assist
WARNI NG
For more information, refer to the General recommendations on the use of driving and manoeuvring aids.
This system provides active parking assistance for vehicles fitted with a manual gearbox: it detects a parking space and then steers in the appropriate direction to park in this space while the driver controls the driving direction, engagement of gears, acceleration and braking.To assist the driver in monitoring the correct manoeuvring operation, the system automatically triggers the display of Top Rear Vision and the activation of the parking sensors.The system performs the measurements of available parking spaces and calculations of distances to obstacles using ultrasonic sensors built into the front and rear bumpers of the vehicle.
The system assists with the following manoeuvres:
A.Entering a "parallel" parking space
B.Leaving a "parallel" parking space
C.Entering a "bay" parking space
Operation
► When approaching a parking area, reduce the speed of your vehicle to 30 km/h (19 mph) or less.
Activating the function
The function is activated via the Driving / Vehicle touch screen menu.
Select "Park Assist".
WARNI NG
Activating the function deactivates the Blind Spot Monitoring System.
NOTIC E
You can deactivate the function at any time until the parking space entry or exit manoeuvre begins, by pressing the arrow located in the top left-hand corner of the display page.
Selecting the type of manoeuvre
A manoeuvre selection page is displayed on the touch screen: by default, the "Entry" page if the
vehicle has been running since the ignition was switched on, otherwise, the "Exit" page.► Select the type and side of the manoeuvre to activate the parking space search.The selected manoeuvre can be changed at any time, even while searching for an available space.This indicator lamp comes on to confirm the selection.
Page 189 of 320
189
Driving
6
Parking space search
► You should drive at a distance of between 0.50 m and 1.50 m (1 ft 7" and 4 ft 11") from the row of parked vehicles, without ever exceeding 30 km/h (19 mph), until the system finds an available space.The parking space search is suspended at higher speeds. The function is automatically deactivated if the vehicle speed exceeds 50 km/h (31 mph).
NOTIC E
For "parallel" parking, the space must measure at least the length of your vehicle plus 0.60 m (1 ft 11").For "bay" parking, the space must be at least as wide as your vehicle plus 0.70 m (2 ft 3").
NOTIC E
If the parking sensors function has been deactivated in the Driving/Vehicle touch screen menu, it will be automatically reactivated when the system is activated.
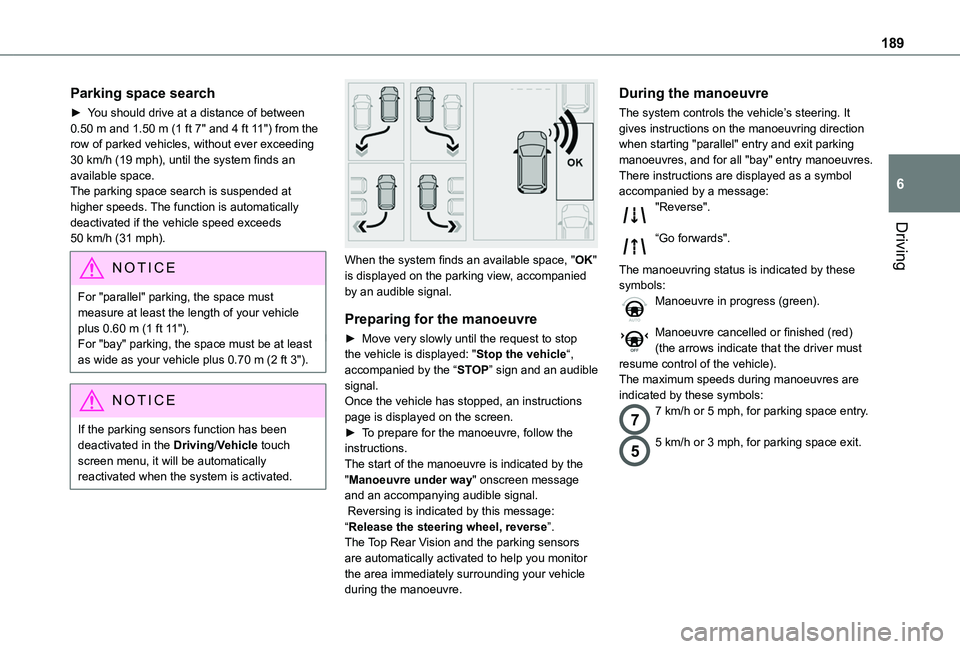
When the system finds an available space, "OK" is displayed on the parking view, accompanied by an audible signal.
Preparing for the manoeuvre
► Move very slowly until the request to stop the vehicle is displayed: "Stop the vehicle“, accompanied by the “STOP” sign and an audible signal.Once the vehicle has stopped, an instructions page is displayed on the screen.► To prepare for the manoeuvre, follow the instructions. The start of the manoeuvre is indicated by the "Manoeuvre under way" onscreen message and an accompanying audible signal. Reversing is indicated by this message: “Release the steering wheel, reverse”.The Top Rear Vision and the parking sensors are automatically activated to help you monitor the area immediately surrounding your vehicle during the manoeuvre.
During the manoeuvre
The system controls the vehicle’s steering. It gives instructions on the manoeuvring direction when starting "parallel" entry and exit parking manoeuvres, and for all "bay" entry manoeuvres.There instructions are displayed as a symbol accompanied by a message:"Reverse".
“Go forwards".
The manoeuvring status is indicated by these symbols:Manoeuvre in progress (green).
Manoeuvre cancelled or finished (red) (the arrows indicate that the driver must resume control of the vehicle).The maximum speeds during manoeuvres are indicated by these symbols:
77 km/h or 5 mph, for parking space entry.
55 km/h or 3 mph, for parking space exit.
Page 191 of 320
191
Driving
6
Operating limits
– The system may suggest an inappropriate parking space (parking prohibited, work in progress with damaged road surface, location alongside a ditch, etc.).– The system may indicate that a space has been found but not offer it because of a fixed obstacle on the opposite side of the manoeuvre, which would not allow the vehicle to follow the necessary trajectory required for parking.– The system may indicate that a space has been found but the manoeuvre will not be triggered, because the width of the lane is insufficient.– The system is not designed to perform the parking manoeuvre on a sharp bend.– The system does not detect spaces that are much larger than the vehicle itself or that are delimited by obstacles that are too low (pavements, studs, etc.) or too thin (trees, posts, wire fences, etc.).– If the boot is heavily loaded, the tilt of the
vehicle towards the rear may interfere with the distance measurements.
WARNI NG
Do not use the function under the following exterior conditions:– Alongside a soft shoulder (e.g. ditch) or quay or on the edge of a drop.– When the road surface is slippery (e.g. ice).
WARNI NG
If any of the following malfunctions occurs, do not use the system:– If a tyre is under-inflated.– If one of the bumpers is damaged.– If one of the cameras is faulty.
WARNI NG
If the vehicle has undergone any of the following modifications, do not use the function:– When carrying an object extending beyond the dimensions of the vehicle (ladder on the roof bars, bicycle carrier on the tailgate, etc.).– With a non-approved towball in place.– With snow chains fitted.– When driving on a small-diameter or "space-saver" type spare wheel.– When the wheels fitted are a different size from the original ones.
– After modifying one or both bumpers (added protection).– If the sensors have been repainted other than by the TOYOTA dealer network.– With sensors not approved for the vehicle.
Malfunctions
When the function is not activated, this indicator lamp will flash briefly and an audible signal will be emitted to indicate a system malfunction.If the malfunction occurs while the system is in use, the warning lamp goes off.If the parking sensor malfunction occurs during use, indicated by this warning lamp coming on, it causes the function to deactivate.In the event of a malfunction, have the system checked by a TOYOTA dealer or a qualified workshop.In the event of a power steering malfunction, this warning lamp is displayed on the instrument panel, accompanied by a warning message.
WARNI NG
You must stop the vehicle.Stop as soon as it is safe to do so and switch off the ignition.Contact a TOYOTA dealer or a qualified workshop.
Page 221 of 320
221
Practical information
7
With drive selector and
electric parking brake /
Release procedure
► With the vehicle stationary and the engine running, depress the brake pedal and select mode N.Within 5 seconds:► Depress and hold the brake pedal, then observe this order: switch off the ignition (if start with START/STOP, press and hold the button for 2 seconds) and move the push selector forwards or backwards.► Release the brake pedal, then switch on the ignition again.► Place your foot on the brake and press the electric parking brake control to release it.► Release the brake pedal, then switch off the ignition.
NOTIC E
Keyless Entry and StartingYou must not depress the brake pedal while switching the ignition on again, then switching it off. If you do, the engine will start, requiring you to restart the procedure.
WARNI NG
A message is displayed on the instrument panel to confirm the unlocking of the wheels for 15 minutes.When the vehicle is free-wheeling, the audio system cannot be updated (message displayed on the instrument panel).
Reverting to normal operation
► While depressing the brake pedal, restart the engine, then set the gear selector to P.
Advice on care and
maintenance
General recommendations
Observe the following recommendations to avoid damaging the vehicle.
Exterior
WARNI NG
Never use a high-pressure jet wash in the engine compartment - risk of damaging the electrical components!Do not wash the vehicle in bright sunshine or extremely cold conditions.
NOTIC E
When washing the vehicle at an automatic roller-brush car wash, be sure to lock the doors and, depending on version, remove the electronic key.When using a pressure washer, hold the lance at least 30 cm from the vehicle (particularly when cleaning areas containing chipped paint, sensors or seals).Promptly clean up any stains containing chemicals liable to damage the vehicle's paint (including tree resin, bird droppings, insect secretions, pollen and tar).If justified by the environment, clean the vehicle frequently to remove salty deposits (in coastal areas), soot (in industrial areas) and mud/salts (in wet or cold areas). These substances can be highly corrosive.Contact any authorized Toyota retailer or Toyota authorized repairer, or any reliable repairer for advice on removing stubborn stains requiring special products (such as tar
or insect removers).Preferably, have paint touch-ups performed by any authorized Toyota retailer or Toyota authorized repairer, or any reliable repairer.
Page 310 of 320
310
Oil change 2 11Oil consumption 2 11OIl, engine 2 11On-board tools 221–222Opening the bonnet 209Opening the boot 31–32Opening the doors 31–32Overhead storage 63
P
Pads, brake 214Paint 220, 252Paint colour code 252Park Assist 186Parking brake 134, 215Parking brake, electric 134–137, 215Parking sensors, audible and visual 177Parking sensors, front 178Parking sensors, rear 178Passenger compartment temperature
pre-conditioning (Electric) 87Pedestrian horn (Electric) 102, 128Plates, identification 252Player, Apple® 258, 269, 295Player, USB 257, 269, 294Port, USB 65, 257, 269–270, 289, 294Power indicator (Electric) 7Pressures, tyres 215, 224, 228, 252Pre-tensioning seat belts 111Priming the fuel system 221
Profiles 273, 299Programmable cruise control 160Protecting children 11 2–11 3, 11 5–11 8, 120, 124–126Public fast charging station 195, 201Puncture 223, 225
R
Radar (warnings) 153Radio 256–257, 266–267, 292Radio, digital (Digital Audio Broadcasting - DAB) 257, 268, 293Range, AdBlue 213RDS 256, 267, 292–293Rear screen, demisting 84Recharging the battery 237Recharging the traction battery 196Recharging the traction battery (Electric) 193, 200–201, 203Recirculation, air 81
Recovery 239Reduction of electrical load 204Regeneration of the particle filter 214Regenerative braking (deceleration by engine braking) 145–146Reinitialisation of the under-inflation detection system 150Reinitialising the remote control 41Reminder, key in ignition 132Reminder, lighting on 91
Remote control 31–35, 37, 39, 129Remote functions 202Remotely operable functions (Electric) 87Removing a wheel 226–227Removing the mat 63Replacing bulbs 228–229Replacing fuses 234Replacing the air filter 214Replacing the oil filter 214Replacing the passenger compartment filter 213Reservoir, screenwash 212Reversing camera 153, 180, 184Reversing lamps 233Roof 64Roof bars 208–209Roof flap 46Running out of fuel (Diesel) 221
S
Safety, children 11 2–11 3, 11 5–11 8, 120, 124–126Saturation of the particle filter (Diesel) 214Screen menu map 270Screenwash 96Screenwash, front 96Screenwash, rear 96–97SCR (Selective Catalytic Reduction) 215Seat belts 108–111, 11 9Seat, bench front, 2-seat 57, 59, 108
Page 311 of 320
3 11
Alphabetical index
Seat, rear bench 59, 61Seats, front 52–54, 57–59Seats, front bench 57–59Seats, heated 55Seats, Multiflex ~ Extenso Cab 73Seats, rear 52, 57, 59–62, 11 6Selector, gear 143–145Sensors (warnings) 153Serial number, vehicle 252Service indicator 18Servicing 213Settings, equipment 28–29Settings, system 260–261, 274, 299Sidelamps 90–92, 229, 231Side parking sensors 179Side repeater 230Silent vehicle warning sound (Electric) 102, 128Sliding side door, electric 37–38, 45Smart Entry & Start 130, 133Snow chains 150, 204–205Snow chains, link 204
Socket, 12 V accessory 63, 65Socket, 220 V 65Socket, auxiliary 257, 269, 294Socket, Jack 294Speed limiter 156–159, 167Speed limit recognition 154, 156Speedometer 10, 154Sport mode 146Stability control (ESC) 104Starting a Diesel engine 190
Starting the engine 129, 132Starting the vehicle 130, 133, 139–142, 144Starting using another battery 133, 236Station, radio 256, 266–267, 292–293Stay, bonnet 209–210Steering mounted controls, audio 254, 264, 278Steering wheel, adjustment 55Stickers, customising ~ Stickers, expressive 220Stopping the vehicle 132–133, 139–142, 144Stop & Start 27, 79, 84, 147–149, 191, 209, 213, 238Storage 63–64Storage boxes 67Stowing rings 70Sunshine sensor 78Super-fast charging (Electric) 201, 203, 251Surround Rear Vision 181Switching off the engine 129, 131–132Synchronising the remote control 41
T
Tables of engines 251Tank, fuel 190–192Technical data 247, 249–251Telephone 66, 259–260, 271–273, 295–298Temperature, coolant 18Three flashes (direction indicators) 91Time (setting) 261, 274, 300TMC (Traffic info) 286
Tools 221Topping-up AdBlue® 217Top Rear Vision 184Touch screen 27–29, 87Towbar 104, 206Towed loads 246–247, 249–251Towing another vehicle 239–240Towing eye 240Toyota Traction Select 105Traction battery charge 196Traction battery (Electric) 29, 193–194, 251Traction control (ASR) 103, 105–106Traffic information (TMC) 286Trailer 104, 206Trailer stability assist (TSA) 104Trajectory control systems 103Triangle, warning 71Trip computer 26–27Type of bulbs 229Tyres 215, 252Tyre under-inflation detection 149–150, 224
U
Under-inflation (detection) 149Unlocking 31–32, 34–37Unlocking from the inside 42–43Unlocking, selective 33–35Unlocking, total 33–35Updating the date 275, 300Updating the time 261, 274, 300