2022 TOYOTA PROACE CITY EV lock
[x] Cancel search: lockPage 63 of 320
63
Ease of use and comfort
3
Rear seats (row 3)
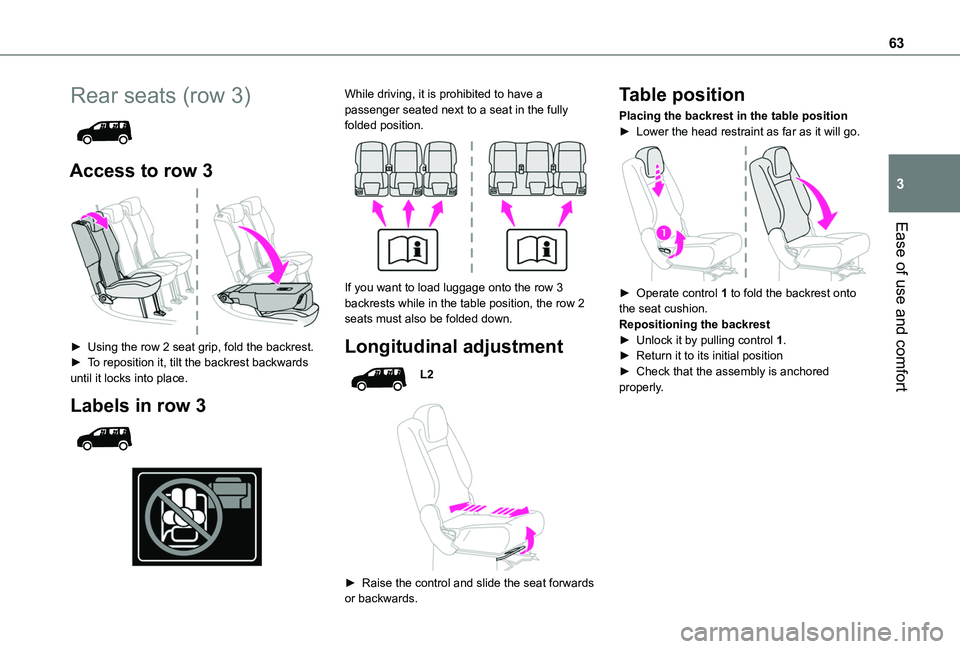
Access to row 3
► Using the row 2 seat grip, fold the backrest.► To reposition it, tilt the backrest backwards until it locks into place.
Labels in row 3
While driving, it is prohibited to have a passenger seated next to a seat in the fully folded position.
If you want to load luggage onto the row 3 backrests while in the table position, the row 2 seats must also be folded down.
Longitudinal adjustment
L2
► Raise the control and slide the seat forwards or backwards.
Table position
Placing the backrest in the table position► Lower the head restraint as far as it will go.
► Operate control 1 to fold the backrest onto the seat cushion.Repositioning the backrest► Unlock it by pulling control 1.► Return it to its initial position► Check that the assembly is anchored properly.
Page 72 of 320
72
Installation
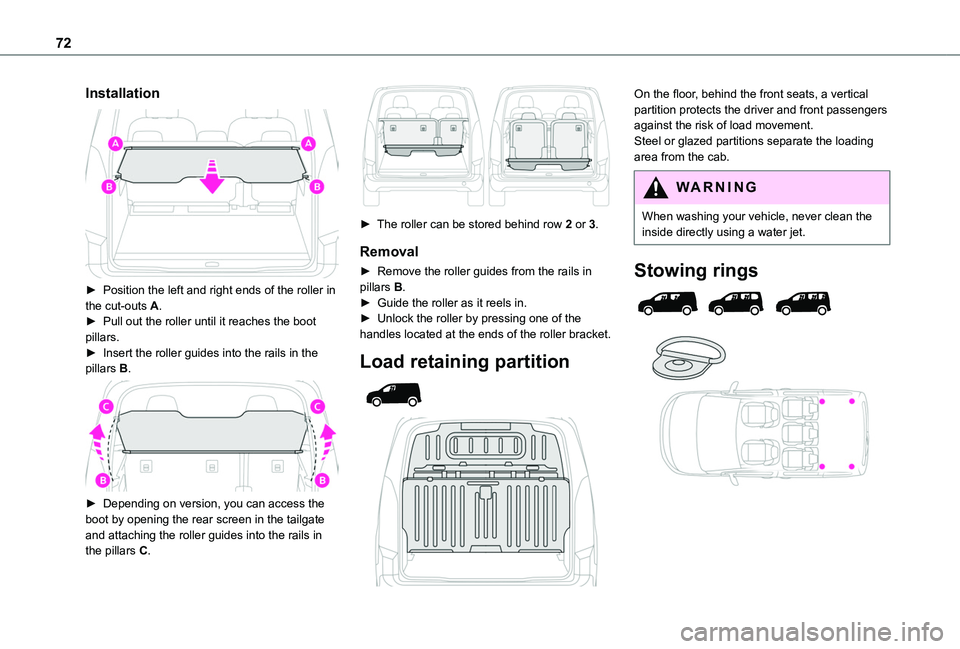
► Position the left and right ends of the roller in the cut-outs A.► Pull out the roller until it reaches the boot pillars.► Insert the roller guides into the rails in the pillars B.
► Depending on version, you can access the boot by opening the rear screen in the tailgate and attaching the roller guides into the rails in the pillars C.
► The roller can be stored behind row 2 or 3.
Removal
► Remove the roller guides from the rails in pillars B.► Guide the roller as it reels in.► Unlock the roller by pressing one of the handles located at the ends of the roller bracket.
Load retaining partition
On the floor, behind the front seats, a vertical partition protects the driver and front passengers against the risk of load movement.Steel or glazed partitions separate the loading area from the cab.
WARNI NG
When washing your vehicle, never clean the inside directly using a water jet.
Stowing rings
Page 74 of 320
74
WARNI NG
The load must be evenly distributed in the loading area so as not to interfere with driving the vehicle.Place the load close to the side panels, or even push it against the side panels between the wheel arches.However, it is recommended that heavy objects are placed as close to the cab as possible as a precaution in case of sharp braking.
WARNI NG
Firmly secure all parts of the load using the stowing rings on the floor of the loading area.For more information on the Interior fittings and in particular on the stowing rings, refer to the corresponding section.
WARNI NG
To avoid the risk of injury or accident, the load must be made stable so that it cannot slide, tip over, fall or be thrown. To do this, use only retaining straps that conform to current standards (DIN for example).For more information on putting straps in place, refer to the manufacturer’s user guide.To prevent the load sliding, there must not be any empty space between the load and the panels of the vehicle.As well as the straps, optimise the stability of the load with stable handling equipment (wedges, rigid blocks of wood or padding).
WARNI NG
When washing your vehicle, never clean the inside directly using a water jet.
For the Extenso cabin and
the Crew cab
WARNI NG
Do not place sharp or pointed objects in the protective cover to avoid damaging it.
WARNI NG
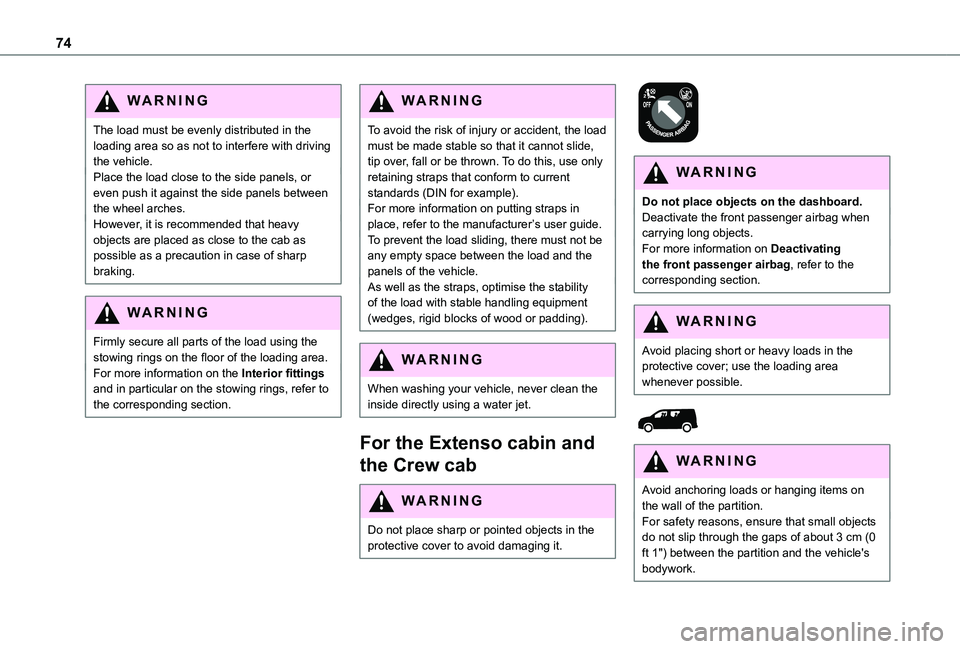
Do not place objects on the dashboard.Deactivate the front passenger airbag when carrying long objects.For more information on Deactivating the front passenger airbag, refer to the corresponding section.
WARNI NG
Avoid placing short or heavy loads in the protective cover; use the loading area whenever possible.
WARNI NG
Avoid anchoring loads or hanging items on the wall of the partition.For safety reasons, ensure that small objects do not slip through the gaps of about 3 cm (0 ft 1") between the partition and the vehicle's bodywork.
Page 77 of 320
77
Ease of use and comfort
3
WARNI NG
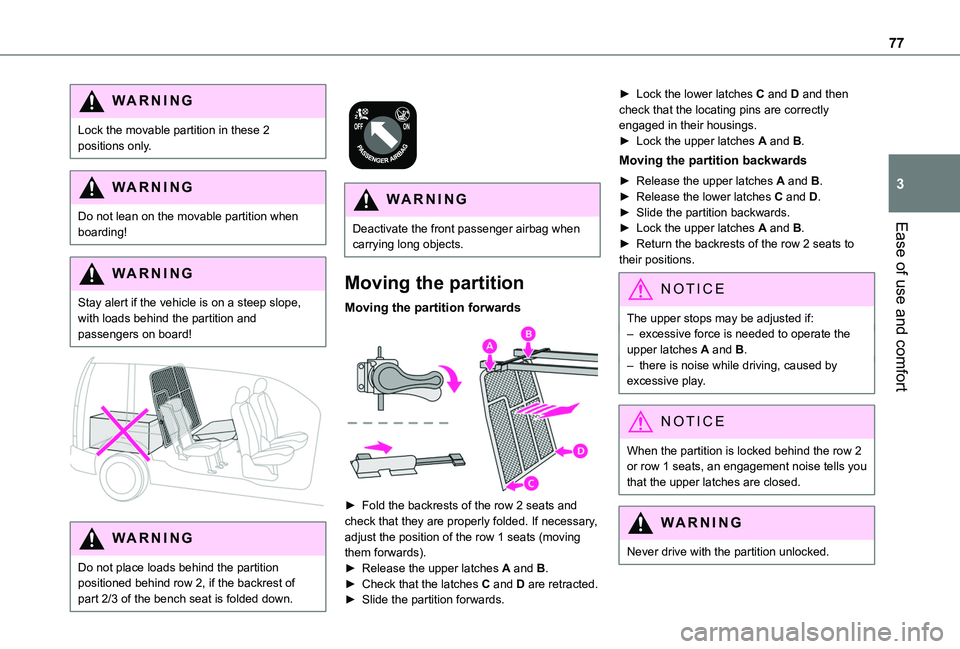
Lock the movable partition in these 2 positions only.
WARNI NG
Do not lean on the movable partition when boarding!
WARNI NG
Stay alert if the vehicle is on a steep slope, with loads behind the partition and passengers on board!
WARNI NG
Do not place loads behind the partition positioned behind row 2, if the backrest of part 2/3 of the bench seat is folded down.
WARNI NG
Deactivate the front passenger airbag when carrying long objects.
Moving the partition
Moving the partition forwards
► Fold the backrests of the row 2 seats and check that they are properly folded. If necessary, adjust the position of the row 1 seats (moving them forwards).► Release the upper latches A and B.► Check that the latches C and D are retracted.
► Slide the partition forwards.
► Lock the lower latches C and D and then check that the locating pins are correctly engaged in their housings.► Lock the upper latches A and B.
Moving the partition backwards
► Release the upper latches A and B.► Release the lower latches C and D.► Slide the partition backwards.► Lock the upper latches A and B.► Return the backrests of the row 2 seats to their positions.
NOTIC E
The upper stops may be adjusted if:– excessive force is needed to operate the upper latches A and B.– there is noise while driving, caused by excessive play.
NOTIC E
When the partition is locked behind the row 2 or row 1 seats, an engagement noise tells you that the upper latches are closed.
WARNI NG
Never drive with the partition unlocked.
Page 78 of 320
78
WARNI NG
The partition must not be moved with the latches extended - risk of scratches or damage to the plastic trims!
WARNI NG
The partition must never be removed to
convert the vehicle from a commercial vehicle to a passenger vehicle.This would pose a risk to the safety of users due to the absence of a child lock on the tailgate (mandatory on passenger vehicles).
WARNI NG
Pay attention to the loading height behind the partition and the size of the long load in the protective cover: the driver must keep a good field of vision.
WARNI NG
Do not place loads between the partition and the bench seat backrest.
Opening/closing the hatch
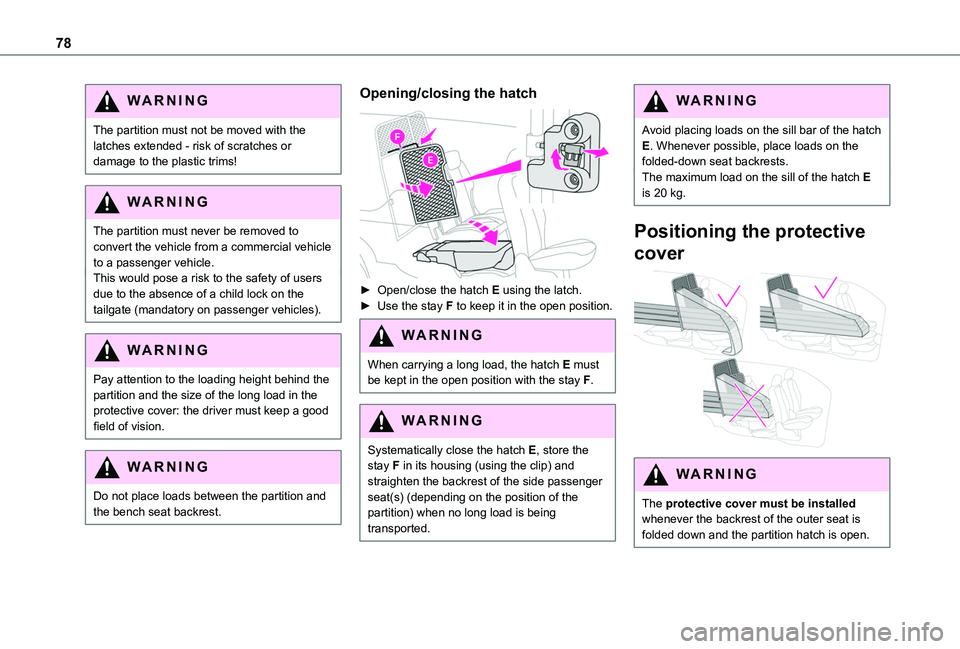
► Open/close the hatch E using the latch.► Use the stay F to keep it in the open position.
WARNI NG
When carrying a long load, the hatch E must be kept in the open position with the stay F.
WARNI NG
Systematically close the hatch E, store the stay F in its housing (using the clip) and straighten the backrest of the side passenger seat(s) (depending on the position of the partition) when no long load is being transported.
WARNI NG
Avoid placing loads on the sill bar of the hatch E. Whenever possible, place loads on the folded-down seat backrests.The maximum load on the sill of the hatch E is 20 kg.
Positioning the protective
cover
WARNI NG
The protective cover must be installed whenever the backrest of the outer seat is folded down and the partition hatch is open.
Page 90 of 320
90
NOTIC E
The fan noise that occurs during temperature pre-conditioning is perfectly normal.
Operating conditions
– The function is only activated when the ignition is switched off and the vehicle locked.– When the vehicle is not connected, the function is only activated if the battery charge level is greater than 50%.– When the vehicle is not connected and a recurring programme is active (e.g. from Monday to Friday), if two temperature pre-conditioning sequences are run without the vehicle being used, the programme will be deactivated.
Courtesy lamp
Automatic switching on/off
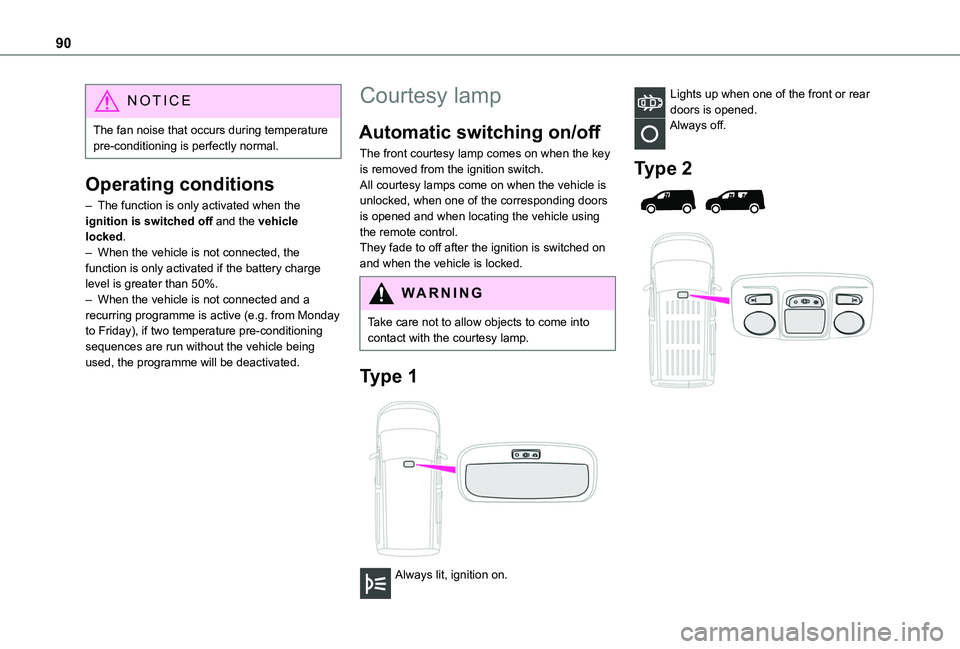
The front courtesy lamp comes on when the key is removed from the ignition switch.All courtesy lamps come on when the vehicle is unlocked, when one of the corresponding doors is opened and when locating the vehicle using the remote control. They fade to off after the ignition is switched on and when the vehicle is locked.
WARNI NG
Take care not to allow objects to come into contact with the courtesy lamp.
Type 1
Always lit, ignition on.
Lights up when one of the front or rear doors is opened.Always off.
Type 2
Page 95 of 320
95
Lighting and visibility
4
NOTIC E
The LEDs are brighter when operating as daytime running lamps.
Guide-me-home and
welcome lighting
Guide-me-home lighting
Automatic
With the ring in the "AUTO" position, when the light is poor, the dipped beam headlamps come on automatically when the ignition is switched off.You can activate/deactivate this function and adjust the guide-me-home lighting duration in the Driving / Vehicle touch screen menu.
Manual
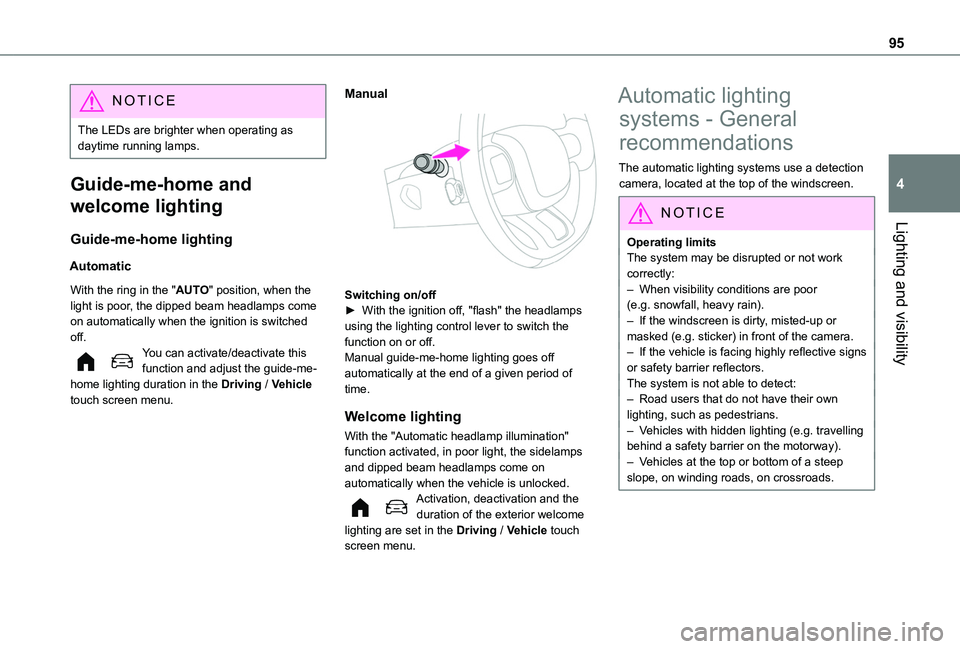
Switching on/off► With the ignition off, "flash" the headlamps using the lighting control lever to switch the function on or off.Manual guide-me-home lighting goes off automatically at the end of a given period of time.
Welcome lighting
With the "Automatic headlamp illumination"
function activated, in poor light, the sidelamps and dipped beam headlamps come on automatically when the vehicle is unlocked.Activation, deactivation and the duration of the exterior welcome lighting are set in the Driving / Vehicle touch screen menu.
Automatic lighting
systems - General
recommendations
The automatic lighting systems use a detection camera, located at the top of the windscreen.
NOTIC E
Operating limits
The system may be disrupted or not work correctly:– When visibility conditions are poor (e.g. snowfall, heavy rain).– If the windscreen is dirty, misted-up or masked (e.g. sticker) in front of the camera.– If the vehicle is facing highly reflective signs or safety barrier reflectors.The system is not able to detect:– Road users that do not have their own lighting, such as pedestrians.– Vehicles with hidden lighting (e.g. travelling behind a safety barrier on the motorway).– Vehicles at the top or bottom of a steep slope, on winding roads, on crossroads.
Page 105 of 320
105
Safety
5
Vehicle stability control
(VSC)
The electronic stability control programme includes the following systems:– Anti-lock braking system (ABS) and Electronic brake force distribution (EBFD).– Emergency braking assistance (EBA).– Anti-slip regulation (ASR).– Dynamic stability control (DSC).– Trailer stability assist (TSA).
Anti-lock braking system
(ABS)/Electronic brake force
distribution (EBFD)
These systems enhance the vehicle’s stability and handling during braking, and enable greater control while cornering, particularly on poor or slippery road surfaces.ABS prevents wheel locking in the event of emergency braking.Electronic brake force distribution (EBFD)
manages overall braking pressure on each individual wheel.► When braking in an emergency, depress the pedal very firmly and maintain this pressure.
NOTIC E
Normal operation of the ABS may make itself felt by slight vibrations of the brake pedal.
The fixed illumination of this warning lamp signals that there is a fault with the ABS.The vehicle retains conventional braking. Drive carefully at a moderate speed.Have it checked by any authorized Toyota retailer or Toyota authorized repairer, or any reliable repairer.This warning lamp, when lit together with the STOP and ABS warning lamps, accompanied by a message and an audible signal, indicates an EBFD malfunction.You must stop the vehicle.Stop as soon as it is safe to do so and switch off the ignition.Contact any authorized Toyota retailer or Toyota authorized repairer, or any reliable repairer.
WARNI NG
When changing wheels (tyres and rims), ensure that these are approved for your vehicle.
WARNI NG
After an impactHave it checked by any authorized Toyota retailer or Toyota authorized repairer, or any reliable repairer.
Emergency braking
assistance (EBA)
This system reduces the emergency stopping distance, by optimising the braking pressure.It is triggered in relation to the speed at which the brake pedal is depressed. The effect of this is a reduction in the resistance of the pedal and an increase in breaking efficiency.
Anti-slip regulation (ASR)
/ Dynamic stability control
(DSC)
Anti-slip regulation (or traction control) optimises traction by using engine braking and by applying the brakes on the driving wheels to avoid one or more wheels spinning. It also enhances the vehicle's directional stability.If there is a difference between the vehicle’s trajectory and the path desired by the driver, the dynamic stability control system automatically uses engine braking and the brakes on one or
more wheels to return the vehicle to the desired path, within the limits of the laws of physics.These systems are activated automatically every time the vehicle is started.These systems are activated in the event of a problem with grip or trajectory (confirmed by this warning lamp flashing on the instrument panel).