2022 TOYOTA PROACE CITY EV lock
[x] Cancel search: lockPage 236 of 320
236
Number plate lamps
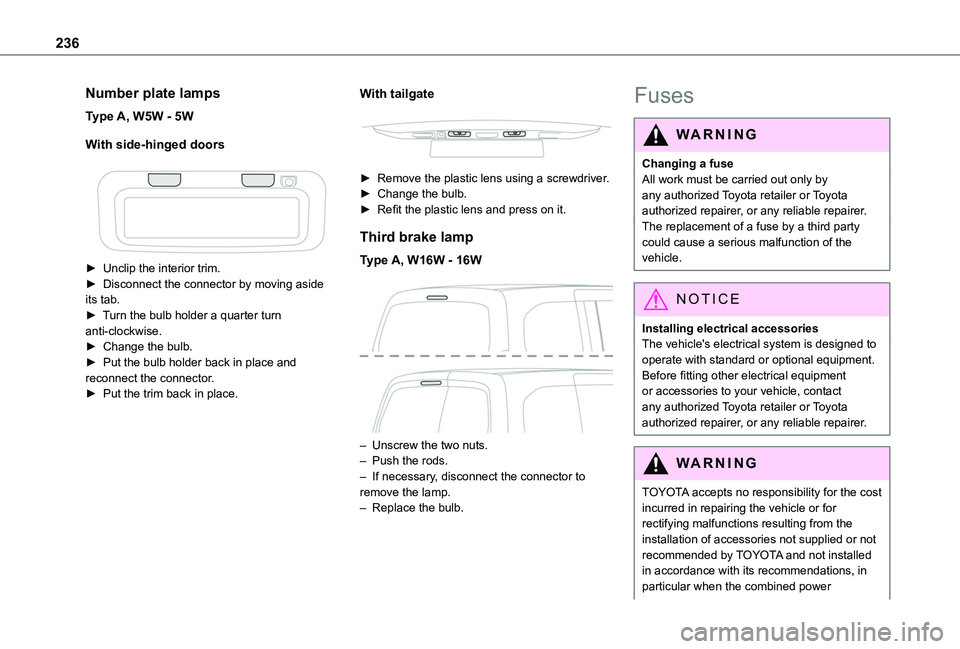
Type A, W5W - 5W
With side-hinged doors
► Unclip the interior trim.► Disconnect the connector by moving aside its tab.► Turn the bulb holder a quarter turn anti-clockwise.► Change the bulb.► Put the bulb holder back in place and reconnect the connector.► Put the trim back in place.
With tailgate
► Remove the plastic lens using a screwdriver.► Change the bulb.► Refit the plastic lens and press on it.
Third brake lamp
Type A, W16W - 16W
– Unscrew the two nuts.– Push the rods.– If necessary, disconnect the connector to remove the lamp.– Replace the bulb.
Fuses
WARNI NG
Changing a fuseAll work must be carried out only by any authorized Toyota retailer or Toyota authorized repairer, or any reliable repairer.The replacement of a fuse by a third party could cause a serious malfunction of the
vehicle.
NOTIC E
Installing electrical accessoriesThe vehicle's electrical system is designed to operate with standard or optional equipment.Before fitting other electrical equipment or accessories to your vehicle, contact any authorized Toyota retailer or Toyota authorized repairer, or any reliable repairer.
WARNI NG
TOYOTA accepts no responsibility for the cost incurred in repairing the vehicle or for rectifying malfunctions resulting from the installation of accessories not supplied or not
recommended by TOYOTA and not installed in accordance with its recommendations, in particular when the combined power
Page 240 of 320
240
Disconnecting/reconnecting
the battery
In order to maintain an adequate state of charge for starting the engine, we recommend disconnecting the battery if the vehicle is to be unused for an extended period.Before disconnecting the battery:► Close all openings (doors, boot, windows, roof).► Switch off all electricity-consuming devices (audio system, wipers, lamps, etc.).► Switch off the ignition and wait for 4 minutes.After accessing the battery, it is only necessary to disconnect the (+) terminal.
Quick-release terminal clamp
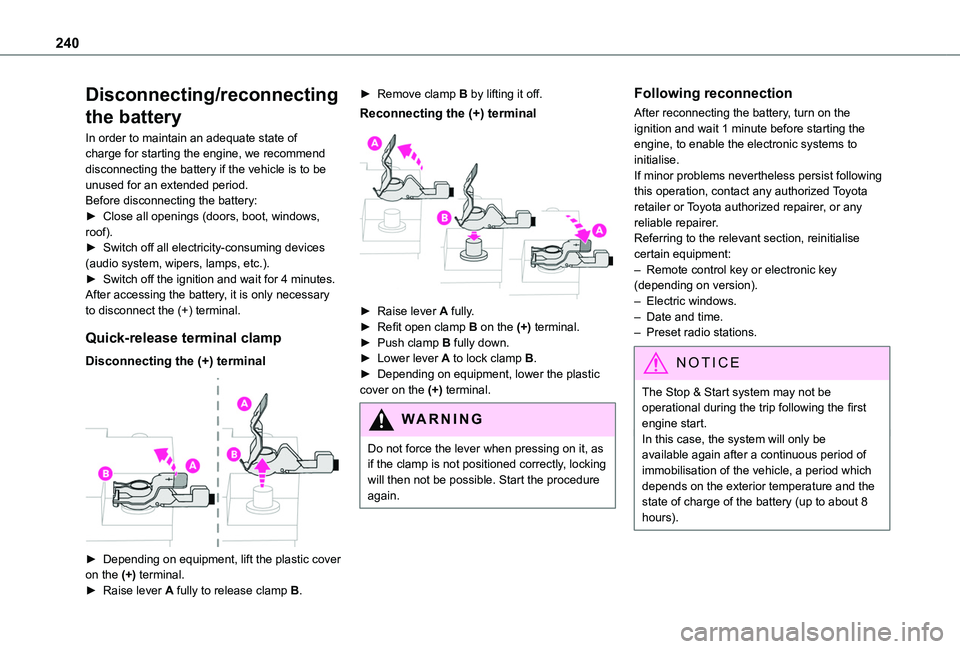
Disconnecting the (+) terminal
► Depending on equipment, lift the plastic cover on the (+) terminal.► Raise lever A fully to release clamp B.
► Remove clamp B by lifting it off.
Reconnecting the (+) terminal
► Raise lever A fully.► Refit open clamp B on the (+) terminal.► Push clamp B fully down.► Lower lever A to lock clamp B.► Depending on equipment, lower the plastic cover on the (+) terminal.
WARNI NG
Do not force the lever when pressing on it, as if the clamp is not positioned correctly, locking will then not be possible. Start the procedure again.
Following reconnection
After reconnecting the battery, turn on the ignition and wait 1 minute before starting the engine, to enable the electronic systems to initialise.If minor problems nevertheless persist following this operation, contact any authorized Toyota retailer or Toyota authorized repairer, or any reliable repairer.Referring to the relevant section, reinitialise certain equipment:– Remote control key or electronic key (depending on version).– Electric windows.– Date and time.– Preset radio stations.
NOTIC E
The Stop & Start system may not be operational during the trip following the first engine start.In this case, the system will only be
available again after a continuous period of immobilisation of the vehicle, a period which depends on the exterior temperature and the state of charge of the battery (up to about 8 hours).
Page 241 of 320
241
In the event of a breakdown
8
Towing
Procedure for having your vehicle towed or for towing another vehicle using the towing eye.
NOTIC E
General recommendationsObserve the legislation in force in the country where you are driving.Ensure that the weight of the towing vehicle is higher than that of the towed vehicle.The driver must remain at the wheel of the towed vehicle and must have a valid driving licence.When towing a vehicle with all four wheels on the ground, always use an approved towbar; ropes and straps are prohibited.
The towing vehicle must move off gently.When the vehicle is towed with its engine off, there is no longer braking and steering assistance.
WARNI NG
A professional recovery service must be called if:– broken down on a motorway or main road;
– not possible to put the gearbox into neutral, unlock the steering, or release the parking brake;– not possible to tow a vehicle with an automatic gearbox, with the engine running;– towing with only two wheels on the ground;– four-wheel drive vehicle;– no approved towbar available.
WARNI NG
Before towing the vehicle, it is essential to put the vehicle in free-wheeling mode.For more information on Free-wheeling, refer to the corresponding section.
NOTIC E
Electric motorAn electric vehicle cannot under any circumstances be used to tow another vehicle.However, it may be used, for example, to exit a rut.
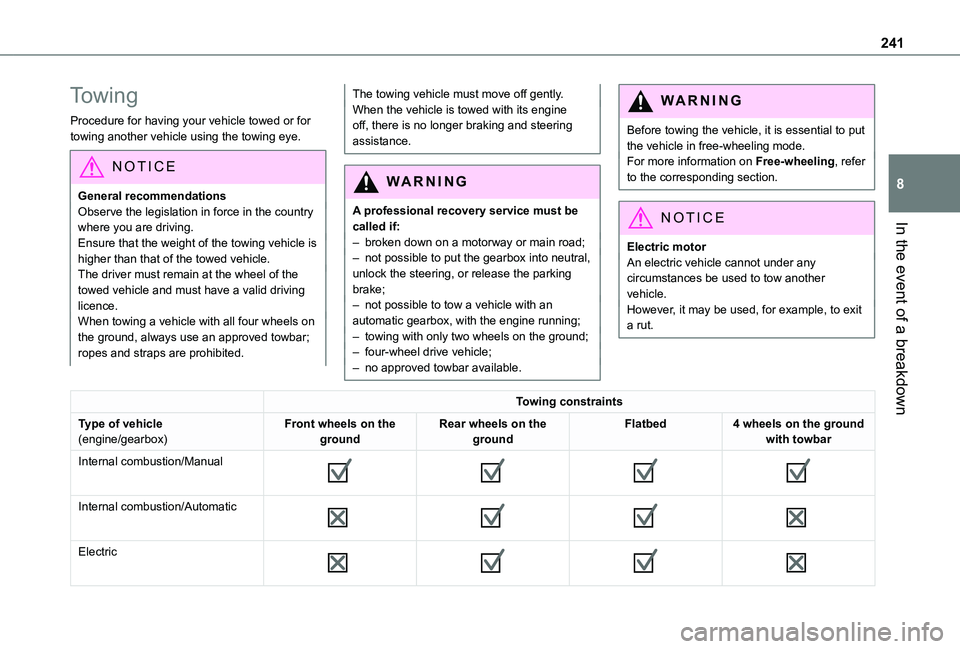
Towing constraints
Type of vehicle(engine/gearbox)Front wheels on the groundRear wheels on the groundFlatbed4 wheels on the ground with towbar
Internal combustion/Manual
Internal combustion/Automatic
Electric
Page 258 of 320
258
Radio
Choose the band
Press the "Radio" menu.
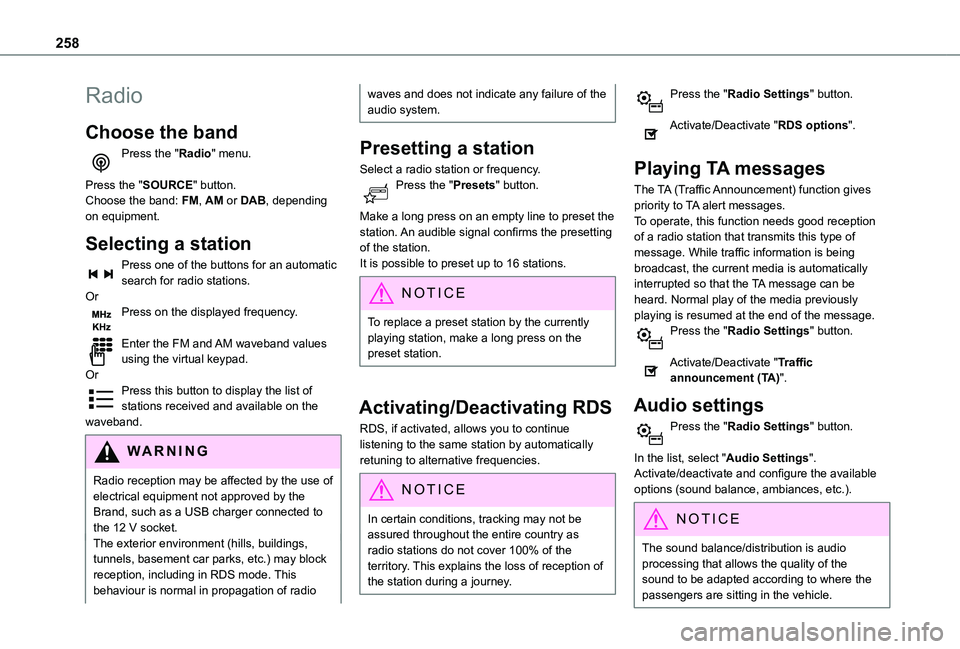
Press the "SOURCE" button.Choose the band: FM, AM or DAB, depending on equipment.
Selecting a station
Press one of the buttons for an automatic search for radio stations.OrPress on the displayed frequency.
Enter the FM and AM waveband values using the virtual keypad.OrPress this button to display the list of stations received and available on the waveband.
WARNI NG
Radio reception may be affected by the use of electrical equipment not approved by the Brand, such as a USB charger connected to the 12 V socket.The exterior environment (hills, buildings, tunnels, basement car parks, etc.) may block reception, including in RDS mode. This behaviour is normal in propagation of radio
waves and does not indicate any failure of the audio system.
Presetting a station
Select a radio station or frequency.Press the "Presets" button.
Make a long press on an empty line to preset the station. An audible signal confirms the presetting of the station.It is possible to preset up to 16 stations.
NOTIC E
To replace a preset station by the currently playing station, make a long press on the preset station.
Activating/Deactivating RDS
RDS, if activated, allows you to continue listening to the same station by automatically retuning to alternative frequencies.
NOTIC E
In certain conditions, tracking may not be assured throughout the entire country as
radio stations do not cover 100% of the territory. This explains the loss of reception of the station during a journey.
Press the "Radio Settings" button.
Activate/Deactivate "RDS options".
Playing TA messages
The TA (Traffic Announcement) function gives priority to TA alert messages.To operate, this function needs good reception of a radio station that transmits this type of message. While traffic information is being broadcast, the current media is automatically interrupted so that the TA message can be heard. Normal play of the media previously playing is resumed at the end of the message.Press the "Radio Settings" button.
Activate/Deactivate "Traffic announcement (TA)".
Audio settings
Press the "Radio Settings" button.
In the list, select "Audio Settings".Activate/deactivate and configure the available options (sound balance, ambiances, etc.).
NOTIC E
The sound balance/distribution is audio processing that allows the quality of the sound to be adapted according to where the passengers are sitting in the vehicle.
Page 263 of 320
263
Touch screen BLUETOOTH audio system
10
Select "Units" to change the units of distance, fuel consumption and temperature.Press "Factory settings" to return to the initial settings.Press "System Info" to check the system version.
Privacy settings
Three data privacy options are available:"No data sharing (data, vehicle position)""Only data sharing"
“Data and vehicle position sharing"
When data and vehicle position sharing are enabled, this symbol is displayed in the upper bar of the touch screen.
Selecting the language
Press "Settings".
Select "Languages" to change the language.
Setting the date and time
Press "Settings".
Press "Date/Time".
Setting the date:
Press the arrows to set the day, month and year.
NOTIC E
First set the day, then the month.
Setting the time:Press these buttons to set hours and minutes.
Select or deselect the 24h format.
In 12h format, choose "AM" or "PM".
NOTIC E
The system does not automatically manage the change between winter and summer time.
Date format:Select the display format for the date.
Frequently asked
questions
The following information groups together the answers to the most frequently asked questions
concerning the system.
Radio
The reception quality of the tuned radio station gradually deteriorates or the station presets are not working (no sound, 87.5 MHz is displayed, etc.).The vehicle is too far from the selected station’s transmitter, or no transmitter is present in the geographical area.► Activate the "RDS" function in the upper bar to enable the system to check whether there is a more powerful transmitter in the geographical area.The environment (hills, buildings, tunnels, basement car parks, etc.) is blocking reception, including in RDS mode.This is a perfectly normal phenomenon, and is not indicative of an audio system malfunction.The aerial is missing or has been damaged (for example while entering a car wash or underground car park).► Have the aerial checked by a dealer.I cannot find some radio stations in the list of
received stations.The name of the radio station changes.The station is no longer received or its name has changed in the list.Some radio stations send other information in place of their name (the title of the song for example).The system interprets these details as the station name.
Page 269 of 320
269
TOYOTA Connect Radio
11
Press the frequency.
Enter the FM and AM waveband values using the virtual keypad.Press "OK" to confirm.
WARNI NG
Radio reception may be affected by the use of
electrical equipment not approved by the Brand, such as a USB charger connected to the 12 V socket.The exterior environment (hills, buildings, tunnels, basement car parks, etc.) may block reception, including in RDS mode. This phenomenon is perfectly normal in the context of radio wave transmission, and in no way indicative of an audio system malfunction.
Changing the waveband
Press Radio Media to display the main page. Press the "OPTIONS" button to access the secondary page.Press "Band" to change waveband.
Press in the shaded area to confirm.
Presetting a station
Select a radio station or frequency.Make a short press on the star outline. If the star is solid, the radio station is already preset.OrSelect a radio station or frequency.Press "Preset".Make a long press on one of the buttons to preset the station.
Activating/Deactivating RDS
RDS, if activated, allows you to continue listening to the same station by automatically retuning to alternative frequencies.Press Radio Media to display the main page.Press the "OPTIONS" button to access the secondary page.Activate/deactivate "RDS".
Press in the shaded area to confirm.
NOTIC E
RDS station tracking may not be available nationwide, as many radio stations do not cover 100 % of the country. This explains the loss of reception of the station during a journey.
Displaying text information
The "Radio Text" function displays information transmitted by the radio station relating to the station or the currently playing song.Press Radio Media to display the main page.Press the "OPTIONS" button to access the secondary page.Activate/deactivate "News".
Press in the shaded area to confirm.
Playing TA messages
The TA (Traffic Announcement) function gives priority to TA alert messages. To operate, this function needs good reception of a radio station that transmits this type of message. While traffic information is being broadcast, the current media is automatically interrupted so that the TA message can be heard. Normal play of the previously playing media resumes at the end of
the message.Press Radio Media to display the main page.Press the "OPTIONS" button to access the secondary page.Activate/deactivate "TA".
Press in the shaded area to confirm.
Page 272 of 320
272
a jack cable (not supplied) or via Bluetooth streaming, if compatible.
WARNI NG
To protect the system, do not use a USB hub.
The audio system will only play audio files with ".wav", ".wma", ".aac", ".ogg" and ".mp3" file extensions, at bit rates between 32 Kbps and
320 Kbps.It also supports VBR (Variable Bit Rate) mode.No other file types (".mp4", etc.) can be read.All ".wma" files must be standard WMA 9 files.The supported sampling rates are 11, 22, 44 and 48 KHz.To avoid reading and display problems, we recommend choosing file names less than 20 characters long that do not contain any special characters (e.g. “ ? . ; ù).Use only USB memory sticks in FAT32 format (File Allocation Table).
NOTIC E
We recommend using the original USB cable for the portable device.
Telephone
USB sockets
Depending on equipment, for more information on the USB sockets compatible with CarPlay® or Android Auto applications, refer to the "Ease of use and comfort" section.
NOTIC E
For the list of compatible smartphones, visit the Manufacturer's website in your country.
NOTIC E
Synchronising a smartphone enables users to display applications that support the smartphone’s CarPlay® or Android Auto technology on the vehicle’s screen. For CarPlay® technology, the CarPlay® function must first be activated on the smartphone.Unlock the smartphone for the communication process between the smartphone and the system to work.As principles and standards are constantly changing, we recommend keeping the smartphone's operating system up-to-date, together with the date and time on the smartphone and the system.
CarPlay® smartphone
connection
Depending on country.
NOTIC E
On connecting the USB cable, the CarPlay® function deactivates the system's Bluetooth® mode.
The "CarPlay" function requires the use of a compatible smartphone and compatible applications.
Connect the USB cable. The smartphone charges when connected by the USB cable.From the system, press Telephone to display the CarPlay® interface.OrIf the smartphone has already connected by Bluetooth®.Connect the USB cable. The smartphone charges when connected by the USB cable.From the system, press "Telephone" to display the main page.Press the "PHONE" button to go to the secondary page.Press "CarPlay" to display the CarPlay® interface.
Page 277 of 320
277
TOYOTA Connect Radio
11
Setting the date
Press Settings to display the main page.
Press "Configuration" to access the secondary page.Press "Date and time".
Select "Date".Press this button to set the date.
Press the back arrow to save the date.
Select the display format for the date.
Press the back arrow again to confirm.
NOTIC E
Time and date setting is only available if "GPS Synchronisation:" is deactivated.
Frequently asked
questions
The following information groups together the answers to the most frequently asked questions concerning the system.
Radio
The reception quality of the tuned radio station gradually deteriorates or the station presets are not working (no sound, 87.5 MHz is displayed, etc.).The vehicle is too far from the selected station’s transmitter, or no transmitter is present in the geographical area.► Activate the "RDS" function in the upper bar to enable the system to check whether there is a more powerful transmitter in the geographical area.The environment (hills, buildings, tunnels, basement car parks, etc.) is blocking reception, including in RDS mode.This is a perfectly normal phenomenon, and is
not indicative of an audio system malfunction.The aerial is missing or has been damaged (for example while entering a car wash or underground car park).► Have the aerial checked by a dealer.I cannot find some radio stations in the list of received stations.The name of the radio station changes.The station is no longer received or its name has
changed in the list.
► Press the round arrow on the "List" tab on the "Radio" page.Some radio stations send other information in place of their name (the title of the song for example).The system interprets these details as the station name.► Press the round arrow on the "List" tab on the "Radio" page.
Media
Playback of my USB memory stick starts only after a very long wait (around 2 to 3 minutes).Some files supplied with the memory stick may greatly slow down access to reading the memory stick (multiplication by 10 of the cataloguing time).► Delete the files supplied with the memory stick and limit the number of sub-folders in the file structure on the memory stick. Some characters in information about the currently playing media are not displayed correctly.
The audio system is unable to process certain types of character.► Use standard characters to name tracks and folders.Playback of streaming files does not start.The connected device does not automatically launch playback.► Start playback from the device.Track names and playing times are not
displayed on the audio streaming screen.