Page 596 of 798
5948-2. Steps to take in an emergency
HILUX_OM_OM0K513E_(EE)
Type C
Lay down the tire with the valve
stem facing up and install the
holding bracket, inserting the
claw into the wheel lug nut hole.
Turn the jack handle extension
clockwise to take up slack in
the chain.
Then, check to ensure the claw is
in the wheel lug nut hole and the
holding bracket is centered in the
wheel hub.
Holding bracket
Claw
WARNING
�Q Stowing the flat tire
Failure to follow steps listed under stowing the tire may result in damage to
the spare tire carrier and loss of the tire, which could result in death or seri-
ous injury.
Stowing the flat tire, jack and all tools
incorrect
correct
1
1
2
Page 597 of 798

5958-2. Steps to take in an emergency
HILUX_OM_OM0K513E_(EE)
8
When trouble arises
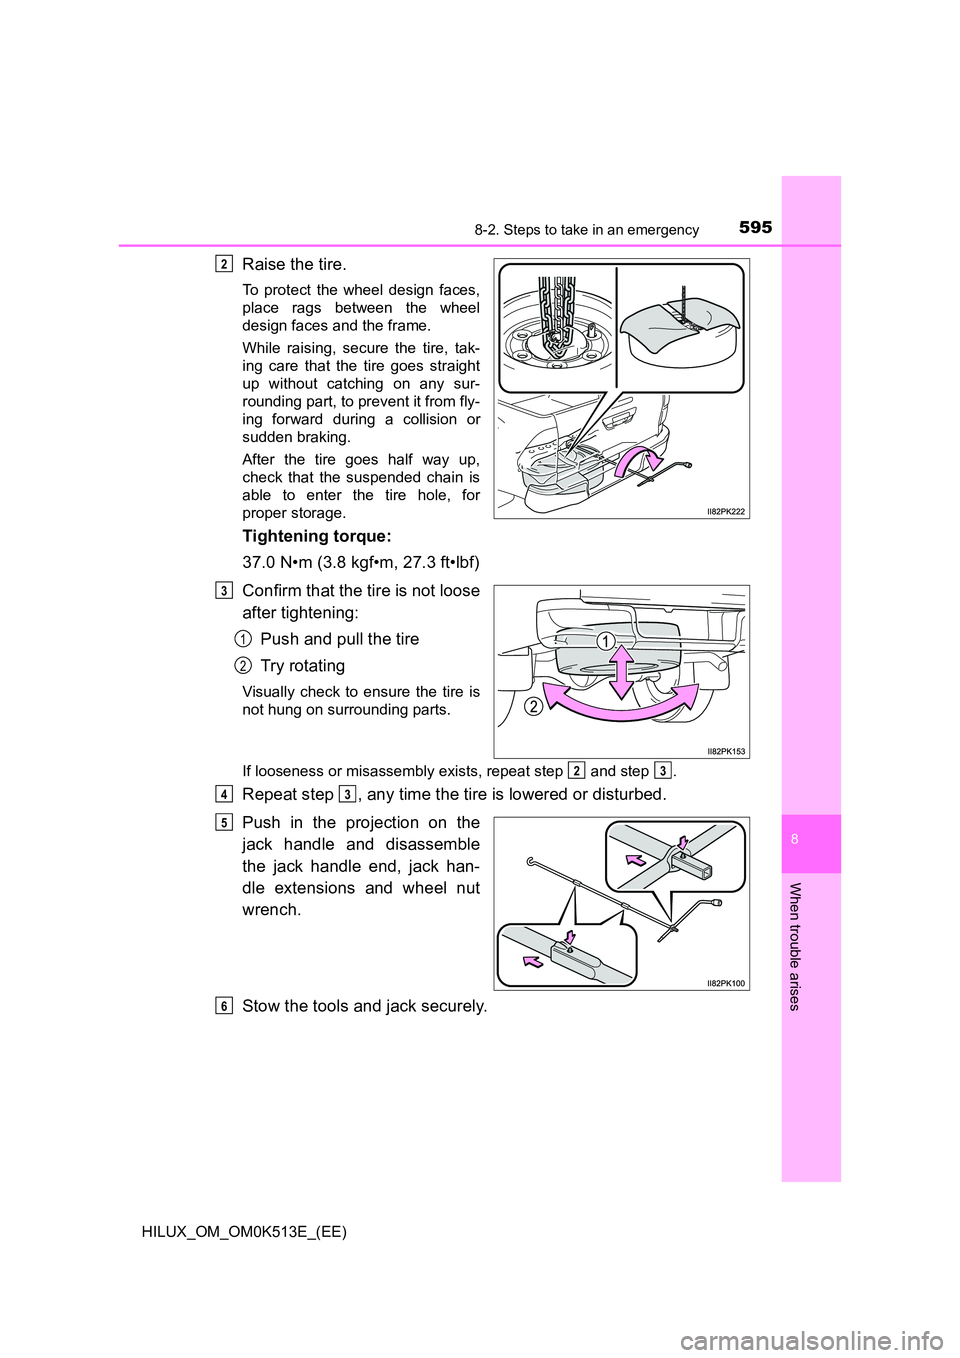
Raise the tire.
To protect the wheel design faces,
place rags between the wheel
design faces and the frame.
While raising, secure the tire, tak-
ing care that the tire goes straight
up without catching on any sur-
rounding part, to prevent it from fly-
ing forward during a collision or
sudden braking.
After the tire goes half way up,
check that the suspended chain is
able to enter the tire hole, for
proper storage.
Tightening torque:
37.0 N•m (3.8 kgf•m, 27.3 ft•lbf)
Confirm that the tire is not loose
after tightening:
Push and pull the tire
Try rotating
Visually check to ensure the tire is
not hung on surrounding parts.
If looseness or misassembly exists, repeat step and step .
Repeat step , any time the tire is lowered or disturbed.
Push in the projection on the
jack handle and disassemble
the jack handle end, jack han-
dle extensions and wheel nut
wrench.
Stow the tools and jack securely.
2
3
1
2
23
43
5
6
Page 599 of 798
5978-2. Steps to take in an emergency
HILUX_OM_OM0K513E_(EE)
8
When trouble arises
�QFlat tire
Repair or replace the flat tire as soon as possible.
When stowing the repaired or replaced tire to the carrier, remove the rags that
are protecting the wheel design faces.
WARNING
�Q After using the tools and jack
Before driving, make sure all the tools and jack are securely in place in their
storage location to reduce the possibility of personal injury during a collision
or sudden braking.
NOTICE
�Q When stowing the flat tire
Ensure that there is no object caught between the tire and the vehicle
underbody (except for rags that is used when stowing the flat tire).
�Q When assembling the jack handle extension
Insert the square head securely until you hear a click. Otherwise the exten-
sion may come off and it may damage the paint or vehicle body.
Page 619 of 798

6178-2. Steps to take in an emergency
HILUX_OM_OM0K513E_(EE)
8
When trouble arises
WARNING
�QWhen attempting to free a stuck vehicle
If you choose to push the vehicle back and forth to free it, make sure the
surrounding area is clear to avoid striking other vehicles, objects or people.
The vehicle may also lunge forward or lunge back suddenly as it becomes
free. Use extreme caution.
�Q When shifting the shift lever
For vehicles with automatic transmission, be careful not to shift the shift
lever with the accelerator pedal depressed.
This may lead to unexpected rapid acceleration of the vehicle that may
cause an accident resulting in death or serious injury.
NOTICE
�Q To avoid damage to the transmission and other components
�O Avoid spinning the wheels and depressing the accelerator pedal more
than necessary.
�O If the vehicle remains stuck even after these procedures are performed,
the vehicle may require towing to be freed.
�O Vehicles with automatic transmission: When a warning message for the
automatic transmission fluid temperature is displayed while attempting to
free a stuck vehicle, immediately remove your foot from the accelerator
pedal and wait until the warning message disappears. Otherwise, the
transmission may become damaged. ( P. 238)
Page 624 of 798
6229-1. Specifications
HILUX_OM_OM0K513E_(EE)
Models for model code destination W*1
Weights (with towing hitch)
Gross vehicle
mass
Single-
cab
models
4WD
models
3080 kg (6790 lb.)*2
3100 kg (6834 lb.)*3
Pre
Runner 3000 kg (6614 lb.)
Smart-
cab
models
4WD
models 3150 kg (6945 lb.)
Pre
Runner 3000 kg (6614 lb.)
Double-
cab
models
4WD
models
Models made in South Africa*1
3210 kg (7077 lb.)
Models made in Thailand*1
2910 kg (6415 lb.)*5
3130 kg (6900 lb.)*6
Pre
Runner
Models made in South Africa*1
3050 kg (6724 lb.)
Models made in Thailand*1
3030 kg (6680 lb.)
Maximum
permissible axle
capacity
Front 1450 kg (3197 lb.)
Rear
Single-
cab
models
1850 kg (4079 lb.)
Smart-
cab
models
1920 kg (4233 lb.)
Double-
cab
models
Except for GUN126L-DTTSXW
and GUN126L-DTTHXW mod-
els*4
1920 kg (4233 lb.)
For GUN126L-DTTSXW and
GUN126L-DTTHXW models*4
1650 kg (3638 lb.)*8
1920 kg (4233 lb.)*9
Drawbar load4WD models 140 kg (309 lb.)
Pre Runner 120 kg (265 lb.)
Page 625 of 798

623
9
9-1. Specifications
Vehicle specifications
HILUX_OM_OM0K513E_(EE)
*1: See “Checking your vehicle’s model” if you are not sure of which model
your vehicle is. ( P. 12)
*2: Except for GUN125R-BNFSXW3 model*4
*3: For GUN125R-BNFSXW3 model*4
*4: The model code is indicated on the manufacturer’ plate or label.
( P. 624)
*5: Except for EURO VI models*7 for Israel and Turkey
*6: For EURO VI models*7 for Israel and Turkey
*7: EURO VI is an emission standard. If it is not clear that your vehicle meets
relevant standards, contact any authorized Toyota retailer or Toyota
authorized repairer, or any reliable repairer.
*8: Except for EURO VI models*7 for Israel, Turkey and Ukraine
*9: For EURO VI models*7 for Israel, Turkey and Ukraine
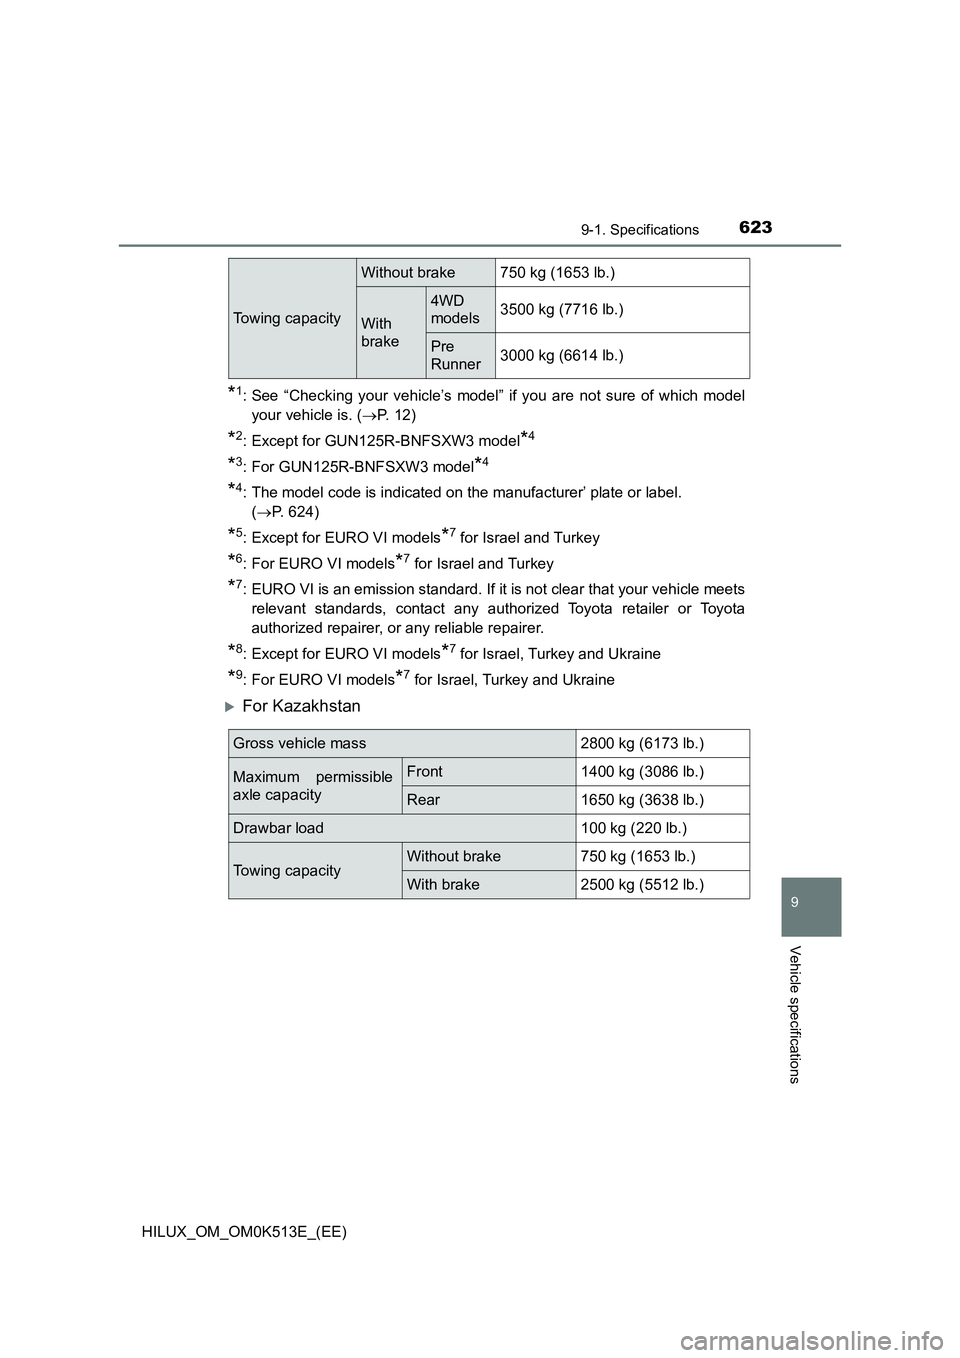
For Kazakhstan
Towing capacity
Without brake 750 kg (1653 lb.)
With
brake
4WD
models 3500 kg (7716 lb.)
Pre
Runner 3000 kg (6614 lb.)
Gross vehicle mass2800 kg (6173 lb.)
Maximum permissible
axle capacity
Front1400 kg (3086 lb.)
Rear1650 kg (3638 lb.)
Drawbar load100 kg (220 lb.)
Towing capacityWithout brake750 kg (1653 lb.)
With brake2500 kg (5512 lb.)
Page 643 of 798
641
9
9-1. Specifications
Vehicle specifications
HILUX_OM_OM0K513E_(EE)
18 inch tires
*: See “Checking your vehicle’s model” if you are not sure of which model
your vehicle is. ( P. 12)
�QWhen towing a trailer (with towing hitch)
Add 20.0 kPa (0.2 kgf/cm2 or bar, 3 psi) to the recommended tire inflation
pressure and drive at speeds below 100 km/h (62 mph).
Tire size265/60R18 110H
Tire inflation
pressure
(Recommended
cold tire inflation
pressure)
Front wheel
(unladen)
kPa
(kgf/cm2 or
bar, psi)
Front wheel
(full load)
kPa
(kgf/cm2 or
bar, psi)
Rear wheel
(unladen)
kPa
(kgf/cm2 or
bar, psi)
Rear wheel
(full load)
kPa
(kgf/cm2 or
bar, psi)
Except for
Kazakhstan,
and except
models for
model code
destination W*
200
(2.0, 29)
230
(2.3, 33)
200
(2.0, 29)
250
(2.5, 36)
For Kazakh-
stan, and
models for
model code
destination W*
230
(2.3, 33)
230
(2.3, 33)
230
(2.3, 33)
250
(2.5, 36)
Wheel size18 7 1/2J
Wheel nut torque105 N•m (10.7 kgf•m, 77 ft•lbf)
Page 665 of 798

663Alphabetical index
HILUX_OM_OM0K513E_(EE)
Driving
Break-in tips .......................... 196
Correct posture ....................... 38
Procedures............................ 192
Winter drive tips .................... 374
Dynamic radar cruise
control .................................... 301
Function ................................ 301
Warning message ................. 580
Eco Driving Indicator....... 126, 128
Emergency flashers................. 554
Electronic key
If the electronic key does
not operate properly ........... 600
Replacing the battery ............ 516
Emergency, in case of
If a warning buzzer
sounds ................................ 566
If a warning light turns on ...... 566
If the electronic key does
not operate properly ........... 600
If the engine will not start ...... 598
If the vehicle battery is
discharged .......................... 604
If the vehicle is submerged or
water on the road is
rising ................................... 557
If you have a flat tire.............. 581
If you lose your keys ............. 151
If you run out of fuel and
the engine stalls.................. 614
If you think something is
wrong .................................. 564
If your vehicle becomes
stuck ................................... 615
If your vehicle has to be
stopped in an
emergency.......................... 555
If your vehicle needs to be
towed .................................. 559
If your vehicle overheats ....... 610
Engine
“ACC” position ...................... 221
Compartment ........................ 486
Engine switch................ 220, 223
Hood ..................................... 484
How to start the
engine......................... 220, 223
Identification number ............ 625
If the engine will not start ...... 598
If you run out of fuel and the
engine stalls ....................... 614
If your vehicle has to be
stopped in an
emergency.......................... 555
Ignition switch
(engine switch) ........... 220, 223
Overheating .......................... 610
Engine coolant
Capacity ................................ 634
Checking ............................... 492
Preparing and checking
before winter....................... 374
Engine coolant
temperature gauge ................ 131
Engine immobilizer system .... 115
Engine oil
Capacity ................................ 628
Checking ............................... 489
Oil level warning light ............ 570
Oil pressure warning light ..... 566
Preparing and checking
before winter....................... 374
Engine oil maintenance
data ......................................... 491
E