Page 403 of 568
4036-2. Maintenance
6
Maintenance and care
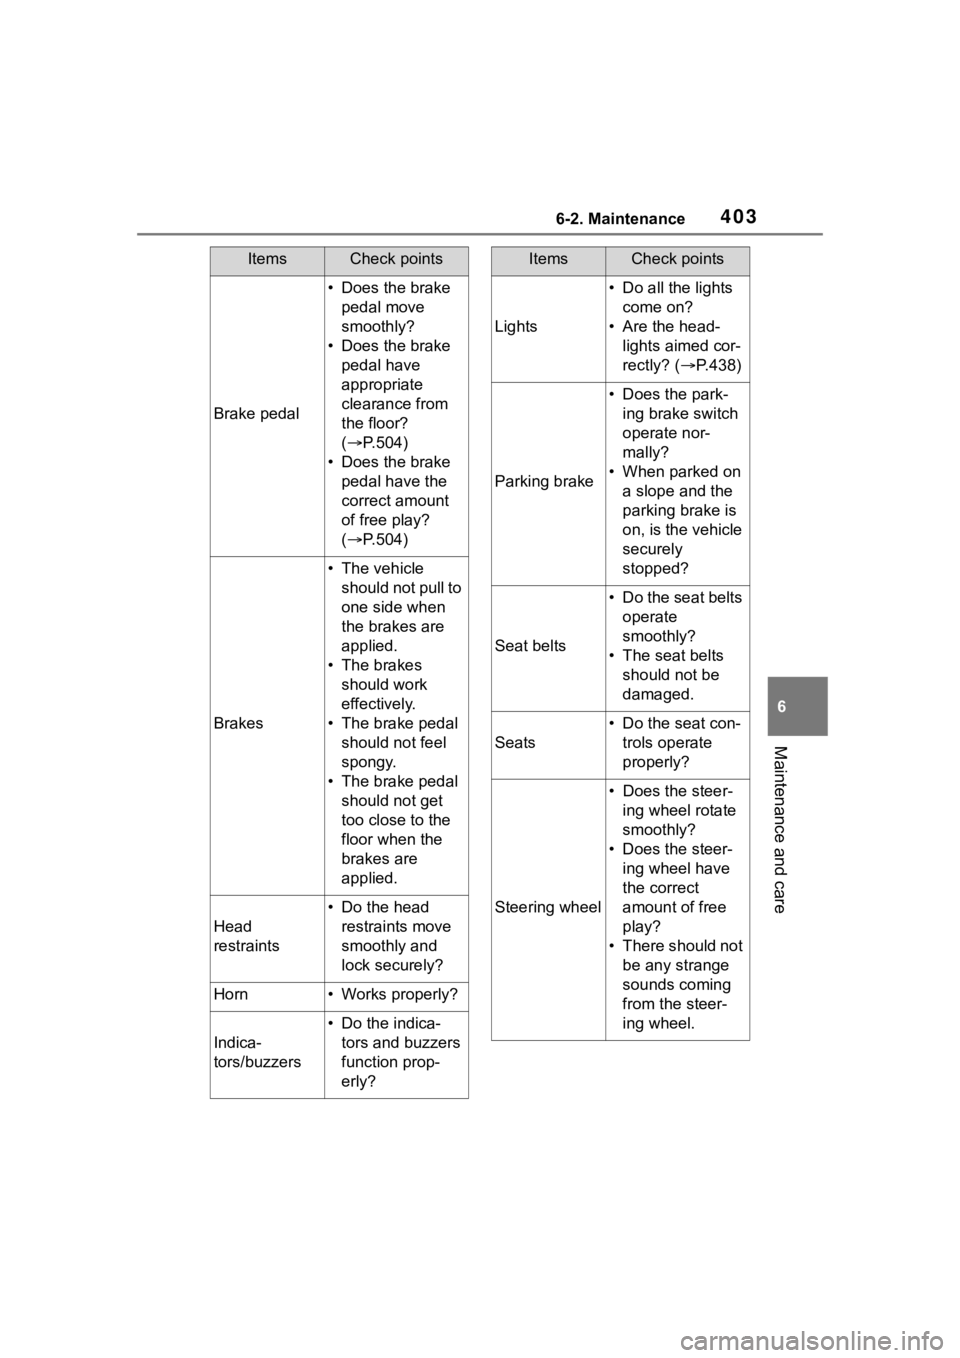
Brake pedal
• Does the brake pedal move
smoothly?
• Does the brake pedal have
appropriate
clearance from
the floor?
( P.504)
• Does the brake pedal have the
correct amount
of free play?
( P.504)
Brakes
• The vehicle
should not pull to
one side when
the brakes are
applied.
• The brakes should work
effectively.
• The brake pedal should not feel
spongy.
• The brake pedal should not get
too close to the
floor when the
brakes are
applied.
Head
restraints
• Do the head restraints move
smoothly and
lock securely?
Horn• Works properly?
Indica-
tors/buzzers
• Do the indica-tors and buzzers
function prop-
erly?
ItemsCheck points
Lights
• Do all the lights come on?
• Are the head- lights aimed cor-
rectly? (P.438)
Parking brake
• Does the park-ing brake switch
operate nor-
mally?
• When parked on a slope and the
parking brake is
on, is the vehicle
securely
stopped?
Seat belts
• Do the seat belts operate
smoothly?
• The seat belts should not be
damaged.
Seats
• Do the seat con-trols operate
properly?
Steering wheel
• Does the steer-ing wheel rotate
smoothly?
• Does the steer- ing wheel have
the correct
amount of free
play?
• There should not be any strange
sounds coming
from the steer-
ing wheel.
ItemsCheck points
Page 404 of 568

4046-2. Maintenance
The OBD system determines
that a problem exists some-
where in the emission control
system. Your vehicle may not
pass the I/M test and may need
to be repaired. Contact your
Toyota dealer to service the
vehicle.
When the battery is discon-
nected or discharged
Readiness codes that are set
during ordinary driving are erased.
Also, depending on your driving
habits, the readiness codes may
not be completely set.
When the fuel tank cap is
loose
Vehicle exterior
ItemsCheck points
Doors
• Do the doors
operate
smoothly?
Engine hood
• Does the engine hood lock system
work properly?
Fluid leaks
• There should not be any signs of
fluid leakage
after the vehicle
has been parked.
Tires
• Is the tire infla-tion pressure
correct?
• The tires should not be damaged
or excessively
worn.
• Have the tires been rotated
according to the
maintenance
schedule?
• The wheel nuts should not be
loose.
Windshield
wipers/rear
window wiper
• The wiper blades should not show
any signs of
cracking, split-
ting, wear, con-
tamination or
deformation.
• The wiper blades should clear the
windshield/rear
window without
streaking or skip-
ping.
Emission inspection
and maintenance (I/M)
programs
Some states have vehicle
emission inspection pro-
grams which include OBD
(On Board Diagnostics)
checks. The OBD system
monitors the operation of
the emission control sys-
tem.
If the malfunction indica-
tor lamp comes on
Your vehicle may not pass
the I/M test in the follow-
ing situations:
Page 408 of 568
4086-3. Do-it-yourself maintenance
1Pull the hood lock release
lever.
The hood will pop up slightly.
2Pull up the auxiliary catch
lever and lift the hood.
3 Hold the hood open by insert-
ing the support rod into the
slot.
Hood
Opening the hood
WARNING
■Pre-driving check
Check that the hood is fully closed
and locked.
If the hood is not locked properly,
it may open while the vehicle is in
motion and cause an accident,
which may result i n death or seri-
ous injury.
■After installing the support
rod into the slot
Make sure the rod supports the
hood securely preventing it from
falling down onto your head or
body.
NOTICE
■When closing the hood
Be sure to return the support rod
to its clip before closing the hood.
Closing the hood with the support
rod not clipped could cause the
hood to bend.
Page 411 of 568
4116-3. Do-it-yourself maintenance
6
Maintenance and care
more than 5 minutes for the
oil to drain back into the bot-
tom of the engine.
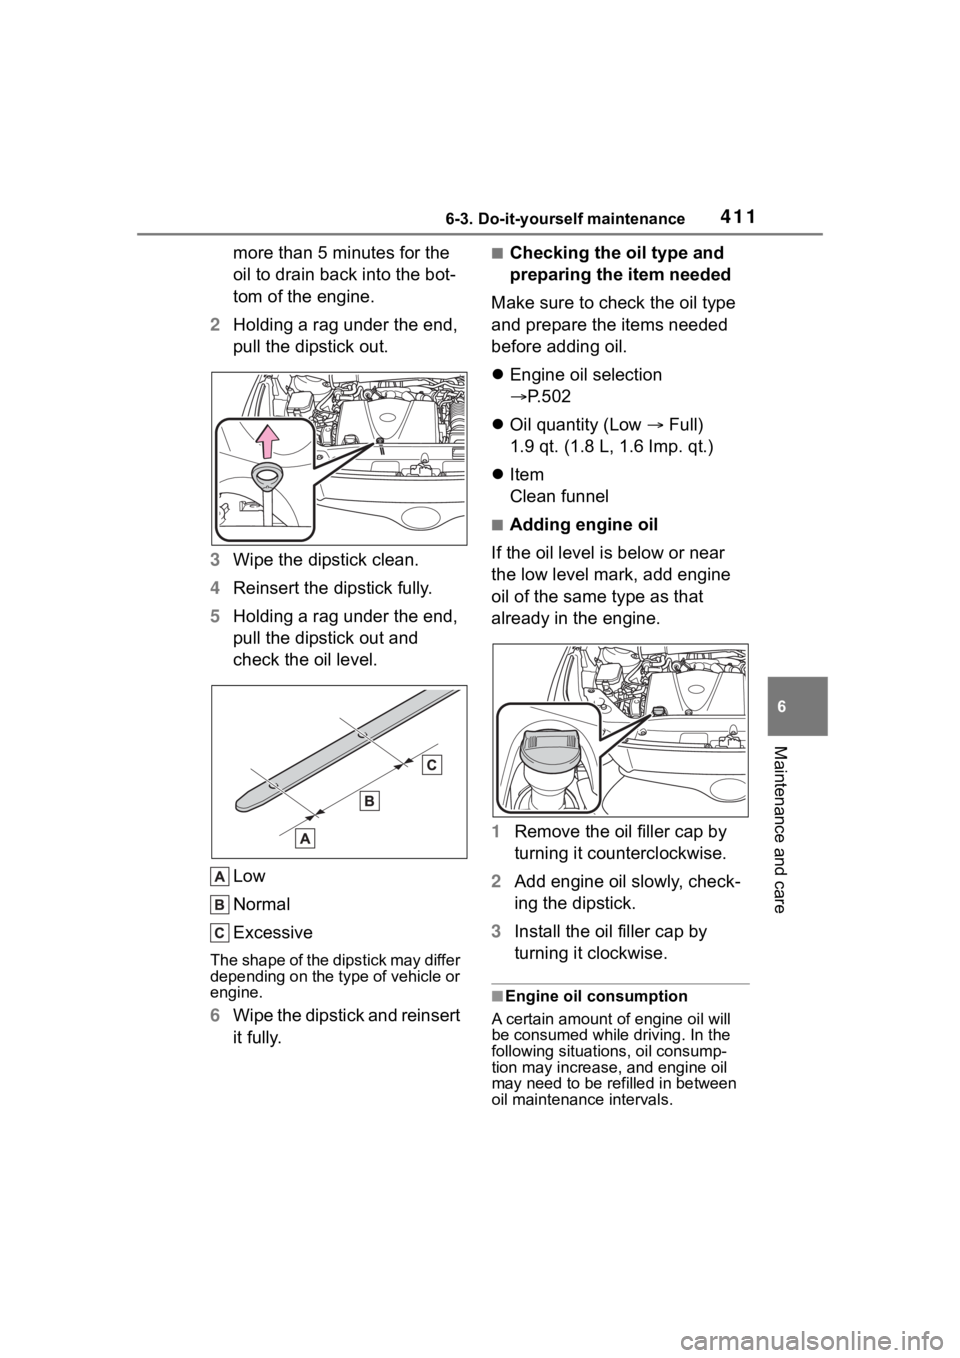
2 Holding a rag under the end,
pull the dipstick out.
3 Wipe the dipstick clean.
4 Reinsert the dipstick fully.
5 Holding a rag under the end,
pull the dipstick out and
check the oil level.
Low
Normal
Excessive
The shape of the dipstick may differ
depending on the type of vehicle or
engine.
6Wipe the dipstick and reinsert
it fully.
■Checking the oil type and
preparing the item needed
Make sure to check the oil type
and prepare the items needed
before adding oil.
Engine oil selection
P.502
Oil quantity (Low Full)
1.9 qt. (1.8 L, 1.6 Imp. qt.)
Item
Clean funnel
■Adding engine oil
If the oil level is below or near
the low level mark, add engine
oil of the same type as that
already in the engine.
1 Remove the oil filler cap by
turning it counterclockwise.
2 Add engine oil slowly, check-
ing the dipstick.
3 Install the oil filler cap by
turning it clockwise.
■Engine oil consumption
A certain amount of engine oil will
be consumed while driving. In the
following situatio ns, oil consump-
tion may increase, and engine oil
may need to be refilled in between
oil maintenance intervals.
Page 415 of 568
4156-3. Do-it-yourself maintenance
6
Maintenance and care
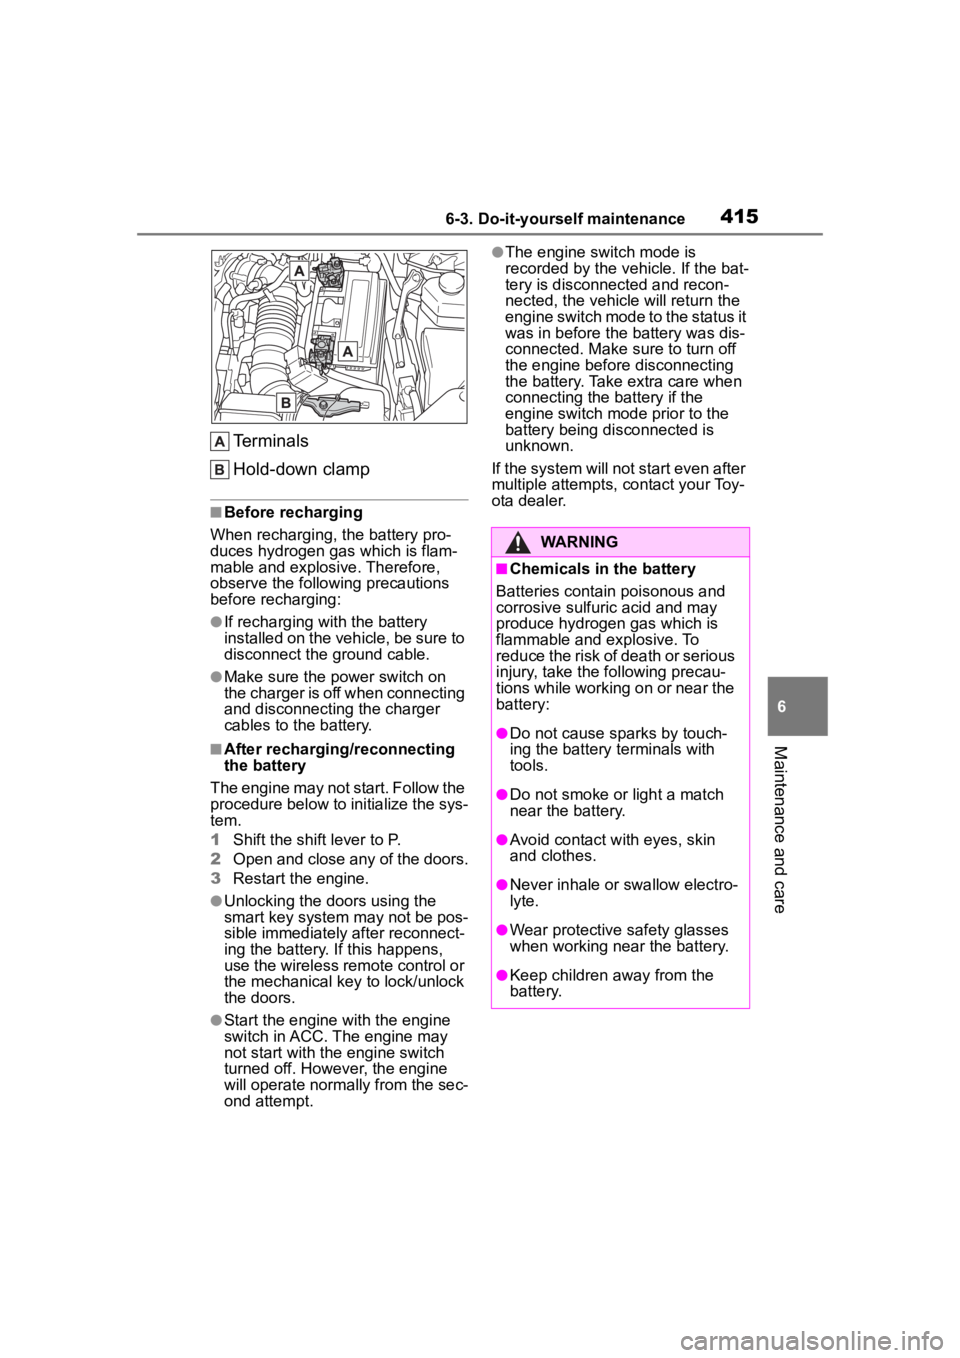
Terminals
Hold-down clamp
■Before recharging
When recharging, t he battery pro-
duces hydrogen ga s which is flam-
mable and explosive. Therefore,
observe the following precautions
before recharging:
●If recharging wi th the battery
installed on the vehicle, be sure to
disconnect the ground cable.
●Make sure the power switch on
the charger is off when connecting
and disconnecting the charger
cables to the battery.
■After recharging/reconnecting
the battery
The engine may not start. Follow the
procedure below to initialize the sys-
tem.
1 Shift the shift lever to P.
2 Open and close any of the doors.
3 Restart the engine.
●Unlocking the doors using the
smart key system may not be pos-
sible immediately after reconnect-
ing the battery. If this happens,
use the wireless remote control or
the mechanical key to lock/unlock
the doors.
●Start the engine with the engine
switch in ACC. The engine may
not start with the engine switch
turned off. However, the engine
will operate normally from the sec-
ond attempt.
●The engine switch mode is
recorded by the vehicle. If the bat-
tery is disconnected and recon-
nected, the vehicle will return the
engine switch mode to the status it
was in before the battery was dis-
connected. Make sure to turn off
the engine before disconnecting
the battery. Take extra care when
connecting the battery if the
engine switch mode prior to the
battery being disconnected is
unknown.
If the system will not start even after
multiple attempts, contact your Toy-
ota dealer.
WARNING
■Chemicals in the battery
Batteries contain poisonous and
corrosive sulfur ic acid and may
produce hydrogen gas which is
flammable and explosive. To
reduce the risk of death or serious
injury, take the following precau-
tions while working on or near the
battery:
●Do not cause sparks by touch-
ing the battery terminals with
tools.
●Do not smoke or light a match
near the battery.
●Avoid contact with eyes, skin
and clothes.
●Never inhale or swallow electro-
lyte.
●Wear protective safety glasses
when working near the battery.
●Keep children away from the
battery.
Page 432 of 568
4326-3. Do-it-yourself maintenance
Use only Toyota wheel nuts
and wrenches designed for
use with your aluminum
wheels.
When rotating, repairing or
changing your tires, check
that the wheel nuts are still
tight after driving 1000 miles
(1600 km).
Be careful not to damage the
aluminum wheels when using
tire chains.
Use only Toyota genuine bal-
ance weights or equivalent
and a plastic or rubber ham-
mer when balancing your
wheels. 1
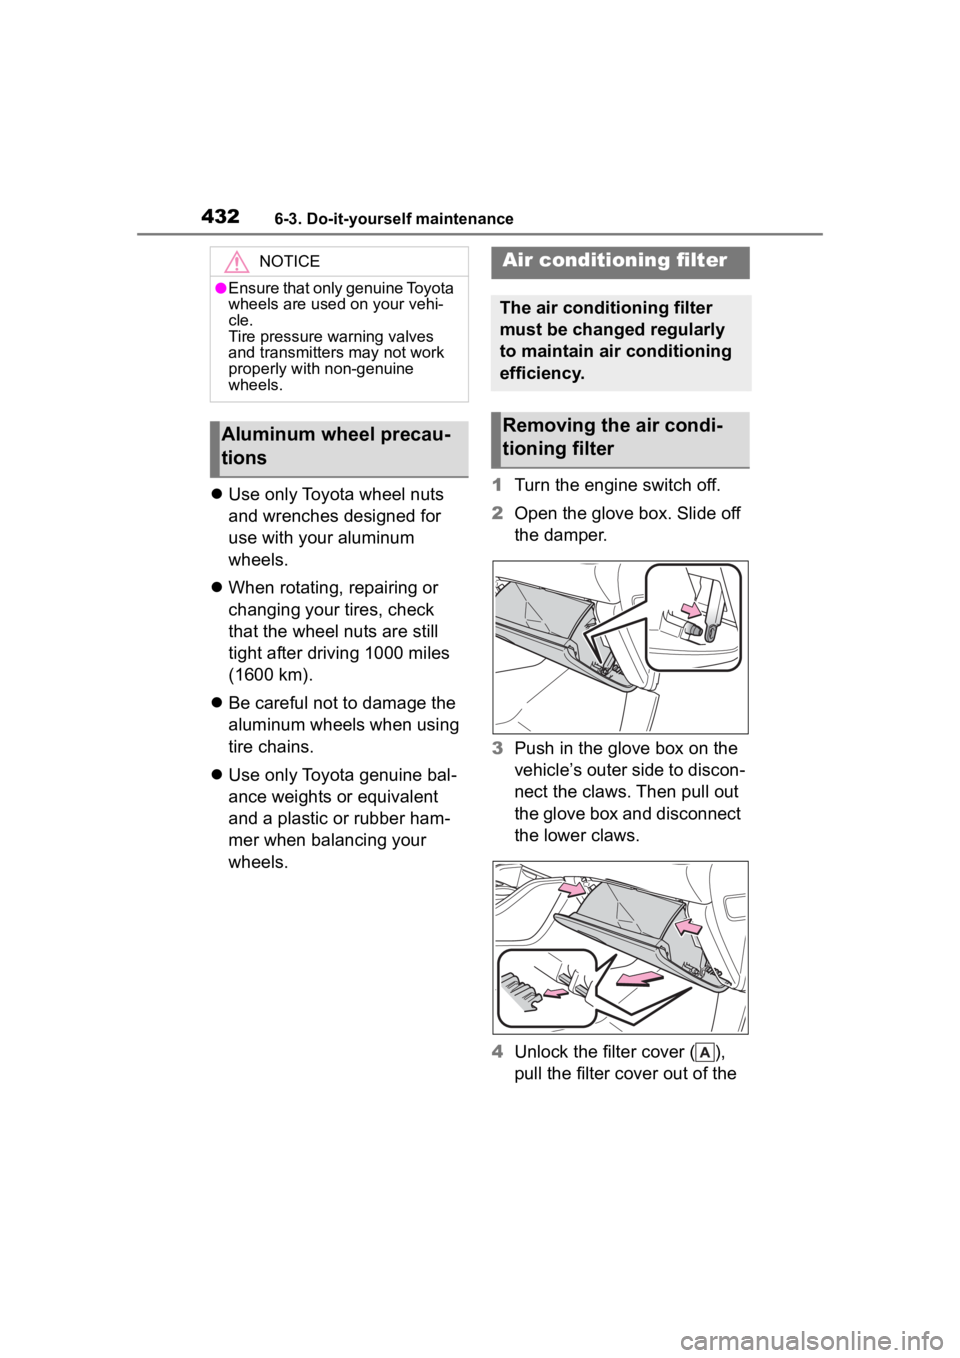
Turn the engine switch off.
2 Open the glove box. Slide off
the damper.
3 Push in the glove box on the
vehicle’s outer side to discon-
nect the claws. Then pull out
the glove box and disconnect
the lower claws.
4 Unlock the filter cover ( ),
pull the filter cover out of the
NOTICE
●Ensure that only genuine Toyota
wheels are used on your vehi-
cle.
Tire pressure warning valves
and transmitters may not work
properly with non-genuine
wheels.
Aluminum wheel precau-
tions
Air conditioning filter
The air conditioning filter
must be changed regularly
to maintain air conditioning
efficiency.
Removing the air condi-
tioning filter
Page 434 of 568
4346-3. Do-it-yourself maintenance
■If the electronic key battery is
depleted
The following symptoms may occur:
●The smart key system and wire-
less remote contr ol will not func-
tion properly.
●The operational range will be
reduced.
Flathead screwdriver
Small flathead screwdriver
Lithium battery CR2032
■Use a CR2032 lithium battery
●Batteries can be purchased at
your Toyota dealer, local electrical
appliance shops or camera stores.
●Replace only with the same or
equivalent type recommended by
the manufacturer.
●Dispose of used ba tteries accord-
ing to the local laws.
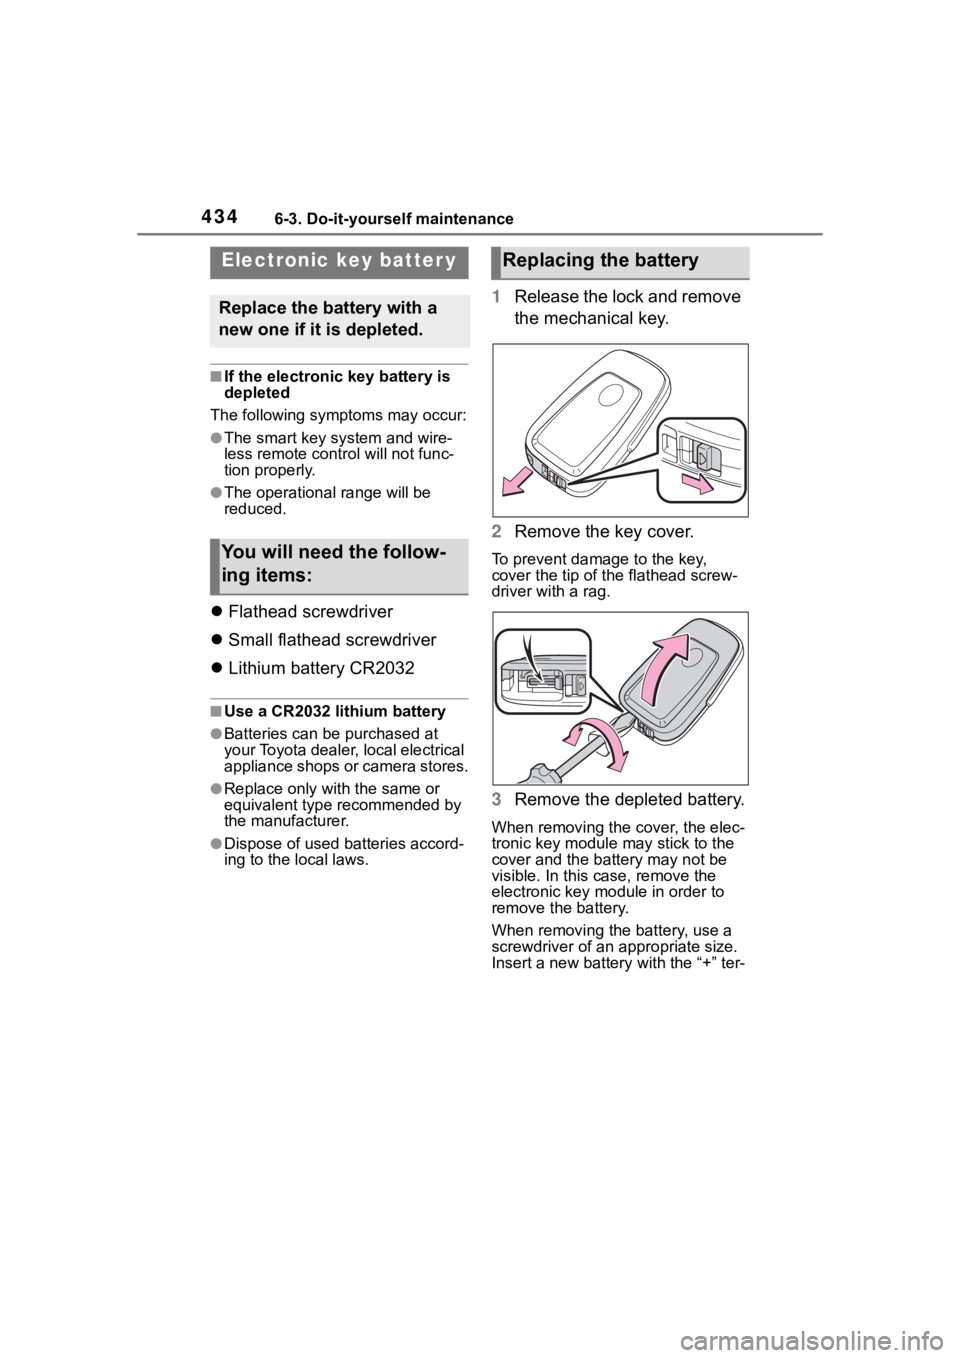
1 Release the lock and remove
the mechanical key.
2 Remove the key cover.
To prevent damage to the key,
cover the tip of the flathead screw-
driver with a rag.
3Remove the depleted battery.
When removing the cover, the elec-
tronic key module may stick to the
cover and the batt ery may not be
visible. In this case, remove the
electronic key module in order to
remove the battery.
When removing the battery, use a
screwdriver of an appropriate size.
Insert a new battery with the “+” ter-
Electronic key batter y
Replace the battery with a
new one if it is depleted.
You will need the follow-
ing items:
Replacing the battery
Page 440 of 568

4406-3. Do-it-yourself maintenance
Back-up lights
License plate lights
■Lights that need to be
replaced by your Toyota
dealer
Headlight low beams
Headlight high beams
Daytime running lights (types
A and C)
Daytime running lights/park-
ing lights (type B)
Front fog lights (if equipped)
Side turn signal lights
Tail lights/stop lights
Rear side marker lights
Tail lights
High mounted stoplight
Outer foot lights (if equipped)
■LED lights
The lights other than the following
lights each consist of a number of
LEDs. If any of the LEDs burn out,
take your vehicle to your Toyota
dealer to have the light replaced.
●Front turn signal lights/parking
lights (types A and C)
●Front turn signal lights (type B)
●Front side marker lights
●Rear turn signal lights
●Back-up lights
●License plate lights
■Condensation build-up on the
inside of the lens
Temporary condensation build-up
on the inside of the light lens does
not indicate a malfunction. Contact
your Toyota dealer for more informa- tion in the following situations:
●Large drops of water have built up
on the inside of the lens.
●Water has built up
inside the light.
■When replacing light bulbs
P.437
■Front turn signal
lights/parking lights (types
A and C) and front turn sig-
nal lights (type B)
1 Turn the bulb base counter-
clockwise and remove it.
2 Remove the light bulb.
3 Install a new light bulb, and
then install the bulb base to
the light unit by inserting it
and turning the bulb base
clockwise.
After installing the bulb base, wig-
gle it lightly to make sure it is
Replacing light bulbs