2022 TOYOTA HIGHLANDER maintenance schedule
[x] Cancel search: maintenance schedulePage 91 of 568
912-1. Instrument cluster
2
Vehicle status information and indicators
Select the open position when
power back door is fully open.
•“Volume”
Select to set the volume of the
buzzer which sounds when the
power back door system operates.
(Stop & Start) (if
equipped) ( P.272)
Select to set the length of time the
Stop & Start system will operate
when the “A/C” switch of the air
conditioning system is on.
“TPWS” (Tire Pressure Warn-
ing System) ( P.420)
• “Set Pressure” (tire pressure
warning system initialization)
Select to initialize the tire pressure
warning system.
• “Change Wheel” (register tire pressure warning system sensor
ID codes)
Select to register the ID codes of
the tire pressure s ensors to the tire
pressure warning system.
“Rear Seat Reminder”
( P. 1 1 9 )
Select to enable/disable the rear
seat reminder.
“Scheduled Maintenance”
( P.401)
Select to reset the scheduled main-
tenance information (maintenance
required message and distance
until maintenance necessary) after
all maintenance is performed.
“Oil Maintenance” ( P.410)
Select to reset the oil maintenance
information (maintenance required
message and distance until mainte- nance necessary) after an oil
change is performed.
■ Meter settings
Press and hold to change
the settings of the following
items:
Language
Select to change the language dis-
played.
Units
Select to change the units of mea-
sure displayed.
Eco Driving Indicator Light
( P.86)
Select to enable/disable the Eco
Driving Indi cator Light.
Fuel economy display
Select to change the average fuel
consumption display between after
start/after reset. ( P. 8 6 )
Select to displa y/not display the
audio system linked display.
Select to change the displayed con-
tent of the following:
• Display contents
Select to displa y/not display the
AWD control (if equipped). ( P.88)
• Drive information type
Select to change the drive informa-
tion type display between after
start/after reset.
• Drive information items
Page 101 of 568

1012-1. Instrument cluster
2
Vehicle status information and indicators
• “Change Wheel” (register tire pressure warning system sensor
ID codes)
Select to register the ID codes of
the tire pressure s ensors to the tire
pressure warning system.
“Rear Seat Reminder”
( P. 1 1 9 )
Select to enable/disable the rear
seat reminder.
“Scheduled Maintenance”
( P.401)
Select to reset the scheduled main-
tenance information (maintenance
required message and distance
until maintenance necessary) after
all maintenance is performed.
“Oil Maintenance” ( P.410)
Select to reset the oil maintenance
information (maintenance required
message and distance until mainte-
nance necessary) after an oil
change is performed.
■ Meter settings
Press and hold to change
the settings of the following
items:
Language
Select to change the language dis-
played.
Units
Select to change t he units of mea-
sure displayed.
Eco Driving Indicator Light
( P. 9 5 )
Select to enable/disable the Eco
Driving Indicator Light.
Speedometer display (digital
speed)
Select to enable/disable the speed-
ometer display.
Gadget content
Select to turn the display of a gad-
get.
Fuel economy type
Select to change the average fuel
consumption display and an item to
be displayed as gadget.
Pop-up display
Select to enable/disable pop-up
displays for each relevant system.
Multi-information display off
Displays a blank screen.
Default setting
Select to reset the meter display
settings to the default setting.
■Vehicle functions and set-
tings that can be changed
P.521
■Background color of the indica-
tor/shift position display area
The background color of the indica-
tor/shift position display area is
changed accordi ng to the driving
mode as follows ( P.311):
●Eco drive mode: Blue
●Sport mode: Red
■Suspension of the settings dis-
play
●Some settings cannot be changed
while driving. When changing set-
tings, park the vehicle in a safe
place.
●If a warning message is displayed,
operation of the settings display
will be suspended.
Page 191 of 568

1914-1. Before driving
4
Driving
●All trailer lights work as required
by law.
●All lights work each time you con-
nect them.
●The trailer ball is set at the proper
height for the coupler on the
trailer.
●The trailer is level when it is
hitched.
Do not drive if the trailer is not
level, and check for improper
tongue weight, overloading, worn
suspension, or other possible
causes.
●The trailer cargo is securely
loaded.
●The rear view mirrors conform to
all applicable federal, state/provin-
cial or local regu lations. If they do
not, install rear view mirrors
appropriate for towing purposes.
■Break-in schedule
If your vehicle is new or equipped
with any new power train compo-
nents (such as an engine, transaxle,
transfer [AWD models], rear differ-
ential [AWD models] or wheel bear-
ing), Toyota recommends that you
do not tow a trailer until the vehicle
has been driven for over 500 miles
(800 km).
After the vehicle has been driven for
over 500 miles (800 km), you can
start towing. However, for the next
500 miles (800 km), drive the vehi-
cle at a speed of less than 50 mph
(80 km/h) when towing a trailer, and
avoid full throttle acceleration.
■Maintenance
●If you tow a trailer, your vehicle
will require more f requent mainte-
nance due to the additional load.
(See “Scheduled Maintenance
Guide” or “Owner’s Manual Sup-
plement”.)
●Retighten the fixing bolts of the
towing ball and bracket after
approximately 600 miles (1000
km) of trailer towing.
■If trailer sway occurs
One or more factors (crosswinds,
passing vehicles, rough roads, etc.)
can adversely affect handling of
your vehicle and trailer, causing
instability.
●If trailer swaying occurs:
• Firmly grip the steering wheel. Steer straight ahead.
Do not try to contr ol trailer sway-
ing by turning the steering wheel.
• Begin releasing the accelerator pedal immediately but very gradu-
ally to reduce speed.
Do not increase speed. Do not
apply vehicle brakes.
If you make no extreme correction
with the steering or brakes, your
vehicle and trailer should stabilize.
(if enabled, Trailer Sway Control can
also help to stabilize the vehicle and
trailer.)
●After the trailer swaying has
stopped:
• Stop in a safe place. Get all occu- pants out of the vehicle.
• Check the tires of the vehicle and the trailer.
• Check the load in the trailer.
Make sure the load has not
shifted.
Make sure the tongue weight is
appropriate, if possible.
• Check the load in the vehicle. Make sure the vehicle is not over-
loaded after occupants get in.
If you cannot find any problems, the
speed at which trailer swaying
occurred is beyond the limit of your
particular vehicle-trailer combina-
tion. Drive at a lower speed to pre-
vent instability. Remember that
swaying of the towing vehicle-trailer
increases as speed increases.
Page 329 of 568
3294-6. Driving tips
4
Driving
NOTICE
■To prevent water damage
Take all necessary safety mea-
sures to ensure that water dam-
age to the engine or other
components does not occur.
●Water entering the engine air
intake will cause severe engine
damage.
●Water entering the automatic
transmission will cause deterio-
ration in shift quality, locking up
of your transmission accompa-
nied by vibration, and ultimately
damage.
●Water can wash the grease
from wheel bearings, causing
rusting and premature failure,
and may also enter the differen-
tial, transmission and transfer
case, reducing the gear oil’s
lubricating qualities.
■When you drive through
water
If driving through water, such as
when crossing shallow streams,
first check the depth of the water
and the bottom of the riverbed for
firmness. Drive slowly and avoid
deep water.
■Inspection after off-road driv-
ing
●Sand and mud that has accu-
mulated in bra ke drums and
around brake di scs may affect
braking efficiency and may
damage brake system compo-
nents.
●Always perform a maintenance
inspection aft er each day of
off-road driving that has taken
you through rough terrain, sand,
mud, or water. For scheduled
maintenance information, refer
to the “Scheduled Maintenance
Guide” or “Owner’s Manual
Supplement”.
Page 400 of 568
4006-2. Maintenance
6-2.Maintenance
■Repair and replacement
It is recommended that genuine
Toyota parts be used for repairs to
ensure performanc e of each sys-
tem. If non-Toyota parts are used in
replacement or if a repair shop other
than a Toyota dealer performs
repairs, confirm the warranty cover-
age.
■Allow inspection and repairs to
be performed by a Toyota
dealer
●Toyota technicians are
well-trained specialists and are
kept up to date with the latest ser-
vice information. They are well
informed about the operation of all
systems on your vehicle.
●Keep a copy of the repair order. It
proves that the maintenance that
has been performed is under war-
ranty coverage. If any problem
should arise while your vehicle is
under warranty, your Toyota
dealer will promptly take care of it.
General maintenance should be
performed on a daily basis. This
can be done by yourself or by a
Toyota dealer.
Scheduled maintenance should
be performed at specified inter-
vals according to the mainte-
nance schedule.
For details about maintenance
items and schedules, refer to the
“Scheduled Maintenance Guide” or
“Owner’s Manual Supplement”.
Maintenance require-
ments
To ensure safe and econom-
ical driving, day-to-day care
and regular maintenance
are essential. It is the
owner’s responsibility to
perform regular checks.
Toyota recommends the fol-
lowing maintenance:
WARNING
■If your vehicle is not properly
maintained
Improper maintenance could
result in serious damage to the
vehicle and possible death or seri-
ous injury.
■Handling of the battery
●Engine exhaust, some of its
constituents, and a wide variety
of automobile components con-
tain or emit chemicals known to
the State of California to cause
cancer and birth defects and
other reproductive harm. Work
in a well ventilated area.
●Oils, fuels and fluids contained
in vehicles as well as waste pro-
duced by component wear con-
tain or emit chemicals known to
the State of California to cause
cancer and birth defects or
other reproductive harm. Avoid
exposure and wash any
affected area immediately.
●Battery posts, terminals and
related accessories contain lead
and lead compounds which are
known to cause brain damage.
Wash your hands after han-
dling. ( P.414)
General maintenance
Scheduled maintenance
Page 401 of 568
4016-2. Maintenance
6
Maintenance and care
■Resetting the message indicat-
ing maintenance is required
After the required maintenance is
preformed according to the mainte-
nance schedule, please reset the
message.To reset t he message, fol-
low the procedures described
below:
4.2-inch display
1 Press or of the meter
control switch to select .
2 Press or of the meter
control switch, select and
then press and hold .
3 Press or of the meter
control switch, se lect “Scheduled
Maintenance” and then press
.
4 Select “Yes” and press .
5 A message will be displayed on
the multi-information display
when the reset procedure has
been completed.
7-inch display
1 Press or of the meter
control switch to select .
2 Press or of the meter
control switch, select and
then press and hold .
3 Press or of the meter
control switch, se lect “Scheduled
Maintenance” and then press
.
4 Select “Yes” and press .
5 A message will be displayed on
the multi-information display
when the reset procedure has
been completed.
You can perform some mainte-
nance procedures by yourself.
Please be aware that do-it-your-
self maintenance may affect
warranty coverage.
The use of Toyota Repair Manuals
is recommended.
For details about warranty cover-
age, refer to the separate “Owner’s
Warranty Informat ion Booklet” or
“Owner’s Manual Supplement”.
Do-it-yourself mainte-
nance
Page 404 of 568

4046-2. Maintenance
The OBD system determines
that a problem exists some-
where in the emission control
system. Your vehicle may not
pass the I/M test and may need
to be repaired. Contact your
Toyota dealer to service the
vehicle.
When the battery is discon-
nected or discharged
Readiness codes that are set
during ordinary driving are erased.
Also, depending on your driving
habits, the readiness codes may
not be completely set.
When the fuel tank cap is
loose
Vehicle exterior
ItemsCheck points
Doors
• Do the doors
operate
smoothly?
Engine hood
• Does the engine hood lock system
work properly?
Fluid leaks
• There should not be any signs of
fluid leakage
after the vehicle
has been parked.
Tires
• Is the tire infla-tion pressure
correct?
• The tires should not be damaged
or excessively
worn.
• Have the tires been rotated
according to the
maintenance
schedule?
• The wheel nuts should not be
loose.
Windshield
wipers/rear
window wiper
• The wiper blades should not show
any signs of
cracking, split-
ting, wear, con-
tamination or
deformation.
• The wiper blades should clear the
windshield/rear
window without
streaking or skip-
ping.
Emission inspection
and maintenance (I/M)
programs
Some states have vehicle
emission inspection pro-
grams which include OBD
(On Board Diagnostics)
checks. The OBD system
monitors the operation of
the emission control sys-
tem.
If the malfunction indica-
tor lamp comes on
Your vehicle may not pass
the I/M test in the follow-
ing situations:
Page 417 of 568
4176-3. Do-it-yourself maintenance
6
Maintenance and care
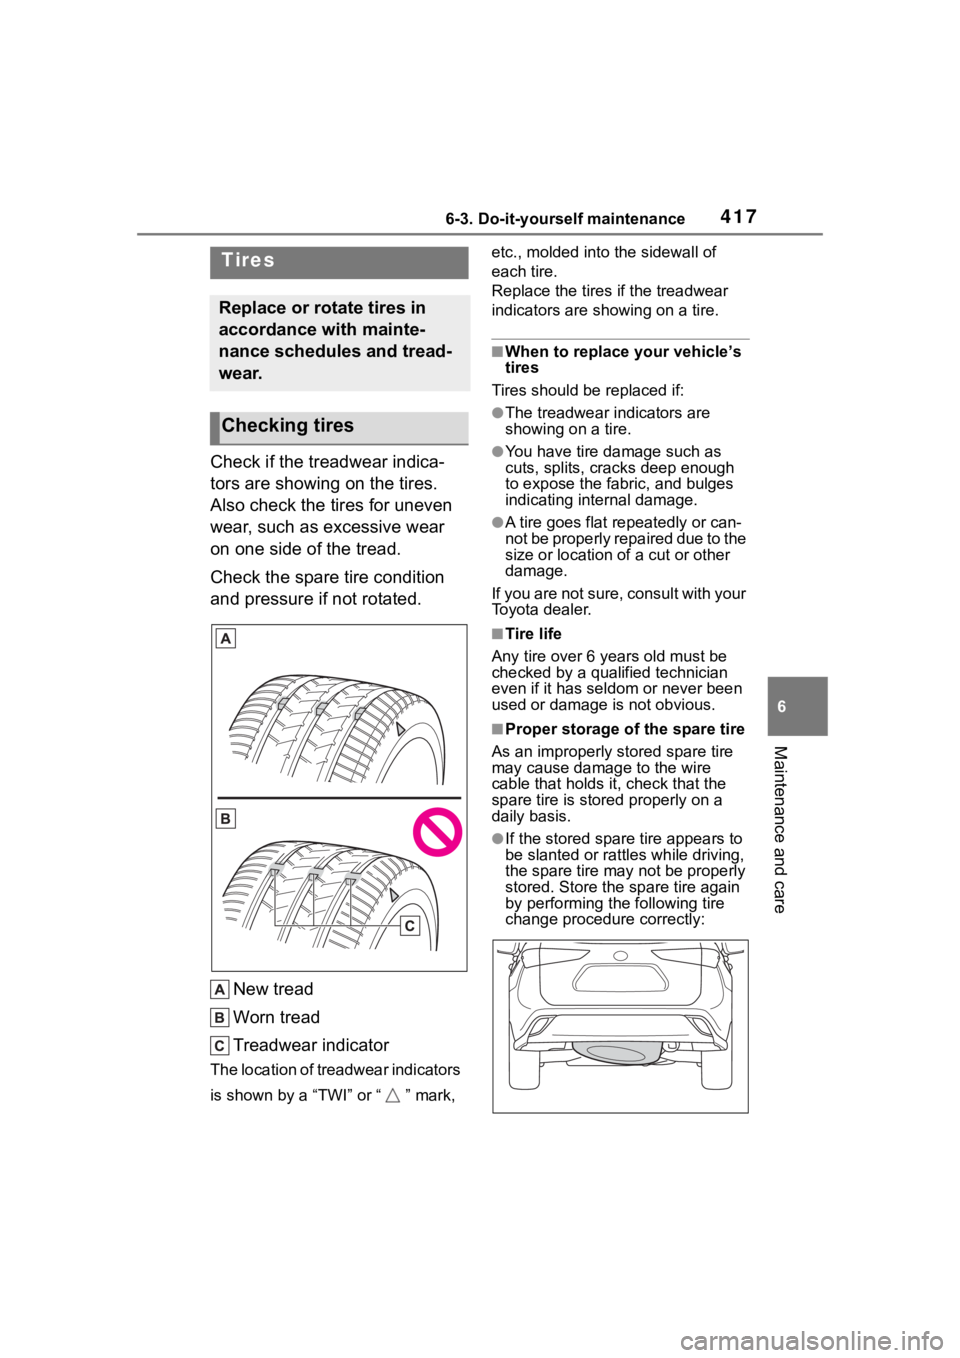
Check if the treadwear indica-
tors are showing on the tires.
Also check the tires for uneven
wear, such as excessive wear
on one side of the tread.
Check the spare tire condition
and pressure if not rotated.New tread
Worn tread
Treadwear indicator
The location of treadwear indicators
is shown by a “TWI” or “ ” mark, etc., molded into the sidewall of
each tire.
Replace the tires if the treadwear
indicators are s
howing on a tire.
■When to replace your vehicle’s
tires
Tires should be replaced if:
●The treadwear indicators are
showing on a tire.
●You have tire damage such as
cuts, splits, cracks deep enough
to expose the fabric, and bulges
indicating internal damage.
●A tire goes flat repeatedly or can-
not be properly repaired due to the
size or location of a cut or other
damage.
If you are not sure, consult with your
Toyota dealer.
■Tire life
Any tire over 6 years old must be
checked by a qualified technician
even if it has seldom or never been
used or damage is not obvious.
■Proper storage of the spare tire
As an improperly s tored spare tire
may cause damage to the wire
cable that holds i t, check that the
spare tire is stored properly on a
daily basis.
●If the stored spare tire appears to
be slanted or ratt les while driving,
the spare tire may not be properly
stored. Store the spare tire again
by performing the following tire
change procedure correctly:
Tires
Replace or rotate tires in
accordance with mainte-
nance schedules and tread-
wear.
Checking tires