2022 TOYOTA GR YARIS weight
[x] Cancel search: weightPage 48 of 470

46
Owner's Manual_Europe_M52P63_en
1-2. Child safety
■When installing a child
restraint system to a front pas-
senger seat
For the safety of a child, install a
child restraint system to a rear seat.
When installing a child restraint
system to a front passenger seat is
unavoidable, adjust the seat as fol-
lows and install the child restraint
system:
Move the front seat fully rear-
ward.
Adjust the seatback angle to the
most upright position.
When installing a forward-facing child
seat, if there is a gap between the child
seat and the seatback, adjust the
seatback angle until good contact is
WARNING
●For effective protection in automo- bile accidents and sudden stops, a
child must be properly restrained, using a seat belt or child restraint system which is correctly installed.
For installation details, refer to the operation manual enclosed with the child restraint system. General
installation instruction is provided in this manual.
●Toyota strongly urges the use of a proper child restraint system that conforms to the weight and size of
the child, installed on the rear seat. According to accident statistics, the child is safer when properly
restrained in the rear seat than in the front seat.
●Holding a child in your or someone else’s arms is not a substitute for a child restraint system. In an acci-
dent, the child can be crushed against the windshield or between the holder and the interior of the
vehicle.
■Handling the child restraint sys-
tem
If the child restraint system is not properly fixed in place, the child or
other passengers may be seriously injured or even killed in the event of sudden braking, sudden swerving, or
an accident.
●If the vehicle were to receive a
strong impact from an accident, etc., it is possible that the child restraint system has damage that is
not readily visible. In such cases, do not reuse the restraint system.
●Depending on the child restraint system, installation may be difficult or impossible. In those cases,
check whether the child restraint system is suitable for installment in the vehicle. ( P.49) Be sure to
install and observe the usage rules after carefully reading the child restraint system fixing method in
this manual, as well as the opera- tion manual enclosed with the child restraint system.
●Keep the child restraint system properly secured on the seat even if
it is not in use. Do not store the child restraint system unsecured in the passenger compartment.
●If it is necessary to detach the child restraint system, remove it from the
vehicle or store it securely in the luggage compartment.
When using a child restraint
system
Page 51 of 470

49
1
Owner's Manual_Europe_M52P63_en
1-2. Child safety
For safety and security
■Child restraint system compat-
ibility for each seating posi-
tion
Compatibility of each seating posi-
tion with child restraint systems
( P.50) displays the type of child
restraint systems that can be used
and possible seating positions for
installation using symbols.
Also, the recommended child
restraint system that is suitable for
your child can be selected.
Otherwise, check [Recommended
child restraint systems information]
for recommended child restraint
systems. ( P. 5 4 )
Check the selected child restraint
system together with the following
[Before confirming the compatibility
of each seating position with child
restraint systems].
■Before confirming the compat-
ibility of each seating position
with child restraint systems
1 Checking the child restraint sys-
tem standards.
Use a child restraint system that
conforms to UN (ECE) R44*1.
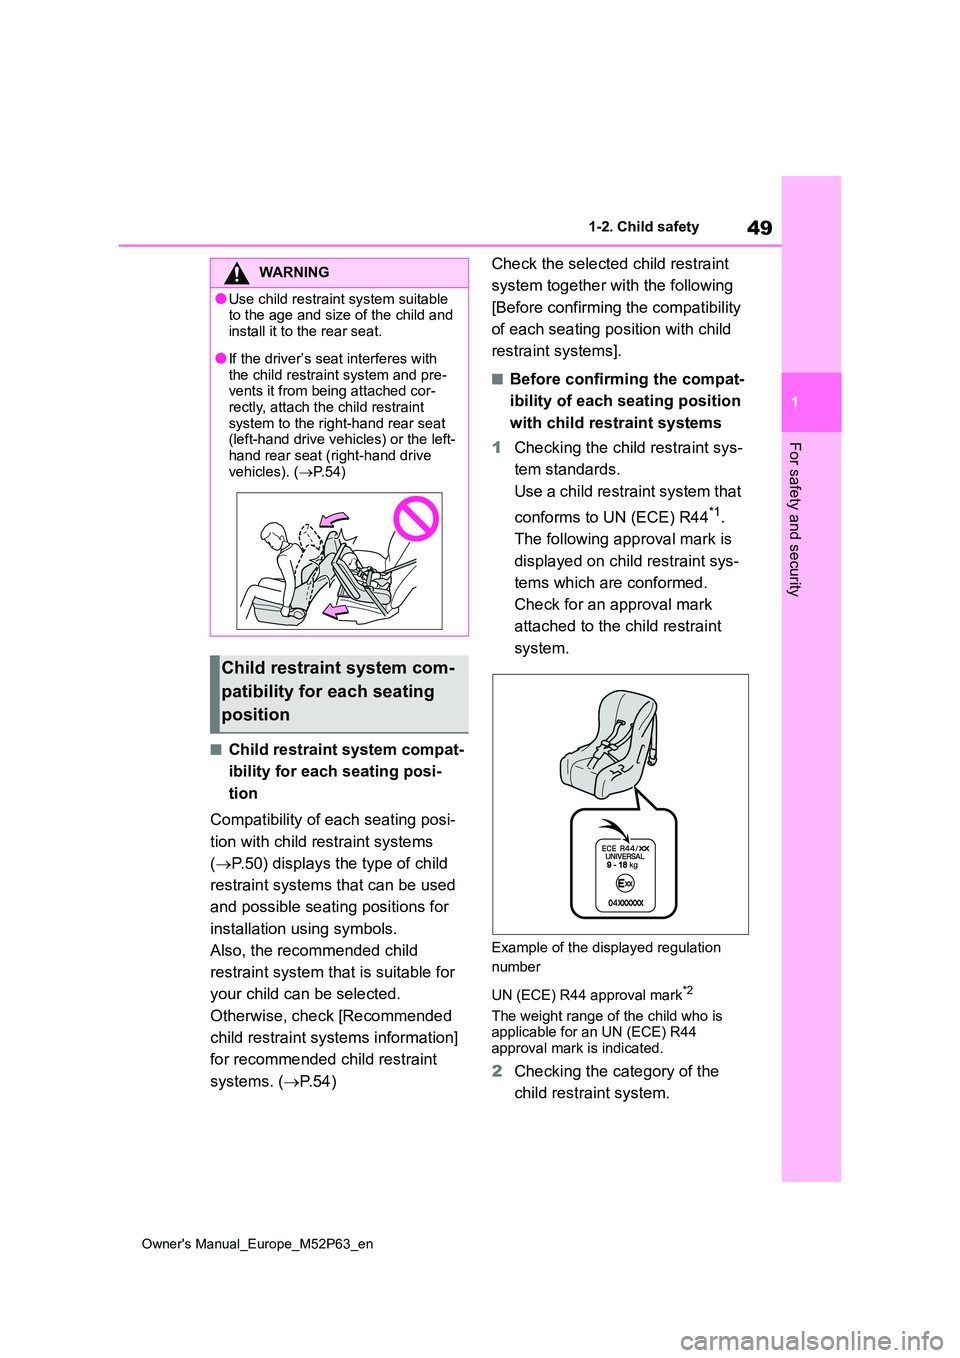
The following approval mark is
displayed on child restraint sys-
tems which are conformed.
Check for an approval mark
attached to the child restraint
system.
Example of the displayed regulation
number
UN (ECE) R44 approval mark*2
The weight range of the child who is applicable for an UN (ECE) R44
approval mark is indicated.
2 Checking the category of the
child restraint system.
WARNING
●Use child restraint system suitable to the age and size of the child and
install it to the rear seat.
●If the driver’s seat interferes with
the child restraint system and pre- vents it from being attached cor-rectly, attach the child restraint
system to the right-hand rear seat (left-hand drive vehicles) or the left-hand rear seat (right-hand drive
vehicles). ( P. 5 4 )
Child restraint system com-
patibility for each seating
position
Page 55 of 470

53
1
Owner's Manual_Europe_M52P63_en
1-2. Child safety
For safety and security
Toyota suggests the users to use and seating positions.
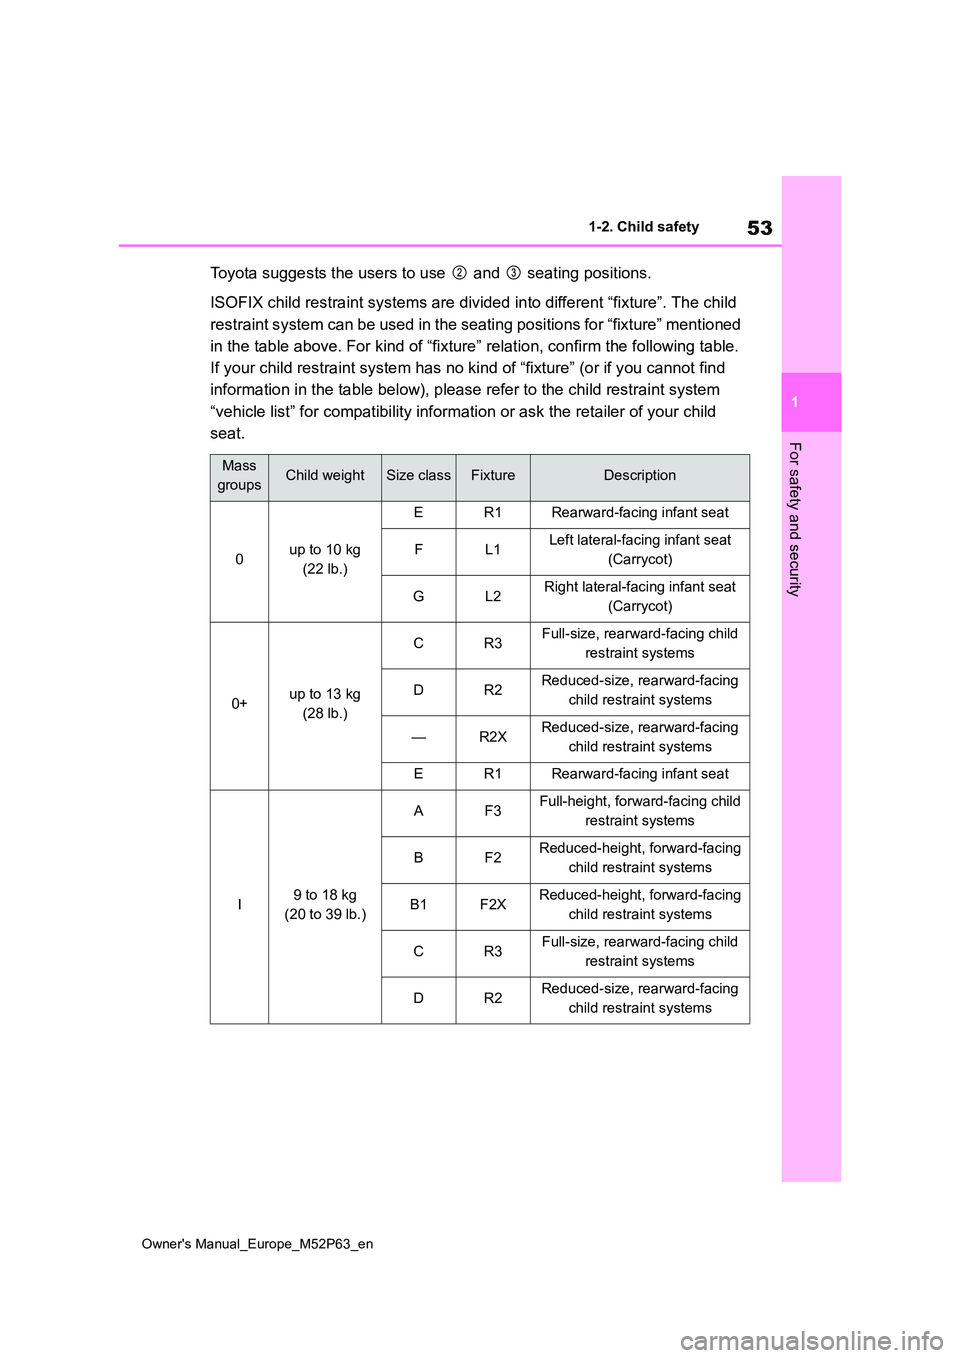
ISOFIX child restraint systems are divided into different “fixt ure”. The child
restraint system can be used in the seating positions for “fixt ure” mentioned
in the table above. For kind of “ fixture” relation, confirm the following table.
If your child restraint system ha s no kind of “fixture” (or if you cannot find
information in the table below), please refer to the child rest raint system
“vehicle list” for compatibility information or ask the retaile r of your child
seat.
Mass
groupsChild weightSize classFixtureDescription
0up to 10 kg
(22 lb.)
ER1Rearward-facing infant seat
FL1Left lateral-facing infant seat
(Carrycot)
GL2Right lateral-facing infant seat
(Carrycot)
0+up to 13 kg
(28 lb.)
CR3Full-size, rearward-facing child
restraint systems
DR2Reduced-size, rearward-facing
child restraint systems
—R2XReduced-size, rearward-facing
child restraint systems
ER1Rearward-facing infant seat
I9 to 18 kg
(20 to 39 lb.)
AF3Full-height, forward-facing child
restraint systems
BF2Reduced-height, forward-facing
child restraint systems
B1F2XReduced-height, forward-facing
child restraint systems
CR3Full-size, rearward-facing child
restraint systems
DR2Reduced-size, rearward-facing
child restraint systems
Page 56 of 470

54
Owner's Manual_Europe_M52P63_en
1-2. Child safety
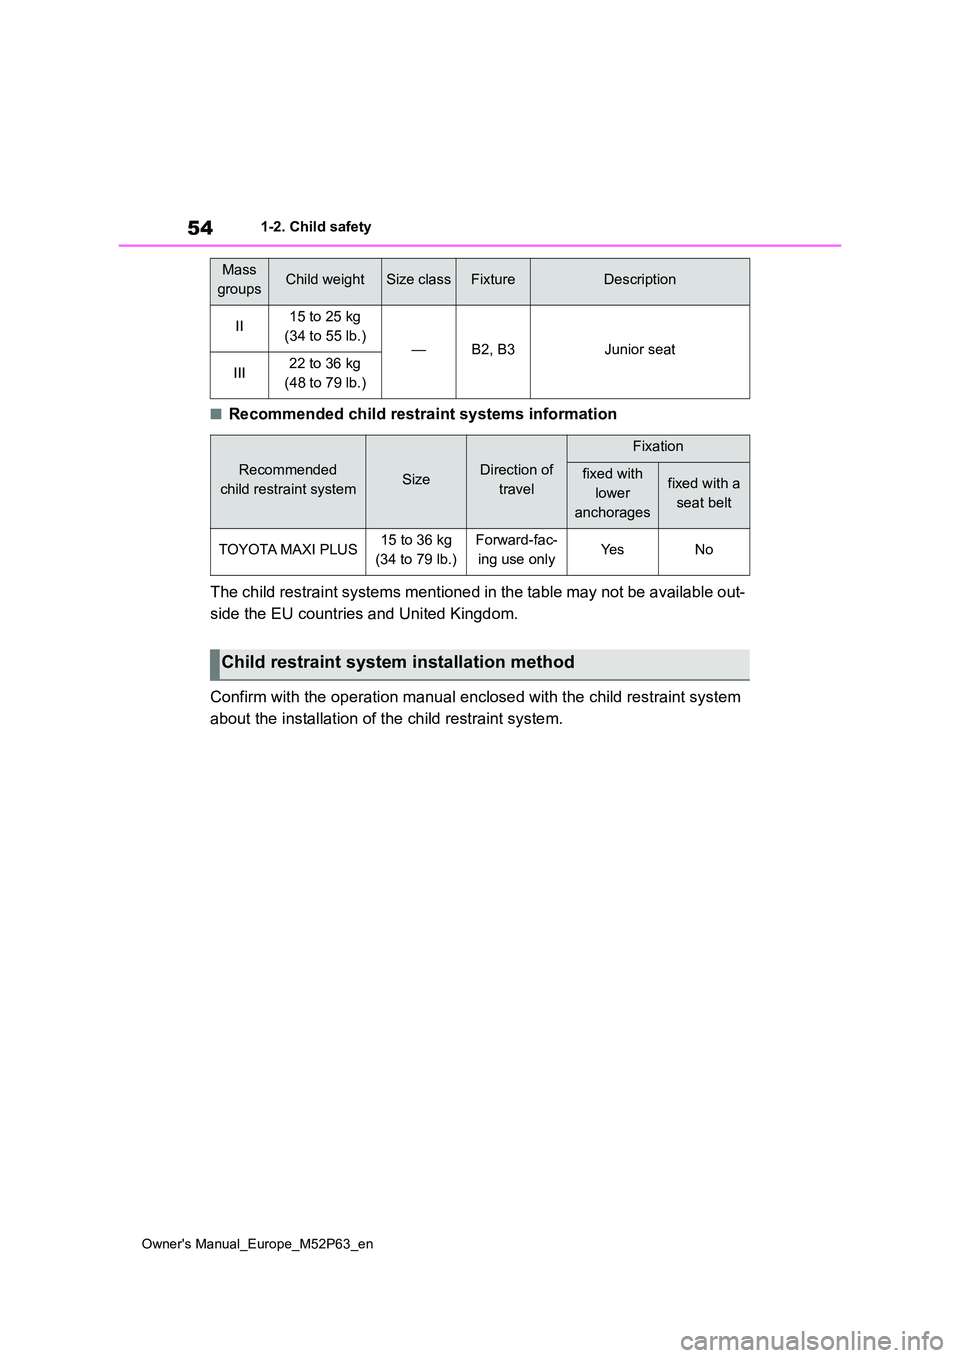
■Recommended child restraint systems information
The child restraint systems mentioned in the table may not be a vailable out-
side the EU countries and United Kingdom.
Confirm with the operation manual enclosed with the child restr aint system
about the installation of the child restraint system.
II15 to 25 kg
(34 to 55 lb.)—B2, B3Junior seat
III22 to 36 kg
(48 to 79 lb.)
Recommended
child restraint systemSizeDirection of
travel
Fixation
fixed with
lower
anchorages
fixed with a
seat belt
TOYOTA MAXI PLUS15 to 36 kg
(34 to 79 lb.)
Forward-fac-
ing use onlyYe sNo
Child restraint system installation method
Mass
groupsChild weightSize classFixtureDescription
Page 282 of 470

280
Owner's Manual_Europe_M52P63_en
6-4. Do-it-yourself maintenance
■The tire pressure warning sys-
tem must be init ialized in the
following circumstances:
When rotating front and rear tires
which have different tire inflation
pressures.
When changing the tire size.
When the tire inflation pressure
is changed such as when chang-
ing traveling speed or load
weight.
When changing between two
registered wheel sets.
When the tire pressure warning
system is initialized, the current tire
inflation pressure is set as the
benchmark pressure.
■How to initialize the tire pres-
sure warning system
1 Park the vehicle in a safe place
and turn the engine switch off,
wait for approximately 15 min-
utes or more and perform the
procedure.
2 Adjust the tire inflation pressure
to the specified cold tire inflation
pressure level. ( P.355)
Make sure to adjust the tire pressure to the specified cold tire inflation pressure level. The tire pressure warning system
will operate based on this pressure level.
3 Turn the engine switch to ON.
Initialization cannot be performed while
the vehicle is moving.
4 Press / of the meter con-
trol switch to select .
5 Press / to select “Vehicle
Settings” and then press and
hold .
6 Press / to select “TPWS
setting” and then press .
7 Press / to select “Setting
Pressure”. Then press and hold
until the tire pressure warn-
ing light blinks 3 times.
Then a message will be displayed on the multi-information display. “--” will be displayed on the multi-information dis-
play for the inflation pressure of each tire while initialization is being per-formed.
8 Drive straight (with occasional
left and right turns) at approxi-
mately 40 km/h (25 mph) or
more for approximately 10 to 30
minutes.
Even if the vehicle is not driven at
approximately 40 km/h (25 mph) or more, initialization can be completed by driving for a long time. However, if ini-
Initializing the tire pressure
warning system
Page 291 of 470

289
6
Owner's Manual_Europe_M52P63_en
6-4. Do-it-yourself maintenance
Maintenance and care
■Effects of incorrect tire inflation pressure
Driving with incorrect tire inflation pres- sure may result in the following:
●Reduced safety
●Damage to the drive train
●Reduced tire life due to wear
●Reduced fuel economy
●Reduced driving comfort and poor
handling
If a tire needs frequent inflating, have it checked by any authorized Toyota
retailer or Toyota authorized repairer, or any reliable repairer.
■Instructions for checking tire infla-tion pressure
When checking tire inflation pressure, observe the following:
●Check only when the tires are cold.If your vehicle has been parked for at least 3 hours or has not been driven
for more than 1.5 km or 1 mile, you will get an accurate cold tire inflation pressure reading.
●Always use a tire pressure gauge.It is difficult to judge if a tire is properly
inflated based only on its appearance.
●It is normal for the tire inflation pres-
sure to be higher after driving as heat is generated in the tire. Do not reduce
tire inflation pressure after driving.
●Passengers and luggage weight
should be placed so that the vehicle is balanced.
WARNING
■Proper inflation is critical to save
tire performance
Keep your tires properly inflated. If the tires are not properly inflated,
the following conditions may occur which could lead to an accident resulting in death or serious injury:
●Excessive wear
●Uneven wear
●Poor handling
●Possibility of blowouts resulting from overheated tires
●Air leaking from between tire and wheel
●Wheel deformation and/or tire dam-age
●Greater possibility of tire damage while driving (due to road hazards,
expansion joints, sharp edges on the road, etc.)
NOTICE
■When inspecting and adjusting
tire inflation pressure
Be sure to put the tire valve caps back on.
If a valve cap is not installed, dirt or moisture may get into the valve and cause an air leak, resulting in
decreased tire inflation pressure.
Page 293 of 470

291
6
Owner's Manual_Europe_M52P63_en
6-4. Do-it-yourself maintenance
Maintenance and care
Use only Toyota wheel nuts and
wheel nut wrenches designed for
use with your aluminum wheels.
When rotating, repairing or
changing your tires, check that
the wheel nuts are still tight after
driving 1600 km (1000 miles).
Be careful not to damage the
aluminum wheels when using
tire chains.
Use only Toyota genuine balance
weights or equivalent and a plas-
tic or rubber hammer when bal-
ancing your wheels.
1 Turn the engine switch off.
2 Open the glove box. Slide off
the damper.
3 Push in the glove box on the
vehicle’s outer side to discon-
nect the 2 claws. Then pull out
the glove box and disconnect
the lower claws.
NOTICE
●Ensure that only genuine Toyota wheels are used on your vehicle.
Tire pressure warning valves and transmitters may not work properly with non-genuine wheels.
Aluminum wheel precau-
tions
Air conditioning filter
The air conditioning filter must
be changed regularly to main-
tain air conditioning efficiency.
Removing the air condition-
ing filter
Page 350 of 470

348
Owner's Manual_Europe_M52P63_en
8-1. Specifications
8-1.Spec ific ations
*: Unladen vehicles
■Vehicle identification number
The vehicle identification number
(VIN) is the legal identifier for your
vehicle. This is the primary identifi-
cation number for your Toyota. It is
used in registering the ownership of
your vehicle.
This number is stamped under the
right-hand front seat.
On some models, this number is
also stamped on the top left of the
instrument panel.
This number is also on the manu-
facturer’s label.
Maintenance data (fuel, oil level, etc.)
Dimensions and weights
Overall length3995 mm (157.3 in.)
Overall width1805 mm (71.1 in.)
Overall height*1445 mm (56.9 in.)
Wheelbase2560 mm (100.8 in.)
TreadFront1535 mm (60.4 in.)
Rear1565 mm (61.6 in.)
Gross vehicle mass1645 kg (3627 lb.)
Maximum permissible axle
capacity
Front970 kg (2138 lb.)
Rear900 kg (1984 lb.)
Vehicle identification