2022 TOYOTA COROLLA hood open
[x] Cancel search: hood openPage 14 of 678
12Pictorial index
To prevent freezing (windshield wiper de-icer)*2......................P.383, 390
Fuel filler door ................................................................................P.188
Refueling method .............................................................................P.189
Fuel type/fuel tank capacity .............................................................P.526
Tires ................................................................................................P.429
Tire size/inflation pressure ...............................................................P.533
Winter tires/tire chains .....................................................................P.321
Checking/rotation/tire pressure warn ing system ..............................P.429
Coping with flat tires.................................................................P.482, 498
Hood ................................................................................................P.419
Opening ...........................................................................................P.419
Engine oil .........................................................................................P.527
Coping with overheating ..................................................................P.518
Headlights/front position lights/daytime running lights/turn signal
lights .......................................................................................P.171, 178
Front fog lights*2............................................................................P.183
Stop lights/tail lights/turn signal lights................................P.171, 178
License plate lights........................................................................P.178
Tail light ..........................................................................................P.178
Rear fog light*3...............................................................................P.183
Back-up light*4
Shifting the shift position to R ..................................................P.165, 169
Tail light ..........................................................................................P.178
Rear fog light*4...............................................................................P.183
Back-up light*3
Shifting the shift position to R ..................................................P.165, 169
*1: Vehicles with a smart entry & start system
*2: If equipped
*3: Right-hand drive vehicles
*4: Left-hand drive vehicles
Light bulbs of the exterior lights for driving
(Replacing method: P.455, Watts: P.535)
Page 48 of 678
461-2. Child safety
WA R N I N G
■When installing a child restraint
system
For safety reasons, always install a child restraint system in a rear seat. In
the event that the rear seat cannot be
used, the front seat can be used as long as the airbag manual on-off sys-
tem is set to “OFF”.
If the airbag manual on-off system is
left on, the strong impact of the airbag deployment (inflation) may cause
serious injury or even death.
■When a child restraint system is
not installed on the front passen-
ger seat
Ensure that the airbag manual on-off
system is set to “ON”.
If it is left off, the airbag may not deploy in the event of an accident,
which may result in serious injury or
even death.
Riding with children
Observe the following precau-
tions when children are in the
vehicle.
Use a child restraint system
appropriate for the child, until
the child becomes large
enough to properly wear the
vehicle’s seat belt.
It is recommended that chil-
dren sit in the rear seats to
avoid accidental contact with
the shift lever, wiper switch,
etc.
Use the rear door child-protec-
tor lock or the window lock
switch to avoid children open-
ing the door while driving or
operating the power window
accidentally. ( P.117, 138)
Do not let small children oper-
ate equipment which may
catch or pinch body parts,
such as the power window,
hood, trunk, seats, etc.
Page 78 of 678
761-4. Theft deterrent system
*: If equipped
■Items to check before locking
the vehicle
To prevent unexpected triggering of
the alarm and vehicle theft, make
sure of the following:
Nobody is in the vehicle.
The windows and moon roof (if
equipped) are closed before the
alarm is set.
No valuables or other personal
items are left in the vehicle.
■Setting
Close the doors, trunk and hood,
and lock all the doors using the
entry function (if equipped) or wire-
less remote contro l. The system will
set automatically after 30 seconds.
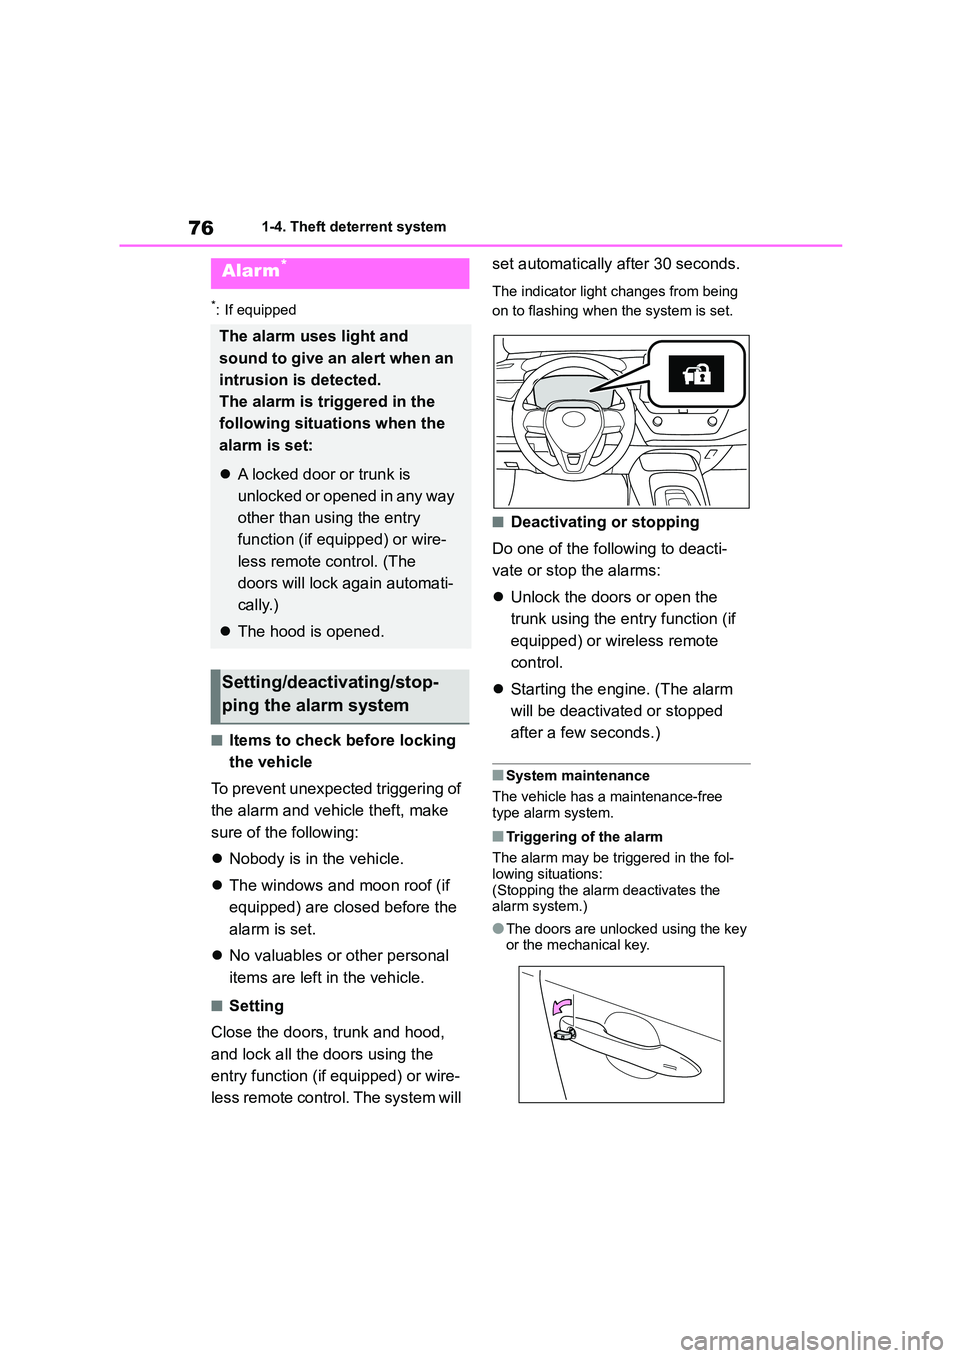
The indicator light changes from being
on to flashing when the system is set.
■Deactivating or stopping
Do one of the following to deacti-
vate or stop the alarms:
Unlock the doors or open the
trunk using the entry function (if
equipped) or wireless remote
control.
Starting the engine. (The alarm
will be deactiva ted or stopped
after a few seconds.)
■System maintenance
The vehicle has a maintenance-free
type alarm system.
■Triggering of the alarm
The alarm may be triggered in the fol-
lowing situations:
(Stopping the alarm deactivates the alarm system.)
●The doors are unlocked using the key or the mechanical key.
Alarm*
The alarm uses light and
sound to give an alert when an
intrusion is detected.
The alarm is triggered in the
following situations when the
alarm is set:
A locked door or trunk is
unlocked or opened in any way
other than using the entry
function (if equipped) or wire-
less remote control. (The
doors will lock again automati-
cally.)
The hood is opened.
Setting/deactivating/stop-
ping the alarm system
Page 79 of 678

77
1
1-4. Theft deterrent system
For safety and security
●A person inside the vehicle opens a
door, the trunk or hood, or unlocks the vehicle.
●A person inside the vehicle unlocks the door using the inside lock buttons.
●The battery is recharged or replaced when the vehicle is locked. ( P.516)
■Alarm-operated door lock
In the following cases, depending on the
situation, the door may automatically
lock to prevent improper entry into the vehicle:
●When a person remaining in the vehi-cle unlocks the door and the alarm is
activated.
●While the alarm is activated, a person
remaining in the vehicle unlocks the
door.
●When recharging or replacing the bat-
tery
NOTICE
■To ensure the system operates correctly
Do not modify or remove the system.
If modified or removed, the proper operation of the system cannot be
guaranteed.
Page 203 of 678

201
4
4-5. Using the driving support systems
Driving
●In the following situations, if the situation has changed (or the vehicle has been
driven for some time) and the normal operating conditions are detected, the mes- sage will disappear and the system will become operational.
If the message does not disappear, contact any authorized Toyota retailer or Toyota authorized repairer, or any reliable repairer.
• When the temperature around t he radar sensor is outside of the operational range,
such as when the vehicle is in the sun or in an extremely cold environment
• When the front camera cannot detect objects in front of the vehicle, such as when driving in the dark, snow, or fog, or when bright lights are shining into the front
camera
SituationActions
When the area around a sensor is cov-
ered with dirt, moisture (fogged up, cov-
ered with condensation, ice, etc.), or
other foreign matter
To clean the part of the windshield in
front of the front camera, use the wind-
shield wipers or the windshield defogger
of the air conditioning system ( P.381,
387).
When the temperature around the front
camera is outside of the operational
range, such as when the vehicle is in the
sun or in an extremely cold environment
If the front camera is hot, such as after
the vehicle had been parked in the sun,
use the air conditi oning system to
decrease the temperature around the
front camera.
If a sunshade was used when the vehicle
was parked, depending on its type, the
sunlight reflected from the surface of the
sunshade may cause the temperature of
the front camera to become excessively
high.
If the front camera is cold, such after the
vehicle is parked in an extremely cold
environment, use the air conditioning
system to increase the temperature
around the front camera.
The area in front of the front camera is
obstructed, such as when the hood is
open or a sticker is attached to the part of
the windshield in front of the front cam-
era.
Close the hood, remove the sticker, etc.
to clear the obstruction.
Page 421 of 678
419
7
7-3. Do-it-yourself maintenance
Maintenance and care
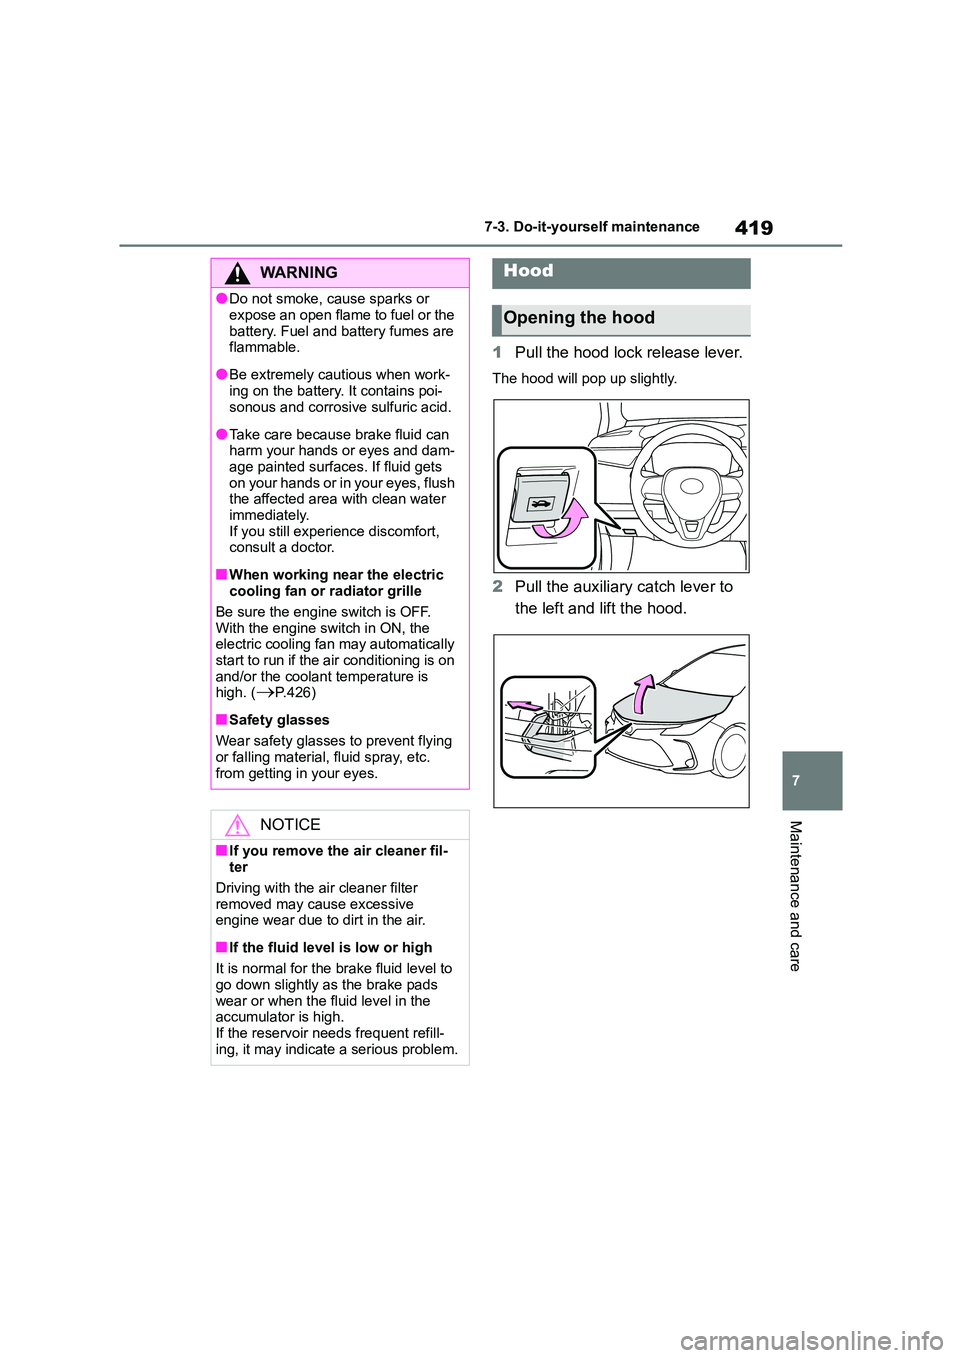
1 Pull the hood lock release lever.
The hood will pop up slightly.
2Pull the auxiliary catch lever to
the left and lift the hood.
WA R N I N G
●Do not smoke, cause sparks or
expose an open flame to fuel or the
battery. Fuel and battery fumes are flammable.
●Be extremely cautious when work-ing on the battery. It contains poi-
sonous and corrosive sulfuric acid.
●Take care because brake fluid can harm your hands or eyes and dam-
age painted surfaces. If fluid gets
on your hands or in your eyes, flush the affected area with clean water
immediately.
If you still experience discomfort, consult a doctor.
■When working near the electric cooling fan or radiator grille
Be sure the engine switch is OFF.
With the engine switch in ON, the electric cooling fan may automatically
start to run if the air conditioning is on
and/or the coolant temperature is high. (P.426)
■Safety glasses
Wear safety glasses to prevent flying
or falling material, fluid spray, etc.
from getting in your eyes.
NOTICE
■If you remove the air cleaner fil- ter
Driving with the air cleaner filter
removed may cause excessive engine wear due to dirt in the air.
■If the fluid level is low or high
It is normal for the brake fluid level to
go down slightly as the brake pads
wear or when the fluid level in the accumulator is high.
If the reservoir needs frequent refill-
ing, it may indicate a serious problem.
Hood
Opening the hood
Page 422 of 678
4207-3. Do-it-yourself maintenance
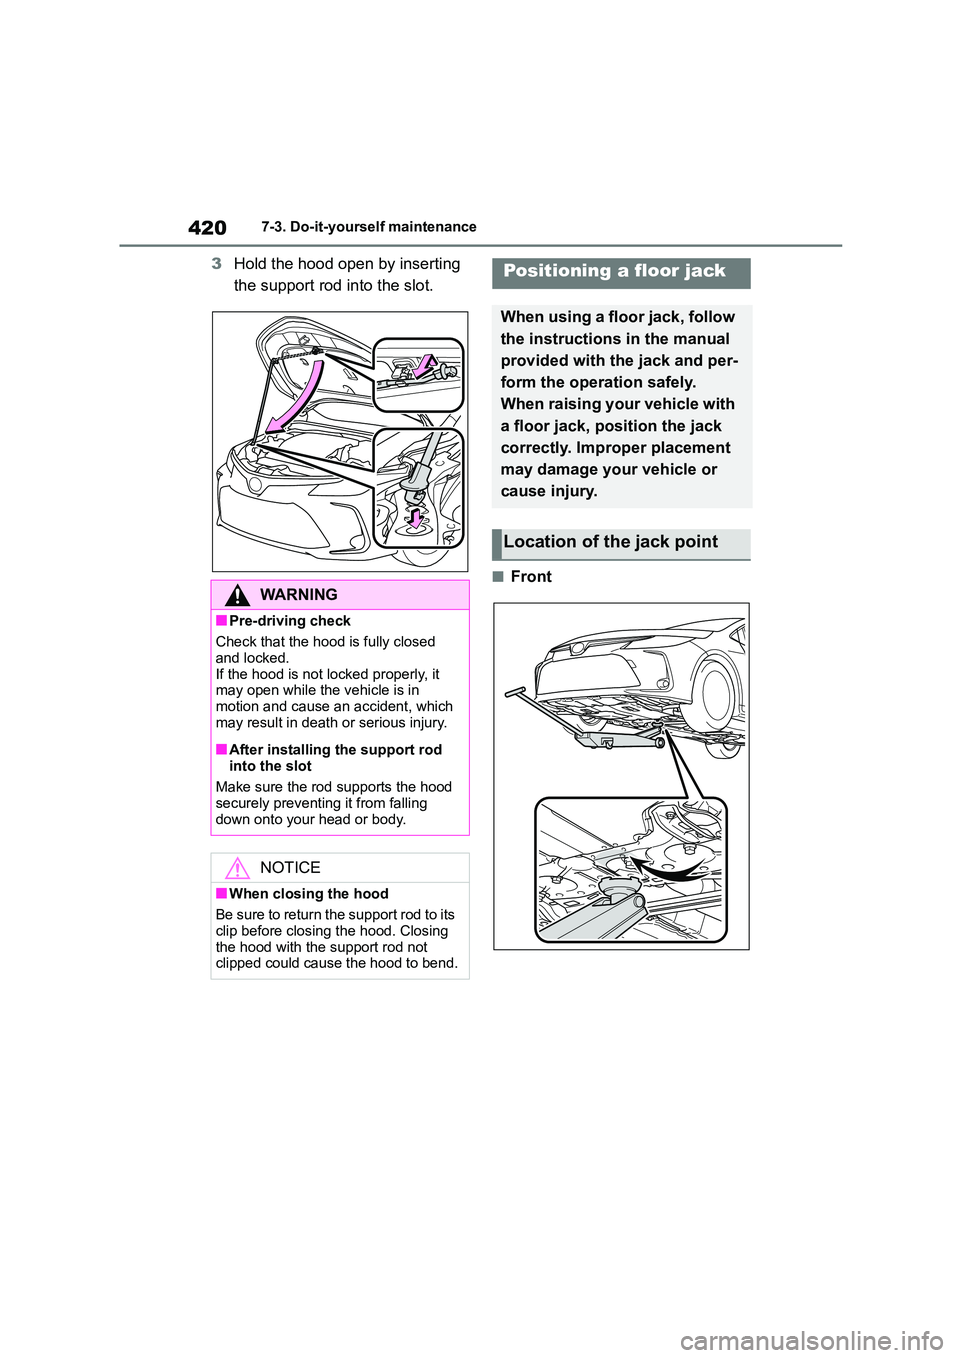
3Hold the hood open by inserting
the support rod into the slot.
■Front
WA R N I N G
■Pre-driving check
Check that the hood is fully closed
and locked.
If the hood is not locked properly, it
may open while the vehicle is in motion and cause an accident, which
may result in death or serious injury.
■After installing the support rod
into the slot
Make sure the rod supports the hood securely preventing it from falling
down onto your head or body.
NOTICE
■When closing the hood
Be sure to return the support rod to its
clip before closing the hood. Closing
the hood with the support rod not clipped could cause the hood to bend.
Positioning a floor jack
When using a floor jack, follow
the instructions in the manual
provided with the jack and per-
form the operation safely.
When raising your vehicle with
a floor jack, position the jack
correctly. Improper placement
may damage your vehicle or
cause injury.
Location of the jack point
Page 516 of 678
5148-2. Steps to take in an emergency
If you have a set of jumper (or
booster) cables and a second vehi-
cle with a 12-volt battery, you can
jump start your vehicle by following
the steps below.
1 Vehicles with an alarm (P. 7 6 ) :
Confirm that the electronic key
(vehicles with a smart entry &
start system) or key (vehicles
without a smart entry & start
system) is being carried.
When connecting the jumper (or booster) cables, depending on the situ-
ation, the alarm may activate and doors
locked. ( P.77)
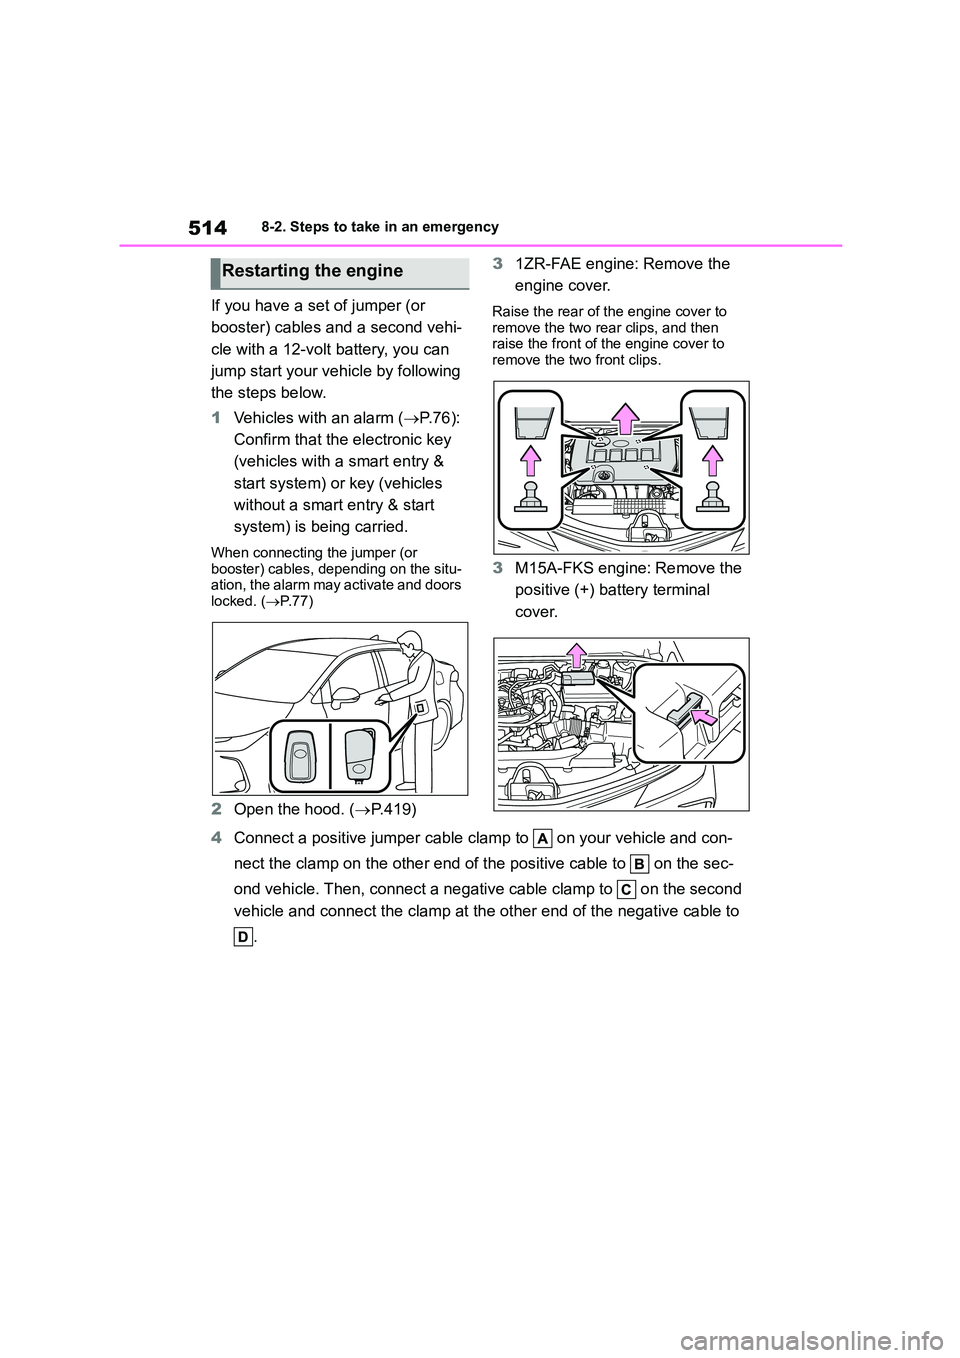
2Open the hood. (P.419)
3 1ZR-FAE engine: Remove the
engine cover.
Raise the rear of the engine cover to
remove the two rear clips, and then raise the front of the engine cover to
remove the two front clips.
3 M15A-FKS engine: Remove the
positive (+) battery terminal
cover.
4 Connect a positive jumper cable clamp to on your vehicle and con-
nect the clamp on the other end of the positive cable to on the sec-
ond vehicle. Then, connect a negativ e cable clamp to on the second
vehicle and connect the clamp at the other end of the negative cable to
.
Restarting the engine