2022 TOYOTA COROLLA lock
[x] Cancel search: lockPage 91 of 678
89
2
2-1. Instrument cluster
Vehicle status information and indicators
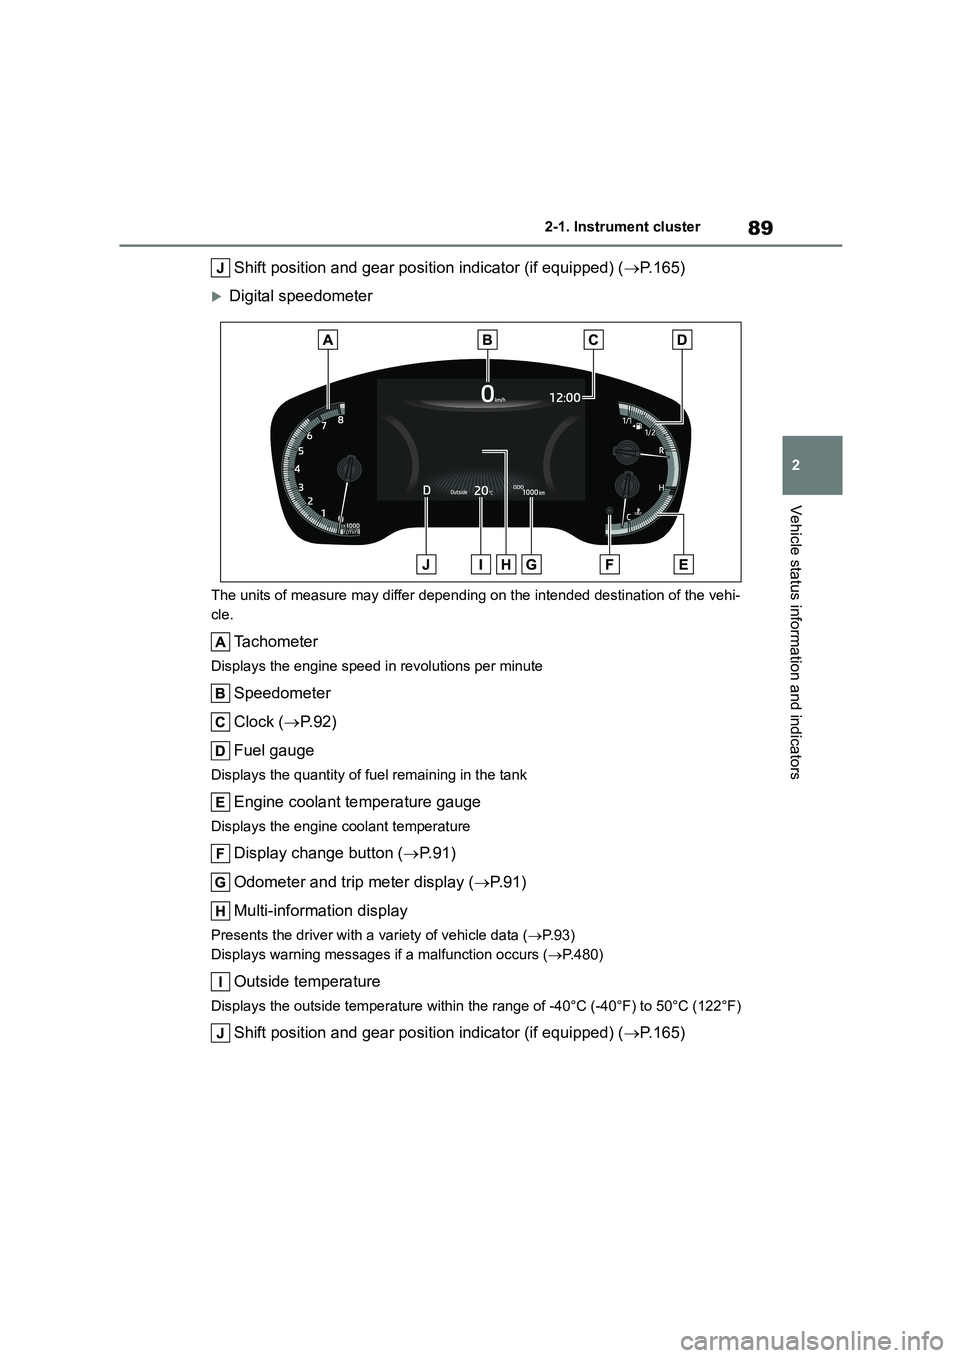
Shift position and gear position indicator (if equipped) ( P.165)
Digital speedometer
The units of measure may differ depending on the intended destination of the vehi-
cle.
Tachometer
Displays the engine speed in revolutions per minute
Speedometer
Clock ( P. 9 2 )
Fuel gauge
Displays the quantity of fuel remaining in the tank
Engine coolant temperature gauge
Displays the engine coolant temperature
Display change button ( P. 9 1 )
Odometer and trip meter display ( P. 9 1 )
Multi-information display
Presents the driver with a variety of vehicle data ( P. 9 3 )
Displays warning messages if a malfunction occurs ( P.480)
Outside temperature
Displays the outside temperature within the range of -40°C (-40°F) to 50°C (122°F)
Shift position and gear position indicator (if equipped) (P.165)
Page 92 of 678
902-1. Instrument cluster
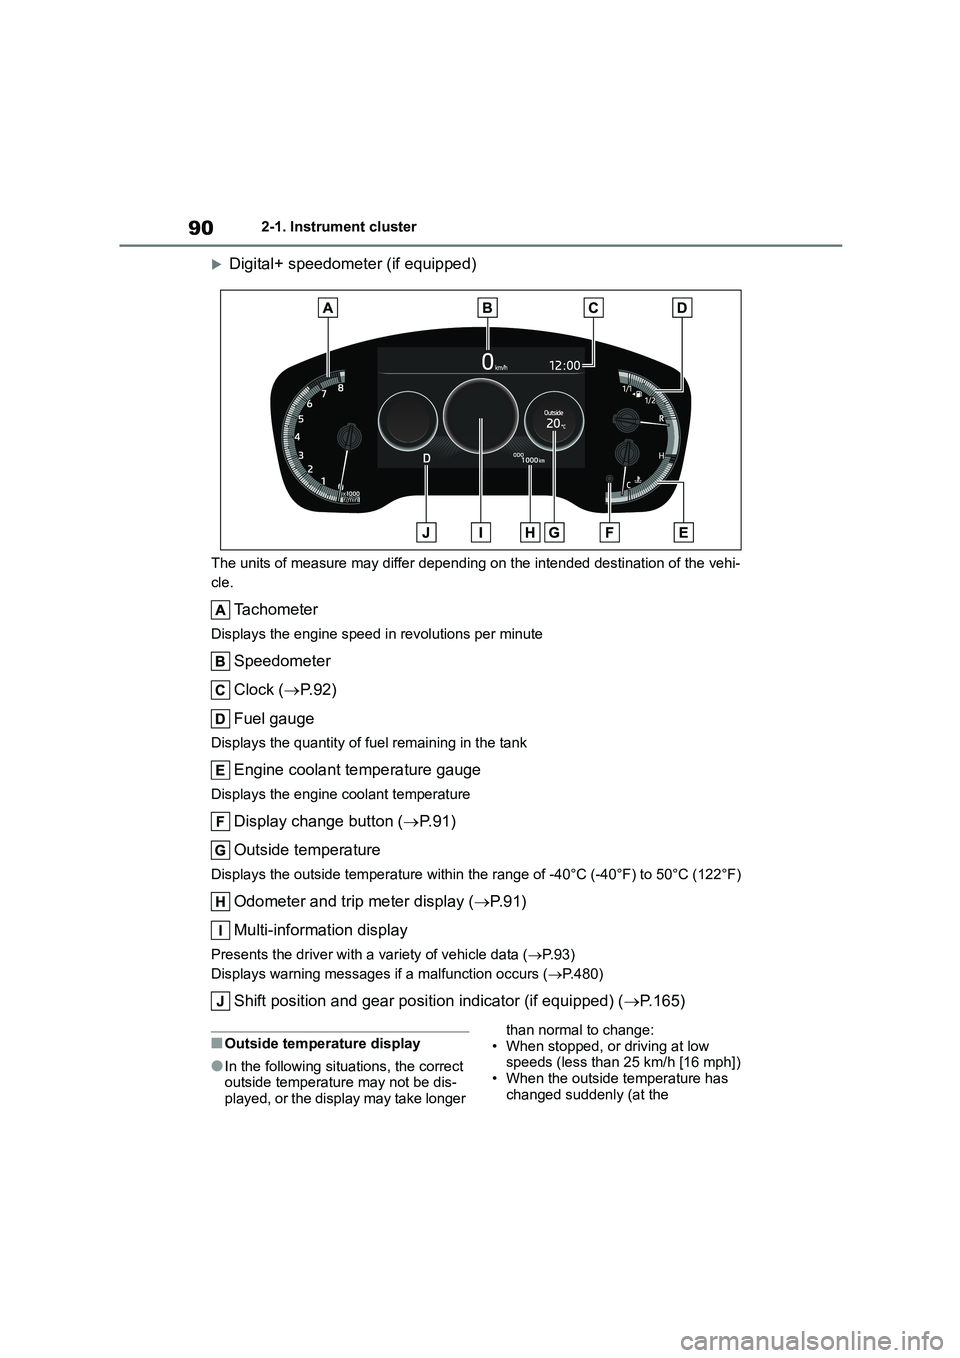
Digital+ speedometer (if equipped)
The units of measure may differ depending on the intended destination of the vehi-
cle.
Tachometer
Displays the engine speed in revolutions per minute
Speedometer
Clock ( P. 9 2 )
Fuel gauge
Displays the quantity of fuel remaining in the tank
Engine coolant temperature gauge
Displays the engine coolant temperature
Display change button ( P. 9 1 )
Outside temperature
Displays the outside temperature within the range of -40°C (-40°F) to 50°C (122°F)
Odometer and trip meter display ( P. 9 1 )
Multi-information display
Presents the driver with a variety of vehicle data ( P. 9 3 )
Displays warning messages if a malfunction occurs ( P.480)
Shift position and gear position indicator (if equipped) (P.165)
■Outside temperature display
●In the following situations, the correct outside temperature may not be dis-
played, or the display may take longer
than normal to change: • When stopped, or driving at low
speeds (less than 25 km/h [16 mph])
• When the outside temperature has changed suddenly (at the
Page 94 of 678
922-1. Instrument cluster
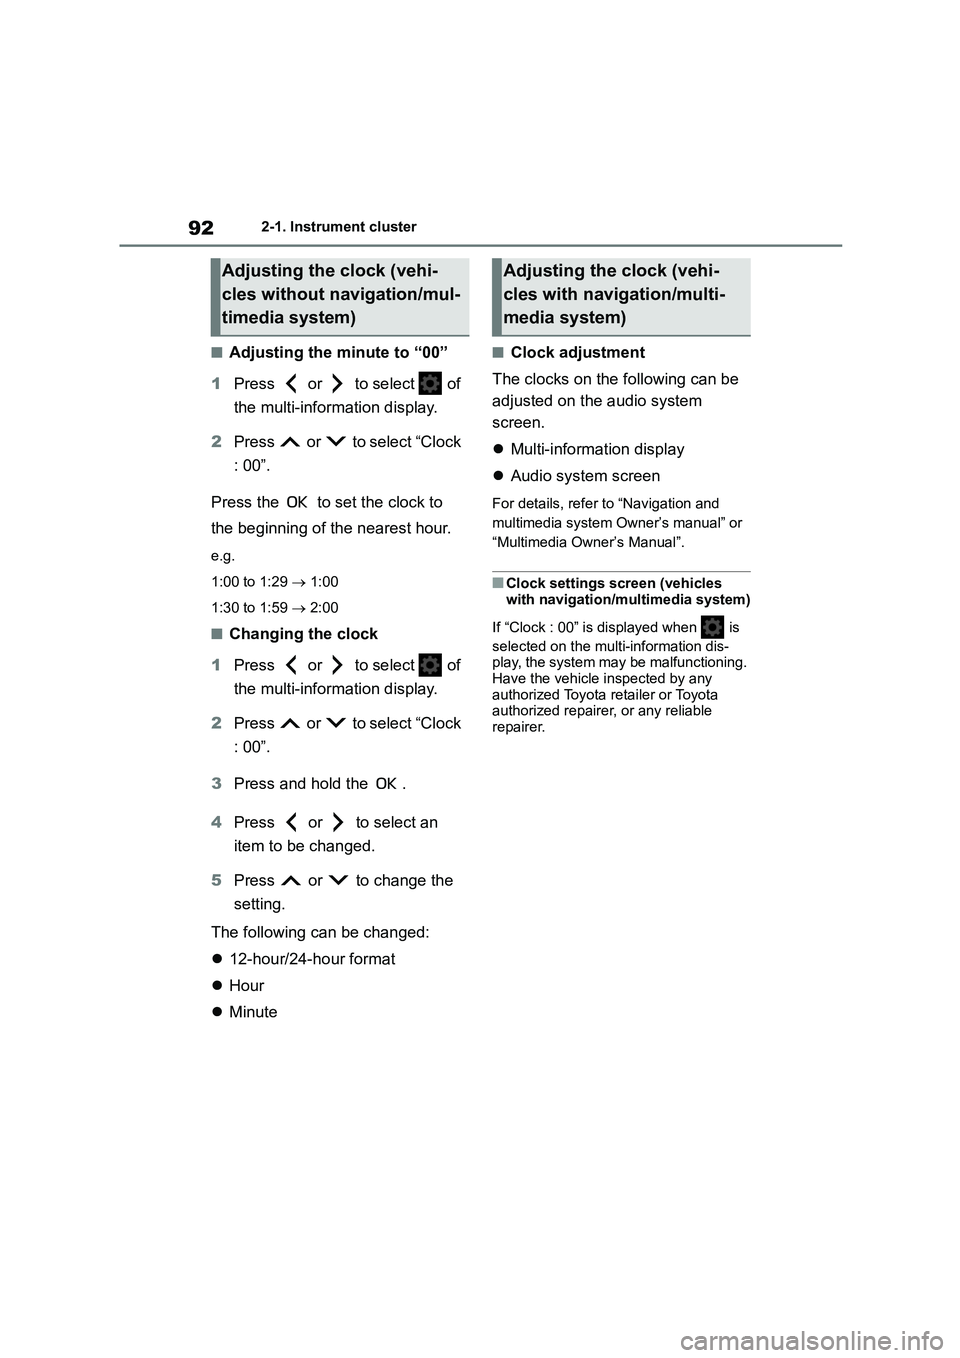
■Adjusting the minute to “00”
1 Press or to select of
the multi-information display.
2 Press or to select “Clock
: 00”.
Press the to set the clock to
the beginning of the nearest hour.
e.g.
1:00 to 1:29 1:00
1:30 to 1:59 2:00
■Changing the clock
1 Press or to select of
the multi-information display.
2 Press or to select “Clock
: 00”.
3 Press and hold the .
4 Press or to select an
item to be changed.
5 Press or to change the
setting.
The following can be changed:
12-hour/24-hour format
Hour
Minute
■Clock adjustment
The clocks on the following can be
adjusted on the audio system
screen.
Multi-information display
Audio system screen
For details, refer to “Navigation and
multimedia system Owner’s manual” or
“Multimedia Owner’s Manual”.
■Clock settings screen (vehicles
with navigation/multimedia system)
If “Clock : 00” is displayed when is
selected on the multi-information dis-
play, the system may be malfunctioning.
Have the vehicle inspected by any authorized Toyota retailer or Toyota
authorized repairer, or any reliable
repairer.
Adjusting the clock (vehi-
cles without navigation/mul-
timedia system)
Adjusting the clock (vehi-
cles with navigation/multi-
media system)
Page 100 of 678
982-1. Instrument cluster
• Average vehicle speed: Displays the
average vehicle speed since the dis-
play was reset*
*: To reset, display the desired item and
press and hold the meter control
switch.
■Meter display settings that can
be changed
Clock setting (vehicles without
navigation/multimedia system)
P.87, 92
Language
Select to change the language dis-
played.
Units
Select to change the units of measure
displayed.
Speedometer display (7-inch dis-
play)
Select to set the display of the speed-
ometer to analog/digital/digital+ (if
equipped).
Eco Driving Indicator Light (if
equipped)
Select to enable/disable the Eco Driv-
ing Indicator Light.
• Fuel economy display
Select to change the average fuel con-
sumption display between after
start/after reset. ( P. 9 5 )
(if equipped)
Select to display/not display the audio
system linked display.
Select to change the displayed content
of the following:
• Drive information type
Select to change the drive information
type display between after start/after
reset.
• Drive information items
Select to set the first and second items
of the drive information display to any of
the following: average vehicle
speed/distance/elapsed time.
Pop-up display
Select to enable/disable pop-up dis-
plays for each relevant system.
Multi-information display off
(when analog/digital speedome-
ter is displayed)
Select to turn the multi-information dis-
play off.
To turn the multi-information display on
again, press any of the following meter
control sw itches
//// /.
Analog clock (when digital+
speedometer is displayed) (if
equipped)
Display the analog clock.
To turn the multi-information display on
again, press any of the following meter
control sw itches
//// /.
Default setting
Select to reset the meter display set-
tings to the default setting.
Settings display
Page 109 of 678
3
107
3
Before driving
Before driving
.3-1. Key information
Keys.................................. 108
3-2. Opening, closing and locking
the doors
Doors ................................ 113
Trunk................................. 118
Smart entry & start system
....................................... 121
3-3. Adjusting the seats
Front seats........................ 126
Rear seats ........................ 127
Head restraints ................. 128
3-4. Adjusting the steering wheel
and mirrors
Steering wheel .................. 131
Inside rear view mirror ...... 132
Outside rear view mirrors
....................................... 133
3-5. Opening and closing the win-
dows
Power windows................. 136
Moon roof ......................... 139
Page 111 of 678
109
3
3-1. Key information
Before driving
Vehicles with a smart entry & start
system
●The standard battery life is 1 to 2
years.
●If the battery becomes low, an alarm
will sound in the cabin and a message will be shown on the multi-information
display when the engine is stopped.
●To reduce key battery depletion when
the electronic key is to not be used for
long periods of time, set the electronic key to the batter y-saving mode.
( P.122)
●As the electronic key always receives
radio waves, the battery will become
depleted even if the electronic key is not used. The following symptoms
indicate that the electronic key battery
may be depleted. Replace the battery when necessary. ( P.449)
• The smart entry & start system or the
wireless remote control does not oper- ate.
• The detection area becomes smaller.
• The LED indicator on the key surface does not turn on.
●To avoid serious deterioration, do not leave the electronic key within 1 m (3
ft.) of the following electrical appli-
ances that produce a magnetic field: •TVs
• Personal computers
• Cellular phones, cordless phones and battery chargers
• Recharging cellular phones or cord-
less phones • Table lamps
• Induction cookers
●If the electronic key is near the vehicle
for longer than necessary, even if the
smart entry & start system is not oper-
ated, the key battery may become depleted faster than normal.
■Replacing the battery
P.449
■If “New Key Registered Contact
Your Dealer if You Did Not Register a New Key” is shown on the
multi-information display (vehicles
with a smart entry & start system)
This message will be displayed each
time the driver’s door is opened when
the doors are unlocked from the outside for approximately 10 days after a new
electronic key has been registered.
If this message is displayed but you have not had a new electronic key regis-
tered, ask any authorized Toyota retailer
or Toyota authorized repairer, or any reli- able repairer to check if an unknown
electronic key (other than those in your
possession) has been registered.
■If a wrong key is used
The key cylinder rotates freely, isolated
from the internal mechanism.
NOTICE
■To prevent key damage
●Do not drop the keys, subject them to strong shocks or bend them.
●Do not expose the keys to high temperatures for long periods of
time.
●Do not get the keys wet or wash
them in an ultrasonic washer etc.
●Vehicles with a smart entry & start
system: Do not attach metallic or
magnetic materials to the keys or place the keys close to such materi-
als.
●Do not disassemble the keys.
●Do not attach a sticker or anything else to the surface of the key.
●Vehicles with a smart entry & start system: Do not place the keys near
objects that produce magnetic
fields, such as TVs, audio systems and induction cookers.
Page 112 of 678
1103-1. Key information
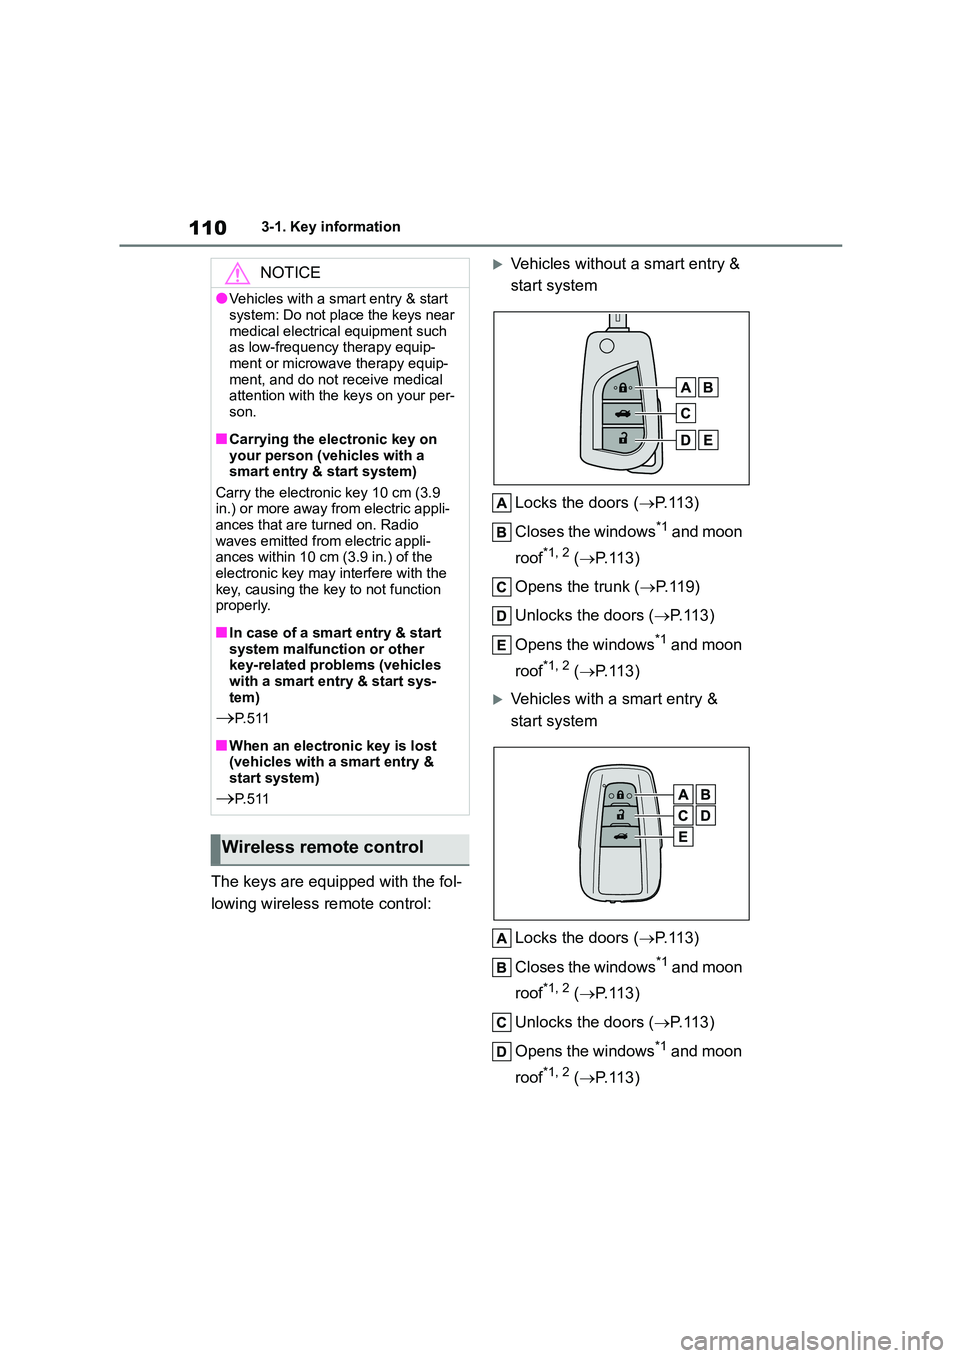
The keys are equipped with the fol-
lowing wireless remote control:
Vehicles without a smart entry &
start system
Locks the doors ( P. 1 1 3 )
Closes the windows*1 and moon
roof*1, 2 ( P. 1 1 3 )
Opens the trunk ( P.119)
Unlocks the doors ( P. 1 1 3 )
Opens the windows*1 and moon
roof*1, 2 ( P. 1 1 3 )
Vehicles with a smart entry &
start system
Locks the doors ( P. 1 1 3 )
Closes the windows*1 and moon
roof*1, 2 ( P. 1 1 3 )
Unlocks the doors ( P. 1 1 3 )
Opens the windows*1 and moon
roof*1, 2 ( P. 1 1 3 )
NOTICE
●Vehicles with a smart entry & start
system: Do not place the keys near
medical electrical equipment such as low-frequency therapy equip-
ment or microwave therapy equip-
ment, and do not receive medical attention with the keys on your per-
son.
■Carrying the electronic key on your person (vehicles with a
smart entry & start system)
Carry the electronic key 10 cm (3.9 in.) or more away from electric appli-
ances that are turned on. Radio
waves emitted from electric appli- ances within 10 cm (3.9 in.) of the
electronic key may interfere with the
key, causing the key to not function properly.
■In case of a smart entry & start system malfunction or other
key-related problems (vehicles
with a smart entry & start sys- tem)
P. 5 1 1
■When an electronic key is lost
(vehicles with a smart entry &
start system)
P. 5 1 1
Wireless remote control
Page 113 of 678
111
3
3-1. Key information
Before driving
Opens the trunk ( P. 1 1 9 )
*1: This setting must be customized at
any authorized Toyota retailer or
Toyota authorized repairer, or any
reliable repairer.
*2: If equipped
■Conditions affecting the operation
of the smart entry & start system or wireless remote control
Vehicles without a smart entry & start system
The wireless remote control function
may not operate normally in the follow- ing situations:
●When the wireless key battery is depleted
●Near a TV tower, electric power plant, gas station, radio station, large dis-
play, airport or other facility that gen-
erates strong radio waves or electrical noise
●When carrying a portable radio, cellu-lar phone or other wireless communi-
cation devices
●When the wireless key is in contact
with, or is covered by a metallic object
●When a wireless key (that emits radio
waves) is being used nearby
●If window tint with a metallic content or
metallic objects are attached to the
rear window
Vehicles with a smart entry & start
system
P.122
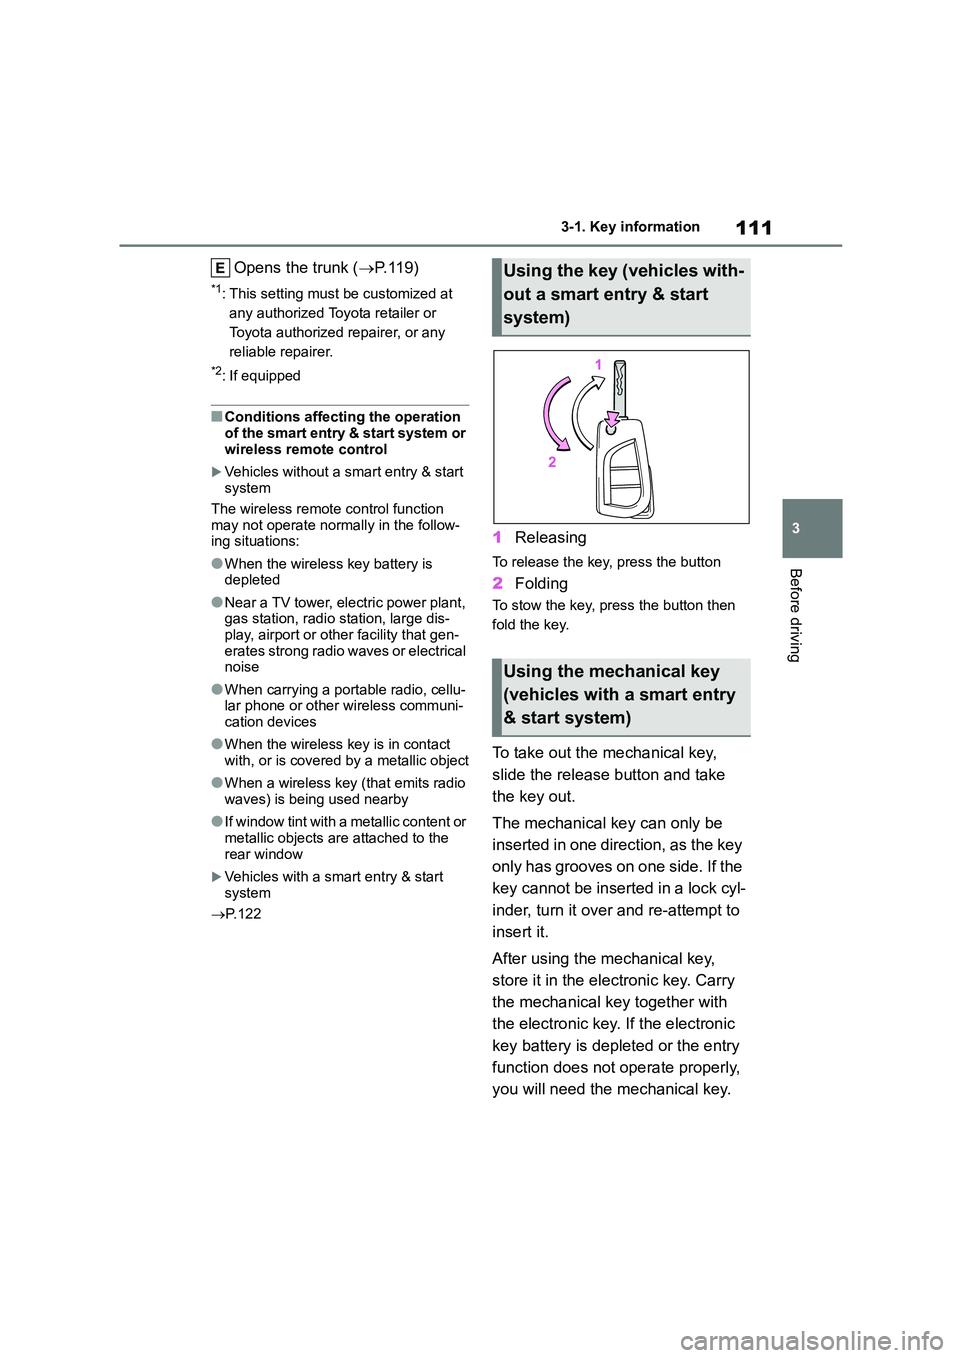
1Releasing
To release the key, press the button
2Folding
To stow the key, press the button then
fold the key.
To take out the mechanical key,
slide the release button and take
the key out.
The mechanical key can only be
inserted in one direction, as the key
only has grooves on one side. If the
key cannot be inserted in a lock cyl-
inder, turn it over and re-attempt to
insert it.
After using the mechanical key,
store it in the electronic key. Carry
the mechanical key together with
the electronic key. If the electronic
key battery is depleted or the entry
function does not operate properly,
you will need the mechanical key.
Using the key (vehicles with-
out a smart entry & start
system)
Using the mechanical key
(vehicles with a smart entry
& start system)