Page 379 of 664

3794-6. Driving tips
4
Driving
CAMRY_U
Regulations regarding the use of tire chains vary depending on loca-
tion and type of road. Always check local regulations before in stalling
chains.
■ Tire chain installation
Observe the following precautions when installing and removing chains:
● Install and remove tire chains in a safe location.
● Install tire chains on the front tires. Do not install tire chains on the rear tires.
● Install tire chains on front tires as tightly as possible. Retighten chains after
driving 1/4 1/2 mile (0.5 1.0 km).
● Install tire chains following the instructions provided with the tire chains.
Regulations on the use of tire chains
WARNING
■ Driving with snow tires
Observe the following precautions to reduce the risk of accidents.
Failure to do so may result in a loss of vehicle control and ca use death or
serious injury.
● Use tires of the size specified.
● Maintain the recommended level of air pressure.
● Do not drive in excess of 75 mph (120 km/h), regardless of the type of
snow tires being used.
● Use snow tires on all, not just some wheels.
■ Driving with tire chains (vehicles with 16 and 17-inch tires)
Observe the following precautions to reduce the risk of accidents.
Failure to do so may result in the vehicle being unable to be d riven safely,
and may cause death or serious injury.
● Do not drive in excess of the speed limit specified for the tir e chains being
used, or 30 mph (50 km/h), whichever is lower.
● Avoid driving on bumpy road surfaces or over potholes.
● Avoid sudden acceleration, abrupt steering, sudden braking and shifting
operations that cause sudden engine braking.
● Slow down sufficiently before entering a curve to ensure that vehicle con-
trol is maintained.
● Do not use LTA (Lane Tracing Assist) system.
Page 381 of 664

381
5Interior features
CAMRY_U5-1. Using the air conditioning
system and defogger
Manual air conditioning system............................. 382
Automatic air conditioning system (without “SYNC”
button) ............................. 387
Automatic air conditioning system (with “SYNC”
button) ............................. 394
Heated steering wheel/ seat heaters/
seat ventilators ................ 402
5-2. Using the interior lights Interior lights list ................ 405
• Interior lights ................. 406
• Personal lights .............. 407
5-3. Using the storage features
List of storage features ..... 409
• Glove box...................... 410
• Console box .................. 410
• Coin holder ................... 410
• Bottle holders ................ 411
• Cup holders .................. 412
• Auxiliary boxes.............. 413
• Open tray ...................... 414
Trunk features ................... 415 5-4. Other interior features
Other interior features ....... 416
• Sun visors ..................... 416
• Vanity mirrors................ 416
• Power outlet .................. 417
• USB charging ports....... 418
• Wireless charger ........... 420
• Armrest ......................... 430
• Assist grips ................... 430
• Coat hooks.................... 431
Garage door opener.......... 432
Page 402 of 664

4025-1. Using the air conditioning system and defogger
CAMRY_U
Heated steering wheel/seat heaters/seat
ventilators
: If equipped
Heated steering wheel and seat heaters heat the side grips of t he
steering wheel and seats, respectively. Seat ventilators mainta in
good ventilation by pulling ai r through the seat upholstery.
WARNING
■To prevent minor burn injuries
Care should be taken to prevent injury if anyone in the followi ng categories
comes in contact with the steering wheel and seats when the heater is on:
● Babies, small children, the elderly, the sick and the physically challenged
● Persons with sensitive skin
● Persons who are fatigued
● Persons who have taken alcohol or drugs that induce sleep (sleeping
drugs, cold remedies, etc.)
■ To prevent damage to the seat heaters
Observe the following precautions to prevent the minor burns or overheat-
ing
● Do not cover the seat with a blanket or cushion when using the seat
heater.
● Do not use seat heater more than necessary.
NOTICE
●Do not put heavy objects that have an uneven surface on the sea t and do
not stick sharp objects (needles, nails, etc.) into the seat.
● To prevent battery discharge, do not use the functions when the engine is
not running.
Page 403 of 664

4035-1. Using the air conditioning system and defogger
5
Interior features
CAMRY_U
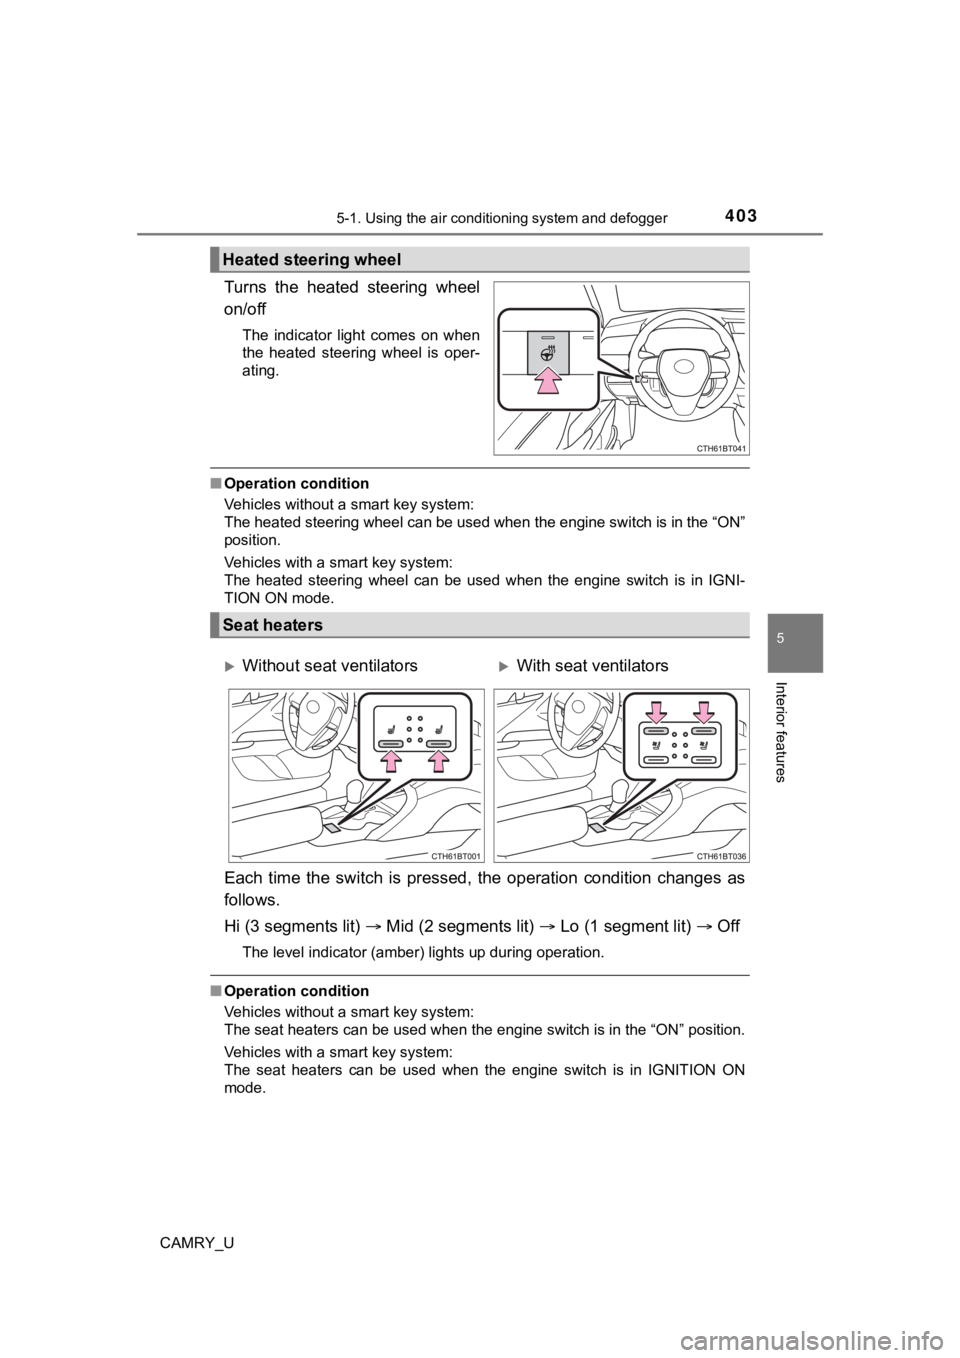
Turns the heated steering wheel
on/off
The indicator light comes on when
the heated steering wheel is oper-
ating.
■Operation condition
Vehicles without a smart key system:
The heated steering wheel can be used when the engine switch is in the “ON”
position.
Vehicles with a smart key system:
The heated steering wheel can be used when the engine switch is in IGNI-
TION ON mode.
Each time the switch is pressed, the operation condition change s as
follows.
Hi (3 segments lit) Mid (2 segments lit) Lo (1 segment lit) Off
The level indicator (amber) lights up during operation.
■Operation condition
Vehicles without a smart key system:
The seat heaters can be used when the engine switch is in the “ ON” position.
Vehicles with a smart key system:
The seat heaters can be used when the engine switch is in IGNIT ION ON
mode.
Heated steering wheel
Seat heaters
Without seat ventilatorsWith seat ventilators
Page 446 of 664

4466-1. Maintenance and care
CAMRY_U
NOTICE
■Cleaning detergents
● Do not use the following types of detergent, as they may discolor the vehi-
cle interior or cause streaks or damage to painted surfaces:
• Areas other than the seats and steering wheel: Organic substan ces
such as benzene or gasoline, alkaline or acidic solutions, dye, and
bleach
• Seats: Alkaline or acidic solutions, such as thinner, benzene, and alco-
hol
• Steering wheel: Organic substances, such as thinner, and clean er that
contains alcohol
● Do not use polish wax or polish cleaner. The instrument panel’s or other
interior part’s painted surface may be damaged.
■ Preventing damage to leather surfaces
Observe the following precautions to avoid damage to and deterioration of
leather surfaces:
● Remove any dust or dirt from leather surfaces immediately.
● Do not expose the vehicle to direct sunlight for extended periods of time.
Park the vehicle in the shade, especially during summer.
● Do not place items made of vinyl, plastic, or containing wax on the uphol-
stery, as they may stick to the leather surface if the vehicle interior heats
up significantly.
■ Water on the floor
Do not wash the vehicle floor with water.
Vehicle systems such as the audio system may be damaged if water comes
into contact with electrical components such as the audio system above or
under the floor of the vehicle. Water may also cause the body to rust.
■ When cleaning the inside of the windshield
Do not allow glass cleaner to contact the lens. Also, do not touch the lens.
(P. 249)
■ Cleaning the inside of the rear window
● Do not use glass cleaner to clean the rear window, as this may cause
damage to the rear window defogger heater wires or antenna. Use a cloth
dampened with lukewarm water to gently wipe the window clean. Wipe the
window in strokes running parallel to the heater wires or antenna.
● Be careful not to scratch or damage the heater wires or antenna .
Page 448 of 664

4486-2. Maintenance
CAMRY_U
■Repair and replacement
It is recommended that genuine Toyota parts be used for repairs to ensure
performance of each system. If non-Toyota parts are used in rep lacement or if
a repair shop other than a Toyota dealer performs repairs, conf irm the war-
ranty coverage.
■ Resetting the message indicating maintenance is required (on so me
models)
After the required maintenance is preformed according to the ma intenance
schedule, please reset the message.
To reset the message, perform the following procedure:
Select (4.2-inch display) or (7-inch display) on the multi-in formation
display using the meter control switches on the steering wheel.
( P. 103, 117)
4.2-inch display: Select “Vehicle Settings” and then press .
7-inch display: Select and then press and hold .
Select “Scheduled Maintenance” and then press .
Select “Yes” and then press .
A message will be displayed on the multi-information display wh en the
reset procedure has been completed.
■ Allow inspection and repairs to be performed by a Toyota dealer
●Toyota technicians are well-trained specialists and are kept up to date with
the latest service information. They are well informed about th e operations
of all systems on your vehicle.
● Keep a copy of the repair order. It proves that the maintenance that has
been performed is under warranty coverage. If any problem should arise
while your vehicle is under warranty, your Toyota dealer will p romptly take
care of it.
1
2
3
4
5
Page 452 of 664

4526-2. Maintenance
CAMRY_U
Seat belts
• Do the seat belts operatesmoothly?
• The seat belts should not be dam-
aged.
Seats• Do the seat controls operate prop-erly?
Steering wheel
• Does the steering wheel rotatesmoothly?
• Does the steering wheel have the correct amount of free play?
• There should not be any strange sounds coming from the steering
wheel.
Vehicle exterior
ItemsCheck points
ItemsCheck points
Doors/trunk• Do the doors/trunk operatesmoothly?
Engine hood• Does the engine hood lock systemwork properly?
Fluid leaks
• There should not be any signs of
fluid leakage after the vehicle has
been parked.
Tires
• Is the tire inflation pressure cor-rect?
• The tires should not be dam- aged or excessively worn.
• Have the tires been rotated
according to the maintenance
schedule?
• The wheel nuts should not be
loose.
Windshield wipers
• The wiper blades should not show
any signs of cracking, splitting,
wear, contamination or deforma-
tion.
• The wiper blades should clear the windshield without streaking or
skipping.
Page 504 of 664
5046-3. Do-it-yourself maintenance
CAMRY_U■
Front side marker l
ights (bulb type)
To ensure enough space to
perform work, turn the steer-
ing wheel to move the front
wheel away from the light
bulb to be replaced.
Turn the steering wheel to the
left when replacing the right side
light bulb, and turn the steering
wheel to the right when replac-
ing the left side light bulb.
Remove the fender liner
clips.
To protect the front bumper
from being damaged, apply
protective tape around the
clip as shown in the illustra-
tion.
Use masking tape, etc. Do not
use duct tape, as it may leave
residue or damage the paint
when removed.
1
2
3