2022 TOYOTA BZ4X provided with the vehicle
[x] Cancel search: provided with the vehiclePage 8 of 674

6
Owners Manual_Europe_M42D76_en
Please note that this manual
applies to all models and explains
all equipment, including options.
Therefore, you may find some
explanations for equipment not
installed on your vehicle.
All specifications provided in this
manual are current at the time of
printing. However, because of the
Toyota policy of continual product
improvement, we reserve the right
to make changes at any time with-
out notice.
Depending on specifications, the
vehicle shown in the illustrations
may differ from your vehicle in
terms of color and equipment.
Both genuine Toyota and a wide
variety of other spare parts and
accessories for Toyota vehicles are
currently available in the market.
Should it be determined that any of
the genuine Toyota parts or acces-
sories supplied with the vehicle
need to be replaced, Toyota recom-
mends that genuine Toyota parts or
accessories, be used to replace
them. Other parts or accessories of
matching quality can also be used.
Toyota cannot accept any liability or
guarantee spare parts and acces-
sories which are not genuine
Toyota products, nor for replace-
ment or installation involving such
parts. In addition, damage or per-
formance problems resulting from
the use of non-genuine Toyota
spare parts or accessories may not
be covered under warranty.
Also, remodeling like this will have
an effect on advanced safety equip-
ment such as Toyota Safety Sense
and there is a danger that it will not
work properly or the danger that it
may work in situations where it
should not be working.
The installation of an RF-transmit-
ter system in your vehicle could
affect electronic systems such as:
EV system
Toyota Safety Sense
Cruise control system
Anti-lock brake system
SRS airbag system
Seat belt pretensioner system
Be sure to check with any autho-
rized Toyota retailer or Toyota
authorized repairer, or any reliable
repairer for precautionary mea-
sures or special instructions regard-
ing installation of an RF-transmitter
system.
For your information
Main Owner’s Manual
Accessories, spare parts
and modification of your
To y o t a
Installation of an RF-trans-
mitter system
Page 34 of 674

32
Owners Manual_Europe_M42D76_en
1-1. For safe use
1-1.For s afe us e
Use only floor mats designed spe-
cifically for vehicles of the same
model and model year as your vehi-
cle. Fix them securely in place onto
the carpet.
1 Insert the retaining hooks (clips)
into the floor mat eyelets.
2 Turn the upper knob of each
retaining hook (clip) to secure
the floor mats in place.
Always align the marks .
The shape of the retaining hooks (clips)
may differ from that shown in the illus-
tration.Before driving
Observe the following before
starting off in t he vehicle to
ensure safety of driving.
Installing floor mats
WARNING
Observe the following precautions.
Failure to do so may cause the driver’s floor mat to slip, possibly interfering with the pedals while driv-
ing. An unexpectedly high speed may result or it may become difficult to stop the vehicle. This could lead to an
accident, resulting in death or serious injury.
■When installing the driver’s floor mat
●Do not use floor mats designed for
other models or different model year vehicles, even if they are Toyota Genuine floor mats.
●Only use floor mats designed for the driver’s seat.
●Always install the floor mat securely using the retaining hooks (clips)
provided.
●Do not use two or more floor mats
on top of each other.
●Do not place the floor mat bottom-
side up or upside-down.
■Before driving
●Check that the floor mat is securely fixed in the correct place with all the provided retaining hooks (clips). Be
especially careful to perform this check after cleaning the floor.
Page 52 of 674

50
Owners Manual_Europe_M42D76_en
1-2. Child safety
■When installing a child
restraint system to the front
passenger seat
For the safety of a child, install a
child restraint system to a rear seat.
When installing a child restraint
system to the front passenger seat
is unavoidable, adjust the seat as
follows and install the child restraint
system:
Adjust the seatback angle to the
most upright position.
When installing a forward-facing child
seat, if there is a gap between the child
seat and the seatback, adjust the
seatback angle until good contact is
achieved.
Move the front seat fully rear-
WARNING
●For effective protection in automo- bile accidents and sudden stops, a
child must be properly restrained, using a seat belt or child restraint system which is correctly installed.
For installation details, refer to the operation manual enclosed with the child restraint system. General
installation instruction is provided in this manual.
●Toyota strongly urges the use of a proper child restraint system that conforms to the weight and size of
the child, installed on the rear seat. According to accident statistics, the child is safer when properly
restrained in the rear seat than in the front seat.
●Holding a child in your or someone else’s arms is not a substitute for a child restraint system. In an acci-
dent, the child can be crushed against the windshield or between the holder and the interior of the
vehicle.
■Handling the child restraint sys-
tem
If the child restraint system is not properly fixed in place, the child or
other passengers may be seriously injured or even killed in the event of sudden braking, sudden swerving, or
an accident.
●If the vehicle were to receive a
strong impact from an accident, etc., it is possible that the child restraint system has damage that is
not readily visible. In such cases, do not reuse the restraint system.
●Depending on the child restraint system, installation may be difficult or impossible. In those cases,
check whether the child restraint system is suitable for installment in the vehicle. ( P.53) Be sure to
install and observe the usage rules after carefully reading the child restraint system fixing method in
this manual, as well as the opera- tion manual enclosed with the child restraint system.
●Keep the child restraint system properly secured on the seat even if
it is not in use. Do not store the child restraint system unsecured in the passenger compartment.
●If it is necessary to detach the child restraint system, remove it from the
vehicle or store it securely in the luggage compartment.
When using a child restraint
system
Page 62 of 674

60
Owners Manual_Europe_M42D76_en
1-2. Child safety
■Installing child restraint sys-
tem using a seat belt
Install the child restraint system in
accordance to the operation man-
ual enclosed with the child restraint
system.
If the child restraint system on hand
is not within the “universal” cate-
gory (or the necessary information
is not in the table), refer to the
“Vehicle List” provided by the child
restraint system maker for various
possible installation positions, or
check the compatibility after asking
the retailer of the child seat.
( P. 5 3 )
Installation methodPage
Seat belt attachmentP. 6 0
ISOFIX lower anchorage
attachmentP. 6 2
Top tether anchorage
attachmentP. 6 3
Child restraint system fixed
with a seat belt
Page 64 of 674

62
Owners Manual_Europe_M42D76_en
1-2. Child safety
(Part No. 73119-22010)
■ISOFIX lower anchorages
(ISOFIX child restraint system)
Lower anchorages are provided for
the outboard rear seats. (Tags dis-
playing the location of the anchor-
ages are attached to the seats.)
■Installation with ISOFIX lower
anchorage (ISOFIX child
restraint system)
Install the child restraint system in
accordance to the operation man-
ual enclosed with the child restraint
system.
If the child restraint system on hand
is not within the “universal” cate-
gory (or the necessary information
is not in the table), refer to the
“Vehicle List” provided by the child
restraint system maker for various
possible installation positions, or
check the compatibility after asking
the retailer of the child seat.
( P. 5 3 )
1 Adjust the seatback angle to the
most upright position. When
installing a forward-facing child
seat, if there is a gap between
the child seat and the seatback,
adjust the seatback angle until
good contact is achieved.
2 If the head restraint interferes
with the child restraint system
and the head restraint can be
WARNING
■When installing a child restraint system
Observe the following precautions.
Failure to do so may result in death or serious injury.
●Do not allow children to play with the seat belt. If the seat belt becomes twisted around a child’s
neck, it may lead to choking or other serious injuries that could result in death. If this occurs and
the buckle cannot be unfastened, scissors should be used to cut the belt.
●Ensure that the belt and plate are securely locked and the seat belt is
not twisted.
●Shake the child restraint system left
and right, and forward and back- ward to ensure that it has been securely installed.
●After securing a child restraint sys-tem, never adjust the seat.
●When a junior seat is installed, always ensure that the shoulder
belt is positioned across the center of the child’s shoulder. The belt should be kept away from the
child’s neck, but not so that it could fall off the child’s shoulder.
●Follow all installation instructions provided by the child restraint sys-tem manufacturer.
Child restraint system fixed
with an ISOFIX lower
anchorage
Page 72 of 674

70
Owners Manual_Europe_M42D76_en
1-3. Emergency assistance
2. INFORMATION ON DATA PROCESSING
2.1.
Any processing of personal data through the 112-
based eCall in-vehicle system shall comply with
the personal data protection rules provided for in
Directives 95/46/EC and 2002/58/EC, and in par-
ticular, shall be based on the necessity to protect
the vital interests of the individuals in accordance
with Article 7(d) of Directive 95/46/EC.
O
2.2.
Processing of such data is strictly limited to the
purpose of handling the emergency eCall to the
single European emergency number 112.
O
2.3. Types of data and its recipients
2.3.1.
The 112-based eCall in-vehicle system may col-
lect and process only the following data: Vehicle
Identification Number, Vehicle type (passenger
vehicle or light commercial vehicle), Vehicle pro-
pulsion storage type (gasoline/die-
sel/CNG/LPG/electric/hydrogen), Vehicle last
three locations and direction of travel, Log file of
the automatic activation of the system and its
timestamp, Any additional data (if applicable)
O
2.3.2.
Recipients of data processed by the 112-based
eCall in-vehicle system are the relevant public
safety answering points designated by the
respective public authorities of the country on
which territory they are located, to first receive
and handle eCalls to the single European emer-
gency number 112. Additional information (if
available):
O
Implementing Regulation Annex1 PART3 User InformationConformity
Page 75 of 674
73
1
Owners Manual_Europe_M42D76_en
1-3. Emergency assistance
For safety and security
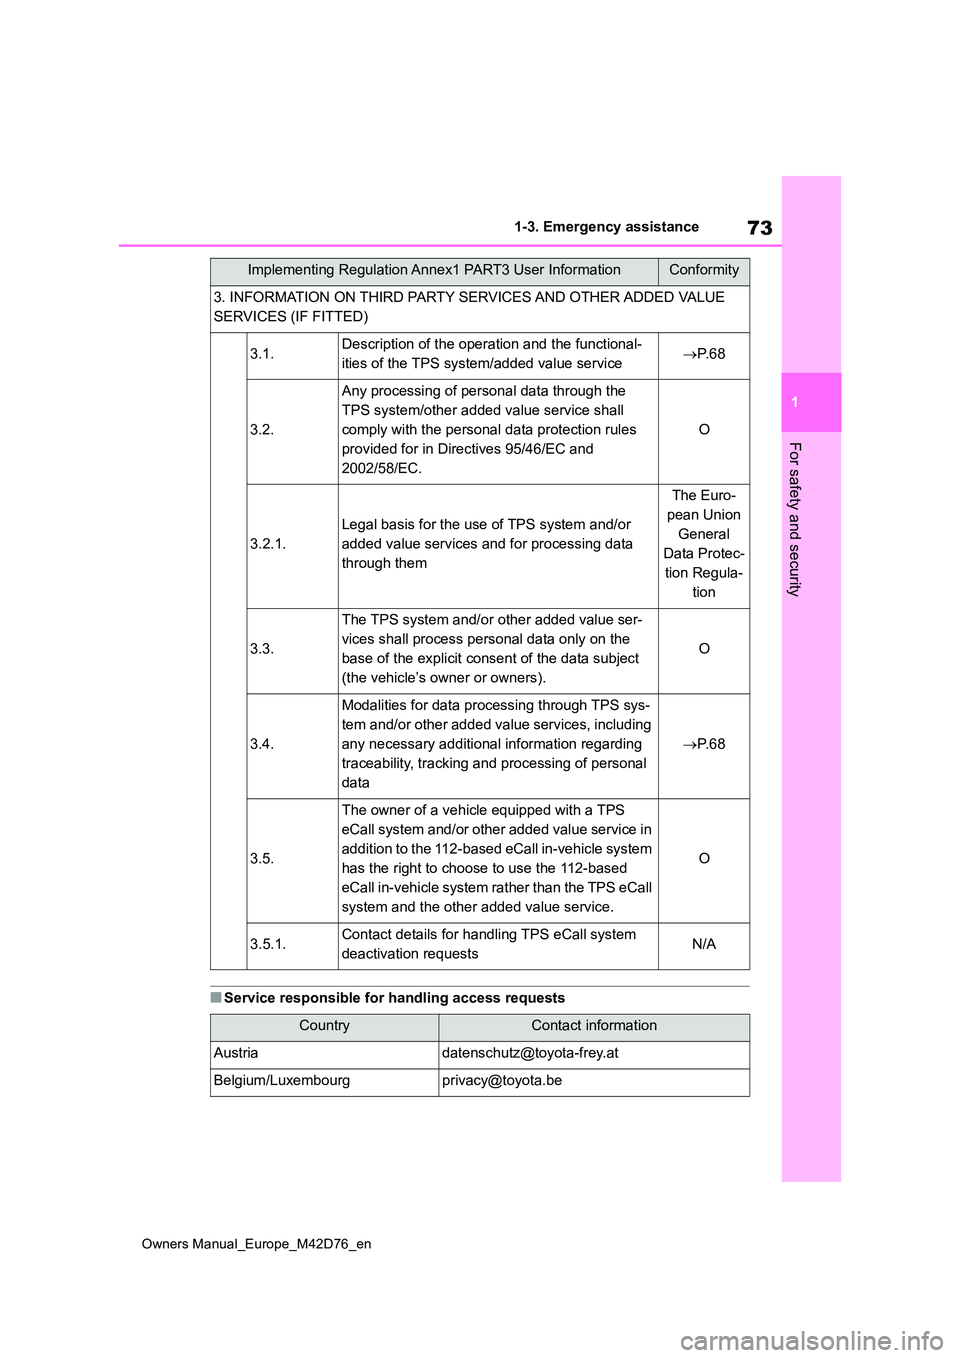
■Service responsible for handling access requests
3. INFORMATION ON THIRD PARTY SERVICES AND OTHER ADDED VALUE
SERVICES (IF FITTED)
3.1.Description of the operation and the functional-
ities of the TPS system/added value service P. 6 8
3.2.
Any processing of personal data through the
TPS system/other added value service shall
comply with the personal data protection rules
provided for in Directives 95/46/EC and
2002/58/EC.
O
3.2.1.
Legal basis for the use of TPS system and/or
added value services and for processing data
through them
The Euro-
pean Union
General
Data Protec-
tion Regula-
tion
3.3.
The TPS system and/or other added value ser-
vices shall process personal data only on the
base of the explicit consent of the data subject
(the vehicle’s owner or owners).
O
3.4.
Modalities for data processing through TPS sys-
tem and/or other added value services, including
any necessary additional information regarding
traceability, tracking and processing of personal
data
P. 6 8
3.5.
The owner of a vehicle equipped with a TPS
eCall system and/or other added value service in
addition to the 112-based eCall in-vehicle system
has the right to choose to use the 112-based
eCall in-vehicle system rather than the TPS eCall
system and the other added value service.
O
3.5.1.Contact details for handling TPS eCall system
deactivation requestsN/A
CountryContact information
[email protected]
Belgium/[email protected]
Implementing Regulation Annex1 PART3 User InformationConformity
Page 103 of 674

101
2
Owners Manual_Europe_M42D76_en
2-2. Charging
Electric Vehicle system
This product must be grounded. In
case of malfunction or break down,
grounding provides a path of least
resistance for electric current to
reduce the risk of electric shock.
This product is equipped with a
grounding conductor and a ground-
ing plug. The grounding plug must
be plugged into an appropriate
socket that is properly installed and
grounded in accordance with all
local codes and ordinances.
The CCID (Charging Circuit Inter-
rupting Device) has the following
safety features.
Charging modeOutline
Mode 1
A charging method which does not use charging control to
detect electrical leakages between an external power source
and the vehicle. Does not apply to this vehicle.
Mode 2
A charging method which connects the vehicle to an external
power source through a AC charging cable equipped with a
CCID (Charging Circuit Interrupting Device).
Applies to charging through most household sockets.
Mode 3
A charging method which charges from a charger (such as at a
public charging station) equipped with charging control to
detect electrical leakages. Control to detect electrical leakag es
is implemented on the charger side. Therefore, a CCID
(Charging Circuit Interrupting Device) is not equipped to the A C
charging cable.
Not all chargers are equipped with AC charging cables. If there
is no AC charging cable available, use the Mode 3 AC charging
cable equipped to this vehicle. (if equipped)
Grounding (Mode 2 AC
charging cable)
WARNING
■Grounding precautions
●Improper connection of the ground-
ing conductor increases the risk of electric shock.Check with a qualified electrician or
serviceman if you are in doubt as to whether the product is properly grounded.
●Do not modify the grounding plug provided with the product. If it does
not fit the socket, have a proper socket installed by a qualified elec-trician.
Safety functions