Page 327 of 494
325
7
Owner's Manual_Europe_M99V08_en
7-2. Steps to take in an emergency
When trouble arises
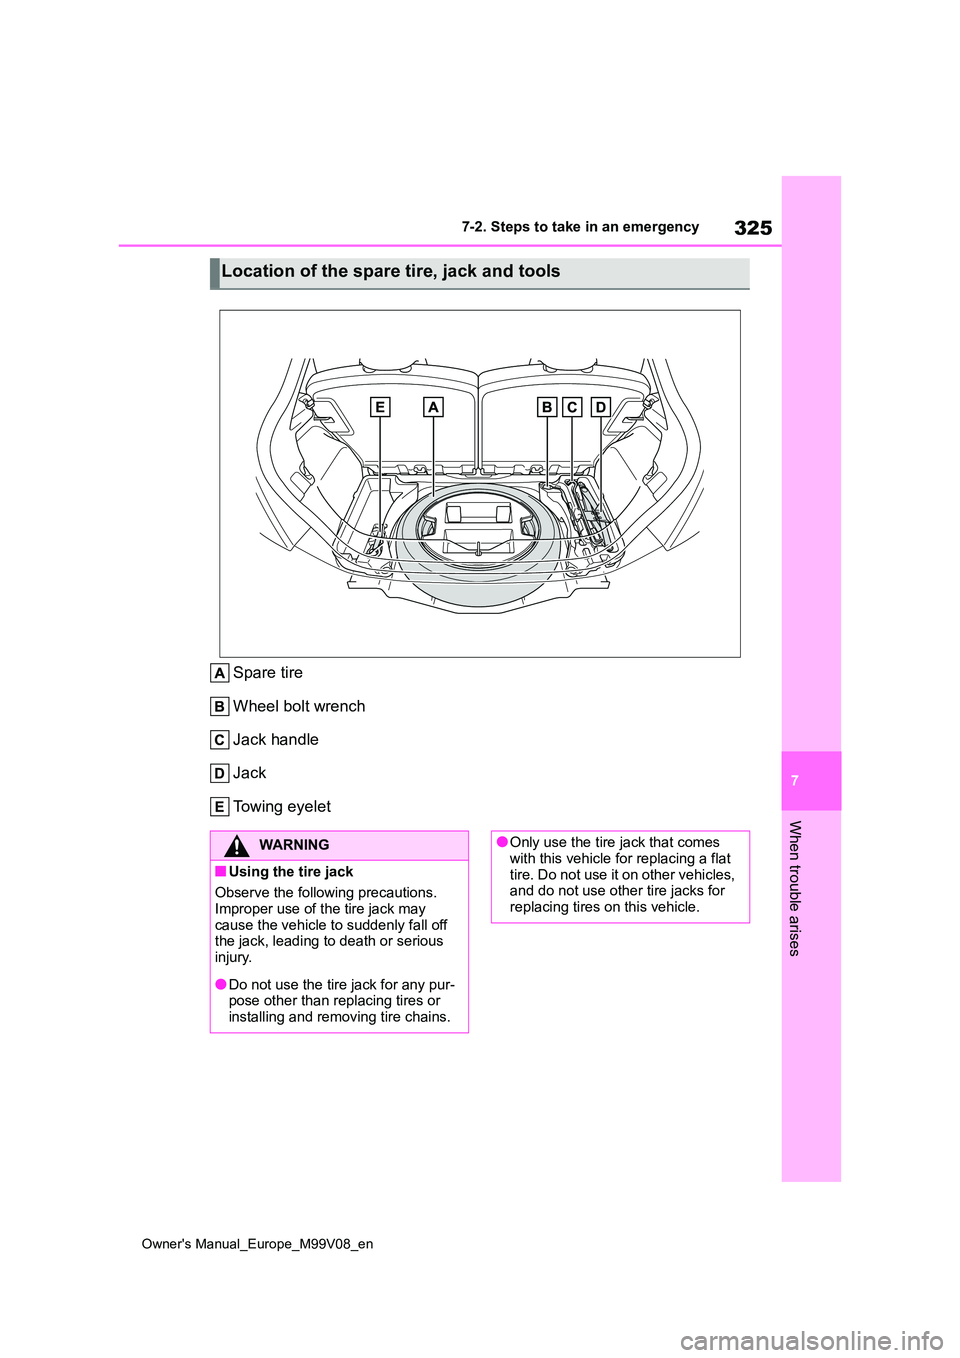
Spare tire
Wheel bolt wrench
Jack handle
Jack
Towing eyelet
Location of the spare tire, jack and tools
WARNING
■Using the tire jack
Observe the following precautions. Improper use of the tire jack may
cause the vehicle to suddenly fall off the jack, leading to death or serious injury.
●Do not use the tire jack for any pur-pose other than replacing tires or
installing and removing tire chains.
●Only use the tire jack that comes
with this vehicle for replacing a flat tire. Do not use it on other vehicles, and do not use other tire jacks for
replacing tires on this vehicle.
Page 329 of 494

327
7
Owner's Manual_Europe_M99V08_en
7-2. Steps to take in an emergency
When trouble arises
3Loosen the center fastener that
secures the spare tire.
1 Chock the tires.
2 Vehicles with a steel wheel:
Remove the wheel ornament
using the wrench.
Insert the wrench into the notch on
the wheel cap.
To protect the wheel ornament, place a
rag between the wrench and the wheel
ornament.
3 Slightly loosen the wheel bolts
(one turn).
4 Check the jack point.
The mark displaying the jack set
position is applied to the rocker mould-
WARNING
■When storing the spare tire
Be careful not get fingers caught or other body parts between the spare tire and the body of the vehicle.
Replacing a flat tire
Flat tireWheel chock posi-
tions
Front left-hand
side
Behind the rear
right-hand side tire
Front right-hand
side
Behind the rear
left-hand side tire
Rear left-hand sideIn front of the front
right-hand side tire
Rear right-hand
side
In front of the front
left-hand side tire
Flat tireWheel chock posi-
tions
Page 330 of 494
328
Owner's Manual_Europe_M99V08_en
7-2. Steps to take in an emergency
ing.
5 Turn the tire jack portion by
hand until the center of the
recessed portion of the jack is in
contact with the center of the
jack point.
6 Assemble the jack handle
extension.
7 Raise the vehicle until the tire is
slightly raised off the ground.
8 Remove all the wheel bolts and
the tire.
When resting the tire on the ground, place the tire so that the wheel design faces up to avoid scratching the wheel
surface.
WARNING
■Replacing a flat tire
●Do not try to remove the wheel
ornament by hand. Take due care in handling the ornament to avoid unexpected personal injury.
●Do not touch the disc wheels or the area around the brakes immedi-
ately after the vehicle has been driven. After the vehicle has been driven the disc wheels and the area
around the brakes will be extremely hot. Touching these areas with hands, feet or other body parts
while changing a tire, etc. may result in burns.
Page 331 of 494

329
7
Owner's Manual_Europe_M99V08_en
7-2. Steps to take in an emergency
When trouble arises
1Remove any dirt or foreign mat-
ter from the wheel contact sur-
face.
If foreign matter is on the wheel contact
surface, the wheel bolts may loosen while the vehicle is in motion, causing the tire to come off.
2 Install the tire and loosely
tighten each wheel bolt by hand
by approximately the same
amount.
Tighten the wheel bolts until the spheri-
cal portion comes into loose contact
with the disc wheel seat .
3 Lower the vehicle.
4 Firmly tighten each wheel bolts
two or three times in the order
shown in the illustration.
Tightening torque: 140 N•m (14.3 kgf•m, 103 ft•lbf)
5 Stow the flat tire, tire jack and all
tools.
■The compact spare tire (if equipped)
●The compact spare tire is identified by the label “TEMPORARY USE ONLY” on the tire sidewall. Use the compact
spare tire temporarily, and only in an emergency.
●Make sure to check the tire inflation pressure of the compact spare tire. ( P.350)
■When the compact spare tire (if
equipped) is equipped
The vehicle becomes lower when driv- ing with the compact spare tire com-
pared to when driving with standard
Installing the spare tire
Page 332 of 494

330
Owner's Manual_Europe_M99V08_en
7-2. Steps to take in an emergency
tires.
■When using the compact spare tire
(if equipped)
As the compact spare tire is not equipped with a tire pressure warning
valve and transmitter, low inflation pres- sure of the compact spare tire will not be indicated by the tire pressure warning
system. Also, if you replace the compact spare tire after the tire pressure warning light comes on, the light remains on.
■If you have a flat front tire on a road
covered with snow or ice (vehicles with a compact spare tire)
Install the compact spare tire on one of
the rear wheels of the vehicle. Perform the following steps and fit tire chains to the front tires:
1 Replace a rear tire with the compact
spare tire.
2 Replace the flat front tire with the tire removed from the rear of the vehicle.
3 Fit tire chains to the front tires.
WARNING
■Installing the compact spare tire
(if equipped)
Failure to follow these precautions could cause the wheel bolts to loosen
and the tire to fall off, resulting in death or serious injury.
●Never apply oil or grease to the
wheel bolts or their contact surface
on the wheel .
Doing so may cause the wheel
bolts to be tightened excessively,
leading to damage to the wheel
bolts, the threaded portion the
wheel bolts install to , or the
wheel.
Also, the wheel bolts may come
loose, possibly leading to the wheel
coming off, causing a serious acci-
dent.
If oil or grease is attached to either
of these parts, remove it.
●When installing a wheel, use the
same wheel bolts that were removed with the wheel. Also, do not use any wheel bolts other than
Toyota Genuine wheel bolts.
●Do not attach a heavily damaged
wheel ornament, as it may fly off the wheel while the vehicle is moving.
●If a wheel bolt hole in a wheel or the threads of a wheel bolt or the wheel hub are deformed, cracked, rusty or
otherwise damaged, have the vehi- cle inspected by any authorized Toyota retailer or Toyota authorized
repairer, or any reliable repairer.
■When tightening the wheel bolts
Do not tighten the wheel bolts exces- sively. Doing so may cause the wheel bolts, the threads of the wheel hub, or
the wheel to be damaged.
Page 352 of 494

350
Owner's Manual_Europe_M99V08_en
8-1. Specifications
*1: Minimum pedal clearance when depressed with a force of 300 N (31.0 kgf, 67.4
lbf) while the engine is running.
*2: Parking brake lever travel when pulled up with a force of 200 N (20.4 kgf, 45.0
lbf)
17-inch tires
18-inch tires
Brakes
Pedal clearance*184 mm (3.3 in.) Min.
Pedal free play1 6 mm (0.04 0.24 in.)
Parking brake lever travel*25 8 clicks
Fluid typeSAE J1704 or FMVSS No.116 DOT 4
Steering
Free playLess than 30 mm (1.2 in.)
Tires and wheels
Tire size175/65R17 87H
Tire inflation pres-
sure
(Recommended
cold tire inflation
pressure)
Front wheel
kPa (kgf/cm2 or bar, psi)
Rear wheel
kPa (kgf/cm2 or bar, psi)
260 (2.6, 37)240 (2.4, 35)
Wheel size17 5J
Wheel bolt torque140 N•m (14.3 kgf•m, 103 ft•lbf)
Tire size175/60R18 85H
Tire inflation pres-
sure
(Recommended
cold tire inflation
pressure)
Front wheel
kPa (kgf/cm2 or bar, psi)
Rear wheel
kPa (kgf/cm2 or bar, psi)
260 (2.6, 37)240 (2.4, 35)
Wheel size18 5J
Wheel bolt torque140 N•m (14.3 kgf•m, 103 ft•lbf)
Page 353 of 494
351
8
Owner's Manual_Europe_M99V08_en
8-1. Specifications
Vehicle specifications
Compact spare tire (if equipped)
■When towing a trailer
Add 20.0 kPa (0.2 kgf/cm2 or bar, 3 psi) to the recommended tire inflation pressure, and drive at speeds below 100 km/h (62 mph).
A: HB3
B: H11
C: H16
D: Wedge base bulbs (W5W)
E: Wedge base bulbs (W16W)
F: Wedge base bulbs (W21W)
Tire sizeT125/70D16 96M
Tire inflation pres-
sure
(Recommended
cold tire inflation
pressure)
420 kPa (4.2 kgf/cm2 or bar, 60 psi)
Wheel size16 4T
Wheel bolt torque140 N•m (14.3 kgf•m, 103 ft•lbf)
Light bulbs
Light bulbsWTyp e
Exterior
Head lights high beam (bulb type)60A
Head lights low beam (bulb type)55B
Front fog lights19C
Front position lights (bulb type)5D
Front turn signal lights (bulb type)21G
Rear turn signal lights (bulb type)21G
Back-up light16E
Rear fog light21F
License plate light5D
InteriorFront interior lights/personal lights5H
Luggage compartment light5H
Page 368 of 494
366
Owner's Manual_Europe_M99V08_en
What to do if... (Troubleshooting)
Is the electronic key left inside
the vehicle?
Check the message on the multi-infor-
mation display. ( P. 3 1 1)
When a warning light turns on or
a warning message is displayed,
refer to P.304, 311.
Vehicles with an emergency tire
puncture repair kit: Stop the vehi-
cle in a safe place and repair the
flat tire temporarily with the
emergency tire puncture repair
kit. ( P.313)
Vehicles with spare tire: Stop the
vehicle in a safe place and
replace the flat tire with the spare
tire. ( P.324)
Try the procedure for when the
vehicle becomes stuck in mud,
dirt, or snow. ( P.341)
A warning light turns on or a
warning message is dis-
played
When a problem has
occurred
If you have a flat tire
The vehicle becomes stuck