2022 TOYOTA AVALON ECO mode
[x] Cancel search: ECO modePage 207 of 572

2074-3. Operating the lights and wipers
4
Driving
■Automatic light off system
●When the headlights are on: The headlights and tail lights turn off 30 sec-
onds after the engine switch is turned to ACCESSORY mode or turned off
and a door is opened and closed. (The lights turn off immediately if
on the key is pressed twice after all the doors are closed.)
● When only the tail lights are on: The tail lights turn off automatically if the
engine switch is turned to ACCESSORY mode or turned off and the driver’s
door is opened.
To turn the lights on again, turn the engine switch to IGNITION ON mode, or
turn the light switch off once and then back to or .
If any of the doors or trunk lid is kept open, the lights automatically turn off
after 20 minutes.
■ Light reminder buzzer (except when the light switch is in )
A buzzer sounds when the engine switch is turned off or turned to ACCES-
SORY mode and the driver's door is opened while the lights are turned on.
■ Windshield wiper linked headlight illumination
When driving during daytime with the headlight switch turned to , if the
windshield wipers are used, the headlights will turn on automatically after
several seconds to help enhance the visibility of your vehicle.
■ Battery-saving function
In the following conditions, the remaining lights will go off automatically after
20 minutes in order to prevent the vehicle battery from being discharged:
●The headlights and/or tail lights are on.
● The engine switch is in ACCESSORY mode or turned off.
This function will be canceled in any of the following situations:
● When the engine switch is turned to IGNITION ON mode.
● When the light switch is operated
● When a door or the trunk is opened or closed
■ Welcome lighting
If the headlight switch is turned to and the surrounding area is dark,
unlocking the doors using the smart key system or wireless remote control
will turn the parking lights and tail lights on automatically.
■ Customization
Some functions can be customized. ( P. 525)
NOTICE
■To prevent battery discharge
Do not leave the lights on longer than necessary when the engin e is not
running.
Page 211 of 572

2114-3. Operating the lights and wipers
4
Driving
• When the windshield is obscured by fog, mist, ice, dirt, etc.
• When the windshield is cracked or damaged
• When the camera sensor is deformed or dirty
• When the temperature of the camera sensor is extremely high
• When the surrounding brightness level is equal to that of head lights, tail
lights or fog lights
• When headlights or tail lights of vehicles ahead are turned off, dirty, changing color, or not aimed properly
• When the vehicle is hit by water, snow, dust, etc. from a prec eding vehi-
cle
• When driving through an area of intermittently changing brightness and
darkness
• When frequently and repeatedly driving ascending/descending roads, or roads with rough, bumpy or uneven surfaces (such as stone-paved
roads, gravel roads, etc.)
• When frequently and repeatedly taking curves or driving on a w inding
road
• When there is a highly reflective object ahead of the vehicle, such as a sign or mirror
• When the back of a preceding vehicle is highly reflective, such as a con-
tainer on a truck
• When the vehicle's headlights are damaged or dirty, or are not aimed
properly
• When the vehicle is listing or titling due to a flat tire, a trailer being towed, etc.
• When the headlights are changed between the high beams and low
beams repeatedly in an abnormal manner
• When the driver believes that the high beams may be flashing or dazzling pedestrians or other drivers
■ Temporarily lowering sensor sensitivity
The sensitivity of the sensor can be temporarily lowered.
Turn the engine switch off while the following conditions are m et.
• The headlight switch is in the or position.
• The headlight switch lever is in the original position.
• Automatic High Beam switch is on.
Turn the engine switch to the IGNITION ON mode.
Within 60 seconds after , repeat pushing the headlight switch lever to the
high beam position then pulling it to the original position qui ckly 10 times,
then leave the lever in the original position.
If the sensitivity is changed, the Automatic High Beam indicato r is turn on
and off 3 times.
1
2
32
4
Page 213 of 572

2134-3. Operating the lights and wipers
4
Driving
Washer/wiper dual oper-
ation
Pulling the lever operates the wip-
ers and washer.
Wipers will automatically operate a
couple of times after the washer
squirts.
(After operating several times, the
wipers operate once more time
after a short delay to prevent drip-
ping. However, the dripping pre-
vention does not operate while the
vehicle is moving.)
■ The windshield wiper and washer can be operated when
The engine switch is in IGNITION ON mode.
■ If no windshield washer fluid sprays
Check that the washer nozzles are not blocked if there is washe r fluid in the
windshield washer fluid reservoir.
■ When stopping the engine in an emergency while driving
If the windshield wipers are operating when the engine is stopped, the wind-
shield wipers will operate in high speed operation. After the v ehicle is
stopped, operation will return to normal when the engine switch is turned to
IGNITION ON mode, or operation will stop when the driver’s door is opened.
7
WARNING
■ Caution regarding the use of washer fluid
When it is cold, do not use the washer fluid until the windshie ld becomes
warm. The fluid may freeze on the windshield and cause low visi bility. This
may lead to an accident, resulting in death or serious injury.
NOTICE
■ When the windshield is dry
Do not use the wipers, as they may damage the windshield.
■ When the washer fluid tank is empty
Damage to the washer fluid pump may be caused if the lever is p ulled
toward you and held continually.
■ When a nozzle becomes blocked
In this case, contact your Toyota dealer.
Do not try to clear it with a pin or other object. The nozzle will be damaged.
Page 267 of 572

2674-5. Using the driving support systems
4
Driving
This mode employs a radar to detect the presence of vehicles up to
approximately 328 ft. (100 m) ahead, determines the current veh icle-
to-vehicle following distance, and operates to maintain a suita ble fol-
lowing distance from the vehicle ahead. The desired vehicle-to- vehi-
cle distance can also be set by operating the vehicle-to-vehicl e
distance switch.
When driving on downhill slopes, the vehicle-to-vehicle distance may
become shorter.
Example of constant speed cruising
When there are no vehicles ahead
The vehicle travels at the speed set by the driver.
Example of deceleration crui sing and follow-up cruising
When a preceding vehicle driving slower than the set speed
appears
When a vehicle is detected running ahead of you, the system automatically
decelerates your vehicle. When a greater reduction in vehicle s peed is
necessary, the system applies the brakes (the stop lights will come on at
this time). The system will respond to changes in the speed of the vehicle
ahead in order to maintain the vehicle-to-vehicle distance set by the driver.
Approach warning warns you when the system cannot decelerate su ffi-
ciently to prevent your vehicle from closing in on the vehicle ahead.
When the vehicle ahead of you stops, your vehicle will also stop (vehicle is
stopped by system control). After the vehicle ahead starts off, pressing the
“+ RES” switch or depressing the accelerator pedal (start-off o peration) will
resume follow-up cruising. If the start-off operation is not pe rformed, sys-
tem control continues to keep your vehicle stopped.
Driving in vehicle-to-vehi cle distance control mode
1
2
Page 268 of 572

2684-5. Using the driving support systems
When the turn signal lever is operated and your vehicle moves to an over-
taking lane while driving at 50 mph (80 km/h) or more, the vehi cle will
accelerate to help to overtake a passing vehicle.
The system’s identification of what is an overtaking lane may b e deter-
mined solely based on the location of the steering wheel in the vehicle (left
side driver position versus right side driver position.) If the vehicle is driven
to a region where the overtaking lane is on a different side fr om where the
vehicle is normally driven, the vehicle may accelerate when the turn signal
lever is operated in the opposite direction to the overtaking l ane (e.g., if the
driver normally operates the vehicle in a region where the overtaking lane
is to the right but then drives to a region where the overtaking lane is to the
left, the vehicle may accelerate when the right turn signal is activated).
Example of acceleration
When there are no longer any preceding vehicles driving slower
than the set speed
The system accelerates until the set speed is reached. The syst em then
returns to constant speed cruising.
Press the cruise control main
switch to activate the cruise
control.
Dynamic radar cruise control indi-
cator will come on and a message
will be displayed on the multi-infor-
mation display.
Press the switch again to deacti-
vate the cruise control.
If the cruise control main switch is pressed and held for 1.5 seconds or
more, the system turns on in constant speed control mode. ( P. 274)
Accelerate or decelerate, with
accelerator pedal operation, to
the desired vehicle speed (at or
above approximately 20 mph
[30 km/h]) and press the “- SET”
switch to set the speed.
Cruise control “SET” indicator will
come on.
The vehicle speed at the moment
the switch is released becomes the
set speed.
Setting the vehicle speed (vehicle-to-vehicle distance control
mode)
3
1
2
Page 274 of 572
2744-5. Using the driving support systems
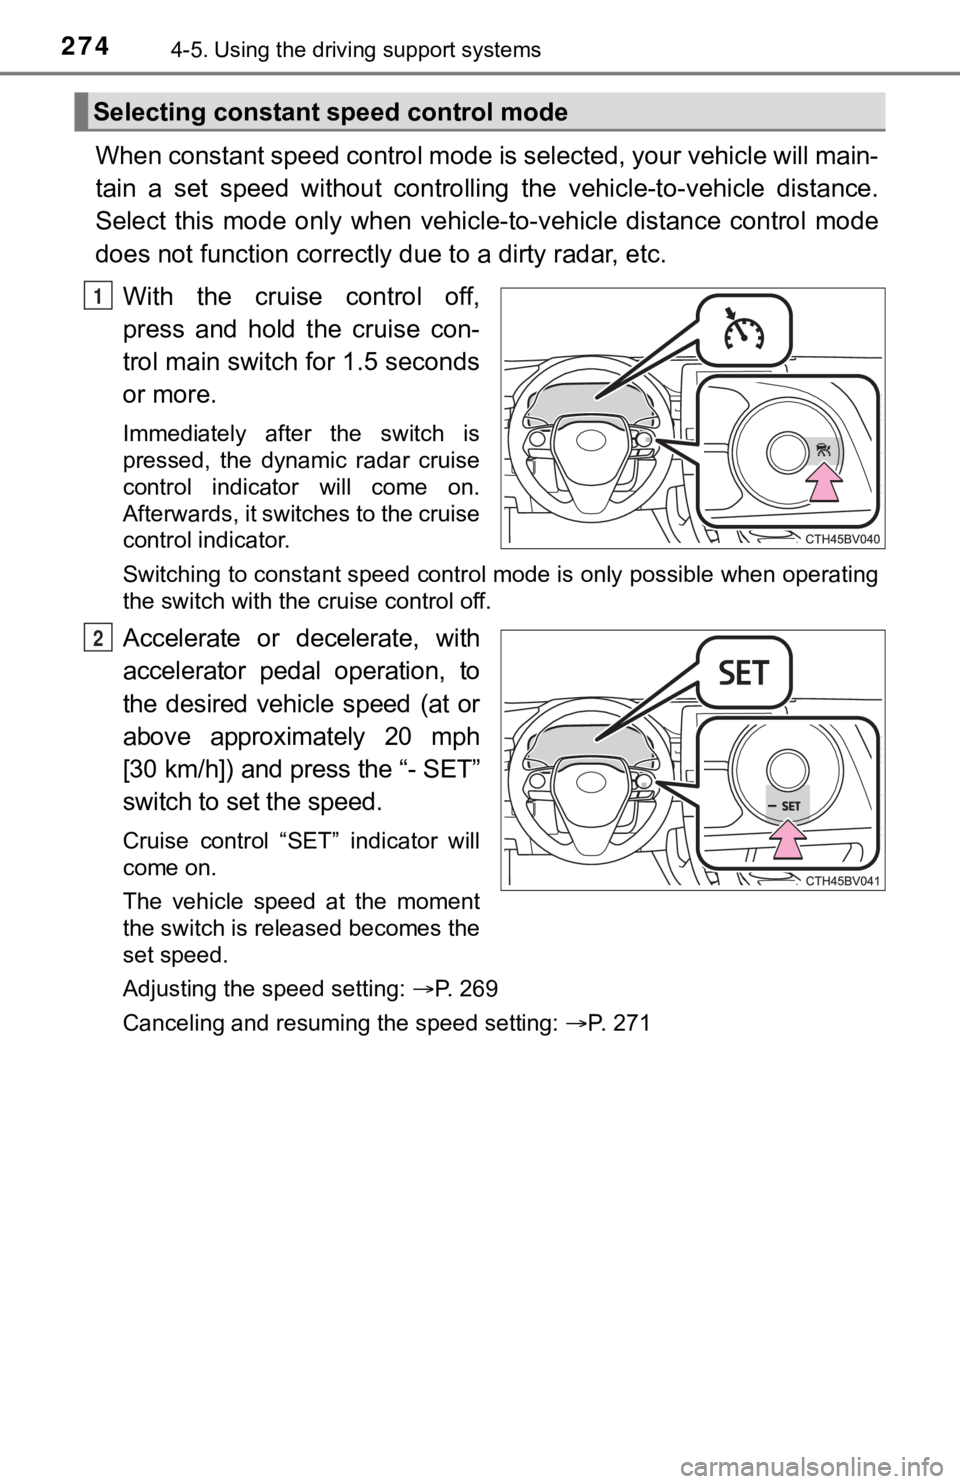
When constant speed control mode is selected, your vehicle will main-
tain a set speed without controllin g the vehicle-to-vehicle distance.
Select this mode only when vehic le-to-vehicle distance control mode
does not function correctly due to a dirty radar, etc.
With the cruise control off,
press and hold the cruise con-
trol main switch for 1.5 seconds
or more.
Immediately after the switch is
pressed, the dynamic radar cruise
control indicator will come on.
Afterwards, it switches to the cruise
control indicator.
Switching to constant speed control mode is only possible when operating
the switch with the cruise control off.
Accelerate or decelerate, with
accelerator pedal operation, to
the desired vehicle speed (at or
above approximately 20 mph
[30 km/h]) and press the “- SET”
switch to se t the speed.
Cruise control “SET” indicator will
come on.
The vehicle speed at the moment
the switch is released becomes the
set speed.
Adjusting the speed setting: P. 269
Canceling and resuming the speed setting: P. 271
Selecting constant speed control mode
1
2
Page 275 of 572

2754-5. Using the driving support systems
4
Driving
■Dynamic radar cruise control wi th full-speed range can be set when
● The shift lever is in D.
● The desired set speed can be set when the vehicle speed is approximately
20 mph (30 km/h) or more.
(However, when the vehicle speed is set while driving at below approxi-
mately 20 mph [30 km/h], the set speed will be set to approximately 20 mph
[30 km/h].)
■ Accelerating after setting the vehicle speed
The vehicle can accelerate by operating the accelerator pedal. After acceler-
ating, the set speed resumes. However, during vehicle-to-vehicl e distance
control mode, the vehicle speed may decrease below the set spee d in order
to maintain the distance to the preceding vehicle.
■ When the vehicle stops while follow-up cruising
●Pressing the “+ RES” switch while the vehicle ahead stops will resume fol-
low-up cruising if the vehicle ahead starts off within approxim ately 3 sec-
onds after the switch is pressed.
● If the vehicle ahead starts off within 3 seconds after your vehicle stops, fol-
low-up cruising will be resumed.
■ Automatic cancelation of vehicle-to-vehicle distance control mo de
Vehicle-to-vehicle distance control mode is automatically cance led in the fol-
lowing situations.
● VSC is activated.
● TRAC is activated for a period of time.
● When the VSC or TRAC system is turned off.
● The sensor cannot detect correctly because it is covered in some way.
● When the brake control or output restriction control of a driving support sys-
tem operates. (For example: Pre -Collision System, Drive-Start Control)
● The parking brake is operated.
● The vehicle is stopped by system control on a steep incline.
● The following are detected when the vehicle has been stopped by system
control:
• The driver is not wearing a seat belt.
• The driver’s door is opened.
• The vehicle has been stopped for about 3 minutes
If vehicle-to-vehicle distance control mode is automatically ca nceled for any
reasons other than the above, there may be a malfunction in the system.
Contact your Toyota dealer.
Page 292 of 572

2924-5. Using the driving support systems
If the rear camera detection func-
tion detects a pedestrian in the
detection area, the buzzer and
icon will operate as shown in the
following table:
■The rear camera detection function is operational when
The rear camera detection function is operational when the foll owing condi-
tions are met:
● The engine switch is in the IGNITION ON mode.
● The shift lever is in R.
■ Setting the buzzer volume
The buzzer volume of this function changes with the RCTA buzzer volume.
( P. 100, 526)
■ If the rear camera detection function is malfunctioning
If a malfunction of the rear camera detection function is detec ted, one of the
following messages will be displayed on the audio system screen. Have the
vehicle inspected by your Toyota dealer.
● “RCD malfunction.”
● “Visit your dealer.”
● “RCD unavailable.”
When a pedestrian is detected
AreaBuzzerIcon
Sounds repeatedly
Blinks 3 times and then stays onWhen the vehicle is stationary:
Sounds 3 times
When the vehicle is backing up:
Sounds repeatedly
When it is determined that a
pedestrian will enter area
within a few seconds: Sounds
repeatedlyWhen it is determined that a
pedestrian will enter area
within a few seconds: Blinks 3
times and then stays on
1
2
311