Page 4 of 584

TABLE OF CONTENTS4
5-1. Using the air conditioning system and defogger
Automatic air conditioning system............................. 360
Heated steering wheel/ seat heaters/
seat ventilators ................ 371
5-2. Using the interior lights Interior lights list ................ 374
• Interior light ................... 375
• Personal lights .............. 375
• Ambient lights ............... 376
5-3. Using the storage features
List of storage features...... 377
• Glove box...................... 378
• Console box .................. 378
• Bottle holders ................ 379
• Cup holders .................. 380
• Auxiliary boxes.............. 381
• Open tray ...................... 382
Trunk features ................... 383
5-4. Other interior features Other interior features ....... 384
• Sun visors ..................... 384
• Vanity mirrors................ 384
• Power outlet .................. 385
• USB charging ports....... 386
• Wireless charger ........... 388
• Armrest ......................... 397
• Assist grips ................... 397
• Coat hooks.................... 398
Garage door opener .......... 399 6-1. Maintenance and care
Cleaning and protecting the vehicle exterior .......... 408
Cleaning and protecting the vehicle interior ........... 411
6-2. Maintenance Maintenance requirements ................... 414
General maintenance ........ 416
Emission inspection and maintenance (I/M)
programs ......................... 420
6-3. Do-it-yourself maintenance
Do-it-yourself service precautions ...................... 421
Hood .................................. 423
Positioning a floor jack....... 424
Engine compartment ......... 425
12-volt battery .................... 433
Tires................................... 437
Tire inflation pressure ........ 449
Wheels............................... 452
Air conditioning filter .......... 454
Cleaning the hybrid battery (traction battery)
air intake vent and
filter.................................. 456
Electronic key battery ........ 461
Checking and replacing fuses ................................ 464
Light bulbs ......................... 467
5Interior features6Maintenance and care
Page 22 of 584
22Pictorial index
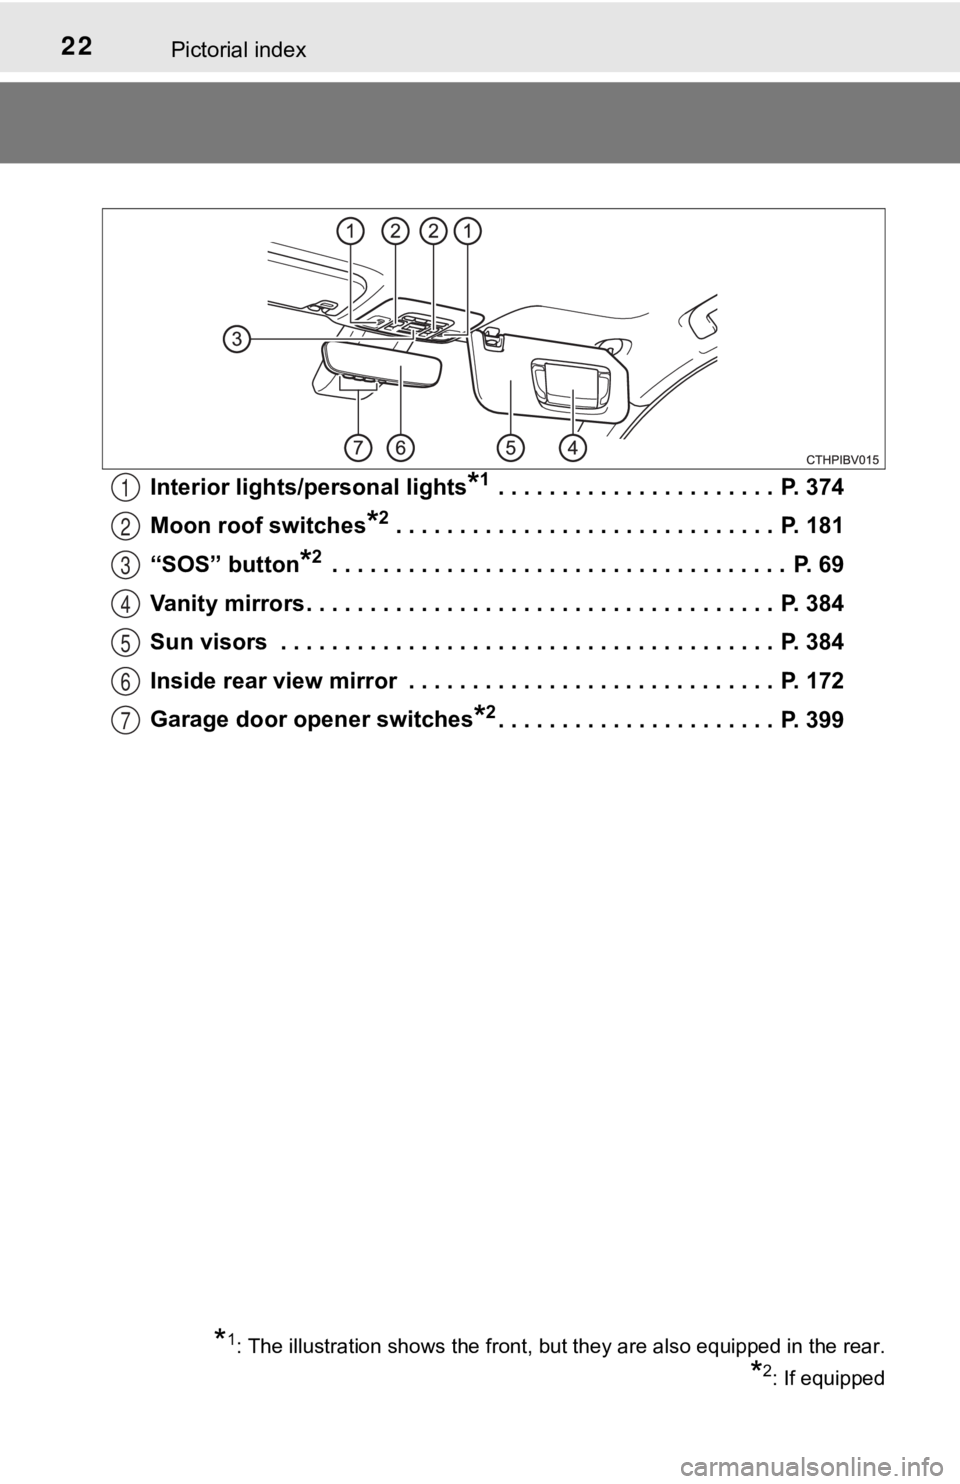
Interior lights/personal lights*1 . . . . . . . . . . . . . . . . . . . . . . P. 374
Moon roof switches
*2 . . . . . . . . . . . . . . . . . . . . . . . . . . . . . . P. 181
“SOS” button
*2 . . . . . . . . . . . . . . . . . . . . . . . . . . . . . . . . . . . . P. 69
Vanity mirrors . . . . . . . . . . . . . . . . . . . . . . . . . . . . . . . . . . . . . P. 384
Sun visors . . . . . . . . . . . . . . . . . . . . . . . . . . . . . . . . . . . . . . . P. 384
Inside rear view mirror . . . . . . . . . . . . . . . . . . . . . . . . . . . . . P. 172
Garage door opener switches
*2. . . . . . . . . . . . . . . . . . . . . . P. 399
1
2
3
4
5
6
7
*1: The illustration shows the front, but they are also equipped in the rear.
*2: If equipped
Page 172 of 584
1723-4. Adjusting the steering wheel and mirrors
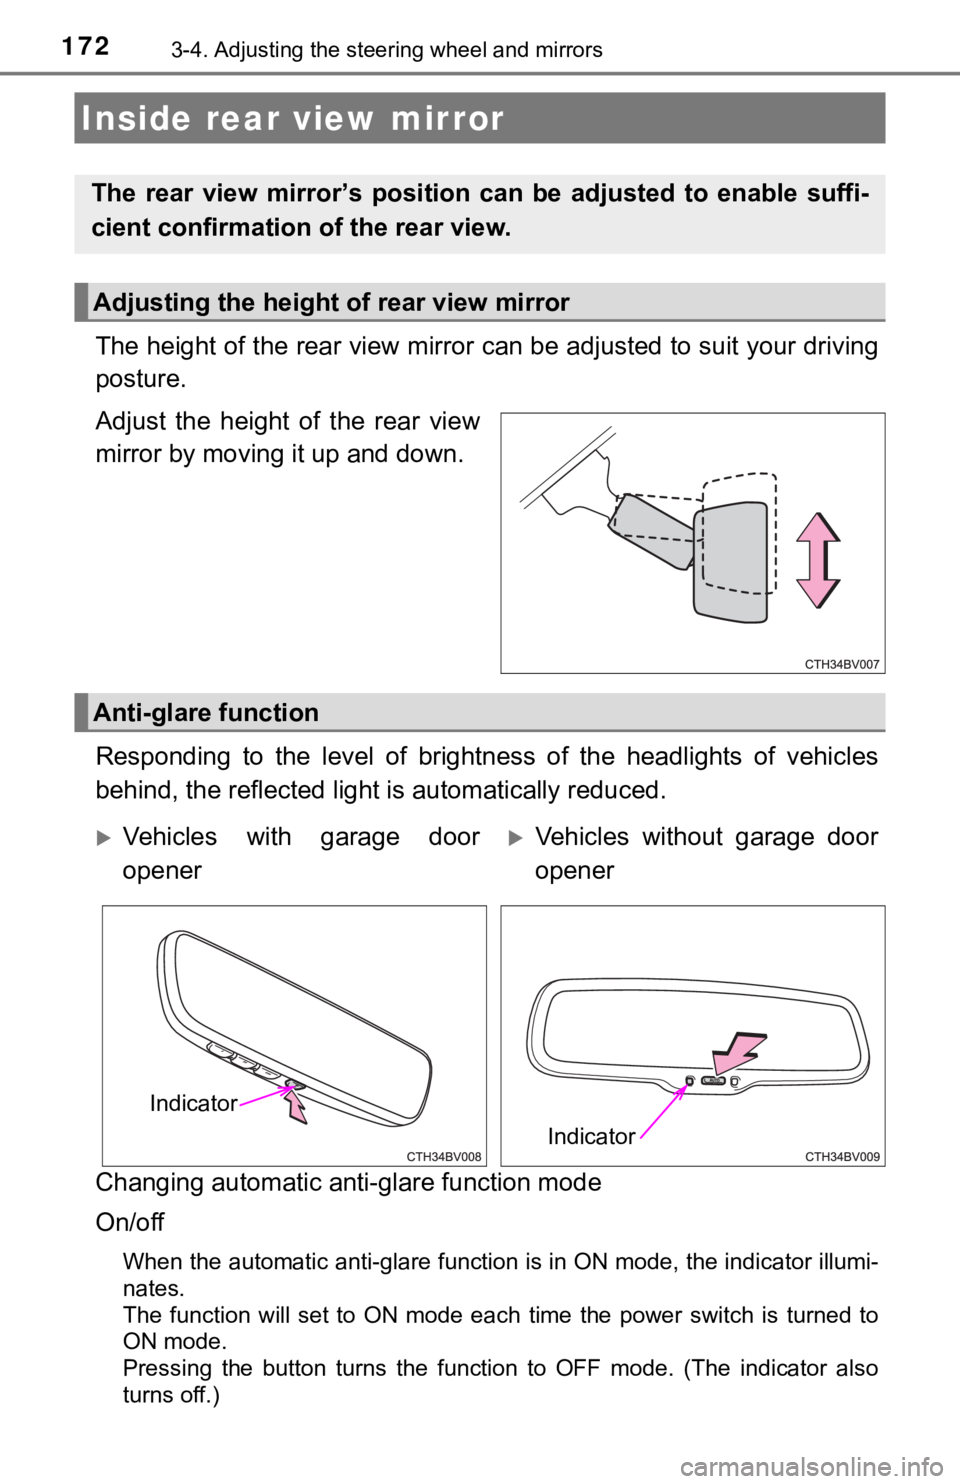
The height of the rear view mirror can be adjusted to suit your driving
posture.
Adjust the height of the rear view
mirror by moving it up and down.
Responding to the level of brightness of the headlights of vehi cles
behind, the reflected light is automatically reduced.
Changing automatic anti- glare function mode
On/off
When the automatic anti-glare function is in ON mode, the indic ator illumi-
nates.
The function will set to ON mode each time the power switch is turned to
ON mode.
Pressing the button turns the function to OFF mode. (The indicator also
turns off.)
Inside rear view mirror
The rear view mirror’s position ca n be adjusted to enable suffi-
cient confirmation of the rear view.
Adjusting the height of rear view mirror
Anti-glare function
Vehicles with garage door
openerVehicles without garage door
opener
Indicator
Indicator
Page 173 of 584
1733-4. Adjusting the steering wheel and mirrors
3
Operation of each component
■To prevent sensor error
Vehicles without garage door opener
Vehicles with garage door opener
To ensure that the sensors operate prop-
erly, do not touch or cover them.
To ensure that the sensors operate prop-
erly, do not touch or cover them.
WARNING
Do not adjust the position of the mirror while driving.
Doing so may lead to mishandling of the vehicle and cause an accident,
resulting in death or serious injury.
Page 359 of 584

359
5Interior features
5-1. Using the air conditioning system and defogger
Automatic air conditioning system............................. 360
Heated steering wheel/ seat heaters/
seat ventilators ................ 371
5-2. Using the interior lights Interior lights list ................ 374
• Interior light ................... 375
• Personal lights .............. 375
• Ambient lights ............... 376
5-3. Using the storage features
List of storage features ..... 377
• Glove box...................... 378
• Console box .................. 378
• Bottle holders ................ 379
• Cup holders .................. 380
• Auxiliary boxes.............. 381
• Open tray ...................... 382
Trunk features ................... 383 5-4. Other interior features
Other interior features ....... 384
• Sun visors ..................... 384
• Vanity mirrors................ 384
• Power outlet .................. 385
• USB charging ports....... 386
• Wireless charger ........... 388
• Armrest ......................... 397
• Assist grips ................... 397
• Coat hooks.................... 398
Garage door opener.......... 399
Page 399 of 584
3995-4. Other interior features
5
Interior features
■HomeLink® programming procedure
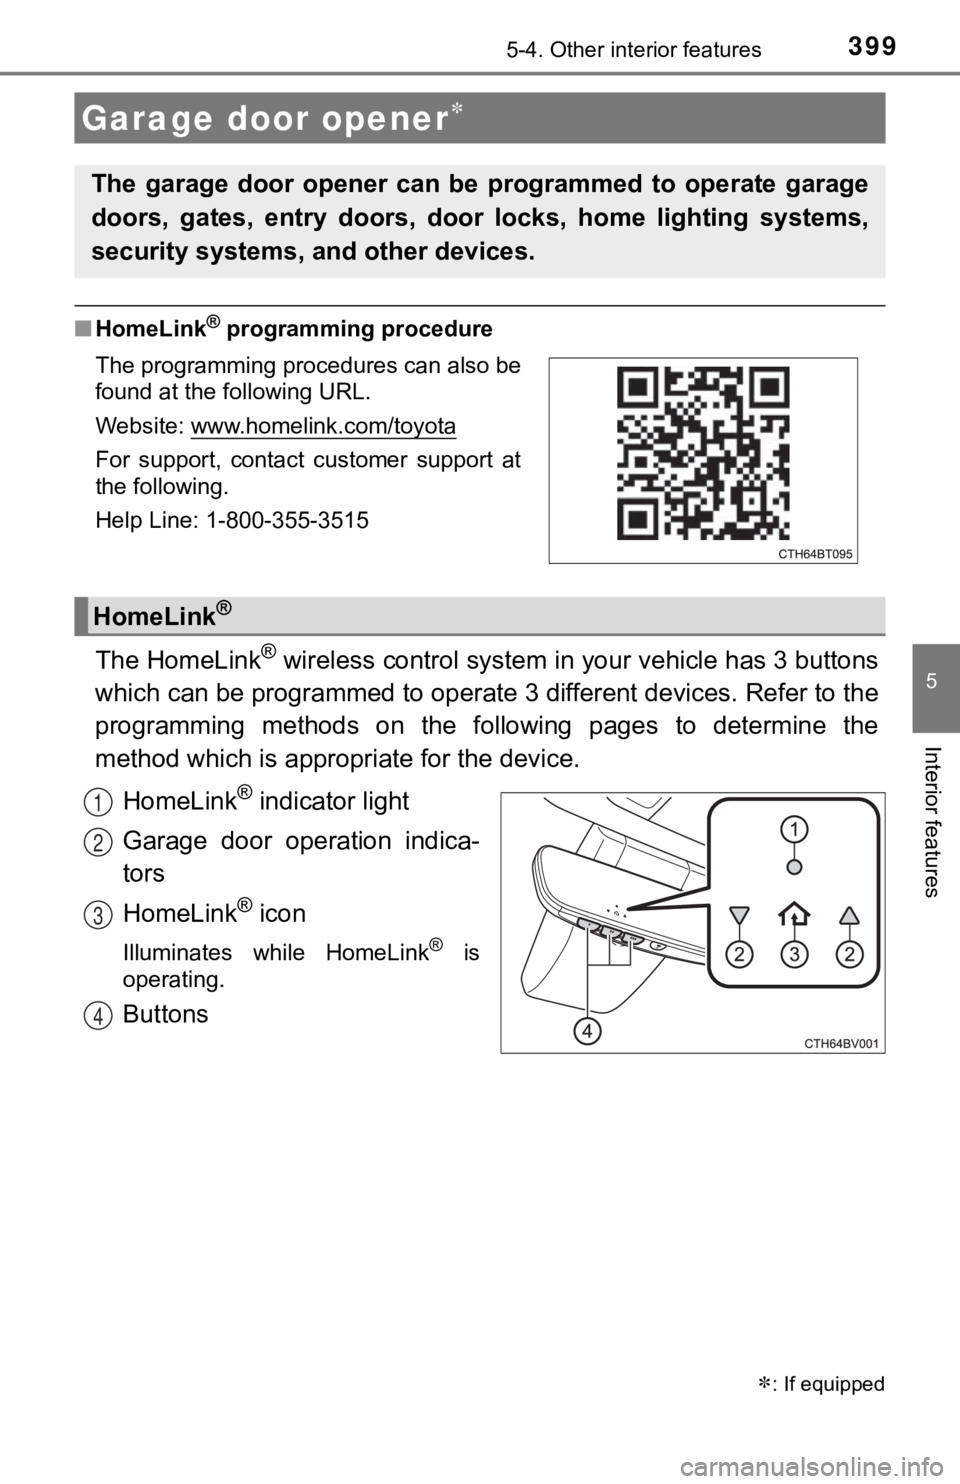
The HomeLink® wireless control system in your vehicle has 3 buttons
which can be programmed to operate 3 different devices. Refer to the
programming methods on the following pages to determine the
method which is approp riate for the device.
HomeLink
® indicator light
Garage door operation indica-
tors
HomeLink
® icon
Illuminates while HomeLink® is
operating.
Buttons
Garage door opener
: If equipped
The garage door opener can be programmed to operate garage
doors, gates, entry doors, door locks, home lighting systems,
security systems, and other devices.
The programming procedures can also be
found at the following URL.
Website: www.homelink.com/toyota
For support, contact customer support at
the following.
Help Line: 1-800-355-3515
HomeLink®
1
2
3
4
Page 400 of 584
4005-4. Other interior features
■Before programming the HomeLink®
●During programming, it is possible that garage doors, gates, or
other devices may operate. For this reason, make sure that peo-
ple and objects are clear of the garage door or other devices t o
prevent injury or other potential harm.
● It is recommended that a new battery be placed in the remote
control transmitter for mo re accurate programming.
● Garage door opener motors manufactured after 1995 may be
equipped with rolling code pro tection. If this is the case, you may
need a stepladder or other sturdy, safe device to reach the
“Learn” or “Smart” button on the garage door opener motor.
■Programming the HomeLink®
Steps through must be perfo rmed within 60 seconds, other-
wise the indicator light will st op flashing and programming wil l not
be able to be completed.
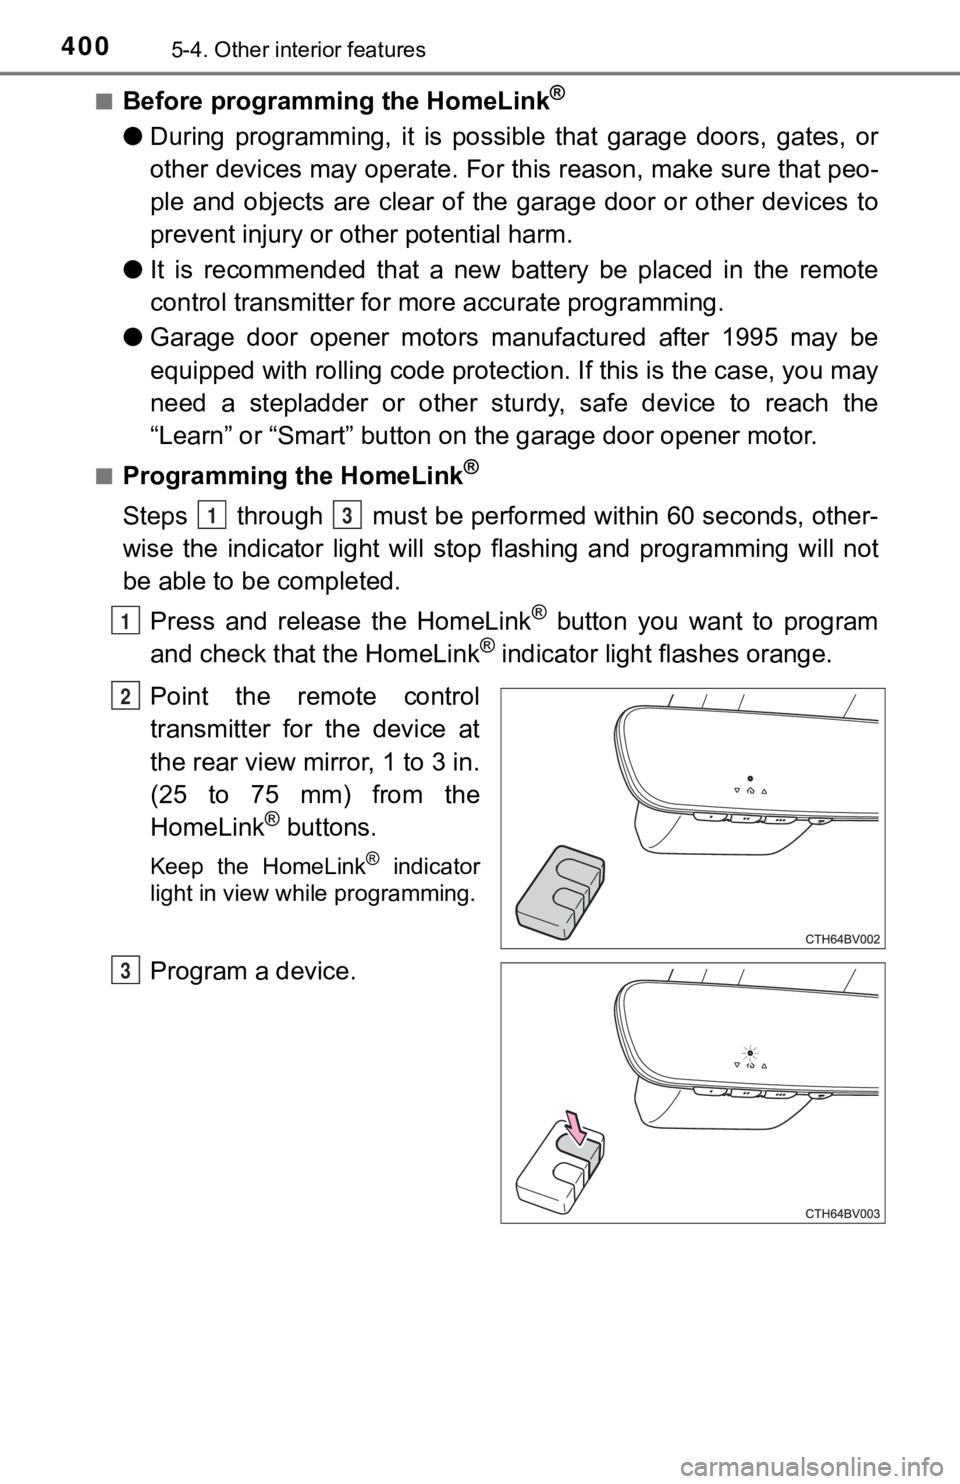
Press and release the HomeLink
® button you want to program
and check that the HomeLink® indicator light flashes orange.
Point the remote control
transmitter for the device at
the rear view mirror, 1 to 3 in.
(25 to 75 mm) from the
HomeLink
® buttons.
Keep the HomeLink® indicator
light in view while programming.
Program a device.
13
1
2
3
Page 401 of 584
4015-4. Other interior features
5
Interior features
Programming a device other than an entry gate (for U.S.A.
owners)
Press and hold the remote control transmitter button until the
HomeLink
® indicator light changes from slowly flashing orange to
rapidly flashing gre en (rolling code) or continuously lit green
(fixed code), then release the button.
Programming an entry gate (for U.S.A. owners)/Programming
a device in the Canadian market
Press and release the remote con trol transmitter button at 2 sec-
ond intervals, repeatedly, until the HomeLink
® indicator light
changes from slowly flashing orange to rapidly flashing green
(rolling code) or continuous ly lit green (fixed code).
Test the HomeLink
® operation by pressing the newly pro-
grammed button and observi ng the indicator light:
● Indicator light illuminates: Progr amming of a fixed code device
has completed. The garage door or other device should operate
when a HomeLink
® button is pressed and released.
● Indicator light flashes rapidly: The garage door opener motor o r
other device is equipped with a rolling code. To complete pro-
gramming, firmly press and hold the HomeLink
® button for 2 sec-
onds then release it.
● If the garage door or other device does not operate, proceed to
“Programming a rol ling code system”.
Repeat the steps above to program another device for any of the
remaining HomeLink
® buttons.
4
5