Page 22 of 281

WARNING: Before driving, you must ensure that the hood is securely latched in the fully closed position by carefully trying to lift the front edge of the hood upward and confirming there is no movement.
Interior Emergency Release
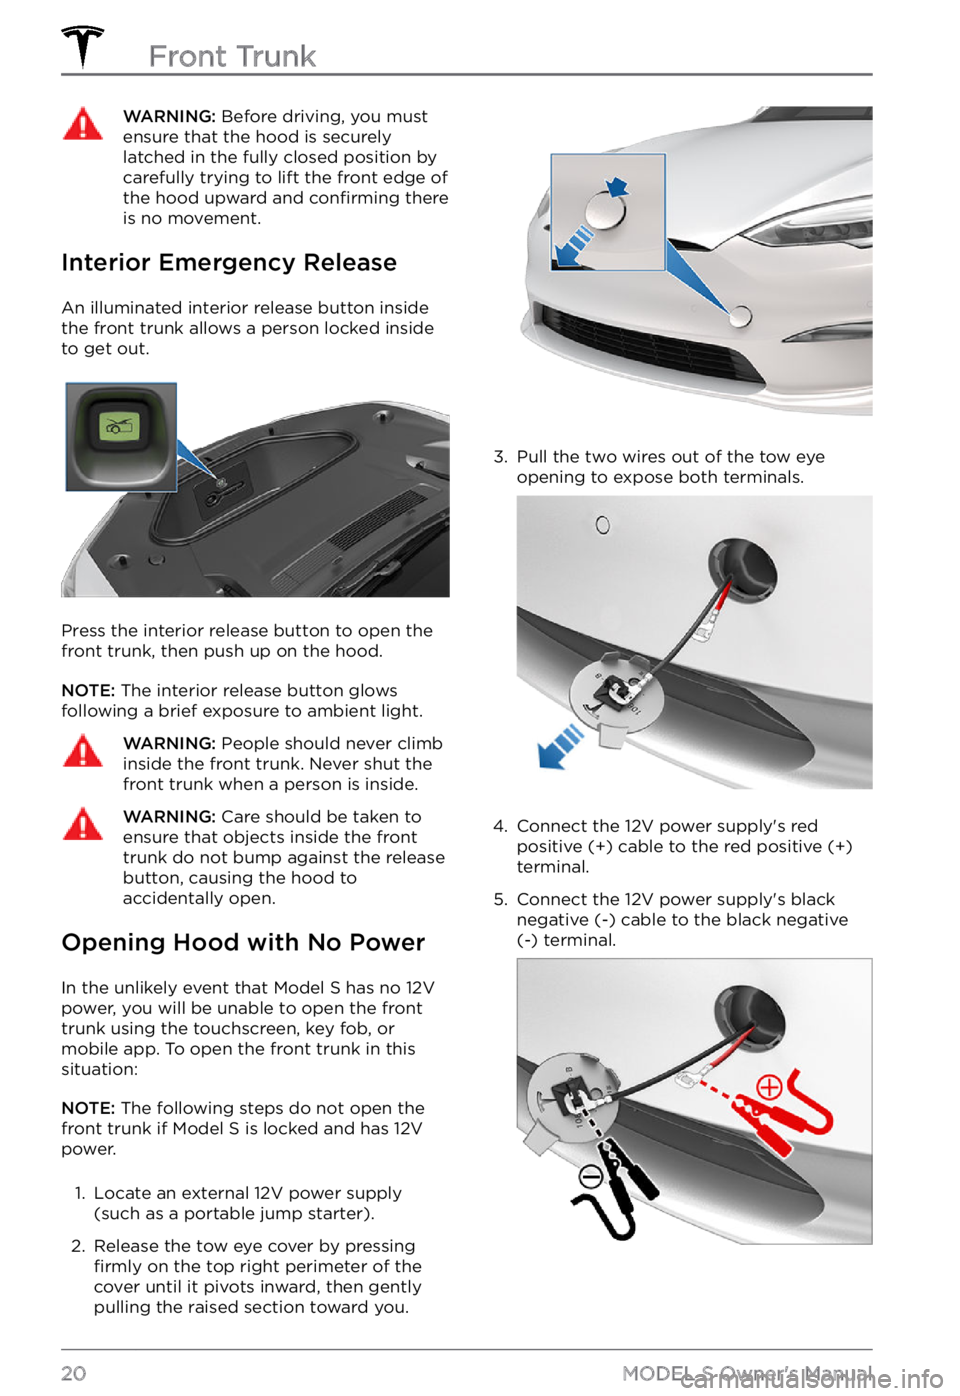
An illuminated interior release button inside
the front trunk allows a person locked inside to get out.
Press the interior release button to open the
front trunk, then push up on the hood.
NOTE: The interior release button glows
following a brief exposure to ambient light.
WARNING: People should never climb inside the front trunk. Never shut the front trunk when a person is inside.
WARNING: Care should be taken to ensure that objects inside the front trunk do not bump against the release button, causing the hood to accidentally open.
Opening Hood with No Power
In the unlikely event that Model S has no 12V
power, you will be unable to open the front
trunk using the touchscreen, key fob, or
mobile app. To open the front trunk in this situation:
NOTE: The following steps do not open the
front trunk if Model S is locked and has 12V
power.
1.
Locate an external 12V power supply
(such as a portable jump starter).
2.
Release the tow eye cover by pressing firmly on the top right perimeter of the
cover until it pivots inward, then gently pulling the raised section toward you.
3.
Pull the two wires out of the tow eye
opening to expose both terminals.
4.
Connect the 12V power supply
Page 24 of 281
Center Console
In addition to housing an RFID transmitter
that reads key fobs and key cards (see Key Card on page 10), the center console includes
cup holders, two storage compartments, wireless phone chargers, and a rear
touchscreen.
To open the main storage compartment, pull its cover upward. Open the front storage
compartment by sliding its cover forward.
Second Row Console
Your Model S has a rear console integrated in
the center of the second row. This console
can serve as an arm rest for rear passengers.
To lower the console, press the button on the
back of the center seat
Page 26 of 281
When placed on the wireless charger, your
phone charges whenever the vehicle is
powered on (the touchscreen is on and you
are in the vehicle). Your phone does not
charge when you leave the vehicle
unless a feature (such as Sentry mode) is enabled (see Sentry Mode on page 162).
NOTE: The phone must be in direct contact
with the wireless charger. Do not place
objects between the phone and the charger
(for example, credit cards, key cards, coins,
keys, metal objects, etc.).
NOTE: The wireless phone charger may not
work if your phone case is too large or is
made of metal. Try removing the phone from
its case before placing it on the charger.
NOTE: The wireless phone charger does not
charge if the vehicle
Page 47 of 281
Linking a Driver Profile to a Key
Fob
You can link a driver profile to a specific key
fob to allow Model S to automatically select
the correct driver profile when the linked key
fob is detected as you approach the vehicle
and open the driver
Page 61 of 281
NOTE: Hazard warning flashers operate even
without a key nearby.
Lights
59Driving
Page 163 of 281

About the Security System
If Model S does not detect a key nearby and a
locked door or trunk is opened, an alarm
sounds and the headlights and turn signals
flash. To deactivate the alarm, press any
button on the key.
To manually enable or disable the alarm
system, touch Controls > Safety > Security Alarm. When enabled, Model S activates its
alarm one minute after you exit, the doors
lock, and a recognized key is no longer
detected.
A battery-backed siren sounds in situations where a locked door or trunk is opened and
Model S does not detect a key nearby (if
equipped). If you also want this siren to sound
in situations where
Model S detects motion
inside the cabin, or is moved or tilted (for
example, with a tow truck or jack), turn on the
Tilt/Intrusion setting (touch Controls > Safety > Tilt/Intrusion) (if equipped).
NOTE: If you plan to leave something that
moves inside your locked Model S, remember
to turn off Tilt/Intrusion. If this setting is on,
any motion detected inside Model S activates
the intrusion alarm.
NOTE: If Model S is in Sentry Mode (see Sentry Mode on page 162), you must disable
Sentry Mode before you can disable the
Security alarm or the Tilt/Intrusion alarm.
NOTE: The Security Alarm must be on to
enable Tilt/Intrusion.
NOTE: The Intrusion Sensor automatically
disables in situations where the climate
control system is operating when you have
left your vehicle (see
Keep Climate On, Dog Mode, and Camp Mode on page 139). To
override, you can manually turn the Intrusion
Sensor on again after choosing Keep Climate On, Dog, or Camp Mode (touch
Controls > Safety > Tilt/Intrusion).
If your Model S is equipped with the
Enhanced Anti-Theft upgrade, the horn
sounds in situations where a locked door or trunk is opened and
Model S does not detect
a key nearby. If the Tilt/Intrusion setting is on,
the horn also sounds if Model S detects
motion inside the cabin, or if the vehicle is moved or tilted (for example, with a tow truck
or jack). To turn the Tilt/Intrusion detection system on or
off, touch Controls > Safety > Tilt/Intrusion.
PIN to Drive
To increase security, you can prevent Model S from being driven until a 4-digit PIN (Personal Identification Number) is entered. To enable
this setting, touch Controls > Safety > PIN to Drive and follow the on-screen prompts to
create a driving PIN.
NOTE: When enabled, in addition to entering
the 4-digit driving PIN to drive, you must also
use it to enter Valet mode for the
first time
and create the 4-digit valet PIN that you can
use to enter and exit Valet mode. When in
Valet mode,
Model S can be driven without
the need for the valet to enter a driving PIN.
In addition, the
PIN to Drive setting is
disabled whenever Valet mode is active.
If you forget your driving PIN, or to disable PIN to Drive, return to this setting, touch the
link to enter your Tesla login credentials, then
follow the on-screen prompts.
NOTE: In the unlikely event that your
touchscreen is unresponsive, you may be
unable to enter the PIN. In this case,
first try
to restart the touchscreen (see Restarting the Touchscreen on page 52). If the touchscreen
is still unresponsive, you can still bypass PIN
to Drive by turning on Keyless Driving in the
Tesla mobile app.
Glovebox PIN
For additional security, you can protect the contents in your glovebox with a 4-digit PIN. To enable this setting, touch
Controls > Safety > Glovebox PIN and follow the on-
screen prompts. When enabled, you are
prompted to enter the PIN to open the
glovebox. To disable this setting, select the
toggle to disable and then enter the PIN.
If you forget your glovebox PIN, reset it by
entering your Tesla login credentials, then
follow the on-screen prompts.
NOTE: When you open the glovebox with
both Glovebox PIN and Valet mode enabled,
you are prompted for the glovebox PIN and taken out of Valet mode after the glovebox
opens.
Security Settings
161Using the Touchscreen
Page 181 of 281

Charging Status
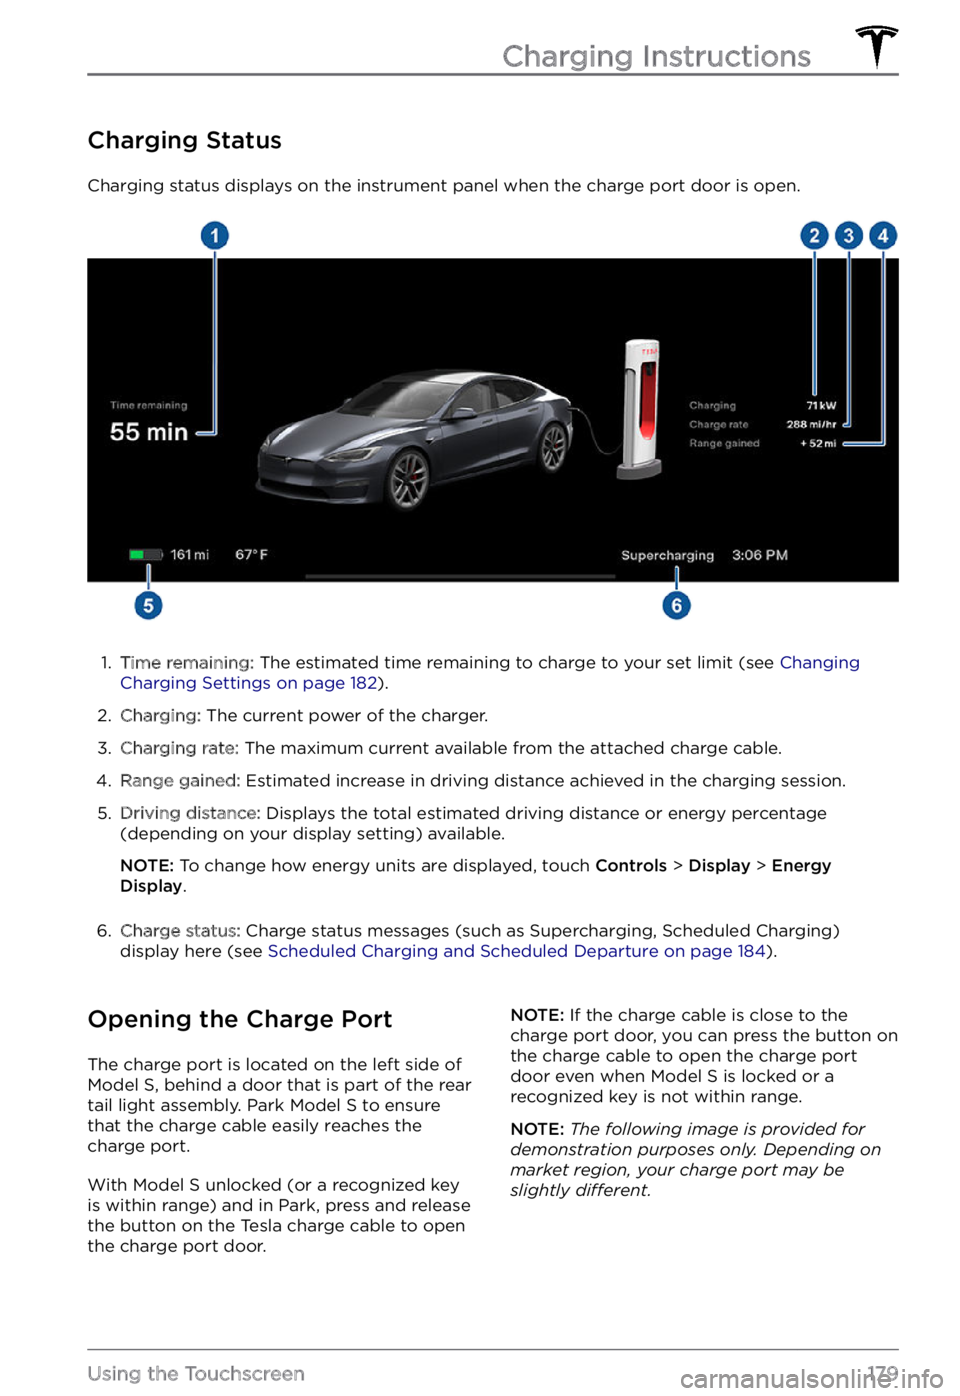
Charging status displays on the instrument panel when the charge port door is open.
1.
Time remaining: The estimated time remaining to charge to your set limit (see Changing Charging Settings on page 182).
2.
Charging: The current power of the charger.
3.
Charging rate: The maximum current available from the attached charge cable.
4.
Range gained: Estimated increase in driving distance achieved in the charging session.
5.
Driving distance: Displays the total estimated driving distance or energy percentage
(depending on your display setting) available.
NOTE: To change how energy units are displayed, touch Controls > Display > Energy Display.
6.
Charge status: Charge status messages (such as Supercharging, Scheduled Charging)
display here (see Scheduled Charging and Scheduled Departure on page 184).
Opening the Charge Port
The charge port is located on the left side of Model S, behind a door that is part of the rear
tail light assembly. Park Model S to ensure
that the charge cable easily reaches the
charge port.
With Model S unlocked (or a recognized key is within range) and in Park, press and release
the button on the Tesla charge cable to open the charge port door.
NOTE: If the charge cable is close to the
charge port door, you can press the button on
the charge cable to open the charge port
door even when Model S is locked or a recognized key is not within range.
NOTE: The following image is provided for demonstration purposes only. Depending on market region, your charge port may be slightly di
Page 231 of 281

FCC and IC CertificationComponentManufacturerModelOperating
Frequency (MHz)FCC IDICB Pillar
EndpointTesla161429113.56
2400-2483.5
6500-80002AEIM-161429120098-1614291Security
ControllerTesla16142802400-2483.52AEIM-161428020098-1614280Fascia
EndpointTesla16138512400-2483.5
6500-80002AEIM-161385120098-1613851Key fobTesla16142832400-2483.5
6500-80002AEIM-161428320098-1614283TPMSTesla14725472400-2483.52AEIM-147254720098-1472547RadarContinentalARS 4-B76000-77000OAYARS4B4135A-ARS4BHomelinkGentexADHL5C286-440MHzNZLADHL5C4112A-ADHL5CCarPCTesla1960000--XMR2020AG525RGL
YZP-ATC5CPC00110224A-2020AG525R
7414C-ATC5CPC001Wireless
ChargerTeslaWC4127.72 KHz
13.56
2400-2483.52AEIM-WC420098-WC4Wireless
ChargerTeslaWC3127.72KHz2AEIM-WC320098-WC3BT USB hubTesla16427832400-2483.52AEIM-164278320098-1642783In cabin
radar*Tesla161663160000-640002AEIM-161663120098-1616631
* The in cabin radar is restricted to factory installation.
The devices listed above comply with Part 15 of the FCC rules and Industry Canada