2022 TESLA MODEL 3 warning light
[x] Cancel search: warning lightPage 54 of 248
5. If you turn on Auto High Beam, your vehicle
automatically switches from high beam headlights to low beam headlights when light is detected in front of
Model 3. See High Beam Headlights on page 52.
6.
If you turn on Headlights after Exit, the exterior lights
remain on for a short period of time after you stop driving and park
Model 3 in low lighting conditions.
See
Headlights After Exit on page 52.
7.
If you turn on Steering Wheel Lights, the arrows
associated with the scroll buttons are backlit in low ambient lighting conditions.
High Beam Headlights
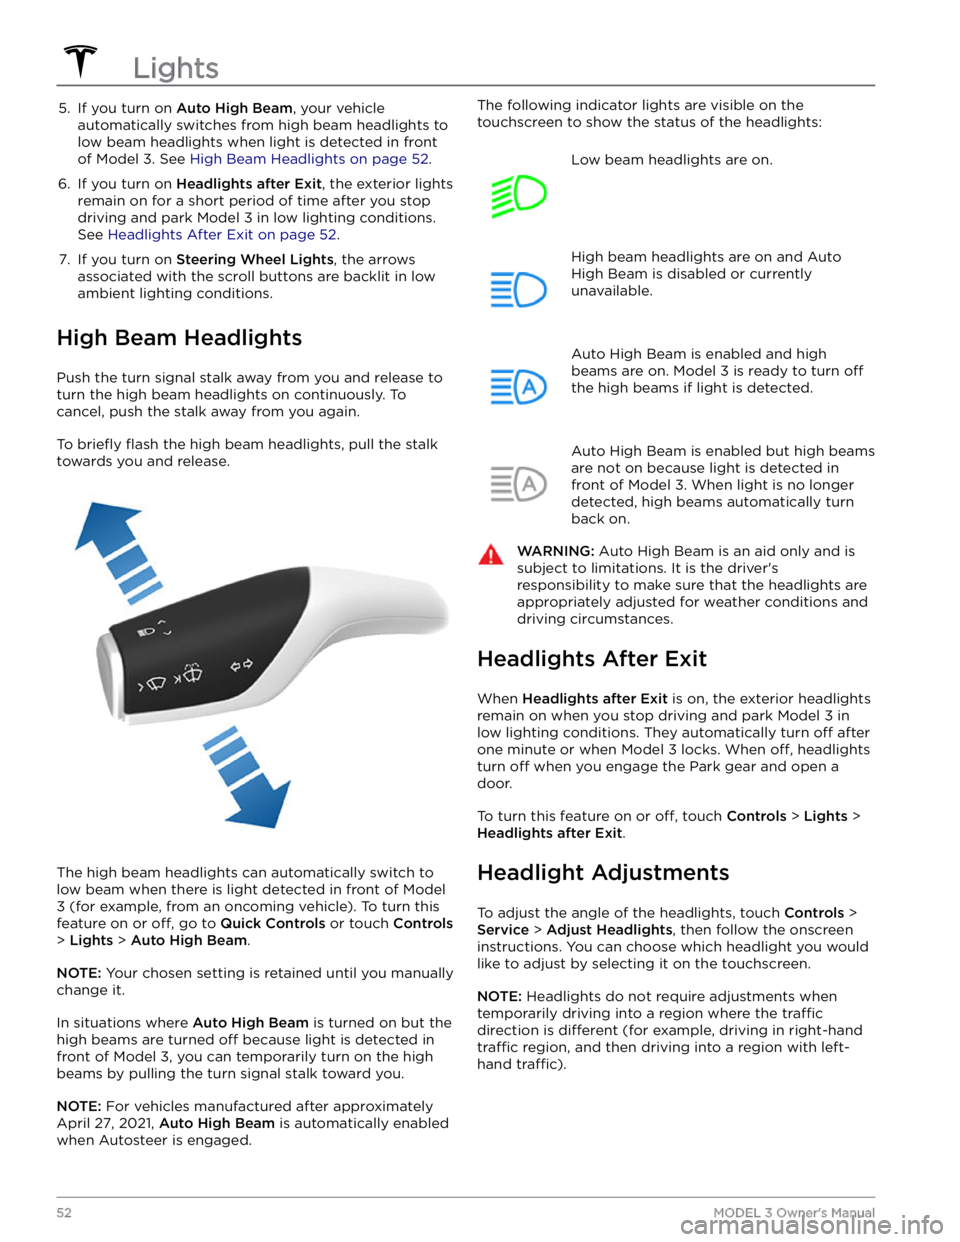
Push the turn signal stalk away from you and release to turn the high beam headlights on continuously. To cancel, push the stalk away from you again.
To briefly flash the high beam headlights, pull the stalk
towards you and release.
The high beam headlights can automatically switch to low beam when there is light detected in front of
Model
3 (for example, from an oncoming vehicle). To turn this
feature on or
off, go to Quick Controls or touch Controls
> Lights > Auto High Beam.
NOTE: Your chosen setting is retained until you manually
change it.
In situations where Auto High Beam is turned on but the
high beams are turned
off because light is detected in
front of
Model 3, you can temporarily turn on the high
beams by pulling the turn signal stalk toward you.
NOTE: For vehicles manufactured after approximately
April 27, 2021,
Auto High Beam is automatically enabled
when Autosteer is engaged.
The following indicator lights are visible on the
touchscreen to show the status of the headlights:Low beam headlights are on.High beam headlights are on and Auto
High Beam is disabled or currently
unavailable.Auto High Beam is enabled and high
beams are on.
Model 3 is ready to turn off
the high beams if light is detected.
Auto High Beam is enabled but high beams
are not on because light is detected in front of
Model 3. When light is no longer
detected, high beams automatically turn
back on.
WARNING: Auto High Beam is an aid only and is
subject to limitations. It is the driver
Page 55 of 248
WARNING: Proceed with caution when adjusting
headlights. Tesla has carefully calibrated the
position of the headlights to be in an optimum
position for most driving scenarios. Tesla
recommends that you do not adjust headlights
unless you are familiar with how headlights should
be adjusted. Once adjusted, you will be unable to
automatically restore them to their originally
calibrated position. Contact Tesla for assistance
when adjusting headlights.
Turn Signals
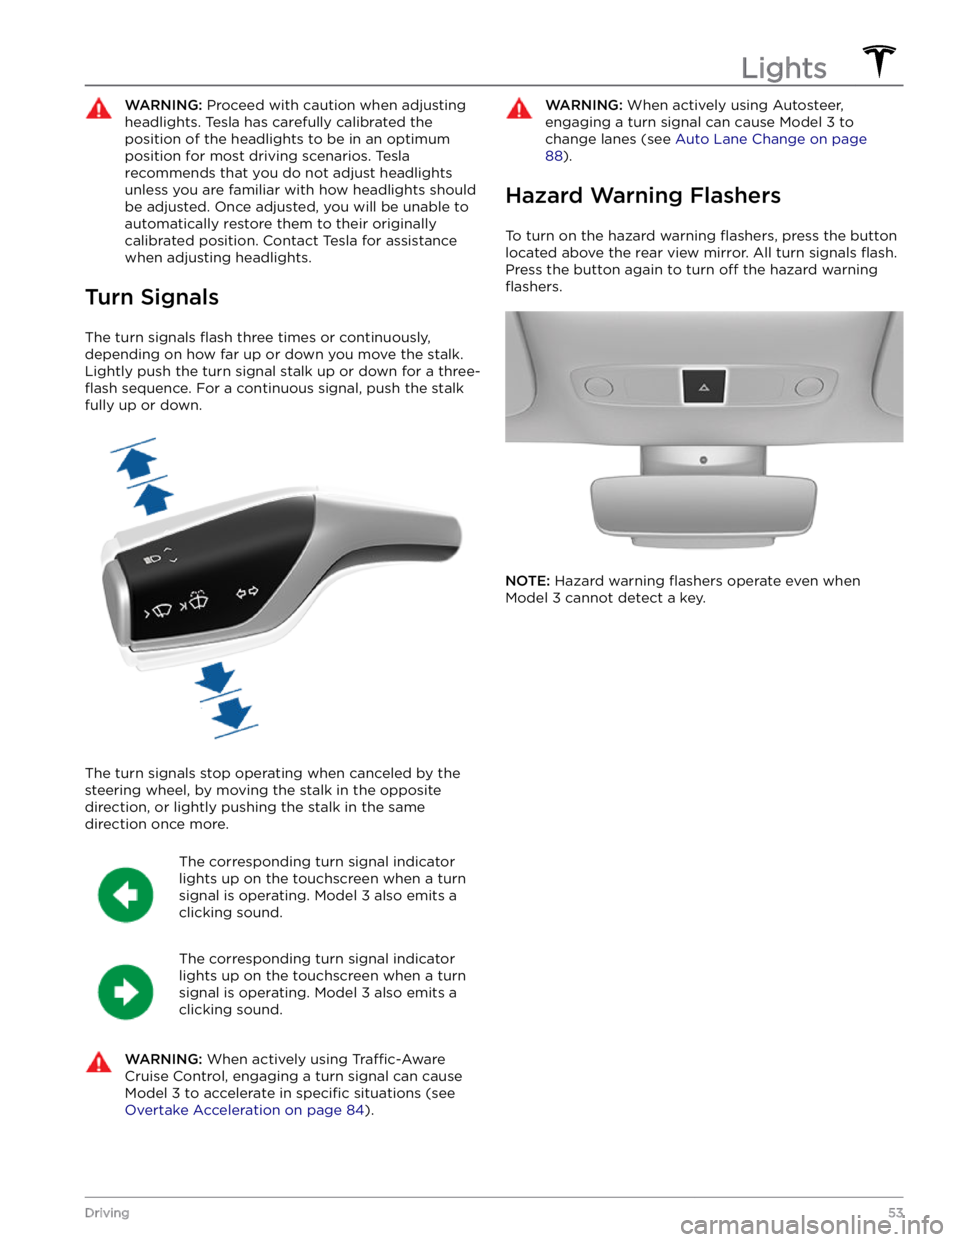
The turn signals flash three times or continuously,
depending on how far up or down you move the stalk.
Lightly push the turn signal stalk up or down for a
three-
flash sequence. For a continuous signal, push the stalk
fully up or down.
The turn signals stop operating when canceled by the steering wheel, by moving the stalk in the opposite direction, or lightly pushing the stalk in the same
direction once more.
The corresponding turn signal indicator
lights up on the touchscreen when a turn
signal is operating.
Model 3 also emits a
clicking sound.
The corresponding turn signal indicator
lights up on the touchscreen when a turn
signal is operating.
Model 3 also emits a
clicking sound.
WARNING: When actively using Traffic-Aware
Cruise Control, engaging a turn signal can cause
Model 3 to accelerate in specific situations (see
Overtake Acceleration on page 84).
WARNING: When actively using Autosteer,
engaging a turn signal can cause Model 3 to
change lanes (see Auto Lane Change on page
88).
Hazard Warning Flashers
To turn on the hazard warning flashers, press the button
located above the rear view mirror. All turn signals
flash.
Press the button again to turn off the hazard warning
flashers.
NOTE: Hazard warning flashers operate even when
Model 3 cannot detect a key.
Lights
53Driving
Page 60 of 248

Braking SystemsWARNING: Properly functioning braking systems
are critical to ensure safety. If you experience a
problem with the brake pedal, brake calipers, or
any component of a Model 3 braking system,
contact Tesla immediately.
Model 3 has an anti-lock braking system (ABS) that
prevents the wheels from locking when you apply
maximum brake pressure. This improves steering control
during heavy braking in most road conditions.
During emergency braking conditions, the ABS
constantly monitors the speed of each wheel and varies
the brake pressure according to the grip available.
The alteration of brake pressure can be felt as a pulsing sensation through the brake pedal. This demonstrates that the ABS is operating and is not a cause for concern. Keep
firm and steady pressure on the brake pedal while
experiencing the pulsing.
The ABS indicator briefly flashes yellow on
the
touchscreen when you first start Model
3. If this indicator lights up at any other
time, an ABS fault has occurred and the ABS is not operating. Contact Tesla. The
braking system remains fully operational
and is not
affected by an ABS failure.
However, braking distances may increase. Drive cautiously and avoid heavy braking.
If the touchscreen displays this red brake
indicator at any time other than
briefly
when you first start Model 3, a brake
system fault is detected, or the level of the
brake
fluid is low. Contact Tesla
immediately. Apply steady pressure and
keep the brakes
firm to bring the vehicle to
a stop when safe to do so.
The touchscreen displays this yellow brake
indicator if a brake booster fault is detected. Apply steady pressure and keep
the brakes
firm to stop the vehicle when
safety permits. Hydraulic Boost
Compensation will be active (see
Hydraulic
Boost Compensation on page 59).
Emergency Braking
In an emergency, fully press the brake pedal and
maintain
firm pressure, even on low traction surfaces.
The ABS varies the braking pressure to each wheel according to the amount of traction available. This prevents wheels from locking and ensures that you stop as safely as possible.
WARNING: Do not pump the brake pedal. Doing so
interrupts operation of the ABS and can increase
braking distance.
WARNING: Always maintain a safe distance from
the vehicle in front of you and be aware of
hazardous driving conditions. While the ABS can
improve stopping distance, it cannot overcome the
laws of physics. It also does not prevent the
danger of hydroplaning (where a layer of water
prevents direct contact between the tires and the
road).
NOTE: Automatic Emergency Braking (see Automatic
Emergency Braking on page 113) may intervene to
automatically brake in situations where a collision is considered imminent. Automatic Emergency Braking is
not designed to prevent a collision. At best, it can
minimize the impact of a frontal collision by attempting to reduce your driving speed. Depending on Automatic
Emergency Braking to avoid a collision can result in serious injury or death. .
CAUTION: In emergency situations, if the brakes
are not functioning properly, press and hold the
Park button on the drive stalk to bring the vehicle
to a stop. Do not use this method to stop the
vehicle unless absolutely necessary.
Brake Disc Wiping
To ensure brakes remain responsive in cold and wet
weather,
Model 3 is equipped with brake disc wiping.
When cold and wet weather is detected, this feature repeatedly applies an imperceptible amount of brake force to remove water from the surface of the brake discs.
Hydraulic Fade Compensation
Model 3 is also equipped with hydraulic fade
compensation. This feature assists in monitoring brake system pressure and ABS activity for instances of reduced brake performance. If reduced brake
performance is detected (for example, as a result of
brake fade, or cold or wet conditions), you may hear a sound, feel the brake pedal pull away from your foot, and notice a strong increase in braking. Brake as you
normally would and continue to press the brake pedal
without releasing or "pumping".
CAUTION: If brakes are not functioning properly,
stop the vehicle when safety permits and contact
Tesla Service. See Park on page 50 for information
on using the Park button to stop the vehicle in
case of emergency.
WARNING: Always maintain a safe driving distance
from the vehicle in front of you and exercise
caution when driving conditions are hazardous.
Brake disc wiping and hydraulic fade
compensation is not a substitute for adequately
applying the brakes.
Braking and Stopping
58MODEL 3 Owner
Page 88 of 248
NOTE: Depending on market region, vehicle
configuration, options purchased, and software version,
your vehicle may not be equipped with Autosteer, or the
feature may not operate exactly as described.
NOTE: Autosteer is a BETA feature.
Autosteer builds upon Traffic-Aware Cruise Control (see
Traffic-Aware Cruise Control on page 81), intelligently
keeping
Model 3 in its driving lane when cruising at a set
speed.
Autosteer also allows you to use the turn signals
to move Model 3 into an adjacent lane (see Auto Lane
Change on page 88). Autosteer detects lane markings
and the presence of vehicles and objects to
steer Model
3.
NOTE: To display more details about the roadway and its
surroundings, such as road markings, stop lights, objects
(such as trash cans and poles), etc., touch
Controls >
Autopilot > Full Self-Driving Visualization Preview (if
equipped).
CAUTION: Ensure all cameras and sensors are
clean. Dirty cameras and sensors, as well as
environmental conditions such as rain and faded
lane markings, affect performance.
WARNING: Autosteer is a hands-on feature. You
must keep your hands on the steering wheel at all
times.
WARNING: Autosteer is intended for use on
highways and limited-access roads with a fully
attentive driver. When using Autosteer, hold the
steering wheel and be mindful of road conditions
and surrounding traffic. Do not use Autosteer on
city streets, in construction zones, or in areas
where bicyclists or pedestrians may be present.
Never depend on Autosteer to determine an
appropriate driving path. Always be prepared to
take immediate action. Failure to follow these
instructions could cause damage, serious injury or
death.
Operating Autosteer
Before you can operate Autosteer, you must enable it by touching
Controls > Autopilot > Autosteer (Beta).
To indicate that Autosteer is available (but
not actively steering
Model 3), the
touchscreen displays a gray Autosteer
icon .
To initiate Autosteer, move the drive stalk fully down
twice in quick succession.
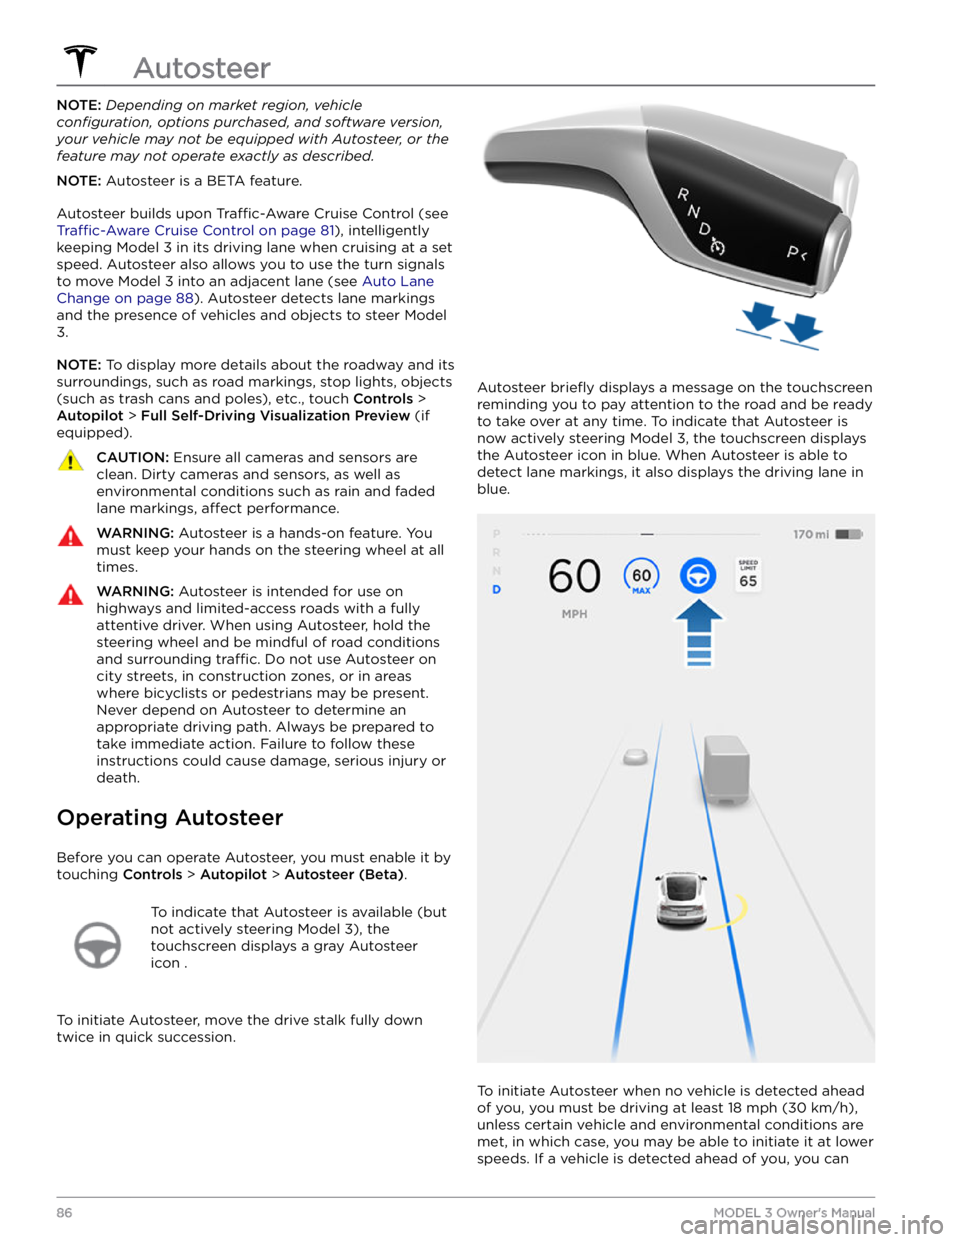
Autosteer briefly displays a message on the touchscreen
reminding you to pay attention to the road and be ready
to take over at any time. To indicate that Autosteer is
now actively steering
Model 3, the touchscreen displays
the Autosteer icon in blue. When Autosteer is able to detect lane markings, it also displays the driving lane in blue.
To initiate Autosteer when no vehicle is detected ahead
of you, you must be driving at least
18 mph (30 km/h),
unless certain vehicle and environmental conditions are met, in which case, you may be able to initiate it at lower speeds. If a vehicle is detected ahead of you, you can
Autosteer
86MODEL 3 Owner
Page 91 of 248
When using Auto Lane Change, it is important to monitor its performance by watching the driving path in front of you and the surrounding area. Stay prepared to take over steering at any time. As you are crossing over into the adjacent lane, the
touchscreen displays the
location in the lane that
Model 3 is moving into.
In situations where Auto Lane Change is unable to operate at optimal performance, or cannot operate due to inadequate data, the
touchscreen displays a series of
warnings. Therefore, when using Auto Lane Change,
always pay attention to the
touchscreen and be
prepared to manually steer
Model 3.
Stop Light and Stop Sign Warning
NOTE: Depending on market region, vehicle
configuration, options purchased, and software version,
your vehicle may not be equipped with Stop Light and
Stop Sign Warning, or the feature may not operate
exactly as described.
While Autosteer is in use, Model 3 displays a warning on
the
touchscreen and sounds a chime if it detects that
you are likely to run through a red stop light or stop sign. If this happens,
TAKE IMMEDIATE CORRECTIVE
ACTION!
The visual and audible warnings cancel after a few seconds, or when you press the brake pedal, whichever
comes
first.
Stop Light and Stop Sign Warning provides warnings
only. It makes no attempt to slow down or stop
Model 3
at red traffic lights, stop signs, road markings, etc. If your
vehicle is equipped with Traffic Light and Stop Sign
Control, you can enable this feature to automatically
stop Model 3 at traffic lights and stop signs (see Traffic
Light and Stop Sign Control on page 94).
NOTE: Touch Controls > Autopilot > Full Self-Driving
Visualization Preview (if equipped) to display more
details about the roadway and its surroundings, such as road markings, stop lights, objects (such as trash cans
and poles), etc.
CAUTION: Stop Light and Stop Sign Warning
requires the vehicle
Page 100 of 248
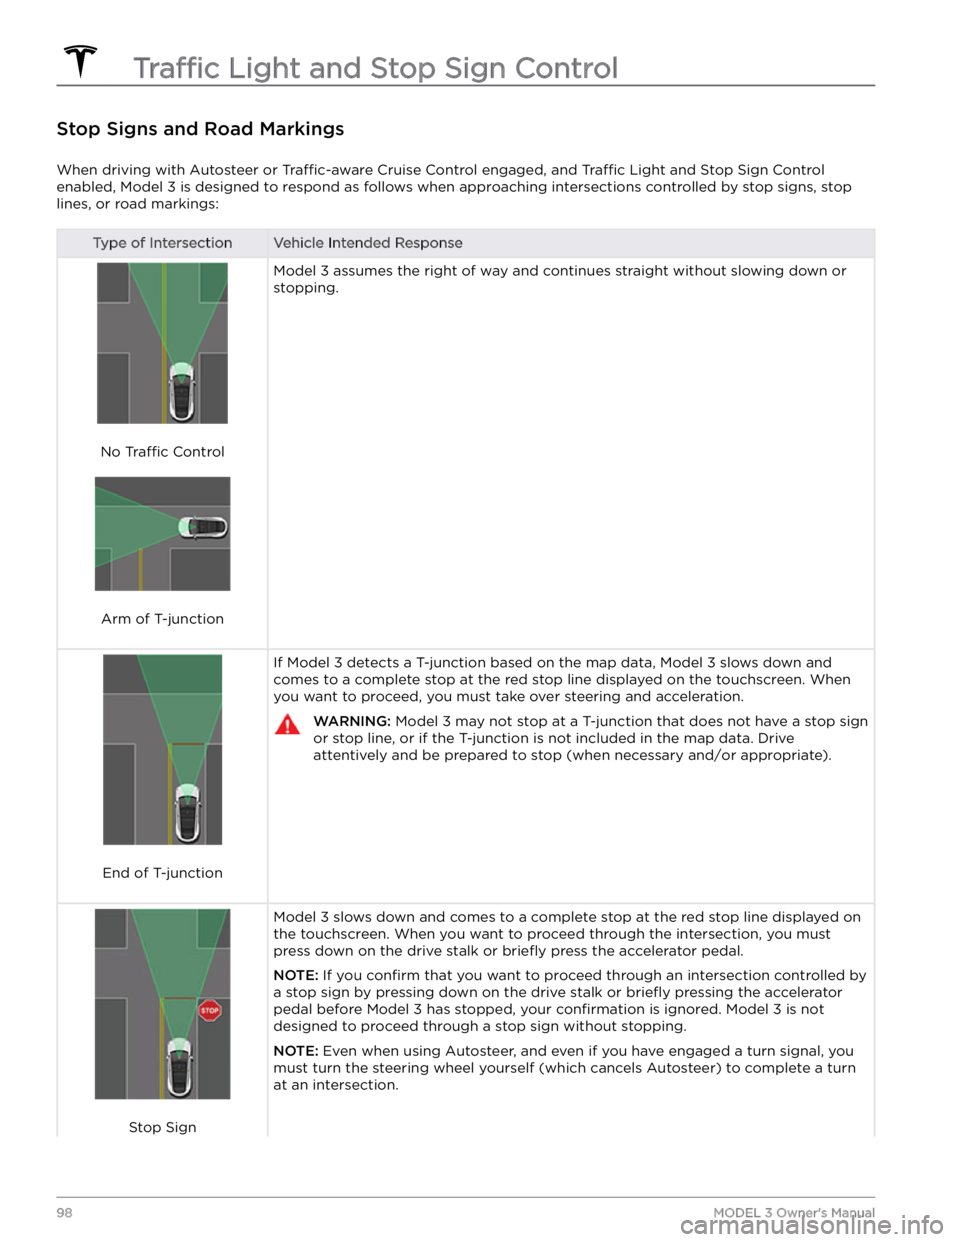
Stop Signs and Road Markings
When driving with Autosteer or Traffic-aware Cruise Control engaged, and Traffic Light and Stop Sign Control
enabled,
Model 3 is designed to respond as follows when approaching intersections controlled by stop signs, stop
lines, or road markings:
Type of IntersectionVehicle Intended Response
No Traffic Control
Arm of T-junction
Model 3 assumes the right of way and continues straight without slowing down or
stopping.
End of T-junction
If Model 3 detects a T-junction based on the map data, Model 3 slows down and
comes to a complete stop at the red stop line displayed on the
touchscreen. When
you want to proceed, you must take over steering and acceleration.
WARNING: Model 3 may not stop at a T-junction that does not have a stop sign
or stop line, or if the T-junction is not included in the map data. Drive
attentively and be prepared to stop (when necessary and/or appropriate).
Stop Sign
Model 3 slows down and comes to a complete stop at the red stop line displayed on
the
touchscreen. When you want to proceed through the intersection, you must
press down on the drive stalk or briefly press the accelerator pedal.
NOTE: If you confirm that you want to proceed through an intersection controlled by
a stop sign by
pressing down on the drive stalk or briefly pressing the accelerator
pedal before
Model 3 has stopped, your confirmation is ignored. Model 3 is not
designed to proceed through a stop sign without stopping.
NOTE: Even when using Autosteer, and even if you have engaged a turn signal, you
must turn the
steering wheel yourself (which cancels Autosteer) to complete a turn
at an intersection.
Traffic Light and Stop Sign Control
98MODEL 3 Owner
Page 101 of 248

Type of IntersectionVehicle Intended Response
Stop Sign and Road Marking
Road Marking
WARNING: Model 3 also slows down and stops at a roundabout. You must take over steering (which cancels
Autosteer) and press down on the drive stalk or briefly press the accelerator pedal to confirm that you want to
continue through the roundabout.
WARNING: At crosswalks, Model 3 may slow down and may stop, depending on whether the crosswalk is
controlled by a traffic light and whether the cameras detect pedestrians, bicyclists, etc. in the crosswalk. Pay
particular attention at crosswalks and be prepared to take over at any time. Failure to do so can result in injury
or death.
Limitations
Depending on many different circumstances and environmental conditions, Traffic Light and Stop Sign Control may
or may not stop at:
Page 163 of 248
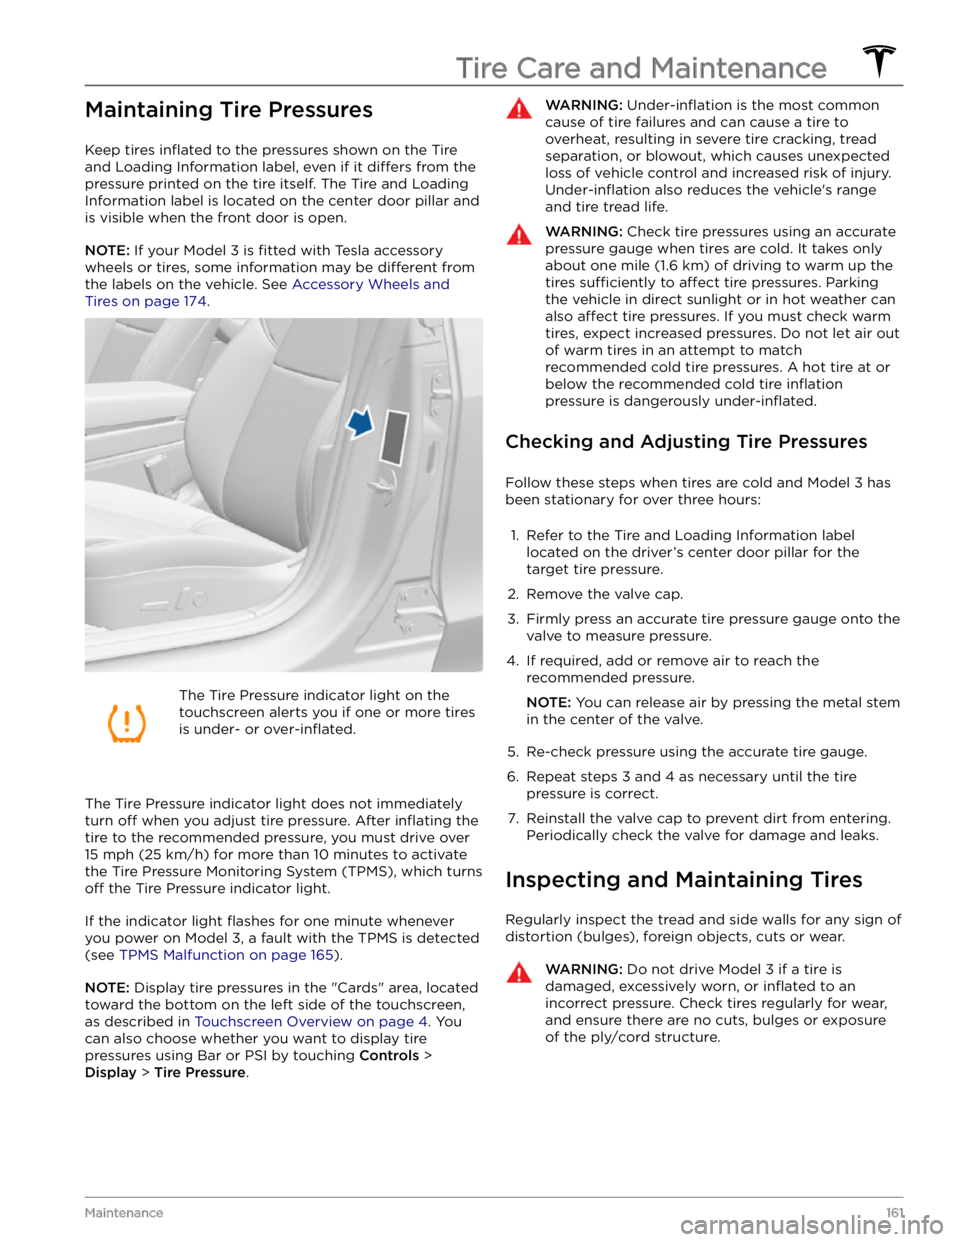
Maintaining Tire Pressures
Keep tires inflated to the pressures shown on the Tire
and Loading Information label, even if it
differs from the
pressure printed on the tire itself. The Tire and Loading
Information label is located on the center door pillar and
is visible when the front door is open.
NOTE: If your Model 3 is fitted with Tesla accessory
wheels or tires, some information may be
different from
the labels on the vehicle.
See Accessory Wheels and
Tires on page 174.
The Tire Pressure indicator light on the
touchscreen alerts you if one or more tires
is under-
or over-inflated.
The Tire Pressure indicator light does not immediately
turn off when you adjust tire pressure. After inflating the
tire to the recommended pressure, you must drive over
15 mph (25 km/h) for more than 10 minutes to activate
the Tire Pressure Monitoring System (TPMS), which turns
off the Tire Pressure indicator light.
If the indicator light flashes for one minute whenever
you power on
Model 3, a fault with the TPMS is detected
(see
TPMS Malfunction on page 165).
NOTE: Display tire pressures in the "Cards" area, located
toward the bottom on the left side of the touchscreen
,
as described in Touchscreen Overview on page 4. You
can also choose whether you want to display tire pressures using Bar or PSI by touching
Controls >
Display > Tire Pressure.
WARNING: Under-inflation is the most common
cause of tire failures and can cause a tire to
overheat, resulting in severe tire cracking, tread
separation, or blowout, which causes unexpected
loss of vehicle control and increased risk of injury.
Under-inflation also reduces the vehicle