2022 TESLA MODEL 3 steering wheel
[x] Cancel search: steering wheelPage 64 of 248

How Park Assist Works
Model 3 has several sensors designed to detect the
presence of objects. When driving slowly in Drive or
Reverse (for example, when parking), the vehicle alerts
you if an object is detected in close proximity of your
Model 3. Objects are only detected in the direction of
the gear you selected; front objects in Drive, rear objects
in Reverse.
WARNING: You may not be alerted if Model 3 rolls
freely in the opposite direction of the selected
gear (for example, Park Assist does not display an
alert if Model 3 rolls backwards down a hill while in
Drive).
The sensors are activated when driving slower than
5 mph (8 km/h).
WARNING: Never depend on Park Assist to inform
you if an area you are approaching is free of
objects and/or people. Several external factors can
reduce the performance of Park Assist, causing
either no readings or false readings (see
Limitations and False Warnings on page 63).
Therefore, depending on Park Assist to determine
if Model 3 is approaching an obstruction can result
in damage to the vehicle and/or objects, and can
potentially cause serious injury. Always inspect the
area with your own eyes. When reversing, perform
shoulder checks and use all mirrors. Park assist
does not detect children, pedestrians, bicyclists,
animals, or objects that are moving, protruding,
located too far above or below the sensors, or too
close or too far from the sensors. Park Assist is for
guidance purposes only and is not intended to
replace your own direct visual checks. It is not a
substitute for careful driving.
Visual and Audio Feedback
When you shift to Reverse, the Park Assist view displays on the
touchscreen, showing objects that are in close
proximity to the front and rear of
Model 3. This view
closes when you shift into Drive unless an object is
detected close to the front of
Model 3, in which case the
Park Assist view closes automatically when your driving speed exceeds
5 mph (8 km/h). When reversing, visual
feedback also displays on the touchscreen (see
Rear
View Camera on page 69). You can manually close the
park assist view on the touchscreen by touching the
X in
the bottom corner.
When driving with the Camera app displayed on the
touchscreen, you can switch to the Park Assist view
when driving at speeds below
5 mph (8 km/h). Touch
the button located in the upper left corner of the Camera app window. This is useful if you need assistance
with parallel parking.
If chimes are turned on (see Controlling Audible
Feedback on page 63), an audible beep sounds as you
approach an object. You can temporarily mute the chime by pressing the scroll button on the left side of the
steering wheel or by touching the mute button on the
bottom left corner of the Park Assist view.
NOTE: If a sensor is unable to provide feedback, the
touchscreen displays an alert message.
CAUTION: Keep sensors clean from dirt, debris,
snow, and ice. Avoid using a high pressure power
washer on the sensors and do not clean a sensor
with a sharp or abrasive object that can scratch or
damage its surface.
CAUTION: Do not install accessories or stickers on
or near the parking sensors.
Park Assist
62MODEL 3 Owner
Page 71 of 248

Camera Location
Model 3 is equipped with a rear view camera located
above the rear license plate.
Whenever you shift into Reverse, the touchscreen displays the view from the camera. Lines show your
driving path based on the position of the
steering wheel.
These lines adjust as you move the
steering wheel.
Model 3 also displays images from the side cameras. To
view these images, simply swipe when the view from the rear view camera is displayed.
NOTE: Visual feedback from the parking sensors also
appear on the
touchscreen (see Park Assist on page 62).
To display the view from the rear view
cameras at any time, touch the
camera
icon on the touchscreen
Page 88 of 248

NOTE: Depending on market region, vehicle
configuration, options purchased, and software version,
your vehicle may not be equipped with Autosteer, or the
feature may not operate exactly as described.
NOTE: Autosteer is a BETA feature.
Autosteer builds upon Traffic-Aware Cruise Control (see
Traffic-Aware Cruise Control on page 81), intelligently
keeping
Model 3 in its driving lane when cruising at a set
speed.
Autosteer also allows you to use the turn signals
to move Model 3 into an adjacent lane (see Auto Lane
Change on page 88). Autosteer detects lane markings
and the presence of vehicles and objects to
steer Model
3.
NOTE: To display more details about the roadway and its
surroundings, such as road markings, stop lights, objects
(such as trash cans and poles), etc., touch
Controls >
Autopilot > Full Self-Driving Visualization Preview (if
equipped).
CAUTION: Ensure all cameras and sensors are
clean. Dirty cameras and sensors, as well as
environmental conditions such as rain and faded
lane markings, affect performance.
WARNING: Autosteer is a hands-on feature. You
must keep your hands on the steering wheel at all
times.
WARNING: Autosteer is intended for use on
highways and limited-access roads with a fully
attentive driver. When using Autosteer, hold the
steering wheel and be mindful of road conditions
and surrounding traffic. Do not use Autosteer on
city streets, in construction zones, or in areas
where bicyclists or pedestrians may be present.
Never depend on Autosteer to determine an
appropriate driving path. Always be prepared to
take immediate action. Failure to follow these
instructions could cause damage, serious injury or
death.
Operating Autosteer
Before you can operate Autosteer, you must enable it by touching
Controls > Autopilot > Autosteer (Beta).
To indicate that Autosteer is available (but
not actively steering
Model 3), the
touchscreen displays a gray Autosteer
icon .
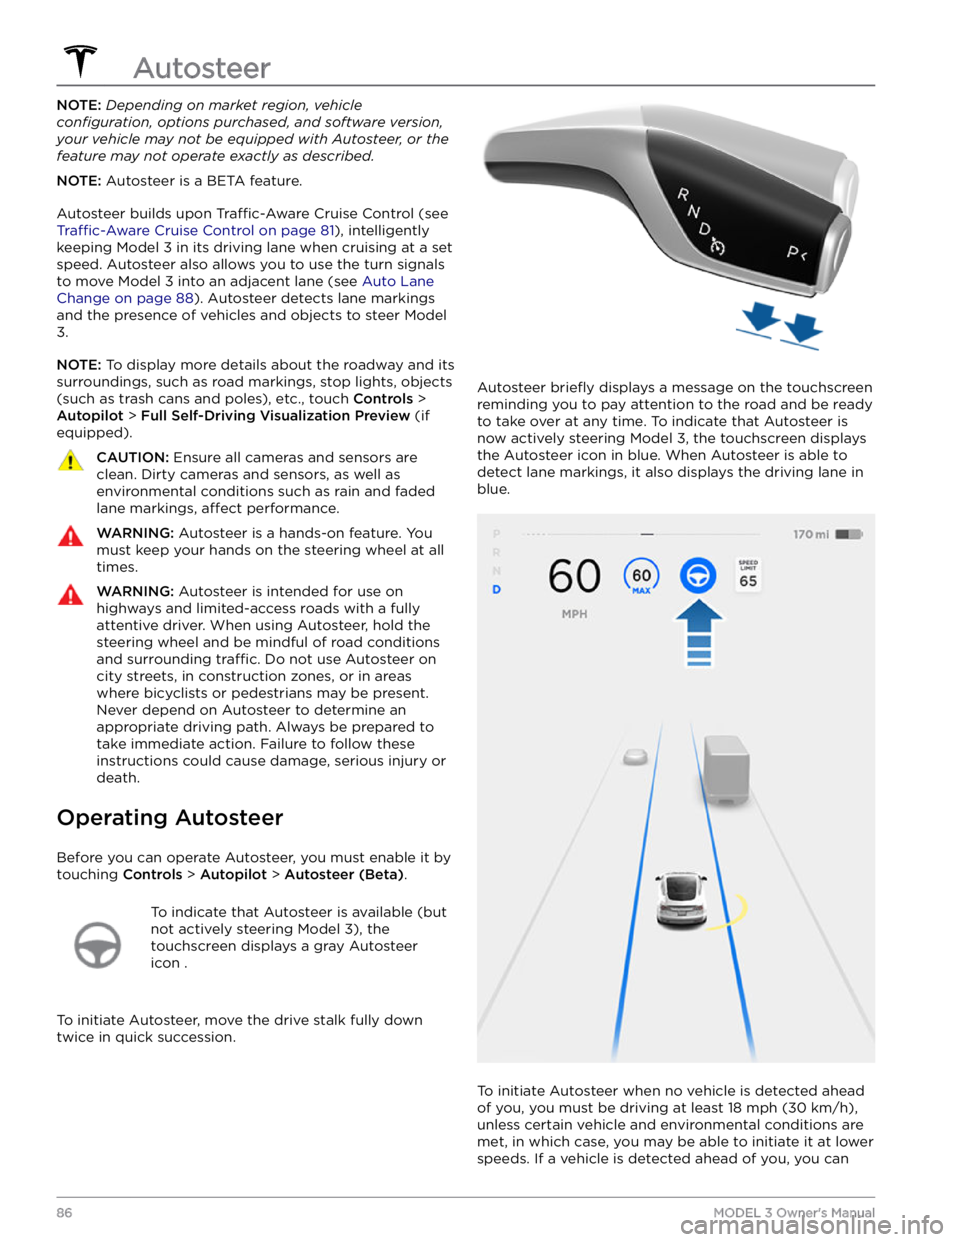
To initiate Autosteer, move the drive stalk fully down
twice in quick succession.
Autosteer briefly displays a message on the touchscreen
reminding you to pay attention to the road and be ready
to take over at any time. To indicate that Autosteer is
now actively steering
Model 3, the touchscreen displays
the Autosteer icon in blue. When Autosteer is able to detect lane markings, it also displays the driving lane in blue.
To initiate Autosteer when no vehicle is detected ahead
of you, you must be driving at least
18 mph (30 km/h),
unless certain vehicle and environmental conditions are met, in which case, you may be able to initiate it at lower speeds. If a vehicle is detected ahead of you, you can
Autosteer
86MODEL 3 Owner
Page 93 of 248

NOTE: Navigate on Autopilot is a BETA feature.
NOTE: Depending on market region, vehicle
configuration, options purchased, and software version,
your vehicle may not be equipped with Navigate on
Autopilot, or the feature may not operate exactly as
described.
When using Autosteer on a controlled-access road (such as a highway or freeway), Navigate on Autopilot guides
Model 3 to off-ramps and interchanges based on your
navigation route. Along the highway portion of a navigation route, Navigate on Autopilot also changes
lanes to prepare for exits and to minimize the driving time to your destination.
WARNING: Navigate on Autopilot does not make
driving autonomous. You must pay attention to the
road, keep your hands on the steering wheel at all
times, and remain aware of your navigation route.
WARNING: As is the case with normal driving, be
extra careful around blind corners, highway
interchanges, and exits because obstacles can
appear quickly and at any time.
WARNING: Navigate on Autopilot may not
recognize or detect oncoming vehicles, stationary
objects, and special-use lanes such as those used
exclusively for bikes, carpools, emergency vehicles,
etc. Remain alert at all times and be prepared to
take immediate action. Failure to do so can cause
damage, injury or death.
Enabling and Customizing Navigate
on Autopilot
To enable Navigate on Autopilot, touch Controls >
Autopilot > Navigate on Autopilot (Beta). Then, to
customize how you want Navigate on Autopilot to operate, touch
CUSTOMIZE NAVIGATE ON AUTOPILOT:
Page 100 of 248

Stop Signs and Road Markings
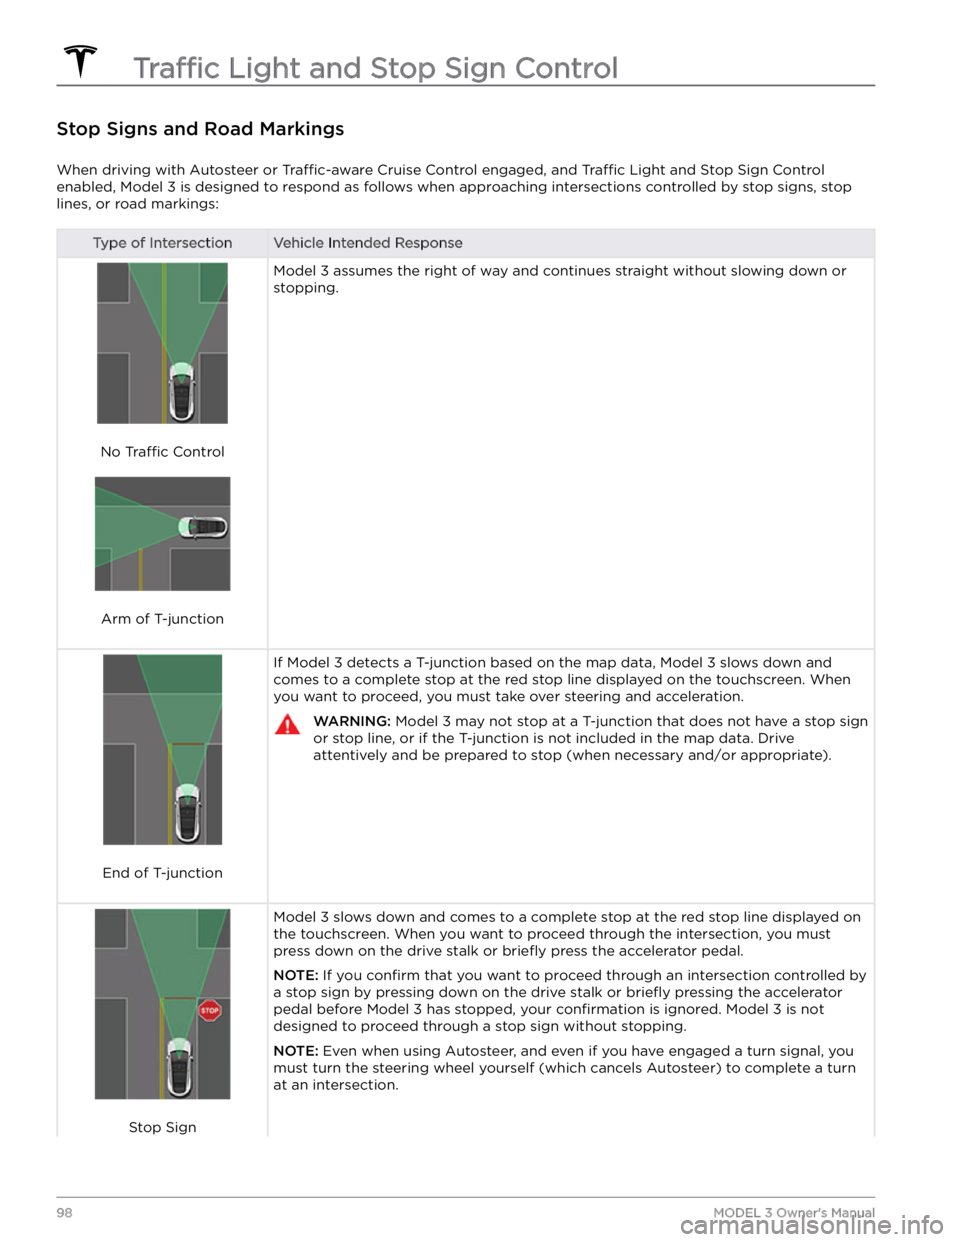
When driving with Autosteer or Traffic-aware Cruise Control engaged, and Traffic Light and Stop Sign Control
enabled,
Model 3 is designed to respond as follows when approaching intersections controlled by stop signs, stop
lines, or road markings:
Type of IntersectionVehicle Intended Response
No Traffic Control
Arm of T-junction
Model 3 assumes the right of way and continues straight without slowing down or
stopping.
End of T-junction
If Model 3 detects a T-junction based on the map data, Model 3 slows down and
comes to a complete stop at the red stop line displayed on the
touchscreen. When
you want to proceed, you must take over steering and acceleration.
WARNING: Model 3 may not stop at a T-junction that does not have a stop sign
or stop line, or if the T-junction is not included in the map data. Drive
attentively and be prepared to stop (when necessary and/or appropriate).
Stop Sign
Model 3 slows down and comes to a complete stop at the red stop line displayed on
the
touchscreen. When you want to proceed through the intersection, you must
press down on the drive stalk or briefly press the accelerator pedal.
NOTE: If you confirm that you want to proceed through an intersection controlled by
a stop sign by
pressing down on the drive stalk or briefly pressing the accelerator
pedal before
Model 3 has stopped, your confirmation is ignored. Model 3 is not
designed to proceed through a stop sign without stopping.
NOTE: Even when using Autosteer, and even if you have engaged a turn signal, you
must turn the
steering wheel yourself (which cancels Autosteer) to complete a turn
at an intersection.
Traffic Light and Stop Sign Control
98MODEL 3 Owner
Page 104 of 248

To Cancel Parking
Autopark cancels the parking sequence when you
manually move the
steering wheel, change gears, or
touch
Cancel on the touchscreen. Autopark also cancels
parking when:
Page 121 of 248

NOTE: When Chill is selected, Chill displays on the
touchscreen above the driving speed.
NOTE: If equipped with the Acceleration Upgrade
package, the modes of acceleration are
Chill and Sport.
Steering Mode: Adjust the amount of effort required to
turn the steering wheel.
Sport feels more responsive
whereas
Comfort feels easier to drive and park (see
Adjusting Steering Effort on page 45).
Stopping Mode: Choose how you want Model 3 to
behave once regenerative braking has reduced the driving speed to a very low speed, a driving gear is still
engaged, and both the accelerator and brake pedals are
released. See
Stopping Mode on page 59. You can adjust
this setting only when
Model 3 is in Park.
Track Mode: (available on Performance vehicles only)
when enabled, this mode
modifies the vehicle
Page 164 of 248

Tire Wear
Adequate tread depth is important for proper tire
performance. Tires with a tread depth less than
4/32”
(3 mm) are more likely to hydroplane in wet conditions
and should not be used. Tires with a tread depth less than
5/32” (4 mm) do not perform well in snow and
slush and should not be used when driving in winter conditions.
Model 3 is originally fitted with tires that have wear
indicators molded into the tread pattern. When the
tread has been worn down to
4/32” (3 mm), the
indicators start to appear at the surface of the tread pattern, producing the
effect of a continuous band of
rubber across the width of the tire. For optimal performance and safety, Tesla recommends replacing tires before the wear indicators are visible.
Tire Rotation, Balance, and Wheel
Alignment
Tesla recommends rotating the tires every 6,250 miles
(10,000 km) or if tread depth difference is 2/32 in (1.5
mm) or greater, whichever comes first.
Unbalanced wheels (sometimes noticeable as vibration through the
steering wheel) affect vehicle handling and
tire life. Even with regular use, wheels can get out of
balance. Therefore, they should be balanced as required.
If tire wear is uneven (on one side of the tire only) or
becomes abnormally excessive, check the alignment of wheels.
NOTE: When replacing only two tires, install the new
tires on the rear if your vehicle