2022 SUZUKI CELERIO page 1
[x] Cancel search: page 1Page 18 of 201

0-6
76MH1-74E
55KS0-74E
11) Any vehicle which has been used for purposes other thanwhat it was designed for.
12) Any damage or deterioration caused by industrial pollutionand bird droppings.
13) Insignificant defects which do not affect the function of thevehicle including without limitation, sound, vibration and fluid seep.
14) Any natural wear and tear including without limitation, agingetc.
15) Installation and usage of domestic LPG gas/LPG Cylinder.
16) V-belts, hoses and gas leaks (For Maruti Suzuki AC vehicle).
17) Any vehicle retrofitted with LPG/CNG kits.
(5) Extent of Warranty:This warranty is the entire written warranty given by Maruti Suzuki
for Maruti Suzuki vehicles and no dealer or its or his agent or
employee is authorised to extend or enlarge this warranty and no
dealer or its or his agent or employee is authorised to make any
oral warranty on Maruti Suzuki’s behalf.
Maruti Suzuki reserves the right to add any improvements or
change the design of any model at any time with no obligation to
make the same changes on units previously sold.
(6) Warranty Service:To obtain warranty service, the complete vehicle must be pre-
sented at the owner’s expenses to any authorised Maruti Suzuki
dealer.
(7) Owner’s Warranty ResponsibIlities:It is responsibility of each owner to:
– Make certain that the warranty registration/PDl card was
completed at the time of delivery of the vehicle;
– Have performed, at his own expenses, by an Maruti Suzuki
authorised dealer/service station all the service inspections
specified in the Maruti Suzuki “Owner’s Manual and Service
Booklet and maintain adequate proof that such service
inspections have been performed.
– Make certain that the Maruti Suzuki authorised dealer/ser-
vice station performing the service inspection has certified
the work on the “Maintenance Service Record” page in the
“Owner’s Manual and Service Booklet and
– Present the Maruti Suzuki “Owner’s Manual and Service
Booklet to the authorised Maruti Suzuki dealer whenever
requesting service inspections or warranty service.
If the “Owner’s Manual and Service Booklet should be lost or
destroyed the owner should consult the authorised Maruti Suzuki
dealer from whom the vehicle was purchased for instructions con-
cerning replacement of the “Owner’s Manual and Service Booklet.
(8) Disclaimer of Consequential Damage:Maruti Suzuki assumes no responsibility for loss of vehicle, loss of
time, inconvenience or any other indirect incidental or consequen-
tial damage resulting from the vehicle not being available to the
owner because of any defect covered by this warranty.
(9) Change of OwnerEven if ownership of the vehicle changes, the remaining warranty
period is effective for the new owner.
7
Page 91 of 201

4-3
DRIVING TIPS
76MH1-74E
76MH1-74E
Keep weight to a minimum The heavier the load, the more fuel the vehicle consumes. Take out any luggageor cargo when it is not necessary.
Keep tire pressures correct Underinflation of the tires can waste fuel due to increased running resistance of the tires. Keep your tires inflated to the correctpressure shown on the label on the driver’s side door or the driver’s door lock pillar.
Highway Driving
When driving at highway speeds, pay attention to the following: Stopping distance progressively increases with vehicle speed. Apply the brakes far enough ahead of the stoppingpoint to allow for the extra stopping dis- tance. On rainy days, “Hydroplaning” can occur.“Hydroplaning” is the loss of direct con- tact between the road surface and the vehicle’s tires due to a water film formingbetween them. Steering or braking the vehicle while “Hydroplaning” can be very difficult, and loss of control can occur.Keep speed down when the road surface is wet. At high speeds, the vehicle may beaffected by side winds. Therefore, reduce speed and be prepared for unex- pected buffeting, which can occur at theexits of tunnels, when passing by a cut of a hill, or when being overtaken by large vehicles, etc.
Driving on Hills
76MH0A063
When climbing steep hills, the vehiclemay begin to slow down and show a lackof power. If this happens, you should shift to a lower gear so that the engine will again be operating in its normalpower range. Shift rapidly to prevent the vehicle from losing momentum. When driving down a hill, the engineshould be used for braking by shifting into a lower gear.
Driving on Slippery Roads
60G089S
Under wet road conditions you should drive at a lower speed than on dry roadsdue to possible slippage of tires during braking. When driving on icy, snow-cov- ered, or muddy roads, reduce your speedand avoid sudden acceleration, abrupt braking, or sharp steering movements.
Tire Chains (if equipped)Tire chains should only be used if they are needed to increase traction or are required by law. Make sure that the chains you use
WA R N I N G
Try not to hold the brake pedal down too long or too often while goingdown a steep or long hill. This could cause the brakes to overheat, result- ing in reduced braking efficiency.Failure to take this precaution could result in loss of vehicle control.
R N D -M+
NOTICE
When descending a down hill, NEVER turn the igni tion key to the “LOCK” position. Emission control system damage may result.
80
Page 116 of 201

5-20
OTHER CONTROLS AND EQUIPMENT
76MH1-74E
76MH1-74E
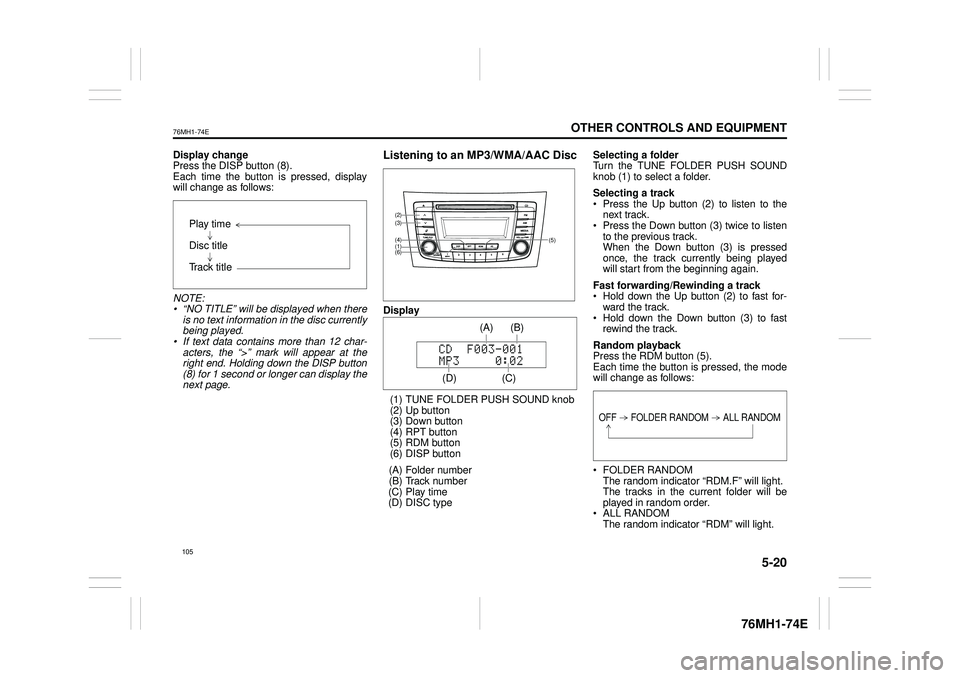
Display change Press the DISP button (8). Each time the button is pressed, displaywill change as follows:
NOTE: • “NO TITLE” will be displayed when there is no text information in the disc currently being played. • If text data contains more than 12 char- acters, the “>” mark will appear at theright end. Holding down the DISP button (8) for 1 second or longer can display the next page.
Listening to an MP3/WMA/AAC Disc
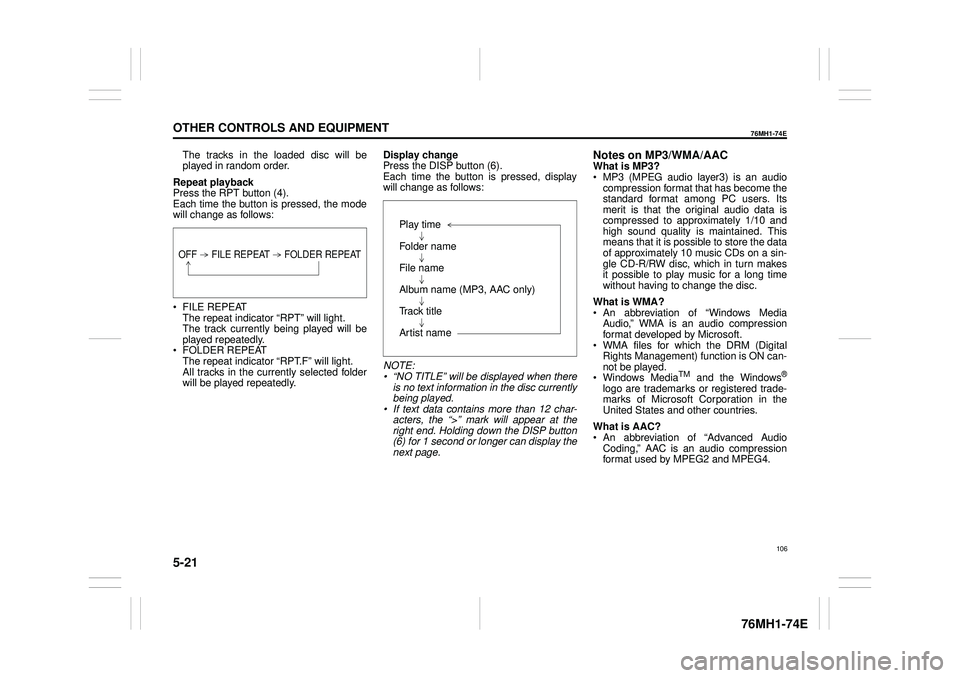
Display
(1) TUNE FOLDER PUSH SOUND knob (2) Up button (3) Down button (4) RPT button(5) RDM button (6) DISP button
(A) Folder number (B) Track number (C) Play time(D) DISC type
Selecting a folder Turn the TUNE FOLDER PUSH SOUND knob (1) to select a folder.
Selecting a track Press the Up button (2) to listen to thenext track. Press the Down button (3) twice to listen to the previous track.When the Down button (3) is pressed once, the track currently being played will start from the beginning again.
Fast forwarding/Rewinding a track Hold down the Up button (2) to fast for-ward the track. Hold down the Down button (3) to fast rewind the track.
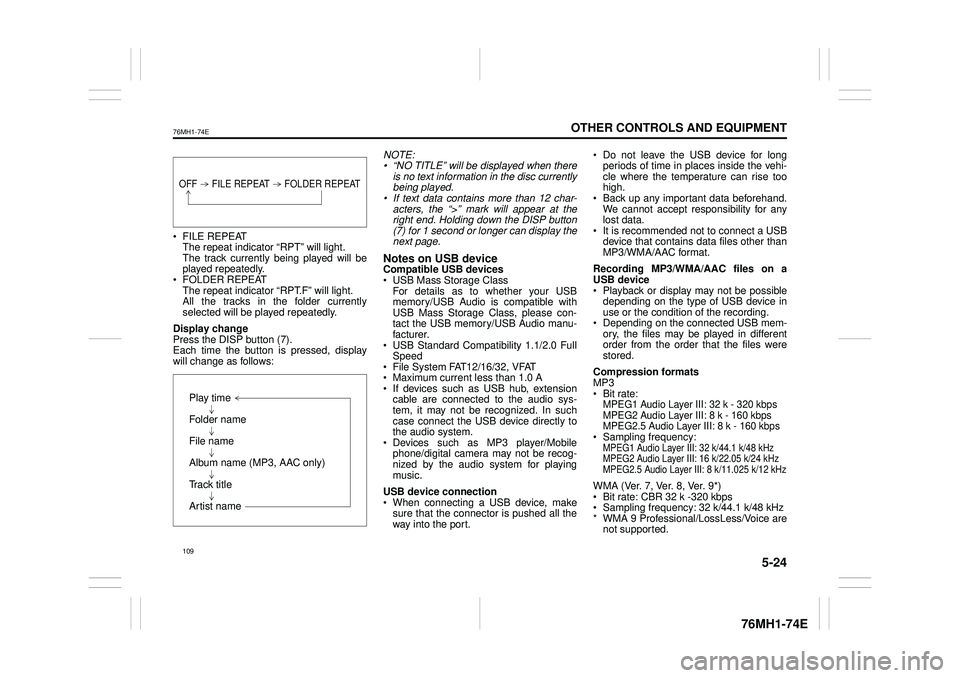
Random playback Press the RDM button (5).Each time the button is pressed, the mode will change as follows:
FOLDER RANDOM The random indicator “RDM.F” will light. The tracks in the current folder will beplayed in random order. ALL RANDOM The random indicator “RDM” will light.
Play time
Disc title
Track title
(5)
(6)
(4)
(3)
(1)
(2)
(C)
(B) (A)
(D)
105
Page 117 of 201

5-21
OTHER CONTROLS AND EQUIPMENT
76MH1-74E
76MH1-74E
The tracks in the loaded disc will be played in random order.
Repeat playback Press the RPT button (4). Each time the button is pressed, the modewill change as follows:
FILE REPEAT The repeat indicator “RPT” will light.The track currently being played will be played repeatedly. FOLDER REPEAT The repeat indicator “RPT.F” will light. All tracks in the currently selected folderwill be played repeatedly.
Display change Press the DISP button (6). Each time the button is pressed, displaywill change as follows:
NOTE: • “NO TITLE” will be displayed when there is no text information in the disc currently being played.• If text data contains more than 12 char- acters, the “>” mark will appear at the right end. Holding down the DISP button(6) for 1 second or longer can display the next page.
Notes on MP3/WMA/AACWhat is MP3? MP3 (MPEG audio layer3) is an audio compression format that has become the standard format among PC users. Itsmerit is that the original audio data is compressed to approximately 1/10 and high sound quality is maintained. Thismeans that it is possible to store the data of approximately 10 music CDs on a sin- gle CD-R/RW disc, which in turn makesit possible to play music for a long time without having to change the disc.
What is WMA? An abbreviation of “Windows Media Audio,” WMA is an audio compressionformat developed by Microsoft. WMA files for which the DRM (Digital Rights Management) function is ON can-not be played. Windows MediaTM and the Windows®
logo are trademarks or registered trade- marks of Microsoft Corporation in the United States and other countries.
What is AAC? An abbreviation of “Advanced Audio Coding,” AAC is an audio compressionformat used by MPEG2 and MPEG4.
OFF FILE REPEAT FOLDER REPEAT
Play time
Folder name
File name
Album name (MP3, AAC only)
Track title
Artist name
106
Page 120 of 201

5-24
OTHER CONTROLS AND EQUIPMENT
76MH1-74E
76MH1-74E
FILE REPEAT The repeat indicator “RPT” will light. The track currently being played will beplayed repeatedly. FOLDER REPEAT The repeat indicator “RPT.F” will light.All the tracks in the folder currently selected will be played repeatedly.
Display change Press the DISP button (7). Each time the button is pressed, display will change as follows:
NOTE: • “NO TITLE” will be displayed when there is no text information in the disc currentlybeing played. • If text data contains more than 12 char- acters, the “>” mark will appear at theright end. Holding down the DISP button (7) for 1 second or longer can display the next page.
Notes on USB deviceCompatible USB devices USB Mass Storage Class For details as to whether your USBmemory/USB Audio is compatible with USB Mass Storage Class, please con- tact the USB memory/USB Audio manu-facturer. USB Standard Compatibility 1.1/2.0 Full Speed File System FAT12/16/32, VFAT Maximum current less than 1.0 A If devices such as USB hub, extensioncable are connected to the audio sys- tem, it may not be recognized. In such case connect the USB device directly tothe audio system. Devices such as MP3 player/Mobile phone/digital camera may not be recog-nized by the audio system for playing music.
USB device connection When connecting a USB device, make sure that the connector is pushed all theway into the port.
Do not leave the USB device for long periods of time in places inside the vehi- cle where the temperature can rise toohigh. Back up any important data beforehand. We cannot accept responsibility for anylost data. It is recommended not to connect a USB device that contains data files other thanMP3/WMA/AAC format.
Recording MP3/WMA/AAC files on a USB device Playback or display may not be possible depending on the type of USB device inuse or the condition of the recording. Depending on the connected USB mem- ory, the files may be played in differentorder from the order that the files were stored.
Compression formats MP3 Bit rate:MPEG1 Audio Layer III: 32 k - 320 kbps MPEG2 Audio Layer III: 8 k - 160 kbps MPEG2.5 Audio Layer III: 8 k - 160 kbps Sampling frequency:MPEG1 Audio Layer III: 32 k/44.1 k/48 kHzMPEG2 Audio Layer III: 16 k/22.05 k/24 kHzMPEG2.5 Audio Layer III: 8 k/11.025 k/12 kHz
WMA (Ver. 7, Ver. 8, Ver. 9*) Bit rate: CBR 32 k -320 kbps Sampling frequency: 32 k/44.1 k/48 kHz * WMA 9 Professional/LossLess/Voice arenot supported.
OFF FILE REPEAT FOLDER REPEAT
Play time
Folder name
File name
Album name (MP3, AAC only)
Track title
Artist name
109
Page 122 of 201

5-26
OTHER CONTROLS AND EQUIPMENT
76MH1-74E
76MH1-74E
Display change Press the DISP button (7). Each time the button is pressed, displaywill change as follows:
NOTE: If text data contains more than 12 charac- ters, the “>” mark will appear at the right end. Holding down the DISP button (7) for1 second or longer can display the next page.
Playing Mode selection 1) Press the button numbered [6] of the Preset buttons (8) for 1 second or lon-ger. 2) Turn the TUNE FOLDER PUSH SOUND knob (2).Each time the knob is turned, the mode will change as follows:
3) Press the TUNE FOLDER PUSH SOUND knob (2) to select the desired mode.
NOTE: • When the button numbered [6] of thePreset buttons (8) is pressed, the previ- ous mode will be displayed.
Notes on iPod®
Supported iPod®
® touch (5th generation)® touch (4rd generation) ® touch (3rd generation)® touch (2nd generation) ® touch (1st generation) ® classic® nano (7th generation) ® nano (6th generation) ® nano (5th generation)® nano (4th generation) ® nano (3rd generation) ® nano (2nd generation)® nano (1st generation) ® (5th generation) iPhone® 5 iPhone® 4S iPhone® 4 iPhone® 3GS iPhone® 3G iPhone®
* Some functions may not be available depending on the model of iPod®. *iPod® is a trademark of Apple Inc., regis- tered in the U.S. and other countries.* iPhone® is a trademark of Apple Inc., registered in the U.S. and other coun- tries.* Apple is not responsible for the operation of this device or its compliance with safety and regulatory standards.
Playlist name /Track title (Playlist mode only)
Artist name / Track title
Album name / Track title
Track title / Play time
PLAYLIST
ARTIST
ALBUM
SONGS
GENRE
111
Page 132 of 201

5-36
OTHER CONTROLS AND EQUIPMENT
76MH1-74E
76MH1-74E
NOTE: If text data contains more than 12 charac- ters, the “>” mark will appear at the rightend. Holding down the DISP button (5) for 1 second or longer can display the next page.
Selection of audio device (Select Audio) Follow the instructions below to select anaudio device to be paired with from the registered audio devices. 1) Press the Bluetooth® setup button (6). The Bluetooth® setup menu will be dis- played. 2) Turn the TUNE FOLDER PUSHSOUND knob (2) to select “Setup Blue- tooth”, and press the knob (2) to deter- mine the selection.3) Turn the TUNE FOLDER PUSH SOUND knob (2) to select “List Audio”, and press the knob (2) to determine theselection. 4) Turn the TUNE FOLDER PUSH SOUND knob (2) to select an audio
device to be used, and press the knob (2) to determine the selection. 5) Turn the TUNE FOLDER PUSHSOUND knob (2) to select “Select”, and press the knob (2) to determine the selection.6) Turn the TUNE FOLDER PUSH SOUND knob (2) to select “Confirm”, and press the knob (2) to complete thepairing.
NOTE: • When selecting “Go Back”, the previous menu will be displayed. • The phone will be disconnected whenthe Bluetooth® ready audio device is selected.
List of audio devices (List Audio) Follow the instructions below to display the names of the registered audio devices insequence. 1) Press the Bluetooth® setup button (6). The Bluetooth® setup menu will be dis-played. 2) Turn the TUNE FOLDER PUSH SOUND knob (2) to select “Setup Blue-tooth”, and press the knob (2) to deter- mine the selection. 3) Turn the TUNE FOLDER PUSHSOUND knob (2) to select “List Audio”, and press the knob (2) to determine the selection. The na mes of registered audio devices will be displayed in sequence.
NOTE: When selecting “Go Back”, the previous menu will be displayed.
Passkey setting (Set Passkey) Follow the instructions below to set thesecurity number (Passkey).1) Press the Bluetooth® setup button (6). The Bluetooth® setup menu will be dis- played. 2) Turn the TUNE FOLDER PUSH SOUND knob (2) to select
Page 138 of 201

5-42
OTHER CONTROLS AND EQUIPMENT
76MH1-74E
76MH1-74E
CD operations
/TUNE VOL - VOL + FLD
/TUNE
MODEASSOUND
1
54
FLD
ENTSEEK TRACKSEEKTRACK
RPT RDM6
MENU3 2
DISP
Press to play the current track ran- domly. Press it again to cancel.
RDM (5) button
Press to plays the current track repeat- edly. Press it again to cancel.
RPT (4) button
Press to skip to the next/previous track. Press it for 1 second or longer to fast-forward/fast- rewind the track.
SEEK TRACK UP/DOWN button
The display switches as follows:
Press it for 1 second or longer to dis- play the next page.
DISP (6) button
Play time
Disc title
Track title
127