Page 4 of 172
REFUELING
FUEL FILLER LID............51
FUEL SPECIFICATIONS AND
CAPACITY..................51
PASSENGER/CARGO AREAS
FOLDING THE REAR SEATS...52
CHILD SAFETY LOCKS.......53
LATCH/ANCHOR............54
REAR SEAT REMINDER.......55
CARGO COVER.............56
SPARE TIRE................57
ENGINE COMPARTMENT
HOOD PROP................58
2.5L ENGINE................59
2.4L TURBO ENGINE.........60
ADDITIONAL SPECIFICATIONS
NEW VEHICLE BREAK-IN......61
ENGINE OIL................61
ENGINE OIL CAPACITY.......61
ROOF RAIL CAPACITY.......62
TRAILER TOWING CAPACITY . . 62
TIRE PRESSURE MONITORING
SYSTEM (TPMS).............63
STARLINK OVERVIEW
OVERVIEW OF YOUR
MULTIMEDIA SYSTEM........66
BUTTONS..................68
TOUCHSCREEN.............69
STEERING WHEEL
CONTROLS.................70
VOICE RECOGNITION........71
STARLINK HOME
HOME SCREEN ICONS.......73
REARRANGING ICONS.......74
ADDING SHORTCUTS........75
DRIVER PROFILE
CREATING A DRIVER PROFILE . . 77
MULTIMEDIA
RADIO.....................81
MEDIA.....................83
PHONE
PAIRING A PHONE...........84
MAKING A CALL.............85
RECEIVING A CALL..........86
TEXT MESSAGES............87
APPS
SUBARU STARLINK®IN-VEHICLE
APPS......................88
SUBARU STARLINK
®MOBILE
APP.......................89
MYSUBARU................90
MAPS
MAPS OVERVIEW............91
STARLINK SAFETY AND
SECURITY
SAFETY AND SECURITY
OVERVIEW.................92
ENROLLMENT..............93
MYSUBARU INTEGRATION....93
SUBARU STARLINK
®WI-FI
HOTSPOT..................94
SETTINGS AND UPDATES
SETTINGS AND UPDATES
OVERVIEW.................95
SOUND....................96
PHONE....................97
MAPS/NAVIGATION..........97
CLOCK....................99
EYESIGHT
EYESIGHT®OVERVIEW......100
OPERATION...............101
FUNCTIONS...............101
STEERING WHEEL
CONTROLS................107
EYESIGHT
®ASSIST MONITOR
(EAM)....................109
LANE DEPARTURE WARNING
AND PRE-COLLISION BRAKING
SYSTEM OFF..............110
TABLE OF CONTENTS
2
Page 5 of 172
DRIVER ASSIST
TECHNOLOGIES
REAR-VISION CAMERA......111
FRONT VIEW MONITOR.....112
BLIND SPOT DETECTION (BSD) /
REAR CROSS TRAFFIC ALERT
(RCTA)...................113
HIGH BEAM ASSIST (HBA)...114
STEERING RESPONSIVE
HEADLIGHTS (SRH).........115
REVERSE AUTOMATIC BRAKING
(RAB)....................115
DRIVERFOCUS DISTRACTION
MITIGATION SYSTEM
DRIVERFOCUS®OVERVIEW . . . 116
DRIVERFOCUS®
COMPONENTS.............116
DROWSY/INATTENTIVE
WARNINGS................118
DRIVER PROFILE/CONVENIENCE
SETTINGS.................118
DRIVER MONITORING
SYSTEM OFF..............120
CARE AND LIMITATIONS
STEREO CAMERA
PRECAUTIONS.............121
WINDSHIELD GLASS AND
DASHBOARD..............121
FRONT VIEW
OUTBACK.................122
EYESIGHT DISCLAIMER
EYESIGHT®DISCLAIMER....123
HOW TO APPENDIX
HOW TO OVERVIEW.........124
SETTING THE CLOCK.......124
MEMORY HEIGHT..........128
MEMORY DRIVER’S SEAT....130
BLUETOOTH
®PAIRING......131
ANDROID AUTO™..........137
APPLE CARPLAY
®..........139
WI-FI.....................141
MAPS....................144
FIRMWARE AND SOFTWARE
UPDATES.................164
INDEX.....................165
TABLE OF CONTENTS
3
Page 9 of 172

KEYLESS ENTRY
1Lock/Arm
• Press the lock/arm button to lock the doors, the rear gate,
and the fuel door and to activate the security alarm. A chirp
sounds and the hazard warning lights flash once.
• If any of the doors or the rear gate are not fully closed, five
rapid chirps sound and the hazard warning lights flash to
alert you.
• Press the lock/arm button three times to activate the vehicle
finder function. If you are within 30 feet of your Subaru, the
horn sounds once, and the hazard warning lights flash three
times.
2Unlock/Disarm
• Press the unlock/disarm button once to unlock the driver’s
door and fuel door. Two chirps sound and the hazard
warning lights flash twice. To unlock all the doors and the
rear gate, briefly press the button twice.
• The interior lights will illuminate when you press the
unlock/disarm button if they are set to the “DOOR” position
on the overhead console.
3Rear Gate
• Press the rear gate button to unlock the rear gate.
• If your Subaru has a Power Rear Gate, press and hold this
button to open or close the rear gate.
4Panic Alarm
• Press the panic alarm button to sound the horn and flash
the hazard warning lights.
•
Press any button on the access key fob or transmitter to deactivate the panic alarm.
Automatic Door Locking/Unlocking
This feature allows you to set when your Subaru automatically locks or unlocks the doors
through the STARLINK®Touchscreen (select “Settings”, then select the “Car” menu in the
top bar). The available settings are listed in the table below.
AVAILABLE SETTINGS
AUTO DOOR LOCK
Vehicle Speed
(12 mph)Shift into or
out of PARKOFF
AUTO DOOR UNLOCK
Ignition OFF Driver’s Door
OpenShift into or
out of PARKOFF
Transmitter
Access Key Fob
ENTRY AND EXIT
7
Page 10 of 172
KEYLESS ACCESS WITH PUSH BUTTON START
(if equipped)
The Keyless Access with Push-Button Start system features the following touch-activated
door locking or unlocking functions without the key ever leaving your pocket or purse.
You can customize the touch-activated door locking or unlocking settings using the
STARLINK
®Touchscreen by selecting “Settings” then selecting the “Car” menu in the
top bar.
Unlocking Using Door Handles
Grip the driver’s door handle to
unlock the driver’s door (or all
doors depending on the setting).
Grip the front passenger’s door
handle to unlock all doors and the
rear gate. Two chirps sound and
the hazard warning lights flash
twice.
Locking Using Door Handles
Close all the doors and the rear
gate and touch the door lock
sensor (two lines) on either front
door handle. All doors and the
rear gate lock. One chirp sounds
and the hazard warning lights
flash once.
Door Unlock Sensor
Door Lock Sensor
ENTRY AND EXIT
8
Page 11 of 172
Unlocking Using the Rear Gate
Press the rear gate opener button
to unlock and open the rear gate
(or also unlock all doors
depending on the setting).
Two chirps sound and the hazard
warning lights flash twice.
Locking Using the Rear Gate
Close all the doors and the rear
gate and press the rear lock
button. All doors and the rear
gate lock. One chirp sounds and
the hazard warning lights flash
once.
Rear Gate Opener Button
Rear Lock Button
ENTRY AND EXIT
9
Page 15 of 172
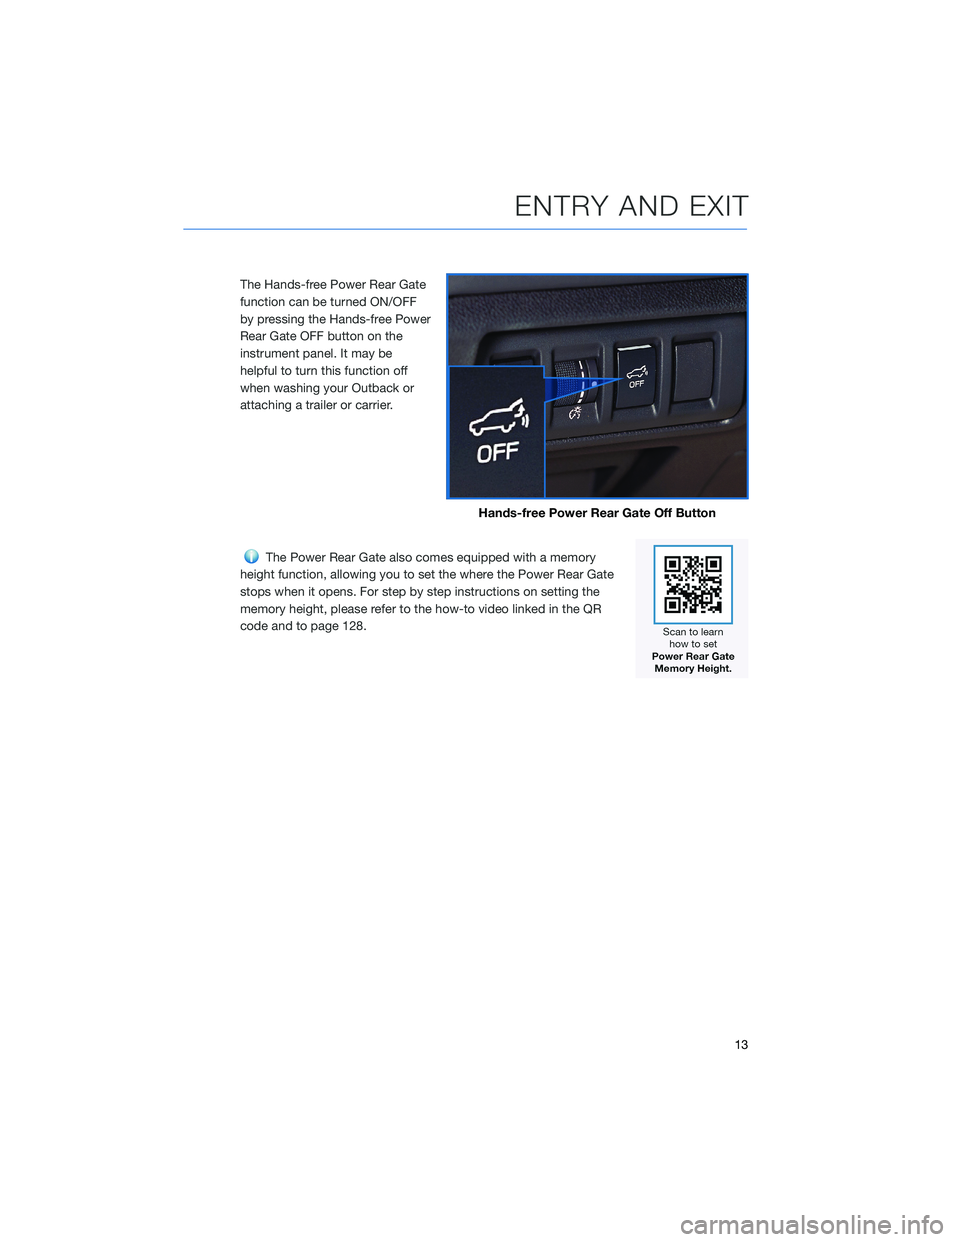
The Hands-free Power Rear Gate
function can be turned ON/OFF
by pressing the Hands-free Power
Rear Gate OFF button on the
instrument panel. It may be
helpful to turn this function off
when washing your Outback or
attaching a trailer or carrier.
The Power Rear Gate also comes equipped with a memory
height function, allowing you to set the where the Power Rear Gate
stops when it opens. For step by step instructions on setting the
memory height, please refer to the how-to video linked in the QR
code and to page 128.
Hands-free Power Rear Gate Off Button
ENTRY AND EXIT
13
Page 19 of 172
Power Driver’s Seat(if equipped)
1Seat Position:Moving the
switch forward or backward will
adjust the seat in that direction.
Pulling up or pushing down on
the back of the switch will
adjust the seat height up or
down. Pulling up or pushing
down on the front of the switch
will adjust the angle of the seat
cushion.
2Recline Seatback:Moving the
top of the switch forward or
backward will adjust the angle
of the seatback.
3Lumbar Support:Pressing the
front of the switch will increase
support. Pressing the rear of
the switch will decrease
support.
4Thigh Extension (if equipped):
Pull up on the lever below the
seat cushion to adjust the
length.
If equipped, your Subaru can be
programmed to automatically recall
your preferred Power Driver’s Seat
and side mirror positions each time
you enter your vehicle. For step by
step instructions on setting the
Power Memory Seat, please refer to
page 130.
Power Seat Controls
Thigh Extension
Memory Seat Buttons
GETTING COMFORTABLE
17
Page 23 of 172
If equipped, the power folding mirrors can also
be set to automatically fold in and out. On the
Center Information Display, select "Settings",
then "Car". Select "Door Mirror Setting" to
turn on or off the Auto Electric Folding
function.
Reverse Tilt Mirror(if equipped)
The passenger side mirror can be set to
automatically tilt down when you move the
select lever to the "R" position, giving better
visibility when backing up. The mirror returns
to its normal position a few seconds after you
move the select lever out of the "R" position.
This setting can also be turned on or off in
“Door Mirror Setting” in the Center Information
Display.
GETTING COMFORTABLE
21