Page 4 of 172

REFUELING
FUEL FILLER LID............51
FUEL SPECIFICATIONS AND
CAPACITY..................51
PASSENGER/CARGO AREAS
FOLDING THE REAR SEATS...52
CHILD SAFETY LOCKS.......53
LATCH/ANCHOR............54
REAR SEAT REMINDER.......55
CARGO COVER.............56
SPARE TIRE................57
ENGINE COMPARTMENT
HOOD PROP................58
2.5L ENGINE................59
2.4L TURBO ENGINE.........60
ADDITIONAL SPECIFICATIONS
NEW VEHICLE BREAK-IN......61
ENGINE OIL................61
ENGINE OIL CAPACITY.......61
ROOF RAIL CAPACITY.......62
TRAILER TOWING CAPACITY . . 62
TIRE PRESSURE MONITORING
SYSTEM (TPMS).............63
STARLINK OVERVIEW
OVERVIEW OF YOUR
MULTIMEDIA SYSTEM........66
BUTTONS..................68
TOUCHSCREEN.............69
STEERING WHEEL
CONTROLS.................70
VOICE RECOGNITION........71
STARLINK HOME
HOME SCREEN ICONS.......73
REARRANGING ICONS.......74
ADDING SHORTCUTS........75
DRIVER PROFILE
CREATING A DRIVER PROFILE . . 77
MULTIMEDIA
RADIO.....................81
MEDIA.....................83
PHONE
PAIRING A PHONE...........84
MAKING A CALL.............85
RECEIVING A CALL..........86
TEXT MESSAGES............87
APPS
SUBARU STARLINK®IN-VEHICLE
APPS......................88
SUBARU STARLINK
®MOBILE
APP.......................89
MYSUBARU................90
MAPS
MAPS OVERVIEW............91
STARLINK SAFETY AND
SECURITY
SAFETY AND SECURITY
OVERVIEW.................92
ENROLLMENT..............93
MYSUBARU INTEGRATION....93
SUBARU STARLINK
®WI-FI
HOTSPOT..................94
SETTINGS AND UPDATES
SETTINGS AND UPDATES
OVERVIEW.................95
SOUND....................96
PHONE....................97
MAPS/NAVIGATION..........97
CLOCK....................99
EYESIGHT
EYESIGHT®OVERVIEW......100
OPERATION...............101
FUNCTIONS...............101
STEERING WHEEL
CONTROLS................107
EYESIGHT
®ASSIST MONITOR
(EAM)....................109
LANE DEPARTURE WARNING
AND PRE-COLLISION BRAKING
SYSTEM OFF..............110
TABLE OF CONTENTS
2
Page 5 of 172

DRIVER ASSIST
TECHNOLOGIES
REAR-VISION CAMERA......111
FRONT VIEW MONITOR.....112
BLIND SPOT DETECTION (BSD) /
REAR CROSS TRAFFIC ALERT
(RCTA)...................113
HIGH BEAM ASSIST (HBA)...114
STEERING RESPONSIVE
HEADLIGHTS (SRH).........115
REVERSE AUTOMATIC BRAKING
(RAB)....................115
DRIVERFOCUS DISTRACTION
MITIGATION SYSTEM
DRIVERFOCUS®OVERVIEW . . . 116
DRIVERFOCUS®
COMPONENTS.............116
DROWSY/INATTENTIVE
WARNINGS................118
DRIVER PROFILE/CONVENIENCE
SETTINGS.................118
DRIVER MONITORING
SYSTEM OFF..............120
CARE AND LIMITATIONS
STEREO CAMERA
PRECAUTIONS.............121
WINDSHIELD GLASS AND
DASHBOARD..............121
FRONT VIEW
OUTBACK.................122
EYESIGHT DISCLAIMER
EYESIGHT®DISCLAIMER....123
HOW TO APPENDIX
HOW TO OVERVIEW.........124
SETTING THE CLOCK.......124
MEMORY HEIGHT..........128
MEMORY DRIVER’S SEAT....130
BLUETOOTH
®PAIRING......131
ANDROID AUTO™..........137
APPLE CARPLAY
®..........139
WI-FI.....................141
MAPS....................144
FIRMWARE AND SOFTWARE
UPDATES.................164
INDEX.....................165
TABLE OF CONTENTS
3
Page 53 of 172

FUEL FILLER LID
The fuel filler lid is located toward the rear of the
passenger side. To open the lid:
1. Make sure your Subaru is stopped and the select
lever is placed in PARK. Then turn the ignition to
the "LOCK"/ "OFF" position.
2. The fuel filler lid is automatically unlocked when the
ignition is moved to the ”LOCK”/OFF” position, or
by unlocking using the access key fob/transmitter
or door handles.
3. Push the rear side of the lid.
4. When the lid opens slightly, open it further by hand.
While refueling, place the fuel filler cap on the cap
holder inside the lid.
After refueling, put the cap back on and turn it
clockwise until you hear a clicking noise. Be certain
not to catch the tether under the cap while tightening.
To close the lid, press it until you hear it latch.
NOTE: The Check Engine warning light may illuminate if the fuel filler cap is not tightened
properly.
FUEL SPECIFICATIONS AND CAPACITY
2.5L Engine Fuel Specifications and Capacity
Fuel Octane Rating
87 AKI or higher
Ethanol Content Limit
No more than 10%
Fuel Tank Capacity
18.5 US Gallons
Low Fuel Warning Light
2.6 US Gallons
2.4L Engine Fuel Specifications and Capacity
Fuel Octane Rating
87 AKI or higher
Ethanol Content Limit
No more than 15%
Fuel Tank Capacity
18.5 US Gallons
Low Fuel Warning Light
2.6 US Gallons
Fuel Filler Lid and Cap
REFUELING
51
Page 69 of 172

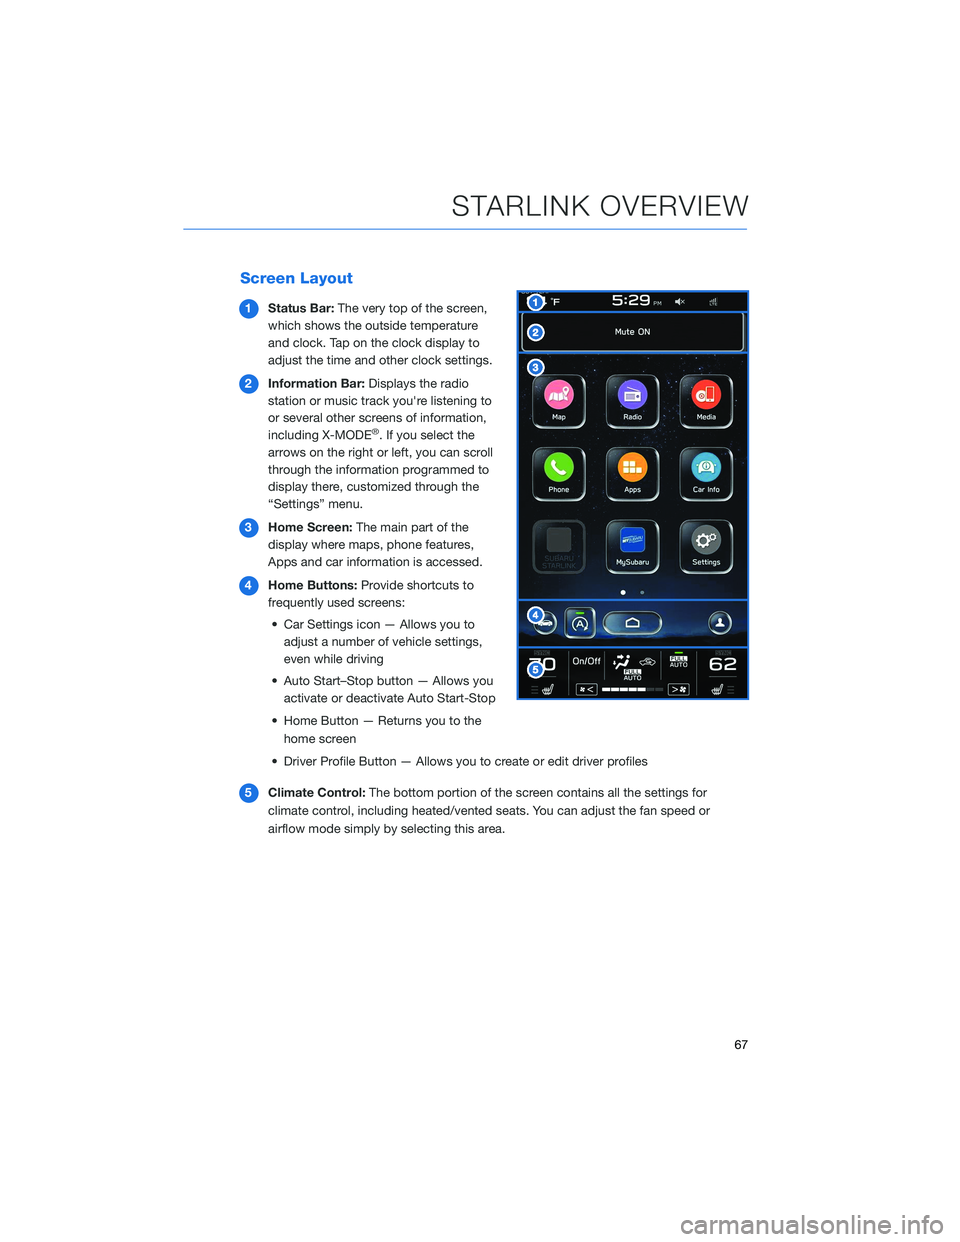
Screen Layout
1Status Bar:The very top of the screen,
which shows the outside temperature
and clock. Tap on the clock display to
adjust the time and other clock settings.
2Information Bar:Displays the radio
station or music track you're listening to
or several other screens of information,
including X-MODE
®. If you select the
arrows on the right or left, you can scroll
through the information programmed to
display there, customized through the
“Settings” menu.
3Home Screen:The main part of the
display where maps, phone features,
Apps and car information is accessed.
4Home Buttons:Provide shortcuts to
frequently used screens:
• Car Settings icon — Allows you to
adjust a number of vehicle settings,
even while driving
• Auto Start–Stop button — Allows you
activate or deactivate Auto Start-Stop
• Home Button — Returns you to the
home screen
• Driver Profile Button — Allows you to create or edit driver profiles
5Climate Control:The bottom portion of the screen contains all the settings for
climate control, including heated/vented seats. You can adjust the fan speed or
airflow mode simply by selecting this area.
STARLINK OVERVIEW
67
Page 101 of 172
CLOCK
Clock settings can be adjusted when the
ignition is in the “ON” position. You can adjust
the clock manually or set the clock to adjust
automatically on the clock setting screen.
To access the clock setting screen with a
single step:
1Select the clock on the status bar at the
top of the Center Information Display.
For more information on clock settings
and full step-by-step instructions on adjusting
the clock both manually and automatically,
please refer to page 124 in this Getting
Started Guide.
1
SETTINGS AND UPDATES
99
Page 126 of 172
HOW TO OVERVIEW
This “How To” appendix provides detailed, step-by-step instructions to easily connect with
features of your Outback.
If you need some help with these features or want to
learn more, we are here to assist you:
Your Subaru Owner’s Manuals:
Located in the glovebox
Online Subaru Owner’s Resources:
www.subaru.com/owners
Subaru Customer Support:
www.subaru.com/customer-support
1-800-782-2783 (1-800-SUBARU3 )
SETTING THE CLOCK
Clock settings can be adjusted when the ignition is in the “ON” position. You can adjust
the clock manually or set the clock to adjust automatically in the clock setting screen.
To directly access the clock setting screen, you can select the clock on the status bar at
the top of the Center Information Display. Full directions for accessing the clock settings
and adjusting the clock manually or automatically are given below.
For more information, please refer to “Quick Guide” in your STARLINK®Owner’s
Manual.
HOW TO APPENDIX
124
Page 127 of 172
Manually
To set the clock manually:
1Select the Clock Display in the Status
Bar.
2Select “Time Setting”.
NOTE: On this screen, you can also
adjust the clock format (12H or 24H) and,
for vehicles with navigation, adjust the
time zone and Daylight Saving Time.
The recommended settings for these are
“Auto.”
1
2
HOW TO APPENDIX
125
Page 128 of 172
3Select “Manual”.
4Adjust the time and date using the
“Arrow Up” and “Arrow Down” buttons.
5Once you are finished, select “OK”.
Automatically
To set the clock automatically:
1Select the Clock Display in the Status
Bar.
3
5
1
HOW TO APPENDIX
126