Page 53 of 172

FUEL FILLER LID
The fuel filler lid is located toward the rear of the
passenger side. To open the lid:
1. Make sure your Subaru is stopped and the select
lever is placed in PARK. Then turn the ignition to
the "LOCK"/ "OFF" position.
2. The fuel filler lid is automatically unlocked when the
ignition is moved to the ”LOCK”/OFF” position, or
by unlocking using the access key fob/transmitter
or door handles.
3. Push the rear side of the lid.
4. When the lid opens slightly, open it further by hand.
While refueling, place the fuel filler cap on the cap
holder inside the lid.
After refueling, put the cap back on and turn it
clockwise until you hear a clicking noise. Be certain
not to catch the tether under the cap while tightening.
To close the lid, press it until you hear it latch.
NOTE: The Check Engine warning light may illuminate if the fuel filler cap is not tightened
properly.
FUEL SPECIFICATIONS AND CAPACITY
2.5L Engine Fuel Specifications and Capacity
Fuel Octane Rating
87 AKI or higher
Ethanol Content Limit
No more than 10%
Fuel Tank Capacity
18.5 US Gallons
Low Fuel Warning Light
2.6 US Gallons
2.4L Engine Fuel Specifications and Capacity
Fuel Octane Rating
87 AKI or higher
Ethanol Content Limit
No more than 15%
Fuel Tank Capacity
18.5 US Gallons
Low Fuel Warning Light
2.6 US Gallons
Fuel Filler Lid and Cap
REFUELING
51
Page 55 of 172
CHILD SAFETY LOCKS
The child safety locks are located on the
inside edges of the rear doors. In the locked
position, the rear doors can only be opened
from the outside.
PASSENGER/CARGO AREAS
53
Page 132 of 172

MEMORY DRIVER’S SEAT(if equipped)
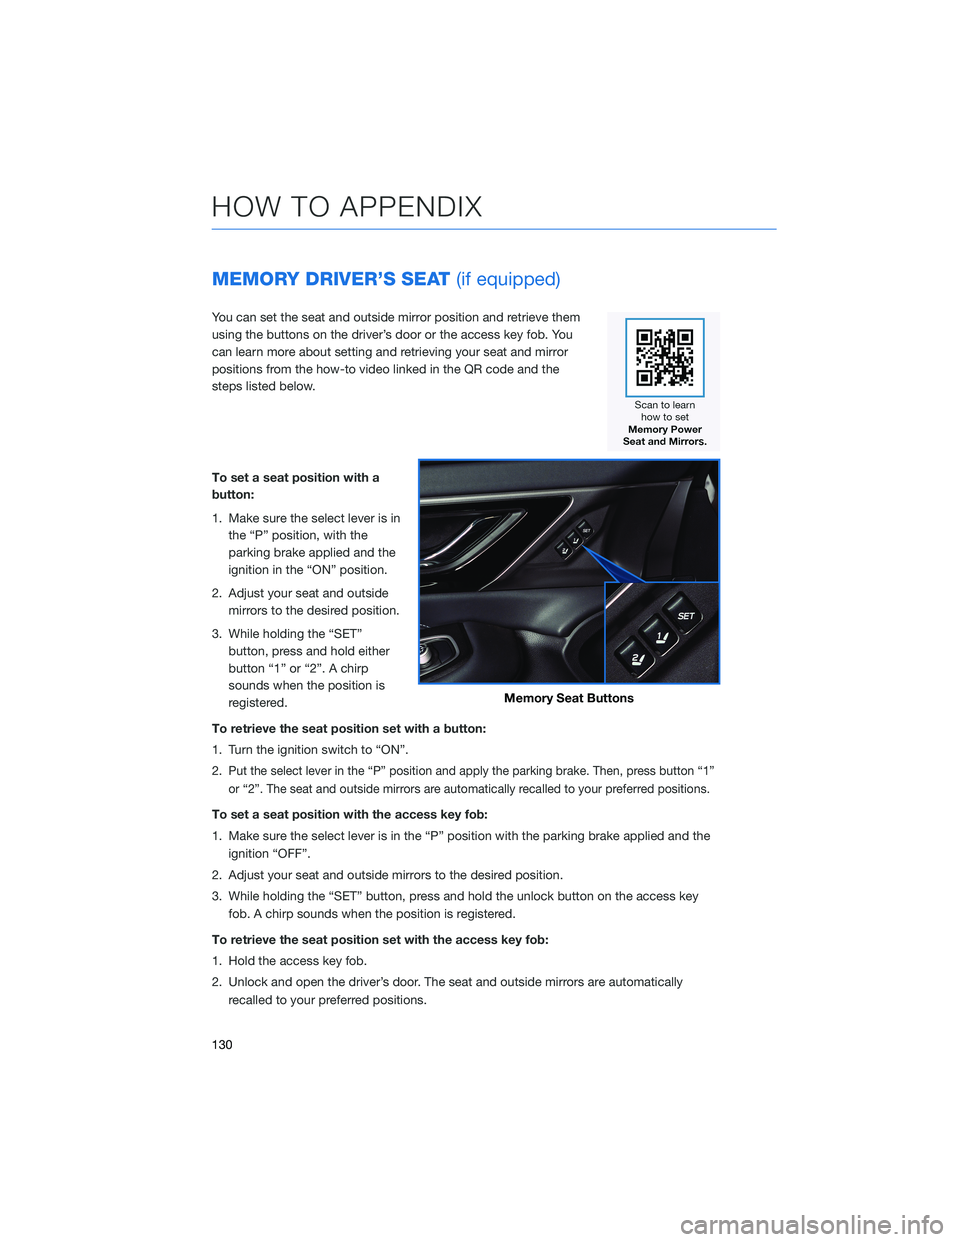
You can set the seat and outside mirror position and retrieve them
using the buttons on the driver’s door or the access key fob. You
can learn more about setting and retrieving your seat and mirror
positions from the how-to video linked in the QR code and the
steps listed below.
To set a seat position with a
button:
1. Make sure the select lever is in
the “P” position, with the
parking brake applied and the
ignition in the “ON” position.
2. Adjust your seat and outside
mirrors to the desired position.
3. While holding the “SET”
button, press and hold either
button “1” or “2”. A chirp
sounds when the position is
registered.
To retrieve the seat position set with a button:
1. Turn the ignition switch to “ON”.
2.
Put the select lever in the “P” position and apply the parking brake. Then, press button “1”
or “2”. The seat and outside mirrors are automatically recalled to your preferred positions.
To set a seat position with the access key fob:
1. Make sure the select lever is in the “P” position with the parking brake applied and the
ignition “OFF”.
2. Adjust your seat and outside mirrors to the desired position.
3. While holding the “SET” button, press and hold the unlock button on the access key
fob. A chirp sounds when the position is registered.
To retrieve the seat position set with the access key fob:
1. Hold the access key fob.
2. Unlock and open the driver’s door. The seat and outside mirrors are automatically
recalled to your preferred positions.
Memory Seat Buttons
HOW TO APPENDIX
130
Page 166 of 172

FIRMWARE AND SOFTWARE UPDATES
Software updates provide enhancements to the system, such as new features, added
security, and upgraded functions. You can ask your preferred Subaru retailer to check for
and perform a full update to the system software. Please ask your preferred Subaru retailer
for specific details on update content.
For the 11.6-inch Multimedia Plus and the 11.6-inch Multimedia Navigation systems, some
system software can be updated via a Wi-Fi network. The update process involves
downloading and installing the software update.
NOTE: System functionality will be restricted during installation, and you may need to
reset radio station presets and volume settings after the update process. Set your clock to
“Auto” (see page 126) before updating the software.
To update the software via Wi-Fi:
1. Connect to a Wi-Fi network (see page 141).
2. Display the general setting screen by pressing the “Home” button, then select
“Settings”, and finally “General”.
3. Select “Software Update”, select “Update”, and then select “Check for Updates”
• If “Automatically Check for Updates” is enabled, an update check will be performed
automatically before proceeding to the next step.
• If “Automatically Download Updates” is enabled, available software updates will be
downloaded automatically.
4. Select “Download Now” to begin the download. The download status progress is
displayed in the upper right of the screen. If you need to stop the download and restart
at a later time, select “Cancel” to stop the process.
5. Select “Install Now” to start the installation process. The installation process will take
several minutes to complete.
6. When the installation is complete, select “OK” on the confirmation message to
complete the update process.
7. Turn the ignition to the “OFF” position and open and close the driver’s door. After about
5 minutes, restart the engine, and the software installation will be applied.
HOW TO APPENDIX
164
Page 168 of 172

F
FIRMWARE AND SOFTWARE
UPDATES . . . . . . . . ....... 164
FOLDING THE REAR SEATS . . . . . . . 52
FRONT VIEW MONITOR . ....... 112
FUEL FILLER LID . . . . . . . . ..... 51
FUEL SPECIFICATIONS AND
CAPACITY . . . . . . . . ........ 51
FUNCTIONS . . . . . . . ........ 101
Advanced Adaptive Cruise Control
with Lane Centering . . . .......105
Conventional Cruise Control . . . . . 106
Lane Departure Prevention......104
Lane Departure Warning . . . . . . . 103
Lane Sway Warning . . . .......103
Lead Vehicle Start Alert . . . . . . . . 107
Pre-Collision Brake Assist . .....102
Pre-Collision Braking . . .......102
Pre-Collision Throttle Management. . 102
H
HIGH BEAM ASSIST (HBA) . . . . . . . 114
HOME SCREEN ICONS ......... 73
HOOD PROP . . . . . . . . ........ 58
HOW TO OVERVIEW . . ........ 124
I
IGNITION SWITCH . . .......... 42
IMPORTANT SAFETY INFORMATION . . 4
IN CASE OF EMERGENCY . . . . . . . . 5
Subaru Roadside Assistance . . . . . . 5
SUBARU STARLINK
®Safety and
Security . . . . . . . . ..........5
INSTRUMENT PANEL SWITCHES
(LOWER LEFT) . . . . . . . . . . . . . 34
I SWITCH . . . . . . . . . . . . . . . . . . 35K
KEYLESS ACCESS WITH PUSH BUTTON
START .................. 8
Locking Using Door Handles . .....8
Locking Using the Rear Gate ......9
Unlocking Using Door Handles.....8
Unlocking Using the Rear Gate .....9
KEYLESS ENTRY . . . . . ......... 7
Automatic Door Locking/Unlocking . . 7
L
LANE DEPARTURE WARNING AND
PRE-COLLISION BRAKING
SYSTEM OFF............. 110
Lane Departure Warning OFF . . . . 110
Pre-Collision Braking System OFF. . 110
LATCH/ANCHOR . . . .......... 54
LIGHT CONTROLS . ........... 36
Daytime Running Lights . . . . . . . . 37
Illumination Brightness . . . . . . . . . 36
M
MAKING A CALL . . . . . . . ...... 85
MAPS . . . . . . . . . . . ........ 144
Arrival Distance/Time . . . . . . . . . 161
Canceling Guidance..........162
Creating Home/Work .........144
Finding a Destination By Address . . 148
Finding a Destination By POI....151
Guidance Screen Icons . . . . . . . . 159
Map Updates . . . . . . . ......162
Map View/Perspectives . . . . . . . . 161
Map Zoom . . . . . . .........160
Nearest Gas Station . . . . ......161
Route Options . . . . . . .......153
Saving Destination as a Favorite . . 156
Shortest/Fastest/Economic . . . . . 154
Traffic Information . . . . . ......161
INDEX
166