Page 58 of 164
Tire pressure specification is listed on the tire pressure inflation label located on the
driver’s side door pillar and in the table below. For complete tire pressure specifications
and information, please refer to the tire specifications in your Owner’s Manual.
Tire Inflation Pressure
Front
WheelRear WheelTemporary
Spare Tire
33 psi 32 psi 60 psi
NOTE: The temporary spare tire must be
used only on a rear wheel. If a front wheel
tire gets punctured, replace the wheel with
a rear wheel and install the temporary spare
tire in place of the removed rear wheel.
The default tire pressure measurement units can be changed from
kPa to PSi by using the Touchscreen. You can learn more about
changing the reading from the how-to video linked in the QR code
and the following steps.
Tire Inflation Pressure Label
ADDITIONAL SPECIFICATIONS
56
Page 64 of 164
STEERING WHEEL CONTROLS
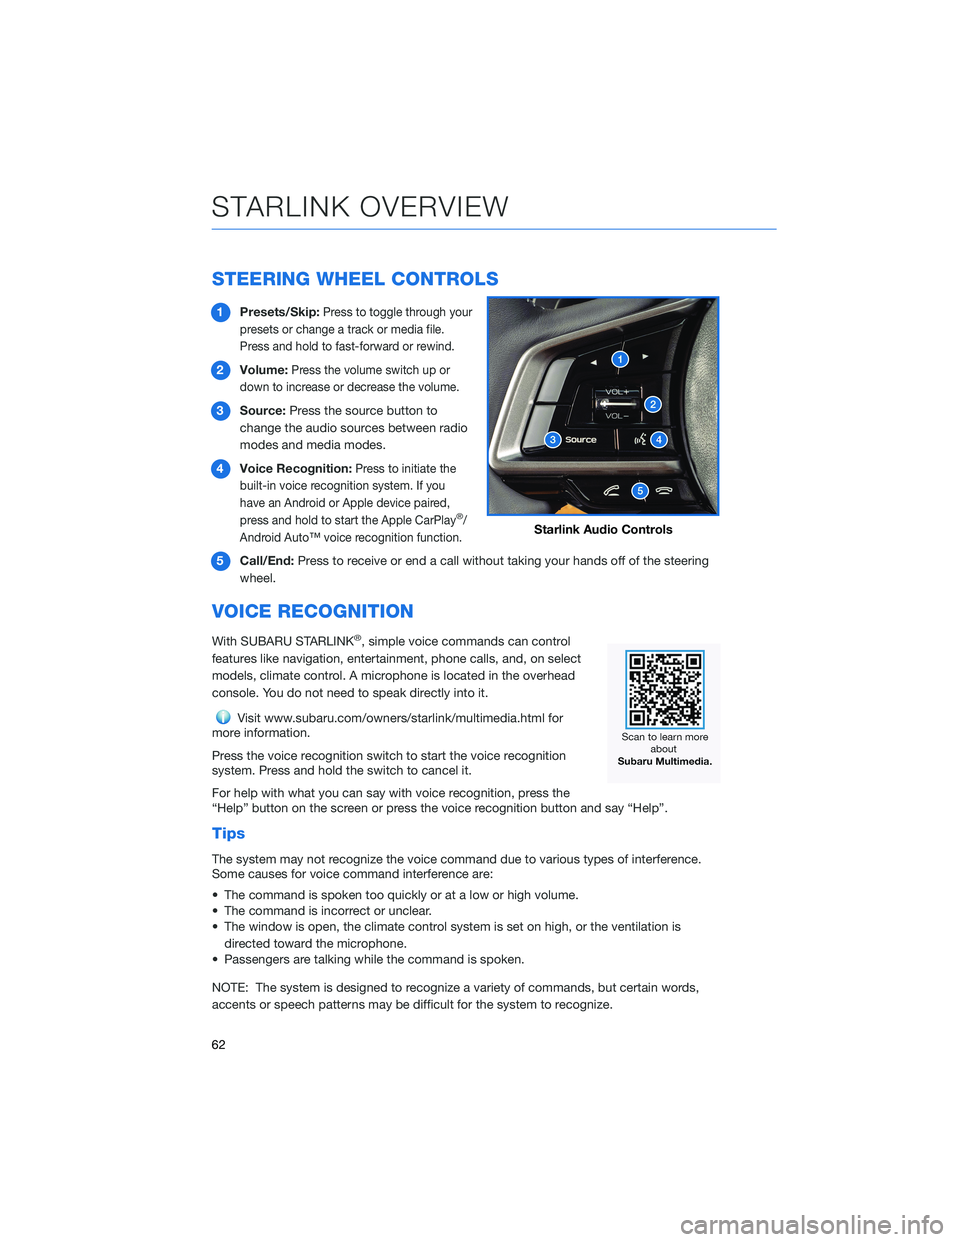
1Presets/Skip:Press to toggle through your
presets or change a track or media file.
Press and hold to fast-forward or rewind.
2Volume:Press the volume switch up or
down to increase or decrease the volume.
3Source:Press the source button to
change the audio sources between radio
modes and media modes.
4Voice Recognition:
Press to initiate the
built-in voice recognition system. If you
have an Android or Apple device paired,
press and hold to start the Apple CarPlay
®/
Android Auto™ voice recognition function.
5Call/End:Press to receive or end a call without taking your hands off of the steering
wheel.
VOICE RECOGNITION
With SUBARU STARLINK®, simple voice commands can control
features like navigation, entertainment, phone calls, and, on select
models, climate control. A microphone is located in the overhead
console. You do not need to speak directly into it.
Visit www.subaru.com/owners/starlink/multimedia.html for
more information.
Press the voice recognition switch to start the voice recognition
system. Press and hold the switch to cancel it.
For help with what you can say with voice recognition, press the
“Help” button on the screen or press the voice recognition button and say “Help”.
Tips
The system may not recognize the voice command due to various types of interference.
Some causes for voice command interference are:
• The command is spoken too quickly or at a low or high volume.
• The command is incorrect or unclear.
• The window is open, the climate control system is set on high, or the ventilation is
directed toward the microphone.
• Passengers are talking while the command is spoken.
NOTE: The system is designed to recognize a variety of commands, but certain words,
accents or speech patterns may be difficult for the system to recognize.
Starlink Audio Controls
STARLINK OVERVIEW
62
Page 78 of 164
MAKING A CALL
With a paired phone, you can make a call
through voice recognition by touching the
“Voice Recognition Switch” on the steering
wheel to start the voice recognition system.
After pressing the “Voice Recognition Switch”,
wait for the “Voice Guidance” screen to appear
on the Touchscreen and say “Call [name and
phone type]” or “Dial [number]”.
To make a call from the Touchscreen, start by
pushing the “Home” button and then select
“Phone”. After the phone screen displays,
select the method you would like to use to
make a call.
• Recents – Allows you to call someone that
has recently called you or that you called.
• Favorites – Allows you to place a call to one
of your favorites on your phone.
• Phonebook – Will display the phonebook
that is on your phone.
• Messages – Allows you to call someone that
recently sent you a text message.
• Keypad – Allow you to dial any number you
would like.
PHONE
76
Page 79 of 164
RECEIVING A CALL
To receive a call, press the “Call” switch on the steering wheel or the “Accept” button on
the Touchscreen.
To reject a call, press the “End” switch on the steering wheel or the “Decline” button on the
Touchscreen.
PHONE
77
Page 90 of 164
PHONE
This system supports Bluetooth®, a wireless data system, allowing you to make and
receive calls without taking your hands off the steering wheel.
In the settings menu, you will be able to manage devices, adjust phone book and message
settings, and adjust other phone/Bluetooth
®settings.
To access the phone settings screen, press the “Home” button, select “Settings”, then
select the “Phone” menu.
MAPS/NAVIGATION
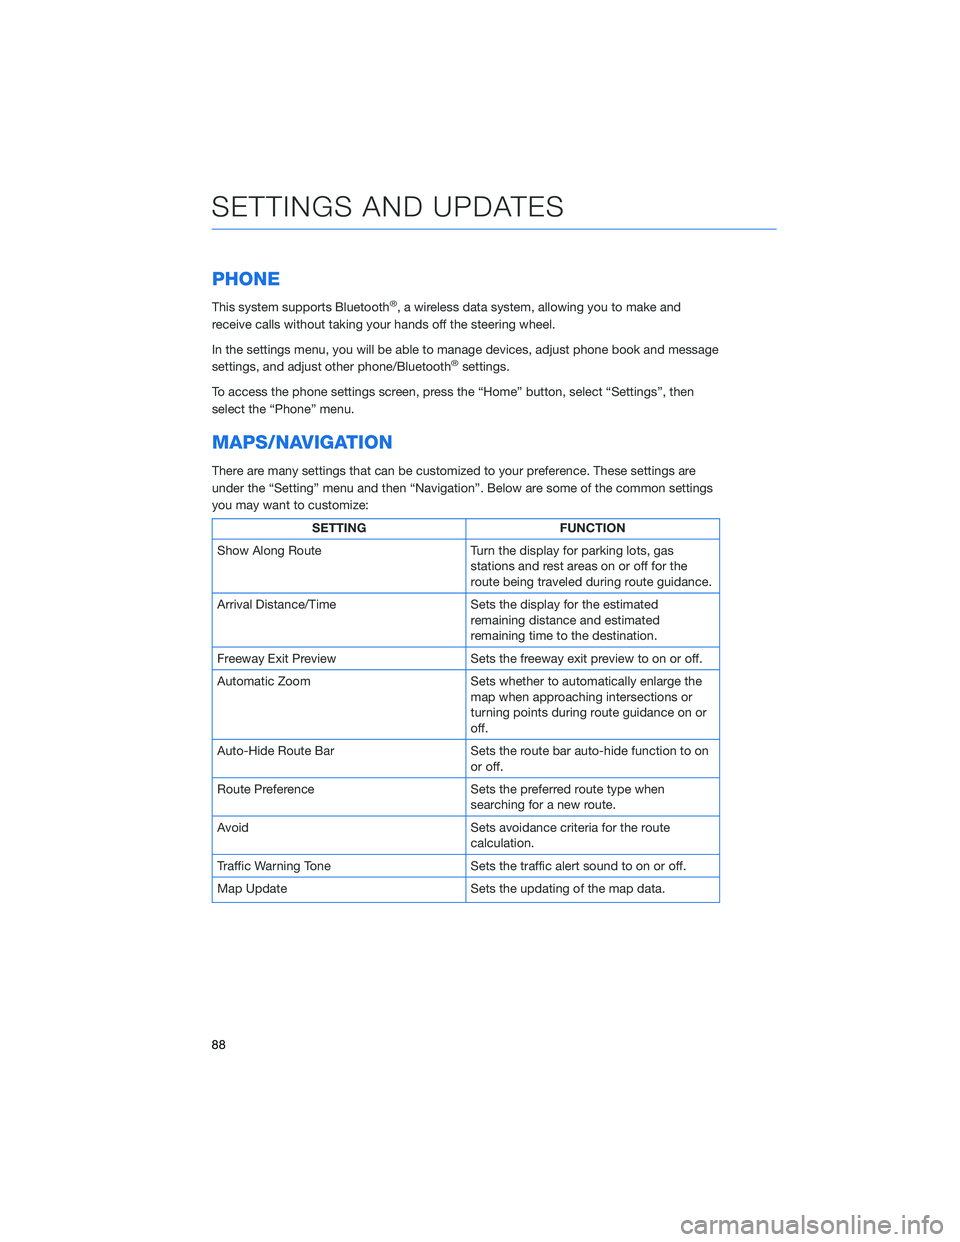
There are many settings that can be customized to your preference. These settings are
under the “Setting” menu and then “Navigation”. Below are some of the common settings
you may want to customize:
SETTING FUNCTION
Show Along Route Turn the display for parking lots, gas
stations and rest areas on or off for the
route being traveled during route guidance.
Arrival Distance/Time Sets the display for the estimated
remaining distance and estimated
remaining time to the destination.
Freeway Exit Preview Sets the freeway exit preview to on or off.
Automatic Zoom Sets whether to automatically enlarge the
map when approaching intersections or
turning points during route guidance on or
off.
Auto-Hide Route Bar Sets the route bar auto-hide function to on
or off.
Route Preference Sets the preferred route type when
searching for a new route.
Avoid Sets avoidance criteria for the route
calculation.
Traffic Warning Tone Sets the traffic alert sound to on or off.
Map Update Sets the updating of the map data.
SETTINGS AND UPDATES
88
Page 98 of 164
Advanced Adaptive Cruise Control with Lane Centering
Advanced Adaptive Cruise Control is a driving support system intended to reduce the
burden on you when driving on an expressway (including during congestion and when
driving at high speed). Advanced Adaptive Cruise Control and Lane Centering work
together to assist you by automatically controlling the accelerator, brake, and steering.
Advanced Adaptive Cruise Control
This system provides cruise control with the
ability to keep a safe distance from the car in
front of you. Using the EyeSight
®camera, the
Advanced Adaptive Cruise Control function
identifies vehicles in front of you in the same
lane, and your vehicle follows the vehicle in
front (up to the maximum of your set speed).
While following, your vehicle will automatically
maintain a following distance that
corresponds to the speed of the vehicle in
front. The vehicle is capable of being
controlled at a speed between 0 mph and
approximately 90 mph.
You can turn the Advanced Adaptive Cruise
Control on or off using the Adaptive Cruise
Control On/Off button on the right side of the steering wheel (see page 98). Once the
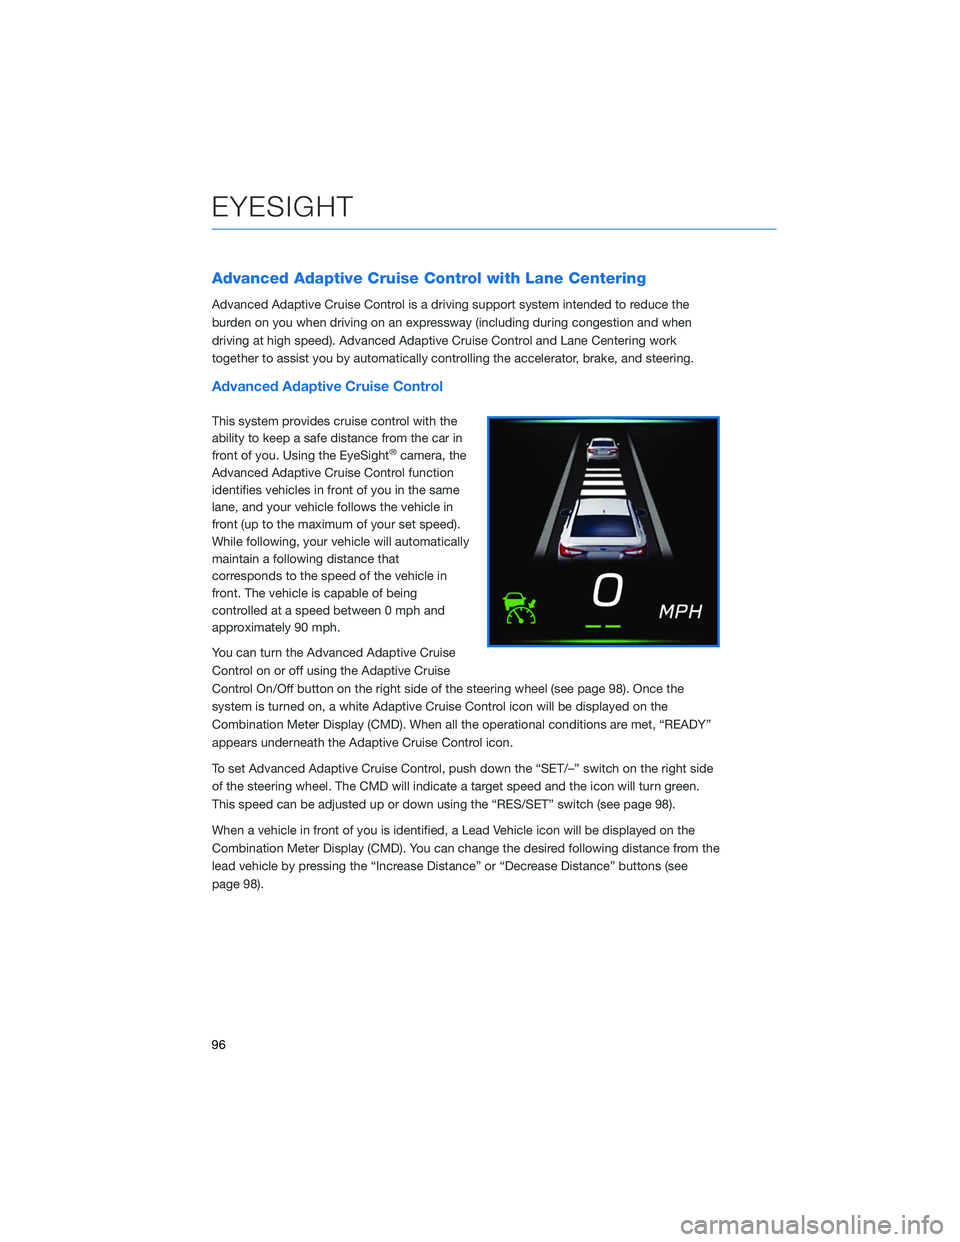
system is turned on, a white Adaptive Cruise Control icon will be displayed on the
Combination Meter Display (CMD). When all the operational conditions are met, “READY”
appears underneath the Adaptive Cruise Control icon.
To set Advanced Adaptive Cruise Control, push down the “SET/–” switch on the right side
of the steering wheel. The CMD will indicate a target speed and the icon will turn green.
This speed can be adjusted up or down using the “RES/SET” switch (see page 98).
When a vehicle in front of you is identified, a Lead Vehicle icon will be displayed on the
Combination Meter Display (CMD). You can change the desired following distance from the
lead vehicle by pressing the “Increase Distance” or “Decrease Distance” buttons (see
page 98).
EYESIGHT
96
Page 99 of 164
Lane Centering
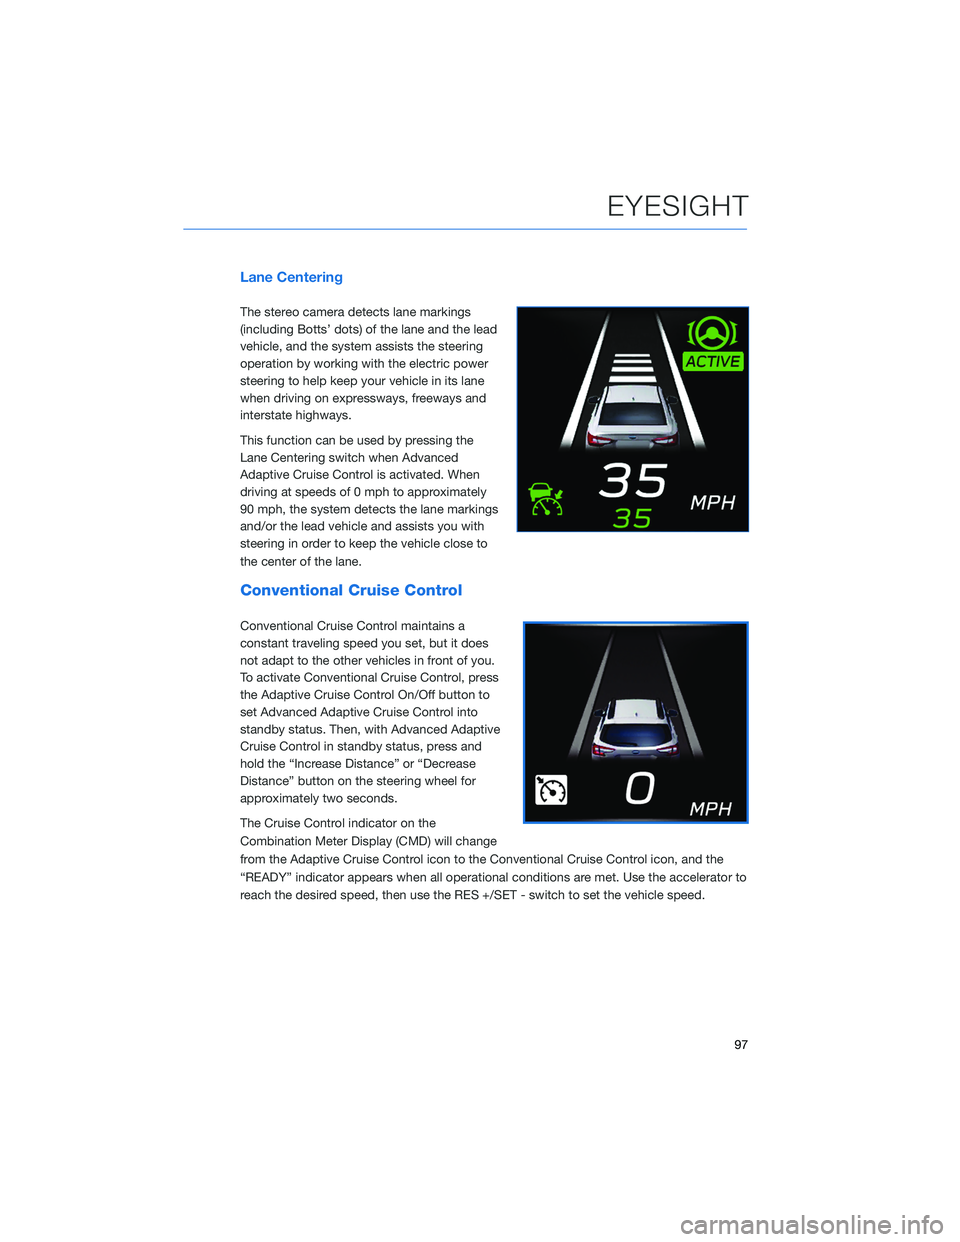
The stereo camera detects lane markings
(including Botts’ dots) of the lane and the lead
vehicle, and the system assists the steering
operation by working with the electric power
steering to help keep your vehicle in its lane
when driving on expressways, freeways and
interstate highways.
This function can be used by pressing the
Lane Centering switch when Advanced
Adaptive Cruise Control is activated. When
driving at speeds of 0 mph to approximately
90 mph, the system detects the lane markings
and/or the lead vehicle and assists you with
steering in order to keep the vehicle close to
the center of the lane.
Conventional Cruise Control
Conventional Cruise Control maintains a
constant traveling speed you set, but it does
not adapt to the other vehicles in front of you.
To activate Conventional Cruise Control, press
the Adaptive Cruise Control On/Off button to
set Advanced Adaptive Cruise Control into
standby status. Then, with Advanced Adaptive
Cruise Control in standby status, press and
hold the “Increase Distance” or “Decrease
Distance” button on the steering wheel for
approximately two seconds.
The Cruise Control indicator on the
Combination Meter Display (CMD) will change
from the Adaptive Cruise Control icon to the Conventional Cruise Control icon, and the
“READY” indicator appears when all operational conditions are met. Use the accelerator to
reach the desired speed, then use the RES +/SET - switch to set the vehicle speed.
EYESIGHT
97
Page 100 of 164
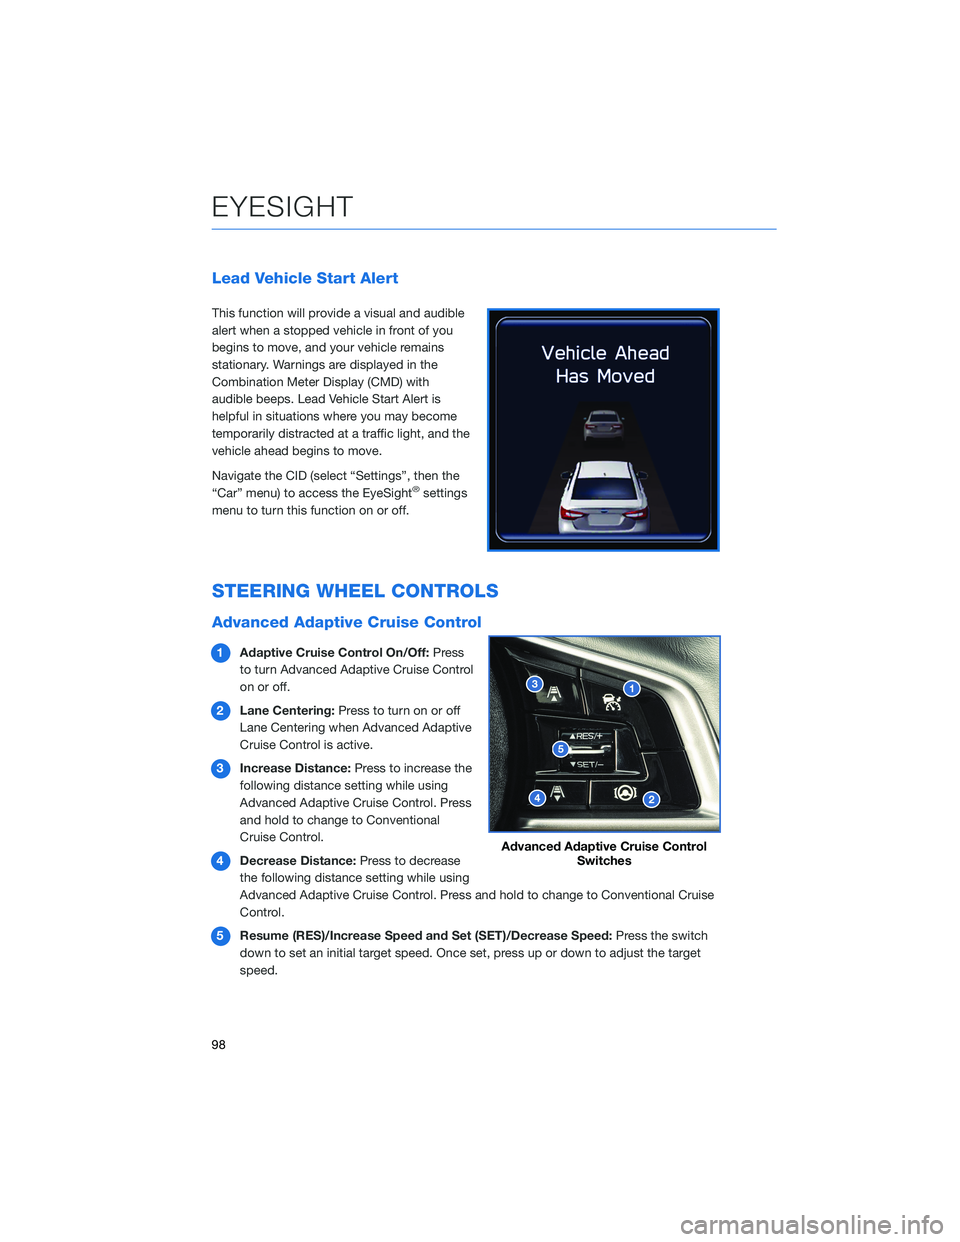
Lead Vehicle Start Alert
This function will provide a visual and audible
alert when a stopped vehicle in front of you
begins to move, and your vehicle remains
stationary. Warnings are displayed in the
Combination Meter Display (CMD) with
audible beeps. Lead Vehicle Start Alert is
helpful in situations where you may become
temporarily distracted at a traffic light, and the
vehicle ahead begins to move.
Navigate the CID (select “Settings”, then the
“Car” menu) to access the EyeSight
®settings
menu to turn this function on or off.
STEERING WHEEL CONTROLS
Advanced Adaptive Cruise Control
1Adaptive Cruise Control On/Off:Press
to turn Advanced Adaptive Cruise Control
on or off.
2Lane Centering:Press to turn on or off
Lane Centering when Advanced Adaptive
Cruise Control is active.
3Increase Distance:Press to increase the
following distance setting while using
Advanced Adaptive Cruise Control. Press
and hold to change to Conventional
Cruise Control.
4Decrease Distance:Press to decrease
the following distance setting while using
Advanced Adaptive Cruise Control. Press and hold to change to Conventional Cruise
Control.
5Resume (RES)/Increase Speed and Set (SET)/Decrease Speed:Press the switch
down to set an initial target speed. Once set, press up or down to adjust the target
speed.
Advanced Adaptive Cruise Control
Switches
EYESIGHT
98