2022 SUBARU LEGACY navigation system
[x] Cancel search: navigation systemPage 89 of 164

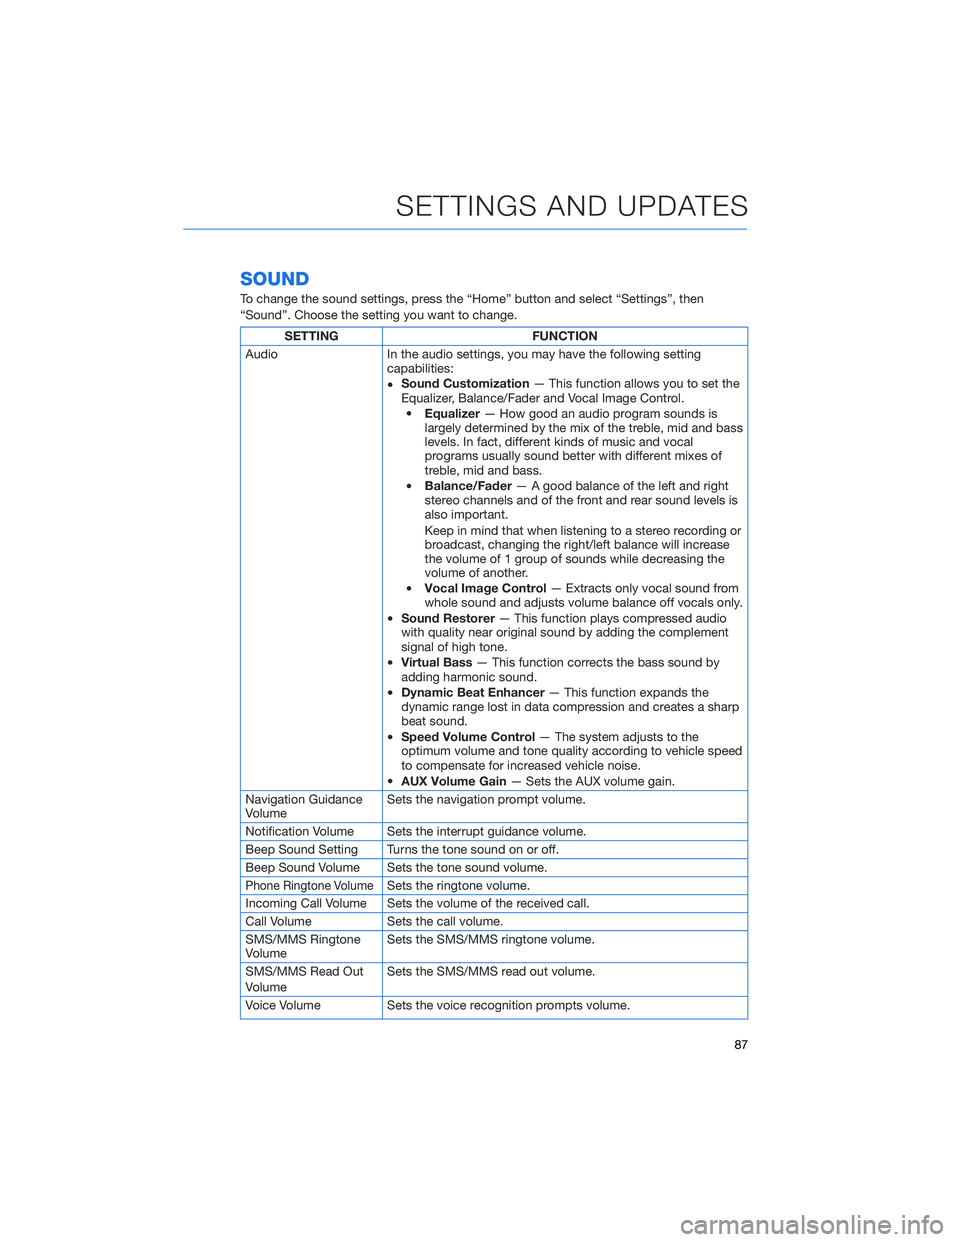
SOUND
To change the sound settings, press the “Home” button and select “Settings”, then
“Sound”. Choose the setting you want to change.
SETTING FUNCTION
Audio In the audio settings, you may have the following setting
capabilities:
•Sound Customization— This function allows you to set the
Equalizer, Balance/Fader and Vocal Image Control.
•Equalizer— How good an audio program sounds is
largely determined by the mix of the treble, mid and bass
levels. In fact, different kinds of music and vocal
programs usually sound better with different mixes of
treble, mid and bass.
•Balance/Fader— A good balance of the left and right
stereo channels and of the front and rear sound levels is
also important.
Keep in mind that when listening to a stereo recording or
broadcast, changing the right/left balance will increase
the volume of 1 group of sounds while decreasing the
volume of another.
•Vocal Image Control— Extracts only vocal sound from
whole sound and adjusts volume balance off vocals only.
•Sound Restorer— This function plays compressed audio
with quality near original sound by adding the complement
signal of high tone.
•Virtual Bass— This function corrects the bass sound by
adding harmonic sound.
•Dynamic Beat Enhancer— This function expands the
dynamic range lost in data compression and creates a sharp
beat sound.
•Speed Volume Control— The system adjusts to the
optimum volume and tone quality according to vehicle speed
to compensate for increased vehicle noise.
•AUX Volume Gain— Sets the AUX volume gain.
Navigation Guidance
VolumeSets the navigation prompt volume.
Notification Volume Sets the interrupt guidance volume.
Beep Sound Setting Turns the tone sound on or off.
Beep Sound Volume Sets the tone sound volume.
Phone Ringtone VolumeSets the ringtone volume.
Incoming Call Volume Sets the volume of the received call.
Call Volume Sets the call volume.
SMS/MMS Ringtone
VolumeSets the SMS/MMS ringtone volume.
SMS/MMS Read Out
VolumeSets the SMS/MMS read out volume.
Voice Volume Sets the voice recognition prompts volume.
SETTINGS AND UPDATES
87
Page 90 of 164

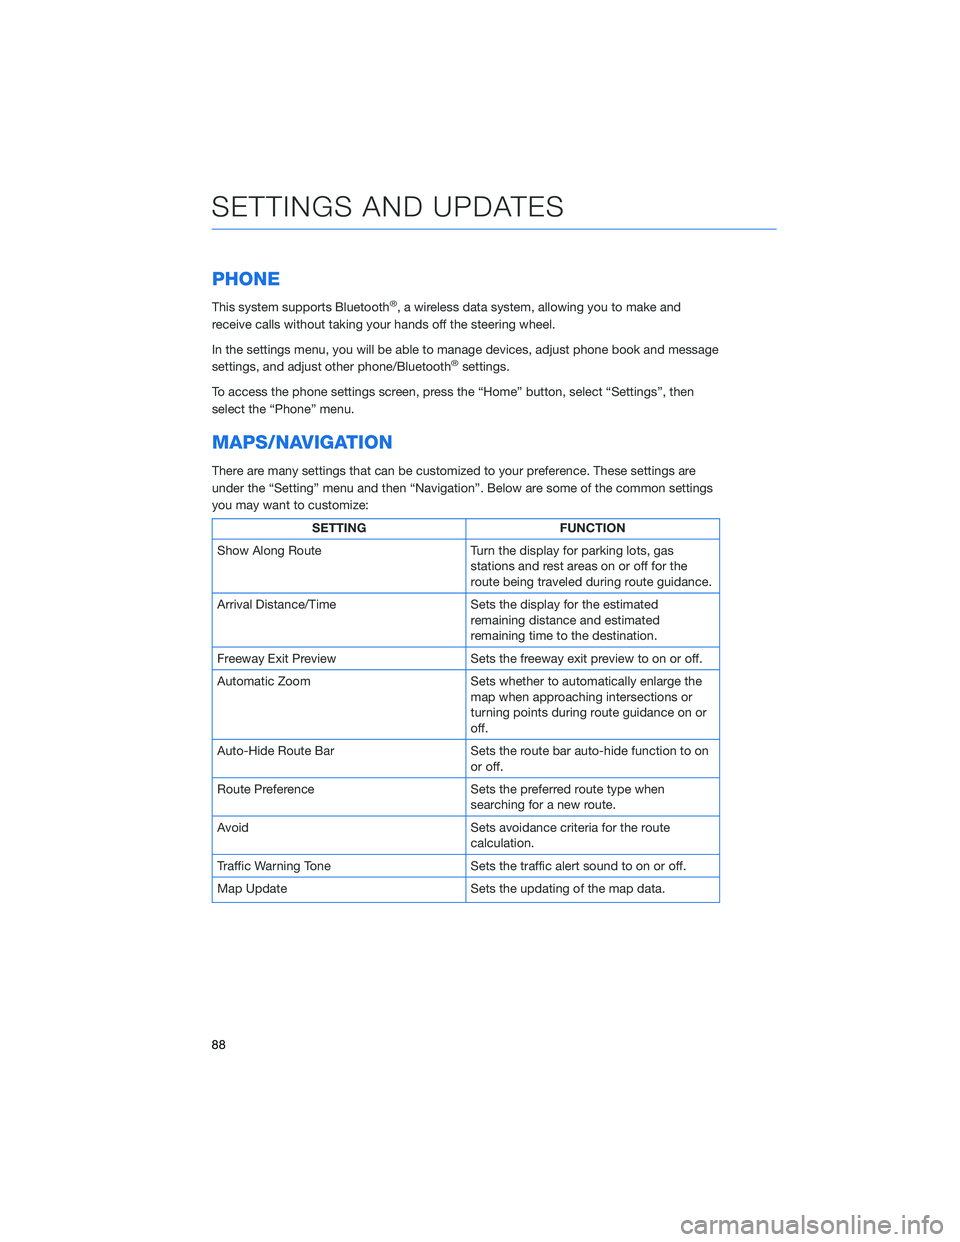
PHONE
This system supports Bluetooth®, a wireless data system, allowing you to make and
receive calls without taking your hands off the steering wheel.
In the settings menu, you will be able to manage devices, adjust phone book and message
settings, and adjust other phone/Bluetooth
®settings.
To access the phone settings screen, press the “Home” button, select “Settings”, then
select the “Phone” menu.
MAPS/NAVIGATION
There are many settings that can be customized to your preference. These settings are
under the “Setting” menu and then “Navigation”. Below are some of the common settings
you may want to customize:
SETTING FUNCTION
Show Along Route Turn the display for parking lots, gas
stations and rest areas on or off for the
route being traveled during route guidance.
Arrival Distance/Time Sets the display for the estimated
remaining distance and estimated
remaining time to the destination.
Freeway Exit Preview Sets the freeway exit preview to on or off.
Automatic Zoom Sets whether to automatically enlarge the
map when approaching intersections or
turning points during route guidance on or
off.
Auto-Hide Route Bar Sets the route bar auto-hide function to on
or off.
Route Preference Sets the preferred route type when
searching for a new route.
Avoid Sets avoidance criteria for the route
calculation.
Traffic Warning Tone Sets the traffic alert sound to on or off.
Map Update Sets the updating of the map data.
SETTINGS AND UPDATES
88
Page 121 of 164

3For 11.6-inch display models, select
“Auto”. For Dual 7.0-inch display models,
select “Sync With Phone”.
4Select “Back”.
The clock automatically adjusts as follows:
• 11.6-inch display with navigation system: Automatically adjusts the clock when a GPS
signal is available.
• 11.6-inch display without navigation system: Automatically adjusts the clock when a
STARLINK
®Safety and Security signal is available.
• Dual 7.0-inch display: Automatically adjusts the clock when a phone is paired and
connected via Bluetooth
®. “Phonebook Download” must be enabled in the Phone
Settings.
For step-by-step procedure to pair a phone to the SUBARU STARLINK
®Touchscreen, see
page 121 for Android devices or page 124 for Apple devices in this Getting Started Guide.
3
4
HOW TO APPENDIX
119
Page 145 of 164

7Select “Let’s Go” to start navigating to
the address. You will see fuel stations,
rest stops, hotels, etc. on the right side of
the screen.
Route Options
You can set the navigation system to avoid certain types of routes:
1From the “Home” screen select “Settings”, then “Navigation”.
2Select “Avoid”.
HOW TO APPENDIX
143
Page 154 of 164

Map Updates
For vehicles with 11.6 Multimedia Plus and 11.6 Multimedia Navigation systems, the maps
can be updated over a Wi-Fi network, either manually or automatically.
For more information, please refer to “Subaru Map Update” in your STARLINK®
Owner’s Manual.
To update your maps automatically over Wi-Fi, follow this process:
1First, make sure you are connected to a Wi-Fi Network (see page 131), return to
“Settings”, and then select the “Navigation” menu.
2Select “Map Update”, select “Wi-Fi” and
then select “Automatic Update”.
3Select “Update maps automatically (at
most 8 can be selected)” and then select
the regions you would like to update.
HOW TO APPENDIX
152
Page 155 of 164

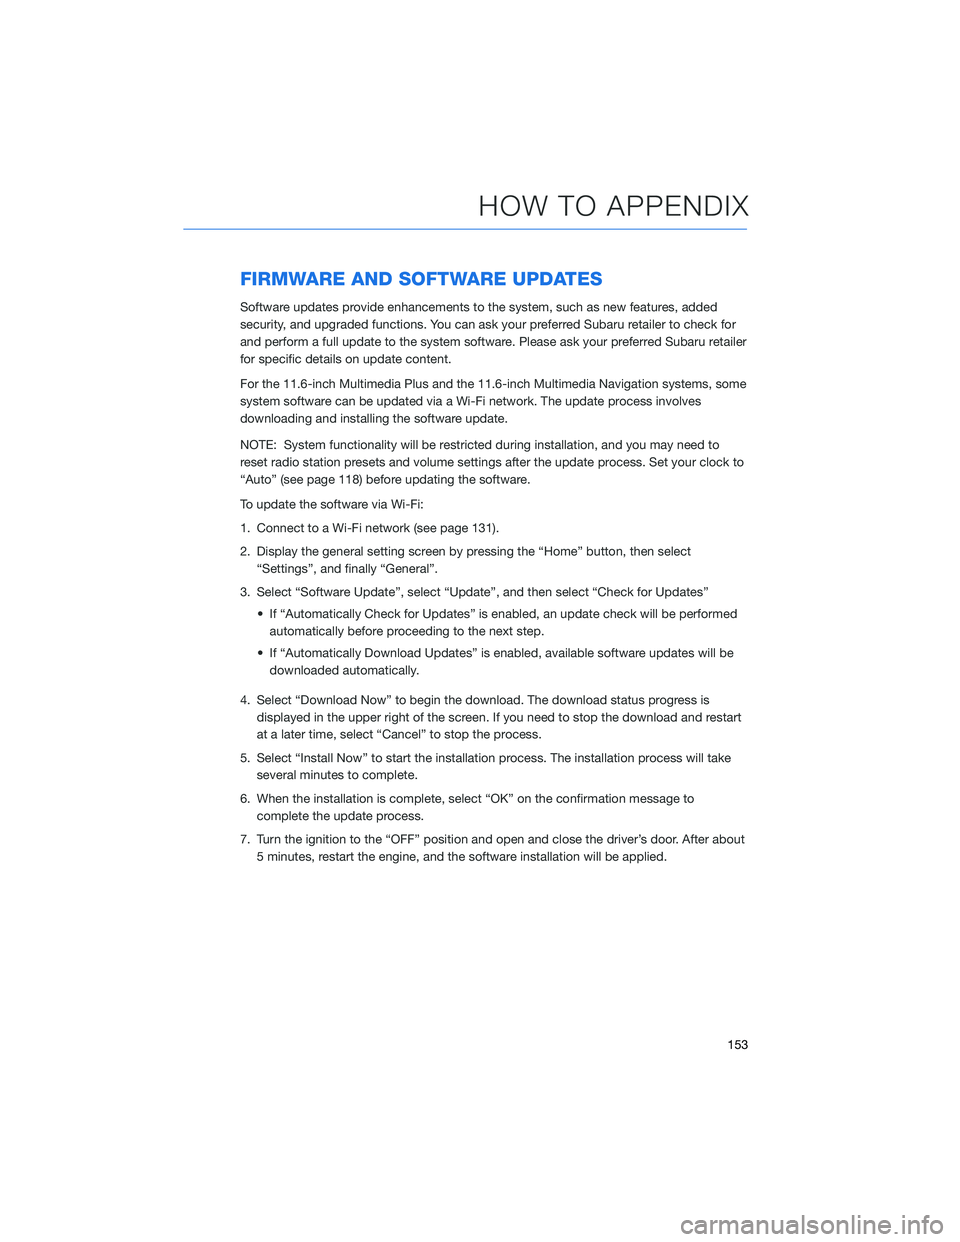
FIRMWARE AND SOFTWARE UPDATES
Software updates provide enhancements to the system, such as new features, added
security, and upgraded functions. You can ask your preferred Subaru retailer to check for
and perform a full update to the system software. Please ask your preferred Subaru retailer
for specific details on update content.
For the 11.6-inch Multimedia Plus and the 11.6-inch Multimedia Navigation systems, some
system software can be updated via a Wi-Fi network. The update process involves
downloading and installing the software update.
NOTE: System functionality will be restricted during installation, and you may need to
reset radio station presets and volume settings after the update process. Set your clock to
“Auto” (see page 118) before updating the software.
To update the software via Wi-Fi:
1. Connect to a Wi-Fi network (see page 131).
2. Display the general setting screen by pressing the “Home” button, then select
“Settings”, and finally “General”.
3. Select “Software Update”, select “Update”, and then select “Check for Updates”
• If “Automatically Check for Updates” is enabled, an update check will be performed
automatically before proceeding to the next step.
• If “Automatically Download Updates” is enabled, available software updates will be
downloaded automatically.
4. Select “Download Now” to begin the download. The download status progress is
displayed in the upper right of the screen. If you need to stop the download and restart
at a later time, select “Cancel” to stop the process.
5. Select “Install Now” to start the installation process. The installation process will take
several minutes to complete.
6. When the installation is complete, select “OK” on the confirmation message to
complete the update process.
7. Turn the ignition to the “OFF” position and open and close the driver’s door. After about
5 minutes, restart the engine, and the software installation will be applied.
HOW TO APPENDIX
153
Page 157 of 164

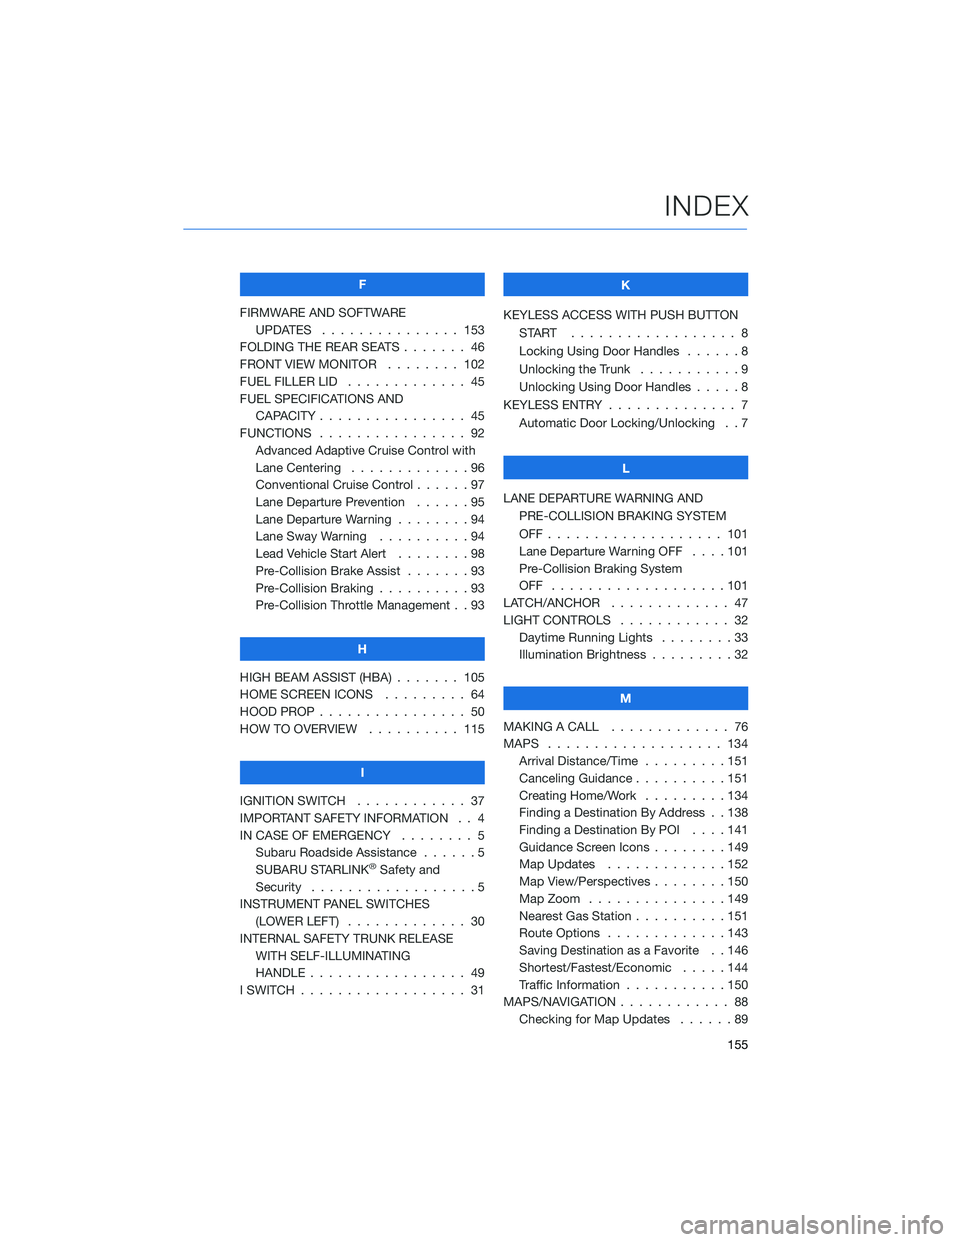
F
FIRMWARE AND SOFTWARE
UPDATES . . . ............ 153
FOLDING THE REAR SEATS....... 46
FRONT VIEW MONITOR . . . . . . . . 102
FUEL FILLER LID . . . .......... 45
FUEL SPECIFICATIONS AND
CAPACITY . . . . ............ 45
FUNCTIONS . . . . ............ 92
Advanced Adaptive Cruise Control with
Lane Centering . . . . . ........96
Conventional Cruise Control......97
Lane Departure Prevention . . . . . . 95
Lane Departure Warning . . . . . . . . 94
Lane Sway Warning..........94
Lead Vehicle Start Alert . . . . . . . . 98
Pre-Collision Brake Assist.......93
Pre-Collision Braking..........93
Pre-Collision Throttle Management . . 93
H
HIGH BEAM ASSIST (HBA) . . . . . . . 105
HOME SCREEN ICONS . . . . . . . . . 64
HOOD PROP . . . . ............ 50
HOW TO OVERVIEW .......... 115
I
IGNITION SWITCH . ........... 37
IMPORTANT SAFETY INFORMATION . . 4
IN CASE OF EMERGENCY . . . . . . . . 5
Subaru Roadside Assistance . . . . . . 5
SUBARU STARLINK
®Safety and
Security . . . . . . . . . .........5
INSTRUMENT PANEL SWITCHES
(LOWER LEFT) . . . . . . . . . . . . . 30
INTERNAL SAFETY TRUNK RELEASE
WITH SELF-ILLUMINATING
HANDLE . . . . . . ........... 49
I SWITCH . . . . . . . ........... 31K
KEYLESS ACCESS WITH PUSH BUTTON
START .................. 8
Locking Using Door Handles ......8
Unlocking the Trunk . ..........9
Unlocking Using Door Handles .....8
KEYLESS ENTRY . ............. 7
Automatic Door Locking/Unlocking . . 7
L
LANE DEPARTURE WARNING AND
PRE-COLLISION BRAKING SYSTEM
OFF................... 101
Lane Departure Warning OFF....101
Pre-Collision Braking System
OFF ...................101
LATCH/ANCHOR . . ........... 47
LIGHT CONTROLS . ........... 32
Daytime Running Lights . .......33
Illumination Brightness . ........32
M
MAKING A CALL . . . .......... 76
MAPS . . . ................ 134
Arrival Distance/Time.........151
Canceling Guidance . . ........151
Creating Home/Work.........134
Finding a Destination By Address . . 138
Finding a Destination By POI . . . . 141
Guidance Screen Icons . .......149
Map Updates .............152
Map View/Perspectives . . . .....150
Map Zoom . . . . . . . . . ......149
Nearest Gas Station ..........151
Route Options . . . . . . . ......143
Saving Destination as a Favorite . . 146
Shortest/Fastest/Economic .....144
Traffic Information . ..........150
MAPS/NAVIGATION . . . ......... 88
Checking for Map Updates......89
INDEX
155