Page 15 of 124
8Cruise Control or Adaptive Cruise Control (p. 17)
9 Multi-Function Display (MFD) (p. 18)
10 Windshield Wipers (p. 20)
11 SUBARU STARLINK
®Multimedia Touchscreen (p. 50)
12 Climate Control System (p. 29)
13 Shifter (MT) or CVT Select Lever (p. 36)
14 Parking Brake
INSTRUMENT PANEL
13
Page 17 of 124
WARNING AND INDICATOR LIGHTS
Redlights indicate immediate attention is required. Some examples are:
Seatbelt warning Door openBrake system
Yellow lights indicate caution. Some examples are:
Low fuel Engine low oil level
warning light Tire pressure
warning light
Green andblue lights are for information. Some examples are:
Headlight indicator light Cold coolant temperature High beam
indicator light
GAUGES AND WARNING LIGHTS
15
Page 22 of 124

Daytime Running Lights
The daytime running lights automatically turn on when the engine is running, the parking
brake is fully released, the select lever is out of the “P” position (CVT models), and the light
switch is set to Off, “AUTO” (if equipped), or “
”. Always turn on the headlights when
it’s dark outside by rotating the dial to the “
” or “AUTO” position.
TURN SIGNALS
Push fully up for the right turn signal and fully
down for the left turn signal. Your Subaru also
has a one-touch lane changer feature: push
slightly up and release to signal a right lane
change or push slightly down and release to
signal a left lane change.
WINDSHIELD WIPERS
1 Intermittent: Push the wiper control lever
down one position for intermittent
operation. When the lever is in the
intermittent position, you can rotate the
dial to adjust the operating interval of the
wipers.
2 Low Speed: Push the wiper control lever
down two positions for low speed wiper
operation.
3 High Speed: Push the wiper control lever
down three positions for high speed wiper operation.
4 Mist: Push the wiper up from the OFF position for a single wipe.
5 Windshield Washer: Pull the lever toward you to wash the windshield. The washer
will spray and the wipers will operate while you pull the lever.
CONTROLS
20
Page 24 of 124

3Automatic Illumination: When the switch is in the “DOOR” position, the map lights
illuminate when any door is opened, the doors are unlocked using the remote keyless
entry system or keyless access function, or the ignition is turned from “ON” or “ACC”
to “LOCK”/“OFF”.
4 Lane Departure Warning OFF Switch: Press and hold this switch for two seconds to
turn off Lane Departure Warning and Lane Sway Warning. Press and hold the switch
again for two seconds to turn the systems back on.
For more information, please refer to page 86 in this Getting Started Guide or
“Lane Departure Warning” in your EyeSight®Owner’s Manual.
5 Pre-Collision Braking System OFF Switch: Press and hold this switch for two
seconds to turn off the Pre-Collision Braking System (including Pre-Collision Brake
Assist) and Pre-Collision Throttle Management. Press and hold the switch again for
two seconds to turn the systems back on.
For more information, please refer to page 86 in this Getting Started Guide or
“Pre-Collision Braking System” in your EyeSight®Owner’s Manual.
6 Map Lights: Press a map light to turn it on or off.
7 Power Moonroof Switch: Operate these switches to tilt and slide the moonroof.
For more information, please refer to page 28 in this Getting Started Guide or
“Keys and Doors” in your Owner’s Manual.
CONTROLS
22
Page 37 of 124

IGNITION SWITCH
The ignition switch has four positions:
LOCK:You can only insert or remove the key in this position.
ACC (Accessory): Provides power to the audio system and accessory power outlets.
ON: All electrical systems are available. The key returns to this position after starting the
engine.
START: Turn the key to this position to start the engine.
PUSH-BUTTON IGNITION SWITCH (if equipped)
Each time you press the ignition switch without
depressing the brake pedal (or clutch pedal for manual
transmission vehicles), the ignition position will change
as follows: ACC, ON, OFF.
ACC (Accessory):Provides power to the audio
system and accessory power outlets. Orange indicator
illuminates.
ON: All electrical systems are available. Orange indicator illuminates.
OFF: Power off and indicator off.
STARTING THE VEHICLE
Without Push-button Ignition
To start the engine:
1. Make sure the select lever is in the “P” position (or neutral position and depress the
clutch for manual transmission vehicles).
2. Using the key, turn the ignition switch to “START”.
NOTE:
Do not depress the accelerator pedal. Release the key as soon as the engine starts.
With Push-button Ignition
To start the engine:
1. Sit in the driver’s seat with the access key fob.
2. Make sure the select lever is in the “P” position or neutral for manual transmission vehicles.
3. Depress the brake pedal (and clutch pedal for manual transmission vehicles).
4. When the Engine START/STOP button indicator turns green, briefly press and release the Engine START/STOP button.
OPERATING THE VEHICLE
35
Page 40 of 124

TURNING OFF THE VEHICLE
Without Push-button Ignition
To stop the engine:
1. Stop your Subaru completely.
2. Move the select lever to the “P” position or set the parking brake for manualtransmission vehicles.
3. Turn the ignition switch to LOCK/OFF. For manual transmission vehicles, it is recommended to leave the vehicle in gear (1st gear for an upgrade and reverse for a
downgrade).
NOTE: The front windows will remain active for about 40 seconds, and the SUBARU
STARLINK
®Multimedia System will remain on for about three minutes, or until a front door
is opened, whichever occurs first.
With Push-button Ignition
To stop the engine:
1. Stop your Subaru completely.
2. Move the select lever to the “P” position or set the parking brake for manual transmission vehicles.
3. Press the ignition switch to stop the engine. For manual transmission vehicles, it is recommended to leave the vehicle in gear (1st gear for an upgrade and reverse for a
downgrade).
NOTE: The front windows will remain active for about 40 seconds, and the SUBARU
STARLINK
®Multimedia System will remain on for about three minutes, or until a front door
is opened, whichever occurs first.
OPERATING THE VEHICLE
38
Page 48 of 124
2.0L ENGINE
1Brake Fluid Reservoir/Clutch Fluid
Reservoir (MT Models)
2 Fuse Box
3 Battery
4 Windshield Washer Tank
5 Radiator Cap 6
Engine Oil Filler Cap
7 Engine Coolant Reservoir
8 Engine Oil Filter
9 Engine Oil Dipstick
10 Air Cleaner Element
The table below lists recommended first service items. Your maintenance needs may
vary depending on your driving conditions. Please consult with your retailer and refer to
the Warranty and Maintenance Booklet for complete information and recommended
replacement intervals.
Maintenance Item Maintenance Interval
6 months or
6,000 Miles 12 months
or
12,000 Miles
Replace Engine Oil and Filter • •
Rotate and Inspect Tires • •
Replace HVAC System A/C filter •
Inspect Clutch Operation (Manual
Transmission) •
Inspect Brake System, Steering
System, and Suspension Components •
ENGINE COMPARTMENT
46
Page 81 of 124

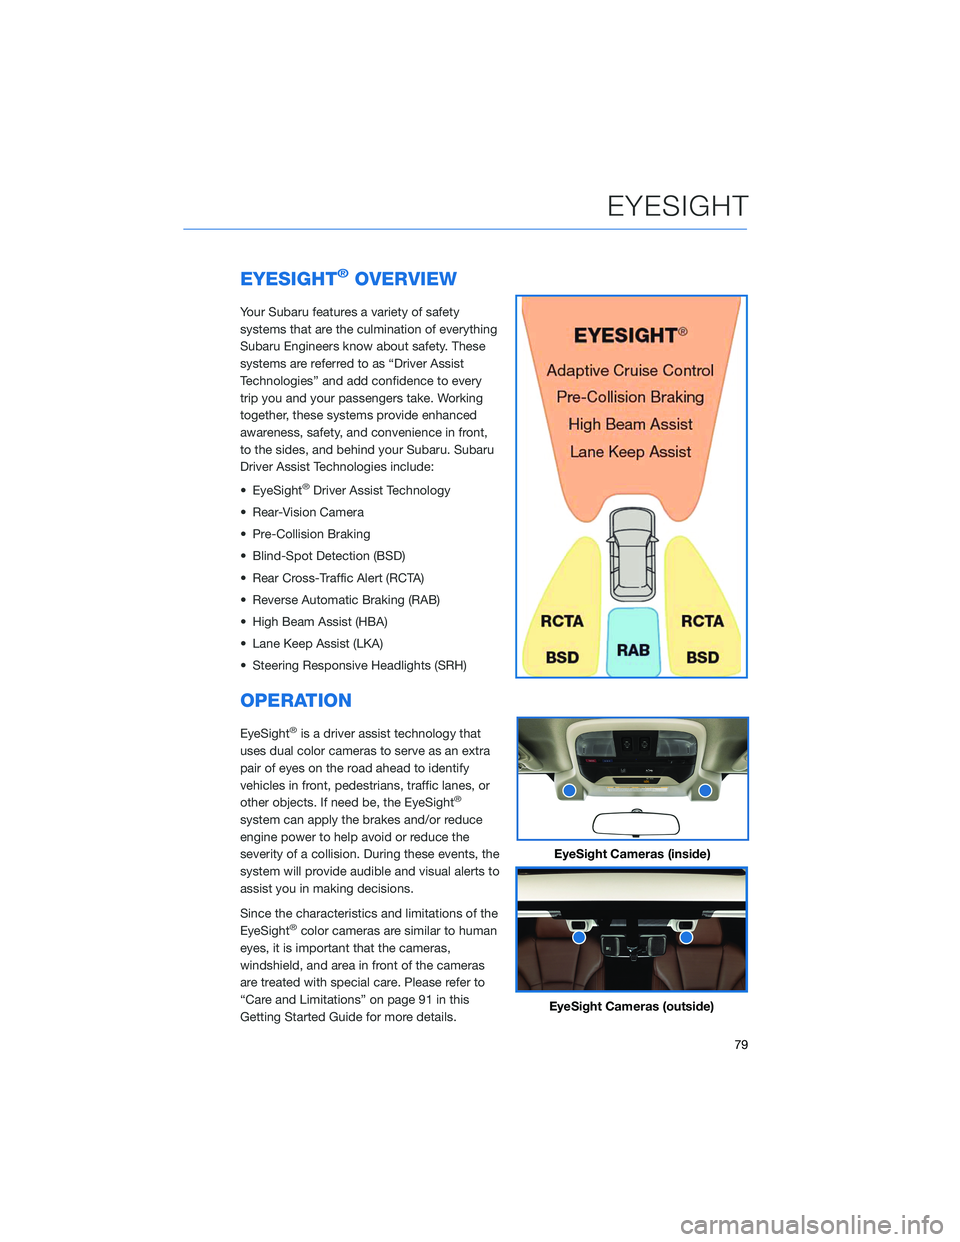
EYESIGHT®OVERVIEW
Your Subaru features a variety of safety
systems that are the culmination of everything
Subaru Engineers know about safety. These
systems are referred to as “Driver Assist
Technologies” and add confidence to every
trip you and your passengers take. Working
together, these systems provide enhanced
awareness, safety, and convenience in front,
to the sides, and behind your Subaru. Subaru
Driver Assist Technologies include:
• EyeSight
®Driver Assist Technology
• Rear-Vision Camera
• Pre-Collision Braking
• Blind-Spot Detection (BSD)
• Rear Cross-Traffic Alert (RCTA)
• Reverse Automatic Braking (RAB)
• High Beam Assist (HBA)
• Lane Keep Assist (LKA)
• Steering Responsive Headlights (SRH)
OPERATION
EyeSight®is a driver assist technology that
uses dual color cameras to serve as an extra
pair of eyes on the road ahead to identify
vehicles in front, pedestrians, traffic lanes, or
other objects. If need be, the EyeSight
®
system can apply the brakes and/or reduce
engine power to help avoid or reduce the
severity of a collision. During these events, the
system will provide audible and visual alerts to
assist you in making decisions.
Since the characteristics and limitations of the
EyeSight
®color cameras are similar to human
eyes, it is important that the cameras,
windshield, and area in front of the cameras
are treated with special care. Please refer to
“Care and Limitations” on page 91 in this
Getting Started Guide for more details.
EyeSight Cameras (inside)
EyeSight Cameras (outside)
EYESIGHT
79