2022 SUBARU FORESTER tow
[x] Cancel search: towPage 3 of 156

PURPOSE OF THIS GUIDE
WELCOME................. 4
IMPORTANT SAFETY
INFORMATION .............. 4
OWNER’S RESOURCES ....... 4
IN CASE OF EMERGENCY ..... 5
TOWING YOUR ALL-WHEEL
DRIVE SUBARU ............. 6
ENTRY AND EXIT
KEYLESS ENTRY ............ 7
KEYLESS ACCESS WITH PUSH
BUTTON START ............. 9
POWER REAR GATE (PRG) ....11
INSTRUMENT PANEL........14
GAUGES AND WARNING
LIGHTS
COMBINATION METER .......16
WARNING AND INDICATOR
LIGHTS ....................17
CONTROLS
INSTRUMENT PANEL SWITCHES
(LOWER LEFT) ..............18
AUDIO CONTROLS ...........18
ADVANCED ADAPTIVE CRUISE
CONTROL .................19
i/SET SWITCH ...............19
INFO SWITCH ...............20
LIGHT CONTROLS ...........20
TURN SIGNALS .............21
WINDSHIELD WIPERS ........22
REAR WINDOW WIPER .......22
OVERHEAD CONSOLE ........23
GETTING COMFORTABLE
SEATING...................25
TILT AND TELESCOPIC
STEERING COLUMN .........27
POWER EXTERIOR MIRRORS . . 28
REAR VIEW MIRROR .........29
POWER WINDOWS ..........30
POWER MOONROOF ........30
CLIMATE CONTROL ..........31
ACCESSORY CONNECTIONS . . 38
TABLE OF CONTENTS
Page 4 of 156

OPERATING THE VEHICLE
IGNITION SWITCH...........39
PUSH-BUTTON IGNITION
SWITCH ...................39
STARTING THE VEHICLE ......39
DRIVING THE VEHICLE .......40
AUTO START–STOP .........42
ELECTRONIC PARKING BRAKE
(EPB) .....................44
X-MODE
®..................45
TURNING OFF THE VEHICLE ...48
REFUELING
FUEL FILLER LID............49
FUEL SPECIFICATIONS AND
CAPACITY ..................49
PASSENGER/CARGO AREAS
FOLDING THE REAR SEATS ...50
CHILD SAFETY LOCKS .......50
LATCH/ANCHOR ............51
REAR SEAT REMINDER .......52
CARGO AREA AND COVER ...53
SPARE TIRE AND JACK .......53
ENGINE COMPARTMENT
HOOD PROP................54
2.5 L ENGINE ...............55
ADDITIONAL SPECIFICATIONS
NEW VEHICLE BREAK-IN ......56
ENGINE OIL ................56
ENGINE OIL CAPACITY .......56
ROOF RAIL CAPACITY .......57
TRAILER TOWING CAPACITY . . 57
TIRE PRESSURE MONITORING
SYSTEM (TPMS) .............58
STARLINK OVERVIEW
OVERVIEW OF YOUR
MULTIMEDIA SYSTEM ........60
BUTTONS ..................60
TOUCHSCREEN .............62
STEERING WHEEL CONTROLS . 63
VOICE RECOGNITION ........64
STARLINK HOME
HOME SCREEN ICONS .......66
REARRANGING ICONS .......66
ADDING SHORTCUTS ........67
DRIVER PROFILE
CREATING A DRIVER PROFILE . . 68
MULTIMEDIA
RADIO.....................70
MEDIA .....................71
PHONE
PAIRING A PHONE ...........72
MAKING A CALL .............72
RECEIVING A CALL ..........73
TEXT MESSAGES ............74
APPS
SUBARU STARLINK®
IN-VEHICLE APPS ...........75
SUBARU STARLINK®
MOBILE APP ................77
MYSUBARU ................77
MAPS (if equipped)
MAPS OVERVIEW ............79
CREATING HOME AND
WORK PROFILES ............79
STARLINK SAFETY AND
SECURITY
SAFETY AND SECURITY
OVERVIEW.................80
ENROLLMENT ..............81
MYSUBARU INTEGRATION ....82
SUBARU STARLINK
®
WI-FI HOTSPOT .............82
SETTINGS AND UPDATES
SETTINGS AND UPDATES
OVERVIEW.................83
SOUND ....................84
PHONE ....................84
MAPS/NAVIGATION ..........85
CLOCK ....................87
TABLE OF CONTENTS
2
Page 7 of 156

IN CASE OF EMERGENCY
SUBARU STARLINK®Safety and Security(subscription required)
SOS Emergency:Press the red
“SOS” button on the overhead
console in the event of an
emergency to speak with a
SUBARU STARLINK
®Customer
Care Advisor.
Enhanced Roadside Assistance:
Press the blue “i” button on the
overhead console or select the
“Roadside Assistance” option in
the “MySubaru” menu on the
multimedia system.
For more information, please
refer to “Safety and Security
Overview” on page 80 in this
Getting Started Guide or “Introduction” in your SUBARU STARLINK
®Safety and Security
Owner’s Manual. Not available in all states. See retailer for details.
Subaru Roadside Assistance
Subaru Roadside Assistance:
1-800-261-2155
Subaru Roadside Assistance is free and standard on your Subaru; there are no forms to
complete. This service is available anytime during the 3-year/36,000-mile Subaru Limited
Warranty, whichever comes first. See your retailer for details and refer to the Roadside
Assistance guide in the owner’s information kit for the details on this coverage. A Subaru
Roadside Assistance decal has been affixed to the driver’s door window.
Roadside assistance helps with:
• Towing to the nearest authorized Subaru retailer if you cannot safely drive your Subaru
• Jump-start if your battery is dead
• Gasoline delivery if you run out of gas
• Flat tire change to install your spare
• Emergency lockout service
• National Subaru retailer locator service, with phone numbers and location of the nearest retailer anywhere in the U.S. or Canada
NOTE: Specifically excluded from Subaru Roadside Assistance coverage are service
requests or claims resulting from: accidents, vandalism, acts of God, violation of any laws,
or vehicle modifications not recommended by the manufacturer.
SOS and Roadside Assistance Buttons
PURPOSE OF THIS GUIDE
5
Page 8 of 156

TOWING YOUR ALL-WHEEL DRIVE SUBARU
Since Subaru Symmetrical All-Wheel Drive distributes power to all four wheels, improper
towing may damage your AWD system. The best way to tow your Forester is with a flatbed
truck by your Subaru retailer or a commercial towing service.
For more information, please refer to “In Case of Emergency” in your Owner’s Manual.
PURPOSE OF THIS GUIDE
6
Page 22 of 156

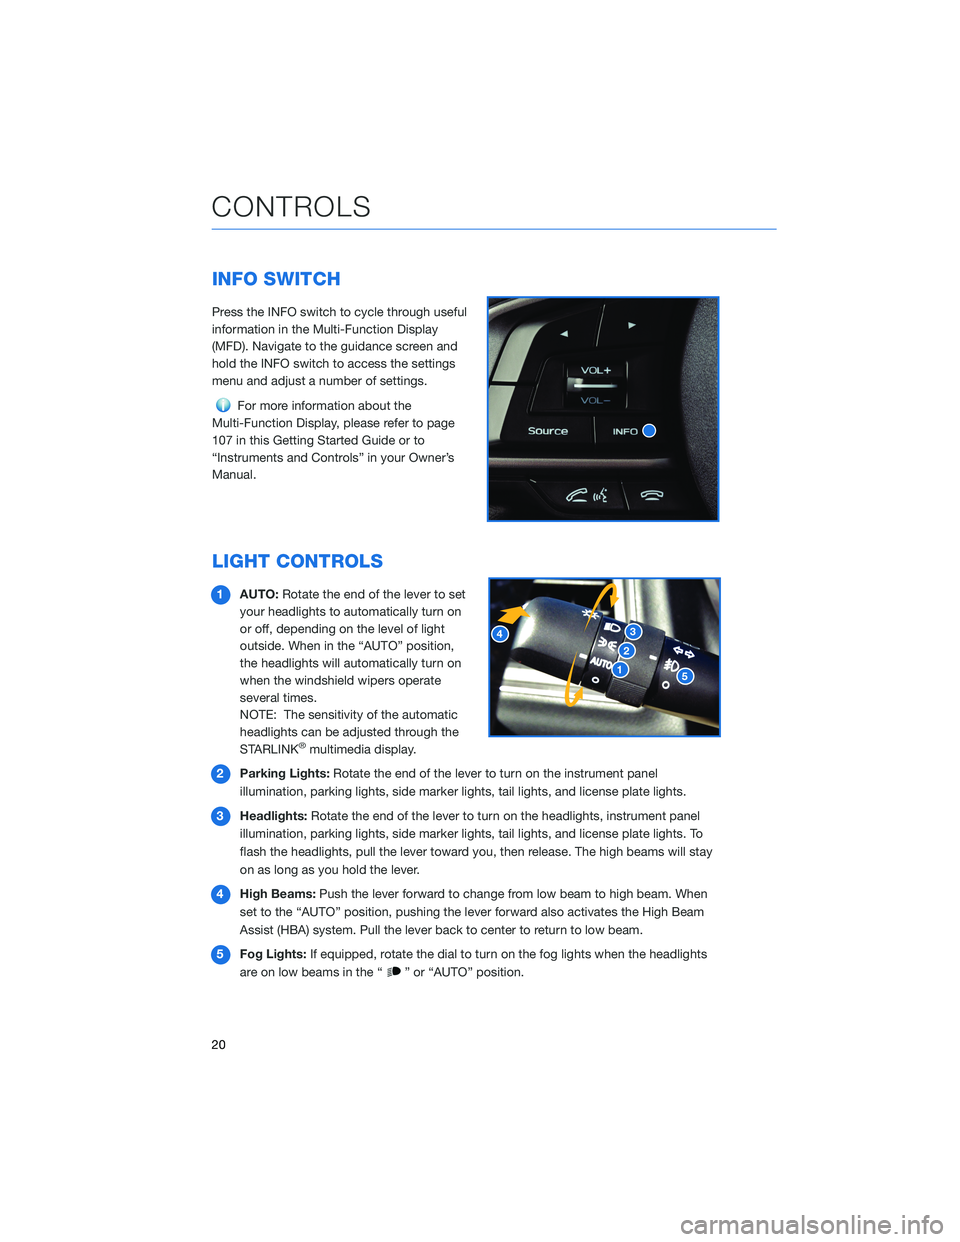
INFO SWITCH
Press the INFO switch to cycle through useful
information in the Multi-Function Display
(MFD). Navigate to the guidance screen and
hold the INFO switch to access the settings
menu and adjust a number of settings.
For more information about the
Multi-Function Display, please refer to page
107 in this Getting Started Guide or to
“Instruments and Controls” in your Owner’s
Manual.
LIGHT CONTROLS
1 AUTO: Rotate the end of the lever to set
your headlights to automatically turn on
or off, depending on the level of light
outside. When in the “AUTO” position,
the headlights will automatically turn on
when the windshield wipers operate
several times.
NOTE: The sensitivity of the automatic
headlights can be adjusted through the
STARLINK
®multimedia display.
2 Parking Lights: Rotate the end of the lever to turn on the instrument panel
illumination, parking lights, side marker lights, tail lights, and license plate lights.
3 Headlights: Rotate the end of the lever to turn on the headlights, instrument panel
illumination, parking lights, side marker lights, tail lights, and license plate lights. To
flash the headlights, pull the lever toward you, then release. The high beams will stay
on as long as you hold the lever.
4 High Beams: Push the lever forward to change from low beam to high beam. When
set to the “AUTO” position, pushing the lever forward also activates the High Beam
Assist (HBA) system. Pull the lever back to center to return to low beam.
5 Fog Lights: If equipped, rotate the dial to turn on the fog lights when the headlights
are on low beams in the “
” or “AUTO” position.
CONTROLS
20
Page 24 of 156

WINDSHIELD WIPERS
1Intermittent:Push the wiper control lever
down one position for intermittent operation.
When the lever is in the intermittent position,
you can rotate the dial to adjust the
operating interval of the wipers.
2 Low Speed: Push the wiper control lever
down two positions for low speed wiper
operation.
3 High Speed: Push the wiper control lever
down three positions for high speed
wiper operation.
4 Mist: Push the wiper up from the OFF position for a single wipe.
5 Windshield Washer: Pull the lever toward you to wash the windshield. The washer
will spray and the wipers will operate while you pull the lever.
REAR WINDOW WIPER
Rotate the end of the lever up one position for
intermittent, or two positions for continuous
operation.
When the lever in is the intermittent position,
the wiper operates at intervals corresponding
with vehicle speed. When you move the select
lever to the “R” position, the wiper will switch
to continuous operation. It will return to
intermittent operation when you move the
select lever out of “R”.
Rotate the dial up from the continuous
operation position or down from the off
position to spray washer fluid. The washer sprays and wiper operates until you release the
dial, and then returns to the previous position.
Rear-vision Camera Washer
To help keep your vision clear, your Subaru
comes equipped with a Rear-vision Camera
Washer. To clean the Rear-vision Camera,
simply use the rear window washer.
For more information about the
Rear-vision Camera and Rear-vision Camera
Washer, please refer to page 101 in this
Getting Started Guide or “Instruments and
Controls” in your Owner’s Manual.
CONTROLS
22
Page 43 of 156

Paddle Shift Control Switches(if equipped)
You can shift gears using the
paddle shift control switches.
To upshift to the next higher gear,
pull the “+” paddle on the right
toward you. To downshift to the
next lower gear, pull the “–”
paddle on the left toward you.
You can temporarily shift gears
even when the select lever is in
the “D” position by pulling either
the “+” or “–” paddle toward you.
Once vehicle speed stabilizes, the
transmission will switch back to
normal mode.
SI-DRIVE
Subaru Intelligent Drive (SI-Drive) has
2 possible mode combinations: Intelligent (I)
and Sport (S) or Intelligent (I) and Sport Sharp
(S#). Each mode is designed for different types
of driving:
Intelligent:
The Intelligent (I) mode provides well balanced performance with greater fuel efficiency and
smooth driveability without stress. Power delivery is moderate during acceleration for
maximum fuel efficiency.
Sport:
The Sport (S) mode provides the engine power desired by those who want to make the
driving experience their own personal adventure.
Sport Sharp:
The Sport Sharp (S#) mode offers an exhilarating level of engine performance and control.
The throttle becomes more responsive regardless of the engine speed. Delivering
maximum driving enjoyment, this mode is ideal for driving on twisting roads and for
merging or overtaking other vehicles on the freeway with confidence.
SI-Drive Switches
OPERATING THE VEHICLE
41
Page 51 of 156

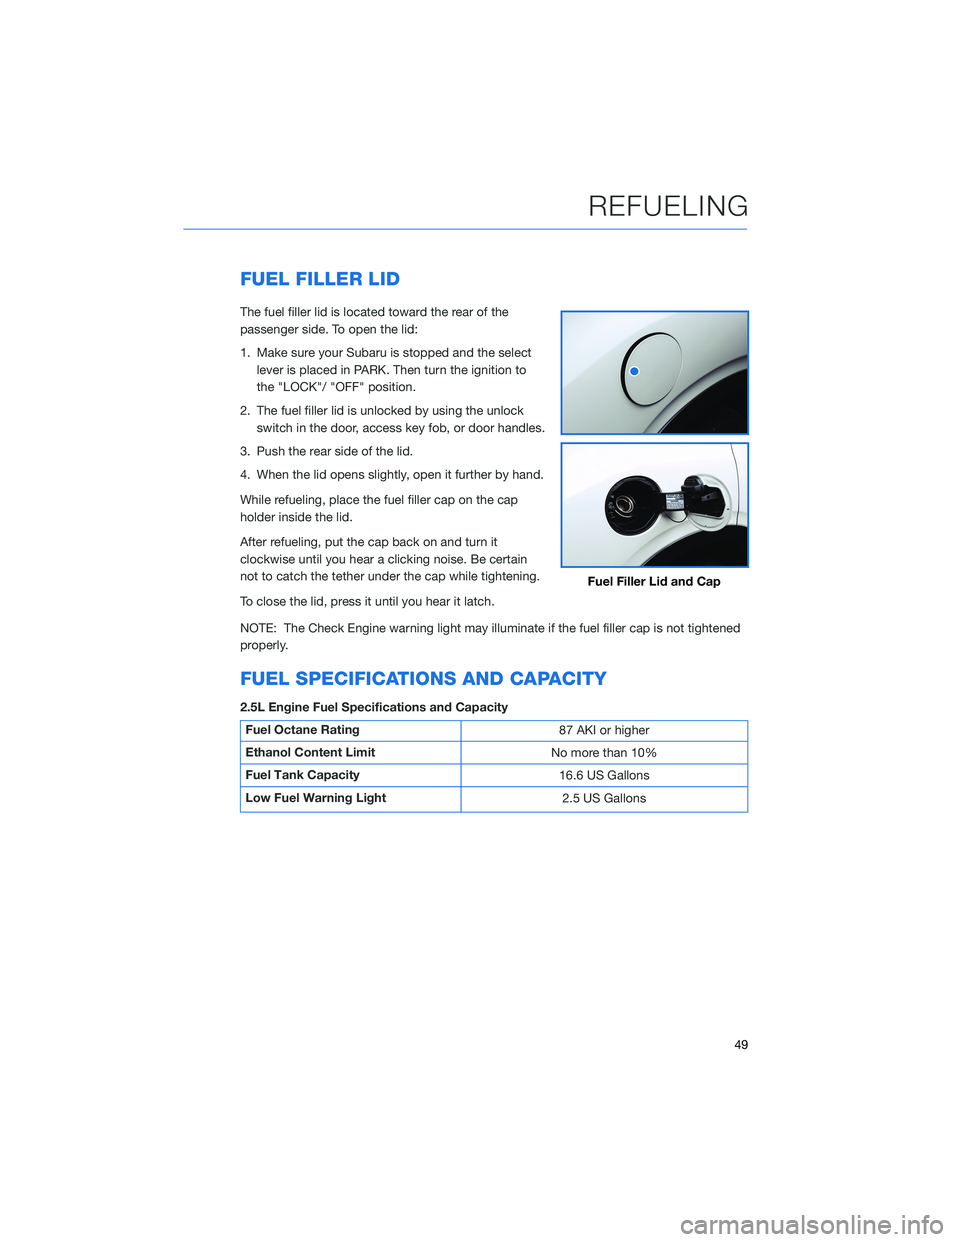
FUEL FILLER LID
The fuel filler lid is located toward the rear of the
passenger side. To open the lid:
1. Make sure your Subaru is stopped and the selectlever is placed in PARK. Then turn the ignition to
the "LOCK"/ "OFF" position.
2. The fuel filler lid is unlocked by using the unlock switch in the door, access key fob, or door handles.
3. Push the rear side of the lid.
4. When the lid opens slightly, open it further by hand.
While refueling, place the fuel filler cap on the cap
holder inside the lid.
After refueling, put the cap back on and turn it
clockwise until you hear a clicking noise. Be certain
not to catch the tether under the cap while tightening.
To close the lid, press it until you hear it latch.
NOTE: The Check Engine warning light may illuminate if the fuel filler cap is not tightened
properly.
FUEL SPECIFICATIONS AND CAPACITY
2.5L Engine Fuel Specifications and Capacity
Fuel Octane Rating 87 AKI or higher
Ethanol Content Limit No more than 10%
Fuel Tank Capacity 16.6 US Gallons
Low Fuel Warning Light 2.5 US Gallons
Fuel Filler Lid and Cap
REFUELING
49