Page 39 of 156
Heated Seats(if equipped)
The heated seat switches are
located between the driver and
passenger seats. There is a
separate switch for the driver and
passenger. Press the “HI” button
for more rapid heating or press
the “LO” button for normal
heating. Return the switch to the
center position to turn off the
heated seat.
Rear Heated Seats (if equipped)
There are separate heated seat
switches for each side on the rear
center console. Press the switch
to activate the heated seat. The
heating mode changes to High,
Low, and Off each time you press
the switch, and yellow indictors
illuminate indicating the level.
Heated Steering Wheel (if equipped)
To activate, pull the heated steering wheel switch with
the ignition in “ON” or “ACC”. The indicator light on
the switch illuminates. To deactivate, pull the switch
again. The heater will stay on for approximately
30 minutes.
Heated Seat Switches
GETTING COMFORTABLE
37
Page 41 of 156

IGNITION SWITCH
The ignition switch has four positions:
LOCK:You can only insert or remove the key in this position.
ACC (Accessory): Provides power to the audio system and accessory power outlets.
ON: All electrical systems are available. The key returns to this position after starting the
engine.
START: Turn the key to this position to start the engine.
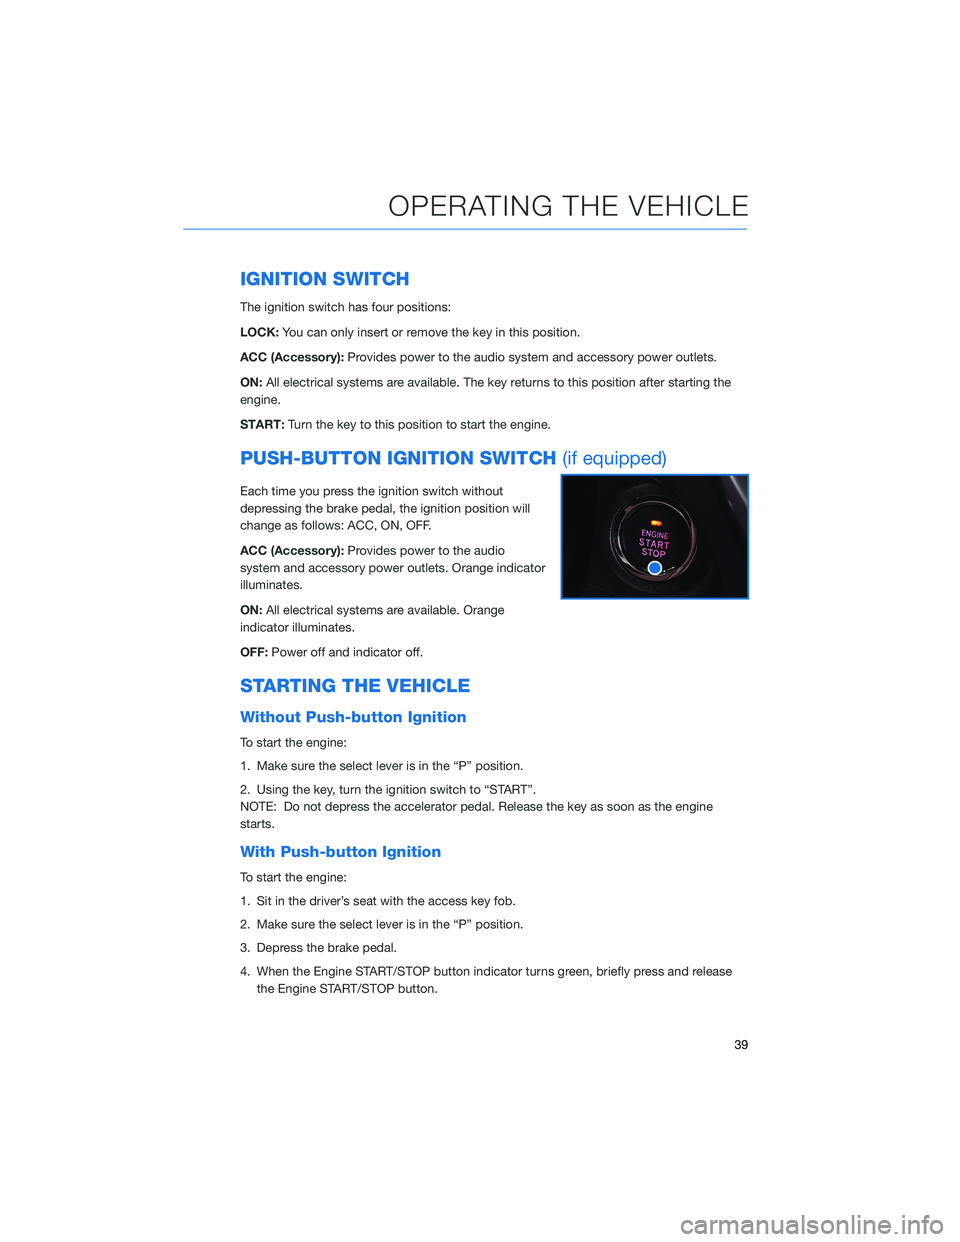
PUSH-BUTTON IGNITION SWITCH (if equipped)
Each time you press the ignition switch without
depressing the brake pedal, the ignition position will
change as follows: ACC, ON, OFF.
ACC (Accessory):Provides power to the audio
system and accessory power outlets. Orange indicator
illuminates.
ON: All electrical systems are available. Orange
indicator illuminates.
OFF: Power off and indicator off.
STARTING THE VEHICLE
Without Push-button Ignition
To start the engine:
1. Make sure the select lever is in the “P” position.
2. Using the key, turn the ignition switch to “START”.
NOTE: Do not depress the accelerator pedal. Release the key as soon as the engine
starts.
With Push-button Ignition
To start the engine:
1. Sit in the driver’s seat with the access key fob.
2. Make sure the select lever is in the “P” position.
3. Depress the brake pedal.
4. When the Engine START/STOP button indicator turns green, briefly press and release
the Engine START/STOP button.
OPERATING THE VEHICLE
39
Page 44 of 156

AUTO START–STOP
The Auto Start-Stop system is designed to automatically stop and
restart the engine when the vehicle is stationary for a short period of
time after the engine has warmed up (while waiting for a traffic light
or in a traffic jam, for example). The system operates in order to
reduce fuel consumption, exhaust emissions, and undesired idling
noise. You can learn more about using the Auto Start-Stop system
from the how-to video linked in the QR code and from the sections
below.
Auto Start-Stop System
ON/OFF
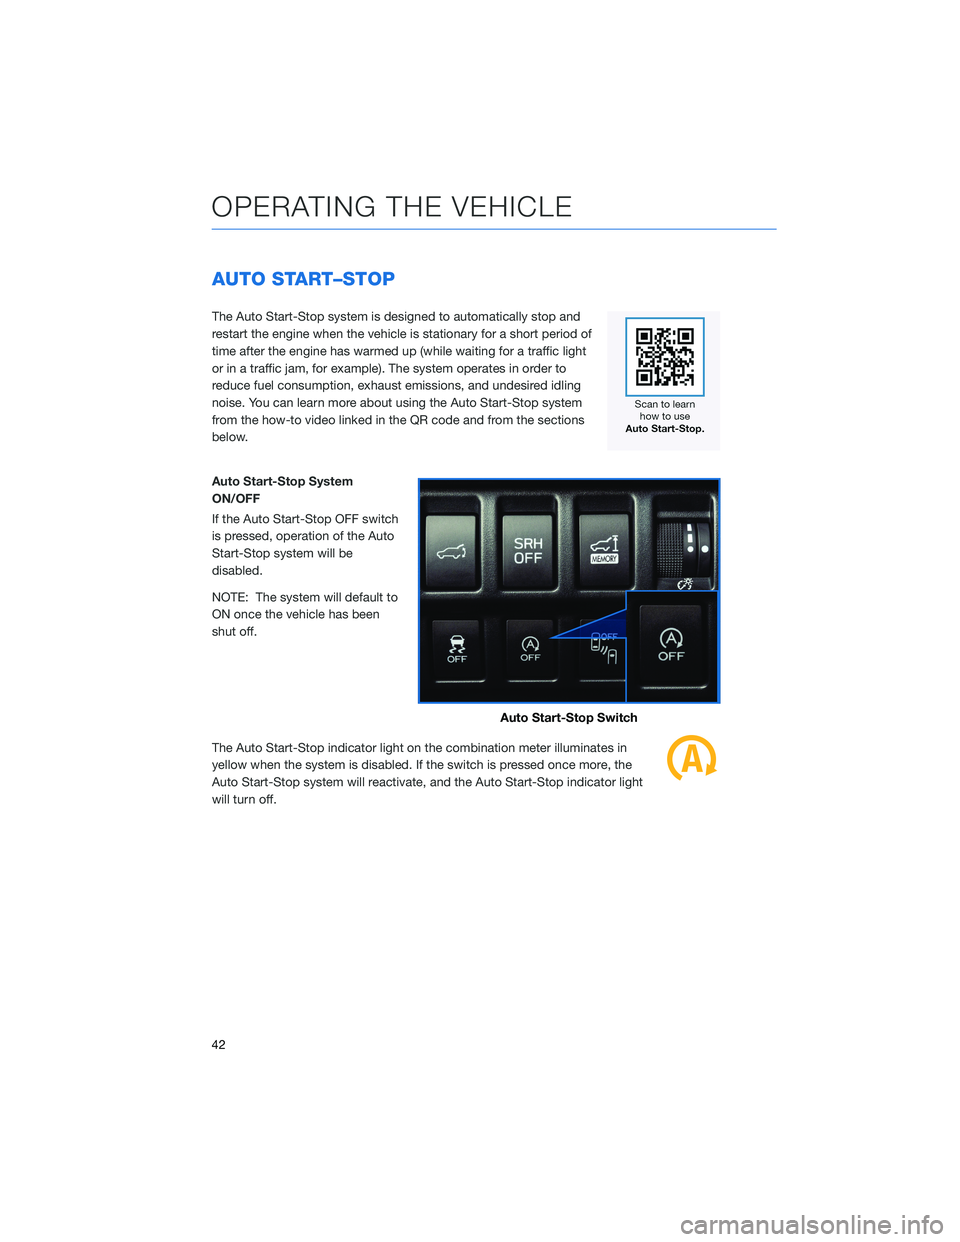
If the Auto Start-Stop OFF switch
is pressed, operation of the Auto
Start-Stop system will be
disabled.
NOTE: The system will default to
ON once the vehicle has been
shut off.
The Auto Start-Stop indicator light on the combination meter illuminates in
yellow when the system is disabled. If the switch is pressed once more, the
Auto Start-Stop system will reactivate, and the Auto Start-Stop indicator light
will turn off.
Auto Start-Stop Switch
OPERATING THE VEHICLE
42
Page 45 of 156

System Operation
So that it can be used safely and comfortably, the Auto Start-Stop system is designed to
constantly monitor vehicle conditions, the environment inside and outside the vehicle, as
well as driver operations, in order to control stopping and restarting the engine.
After the vehicle has been completely stopped by depressing the brake pedal
with the select lever in the “D” position, the engine will be automatically
stopped and the green indicator will illuminate in the combination meter.
If you release the brake pedal with the select lever kept in the “D” position, the
engine will be automatically restarted. The indicator light will turn off when the system
restarts the engine.
There are several operating conditions for this system to operate as intended.
For more information, please refer to “Starting and Operating” in your Owner’s
Manual.
Auto Start-Stop Screen
You can use the “i/Set” and arrow switches to
display the Auto Start-Stop Screen in the
Combination Meter Display (CMD), showing
how much time the engine was off in the top
line and the amount of fuel saved in the
bottom line. Displayed are the total stop time
and fuel saved since the trip meter was reset.
No Activity Detected Indicator Light
If the operational conditions are not met when the vehicle is stopped, the
engine will not stop and the white Auto Start-Stop No Activity Detected
indicator light will illuminate. It will turn off when the brake pedal is released.
OPERATING THE VEHICLE
43
Page 46 of 156

Auto Start-Stop Warning Light
The Auto Start-Stop warning light will illuminate in yellow when initially turning
the ignition switch to the “ON” position. The light will turn off after the engine
has started.
NOTE: If the Auto Start-Stop warning light does not turn off after the engine
has started or is flashing, the Auto Start-Stop system may be malfunctioning. We
recommend that you contact your authorized SUBARU retailer for an inspection.
INDICATOR PATTERN CONDITION
Solid green This indicator light illuminates when the engine has beentemporarily stopped by the Auto Start-Stop system.
It will turn off when the engine is restarted.
Solid White Operational conditions have not been met, the enginewill not stop and this light will illuminate. The light turns
off once the brake pedal is released.
Solid Yellow This light indicates that the system has been turned off.The light will turn off once the system is turned back on.
Flashing
Yellow A fault has been detected with the Start-Stop system.
Please contact your authorized Subaru Retailer.
ELECTRONIC PARKING BRAKE (EPB)
To apply the parking brake,
depress the brake pedal and pull
the parking brake switch up. The
indicator light on the parking
brake switch will illuminate and
“PARK” will appear in the
Combination Meter.
To release the parking brake
manually, depress the brake pedal
and push the parking brake
switch down with the ignition in
the “ON” position. To
automatically release the parking
brake, gently press the
accelerator pedal with the select lever in the “D” or “R” position.
NOTE: Automatic parking brake release will not work unless all the doors are closed and
your seatbelt is fastened.
OPERATING THE VEHICLE
44
Page 47 of 156

Auto Vehicle Hold (AVH)
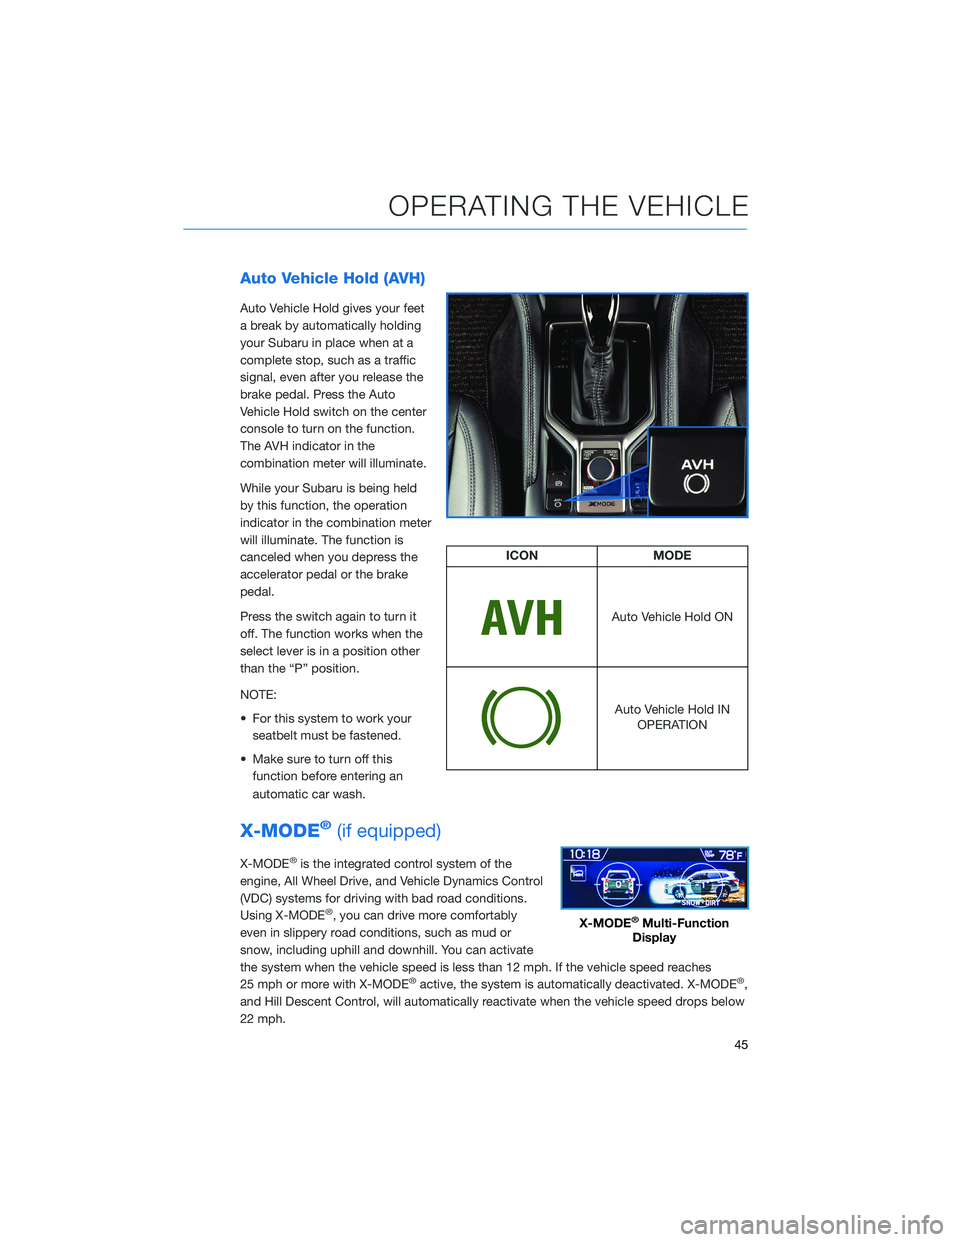
Auto Vehicle Hold gives your feet
a break by automatically holding
your Subaru in place when at a
complete stop, such as a traffic
signal, even after you release the
brake pedal. Press the Auto
Vehicle Hold switch on the center
console to turn on the function.
The AVH indicator in the
combination meter will illuminate.
While your Subaru is being held
by this function, the operation
indicator in the combination meter
will illuminate. The function is
canceled when you depress the
accelerator pedal or the brake
pedal.
Press the switch again to turn it
off. The function works when the
select lever is in a position other
than the “P” position.
NOTE:
• For this system to work yourseatbelt must be fastened.
• Make sure to turn off this function before entering an
automatic car wash.
X-MODE®(if equipped)
X-MODE®is the integrated control system of the
engine, All Wheel Drive, and Vehicle Dynamics Control
(VDC) systems for driving with bad road conditions.
Using X-MODE
®, you can drive more comfortably
even in slippery road conditions, such as mud or
snow, including uphill and downhill. You can activate
the system when the vehicle speed is less than 12 mph. If the vehicle speed reaches
25 mph or more with X-MODE
®active, the system is automatically deactivated. X-MODE®,
and Hill Descent Control, will automatically reactivate when the vehicle speed drops below
22 mph.
ICON MODE
Auto Vehicle Hold ON
Auto Vehicle Hold IN
OPERATION
X-MODE®Multi-Function
Display
OPERATING THE VEHICLE
45
Page 48 of 156
X-MODE®Standard System
To activate the X-MODE®system, press the X-MODE®switch.
While the system is active, the X-MODE®indicator appears, and the
Multi-Function Display shows vehicle posture and function
operation status. To deactivate X-MODE
®, press the X-MODE®
switch again.
In certain situations, such as navigating a vehicle
stuck in mud or snow, it may be helpful to allow more
wheel spin by turning off the Vehicle Dynamics Control
(VDC) system. To turn off the VDC system, turn the
Vehicle Dynamics Control OFF switch to the left. Turn
the Vehicle Dynamics Control OFF Switch back to
“Normal” to reactivate the VDC system.
X-Mode®Indicator
Standard
OPERATING THE VEHICLE
46
Page 49 of 156
X-MODE®Dual Mode System
To activate the X-MODE®system, turn the switch to
the left for SNOW/DIRT or to the right for
D.SNOW/MUD. While the system is active, the
X-MODE
®indicator appears, and the Multi-Function
Display shows vehicle posture and function operation
status. To deactivate X-MODE
®, press the X-MODE®
switch.
• SNOW/DIRT is suitable for driving on slippery road surfaces such as snow or gravel, where the points of contact between the tires
and road surface are visible.
• D.SNOW/MUD provides maximum torque from the engine and the optimal amount of slip in the driving wheels, enabling the
vehicle to free itself more effectively. It is suitable for driving on
roads where the tires can become buried, such as deep snow, dry
sand, or muddy roads.
Dual Mode
Snow/DirtIndicator
Deep Snow/Mud Indicator
OPERATING THE VEHICLE
47