Page 25 of 156
OVERHEAD CONSOLE
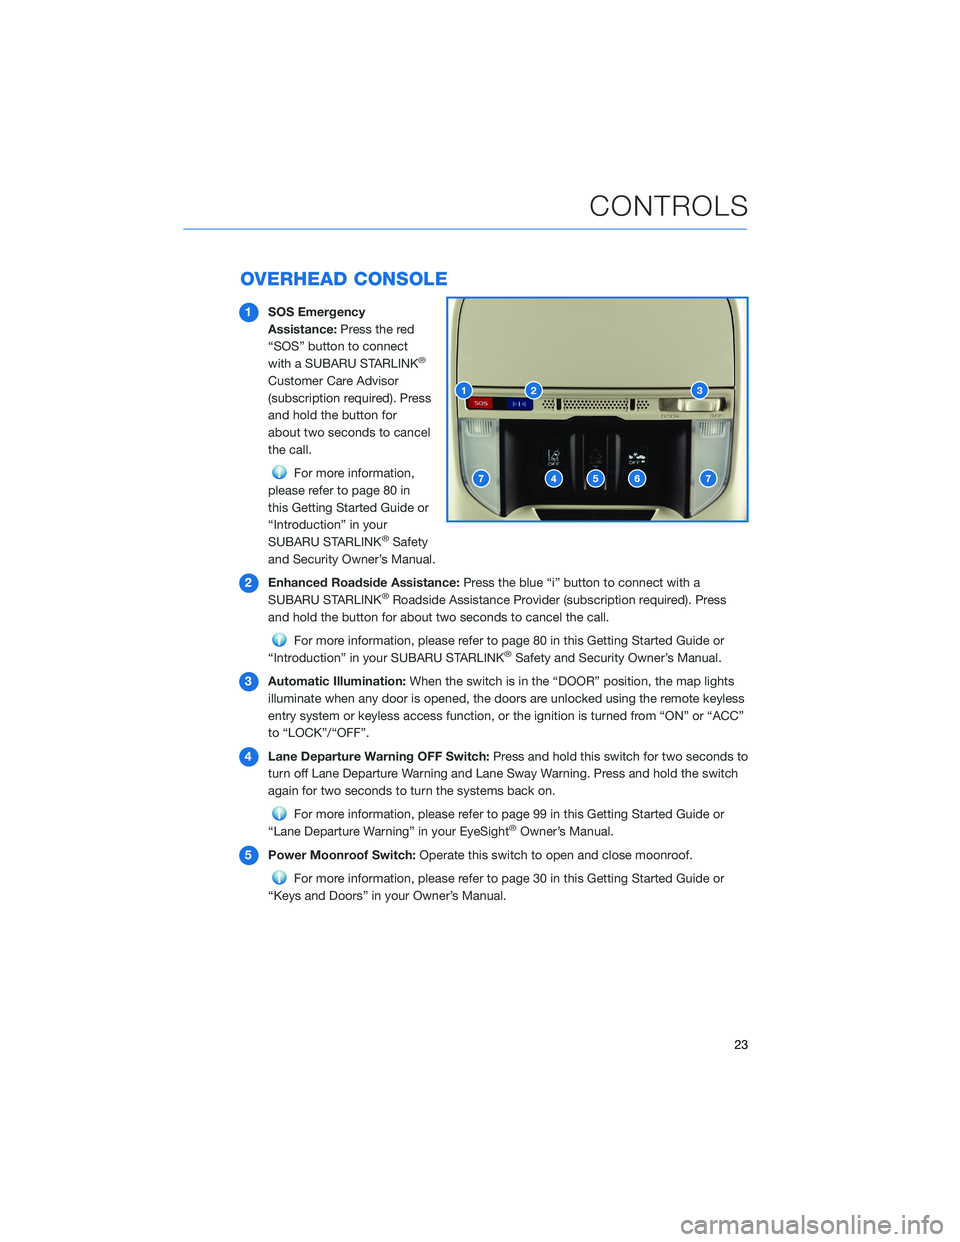
1SOS Emergency
Assistance: Press the red
“SOS” button to connect
with a SUBARU STARLINK
®
Customer Care Advisor
(subscription required). Press
and hold the button for
about two seconds to cancel
the call.
For more information,
please refer to page 80 in
this Getting Started Guide or
“Introduction” in your
SUBARU STARLINK
®Safety
and Security Owner’s Manual.
2 Enhanced Roadside Assistance: Press the blue “i” button to connect with a
SUBARU STARLINK
®Roadside Assistance Provider (subscription required). Press
and hold the button for about two seconds to cancel the call.
For more information, please refer to page 80 in this Getting Started Guide or
“Introduction” in your SUBARU STARLINK®Safety and Security Owner’s Manual.
3 Automatic Illumination: When the switch is in the “DOOR” position, the map lights
illuminate when any door is opened, the doors are unlocked using the remote keyless
entry system or keyless access function, or the ignition is turned from “ON” or “ACC”
to “LOCK”/“OFF”.
4 Lane Departure Warning OFF Switch: Press and hold this switch for two seconds to
turn off Lane Departure Warning and Lane Sway Warning. Press and hold the switch
again for two seconds to turn the systems back on.
For more information, please refer to page 99 in this Getting Started Guide or
“Lane Departure Warning” in your EyeSight®Owner’s Manual.
5 Power Moonroof Switch: Operate this switch to open and close moonroof.
For more information, please refer to page 30 in this Getting Started Guide or
“Keys and Doors” in your Owner’s Manual.
CONTROLS
23
Page 46 of 156

Auto Start-Stop Warning Light
The Auto Start-Stop warning light will illuminate in yellow when initially turning
the ignition switch to the “ON” position. The light will turn off after the engine
has started.
NOTE: If the Auto Start-Stop warning light does not turn off after the engine
has started or is flashing, the Auto Start-Stop system may be malfunctioning. We
recommend that you contact your authorized SUBARU retailer for an inspection.
INDICATOR PATTERN CONDITION
Solid green This indicator light illuminates when the engine has beentemporarily stopped by the Auto Start-Stop system.
It will turn off when the engine is restarted.
Solid White Operational conditions have not been met, the enginewill not stop and this light will illuminate. The light turns
off once the brake pedal is released.
Solid Yellow This light indicates that the system has been turned off.The light will turn off once the system is turned back on.
Flashing
Yellow A fault has been detected with the Start-Stop system.
Please contact your authorized Subaru Retailer.
ELECTRONIC PARKING BRAKE (EPB)
To apply the parking brake,
depress the brake pedal and pull
the parking brake switch up. The
indicator light on the parking
brake switch will illuminate and
“PARK” will appear in the
Combination Meter.
To release the parking brake
manually, depress the brake pedal
and push the parking brake
switch down with the ignition in
the “ON” position. To
automatically release the parking
brake, gently press the
accelerator pedal with the select lever in the “D” or “R” position.
NOTE: Automatic parking brake release will not work unless all the doors are closed and
your seatbelt is fastened.
OPERATING THE VEHICLE
44
Page 51 of 156
FUEL FILLER LID
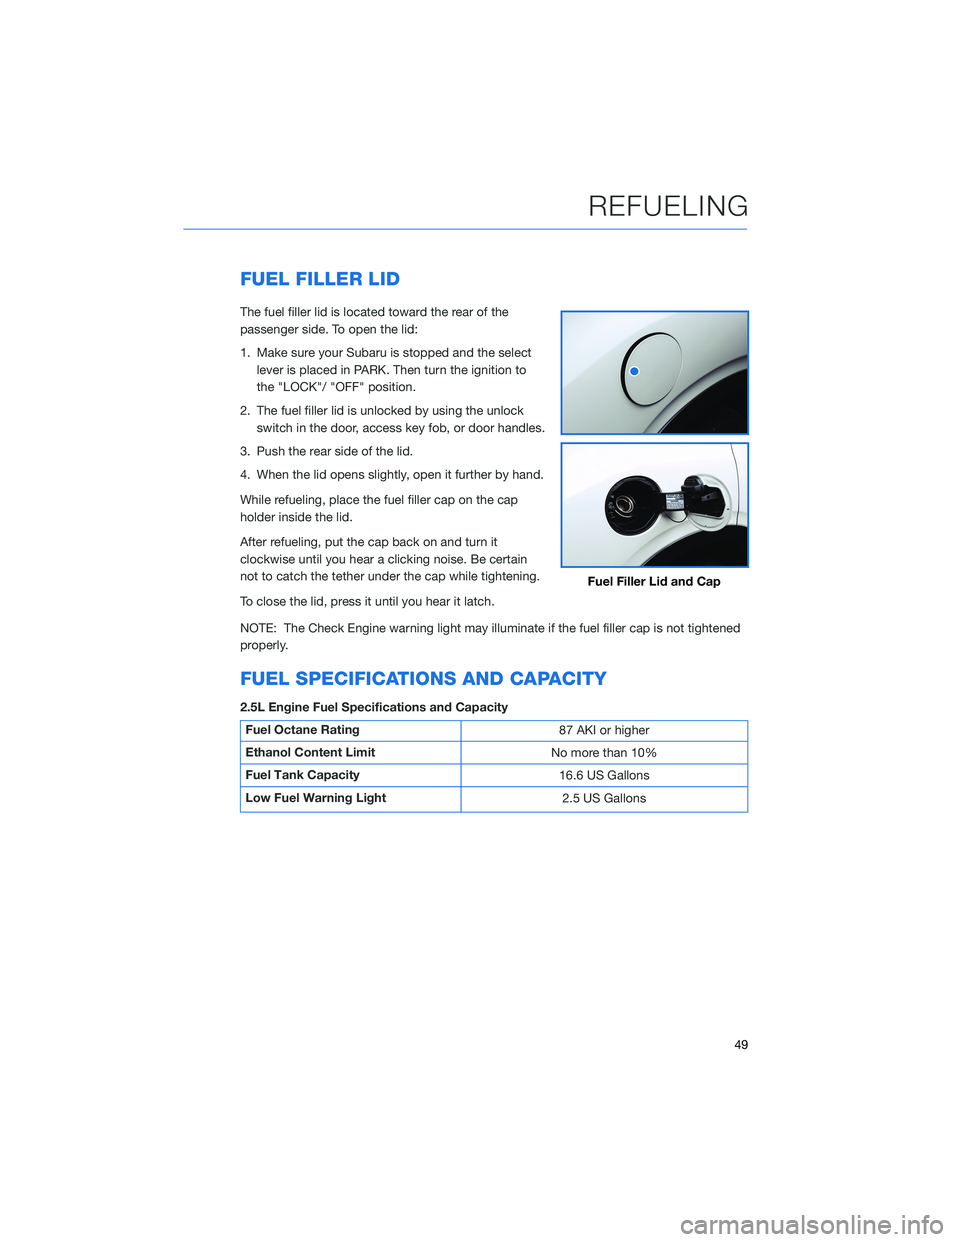
The fuel filler lid is located toward the rear of the
passenger side. To open the lid:
1. Make sure your Subaru is stopped and the selectlever is placed in PARK. Then turn the ignition to
the "LOCK"/ "OFF" position.
2. The fuel filler lid is unlocked by using the unlock switch in the door, access key fob, or door handles.
3. Push the rear side of the lid.
4. When the lid opens slightly, open it further by hand.
While refueling, place the fuel filler cap on the cap
holder inside the lid.
After refueling, put the cap back on and turn it
clockwise until you hear a clicking noise. Be certain
not to catch the tether under the cap while tightening.
To close the lid, press it until you hear it latch.
NOTE: The Check Engine warning light may illuminate if the fuel filler cap is not tightened
properly.
FUEL SPECIFICATIONS AND CAPACITY
2.5L Engine Fuel Specifications and Capacity
Fuel Octane Rating 87 AKI or higher
Ethanol Content Limit No more than 10%
Fuel Tank Capacity 16.6 US Gallons
Low Fuel Warning Light 2.5 US Gallons
Fuel Filler Lid and Cap
REFUELING
49
Page 54 of 156
REAR SEAT REMINDER
The Rear Seat Reminder system assists you in
preventing a child or pet from being left in your
Subaru, prompting you to confirm the
presence of passengers and cargo in the rear
seats. The system monitors the opening and
closing of the rear doors. It does not physically
sense the presence of a child or pet.
The system activates when the rear doors are
opened and closed. When the ignition switch
is turned from the “ON” position to the “OFF”
position, the system warns you with audible
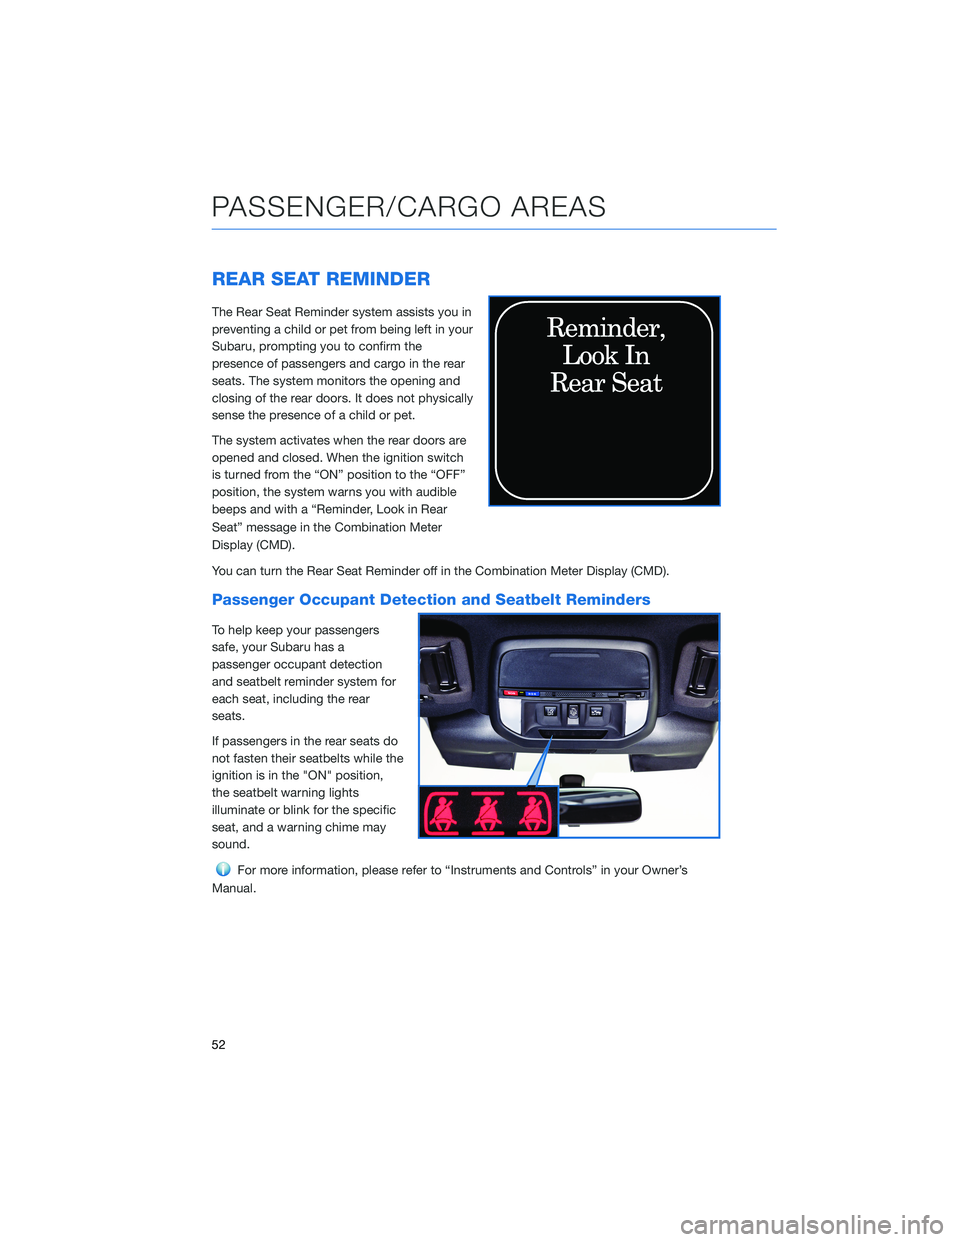
beeps and with a “Reminder, Look in Rear
Seat” message in the Combination Meter
Display (CMD).
You can turn the Rear Seat Reminder off in the Combination Meter Display (CMD).
Passenger Occupant Detection and Seatbelt Reminders
To help keep your passengers
safe, your Subaru has a
passenger occupant detection
and seatbelt reminder system for
each seat, including the rear
seats.
If passengers in the rear seats do
not fasten their seatbelts while the
ignition is in the "ON" position,
the seatbelt warning lights
illuminate or blink for the specific
seat, and a warning chime may
sound.
For more information, please refer to “Instruments and Controls” in your Owner’s
Manual.
PASSENGER/CARGO AREAS
52
Page 99 of 156
Lead Vehicle Start Alert
This function will provide a visual and audible
alert when a stopped vehicle in front of you
begins to move, and your vehicle remains
stationary. Warnings are displayed in the
Combination Meter Display (CMD) with
audible beeps. Lead Vehicle Start Alert is
helpful in situations where you may become
temporarily distracted at a traffic light, and the
vehicle ahead begins to move.
This function can be customized. To change
this setting, use the steering wheel mounted
“i/SET” switches to access the EyeSight
®
settings menu on the CMD.
Vehicle AheadHas Moved
EYESIGHT
97
Page 104 of 156
FRONT VIEW MONITOR(if equipped)
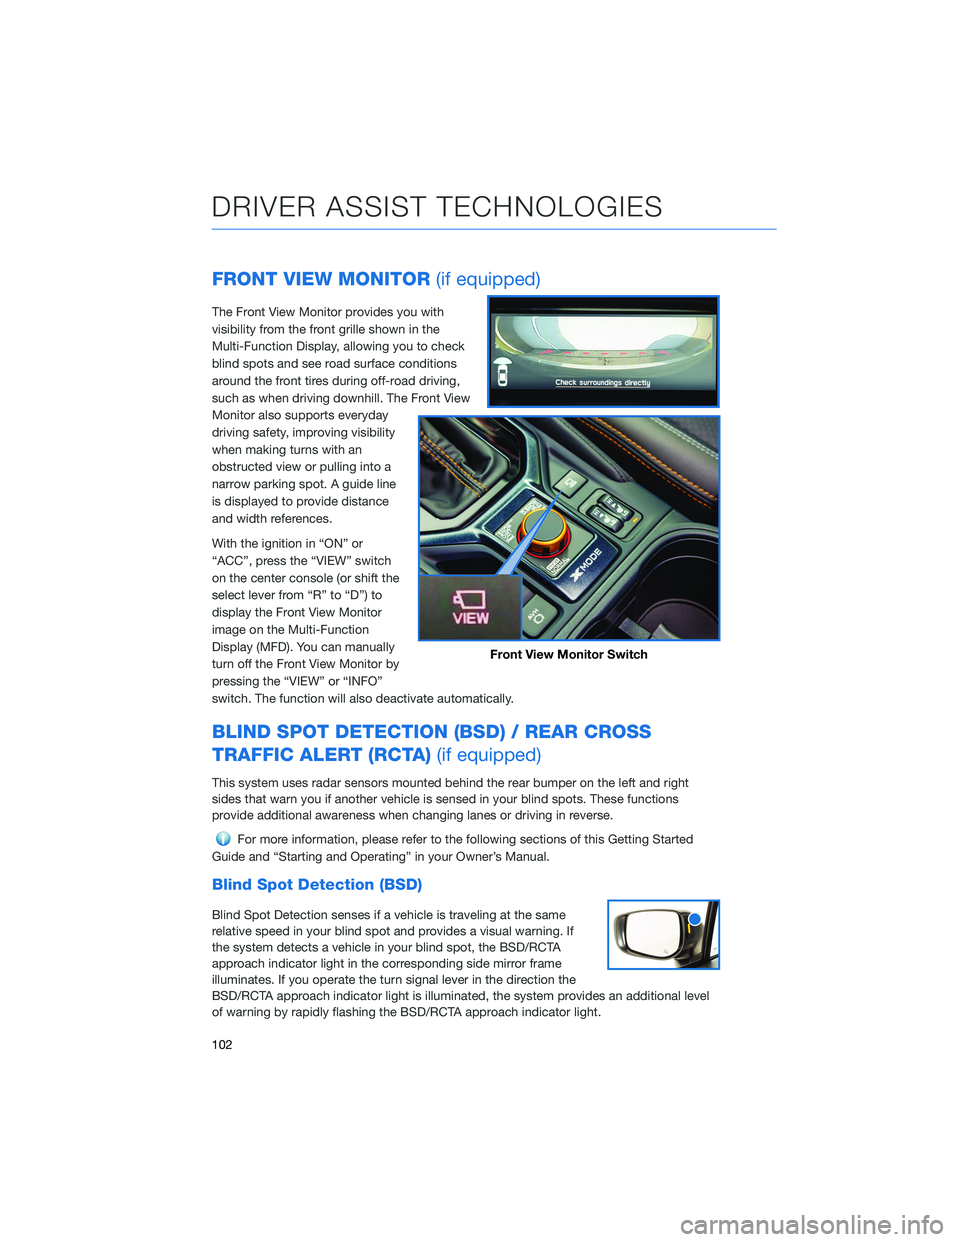
The Front View Monitor provides you with
visibility from the front grille shown in the
Multi-Function Display, allowing you to check
blind spots and see road surface conditions
around the front tires during off-road driving,
such as when driving downhill. The Front View
Monitor also supports everyday
driving safety, improving visibility
when making turns with an
obstructed view or pulling into a
narrow parking spot. A guide line
is displayed to provide distance
and width references.
With the ignition in “ON” or
“ACC”, press the “VIEW” switch
on the center console (or shift the
select lever from “R” to “D”) to
display the Front View Monitor
image on the Multi-Function
Display (MFD). You can manually
turn off the Front View Monitor by
pressing the “VIEW” or “INFO”
switch. The function will also deactivate automatically.
BLIND SPOT DETECTION (BSD) / REAR CROSS
TRAFFIC ALERT (RCTA) (if equipped)
This system uses radar sensors mounted behind the rear bumper on the left and right
sides that warn you if another vehicle is sensed in your blind spots. These functions
provide additional awareness when changing lanes or driving in reverse.
For more information, please refer to the following sections of this Getting Started
Guide and “Starting and Operating” in your Owner’s Manual.
Blind Spot Detection (BSD)
Blind Spot Detection senses if a vehicle is traveling at the same
relative speed in your blind spot and provides a visual warning. If
the system detects a vehicle in your blind spot, the BSD/RCTA
approach indicator light in the corresponding side mirror frame
illuminates. If you operate the turn signal lever in the direction the
BSD/RCTA approach indicator light is illuminated, the system provides an additional level
of warning by rapidly flashing the BSD/RCTA approach indicator light.
Front View Monitor Switch
DRIVER ASSIST TECHNOLOGIES
102
Page 105 of 156
Lane Change Assist (LCA)
Lane Change Assist (LCA) provides an additional level of protection by warning you of
rapidly approaching vehicles in the neighboring lanes. If LCA detects a vehicle
approaching at a high speed in the neighboring lanes, the BSD/RCTA approach indicator
light in the corresponding side mirror frame illuminates. If you operate the turn signal lever
in the direction the BSD/RCTA approach indicator light is illuminated, the system rapidly
flashes the BSD/RCTA approach indicator light.
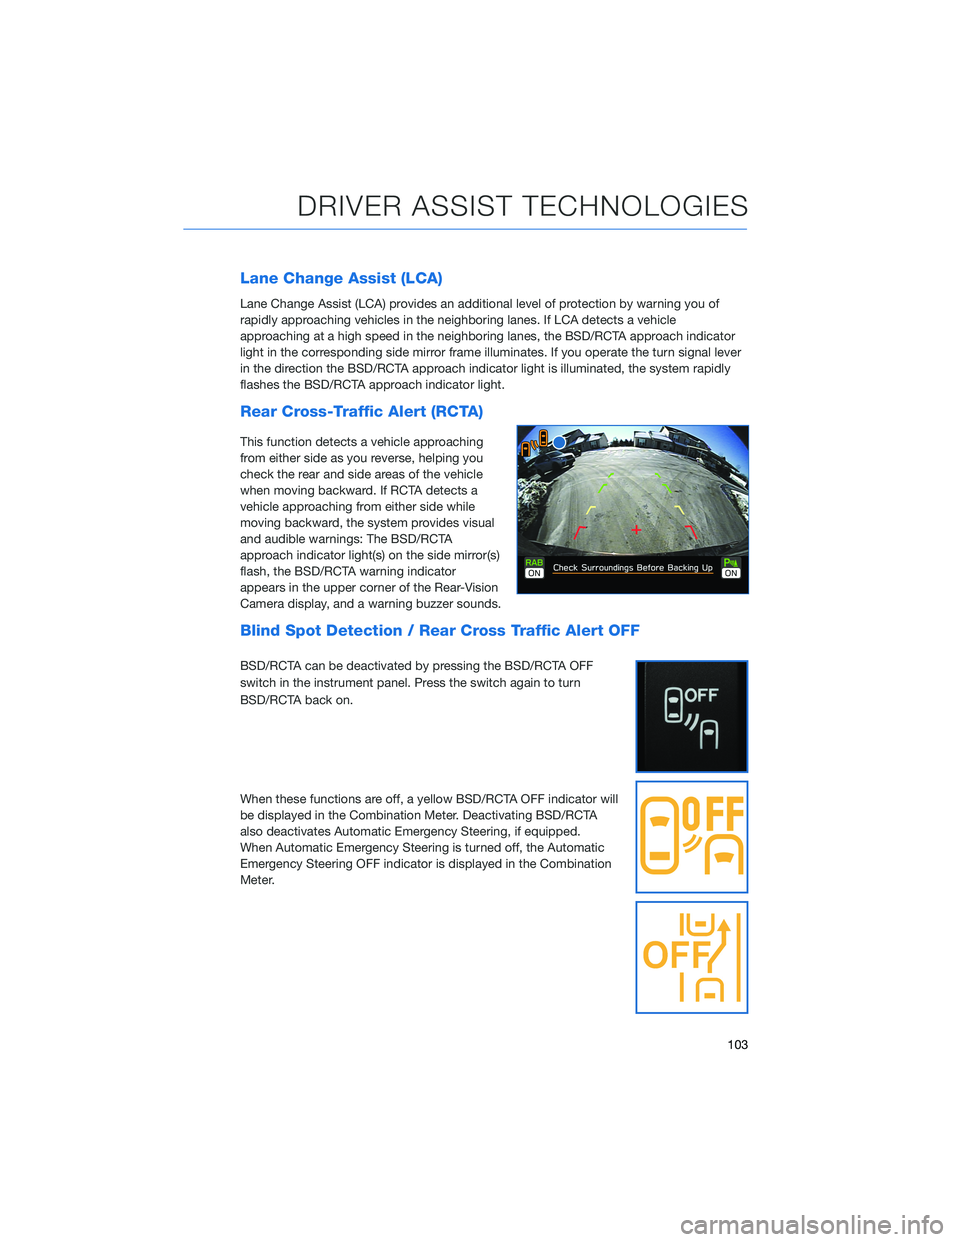
Rear Cross-Traffic Alert (RCTA)
This function detects a vehicle approaching
from either side as you reverse, helping you
check the rear and side areas of the vehicle
when moving backward. If RCTA detects a
vehicle approaching from either side while
moving backward, the system provides visual
and audible warnings: The BSD/RCTA
approach indicator light(s) on the side mirror(s)
flash, the BSD/RCTA warning indicator
appears in the upper corner of the Rear-Vision
Camera display, and a warning buzzer sounds.
Blind Spot Detection / Rear Cross Traffic Alert OFF
BSD/RCTA can be deactivated by pressing the BSD/RCTA OFF
switch in the instrument panel. Press the switch again to turn
BSD/RCTA back on.
When these functions are off, a yellow BSD/RCTA OFF indicator will
be displayed in the Combination Meter. Deactivating BSD/RCTA
also deactivates Automatic Emergency Steering, if equipped.
When Automatic Emergency Steering is turned off, the Automatic
Emergency Steering OFF indicator is displayed in the Combination
Meter.
DRIVER ASSIST TECHNOLOGIES
103
Page 119 of 156
3Press the memory switch in
the instrument panel to
select the “ON” status
(switch is depressed and you
can no longer see the white
line on top).
4 With the rear gate at the
desired height, press and
hold the Power Rear Gate
Close Button on the inside
edge of the rear gate. A chirp
will sound and the hazard
warning lights will flash to
confirm the height is set.
When the memory switch is in the “ON” status, the rear gate will stop at the set memory
height when you use any of the Power Rear Gate buttons.
For more information, please refer to “Keys and Doors” in your Owner’s Manual.
Memory Height Button
Power Rear Gate Close Button
HOW TO APPENDIX
117