2022 SUBARU FORESTER instrument panel
[x] Cancel search: instrument panelPage 37 of 156
If you operate any of the buttons other than “ON/OFF”, rear window defogger, “SYNC”, or
the temperature control dial, the “FULL” indicator light will turn off. The “AUTO” light will
remain illuminated. You can then manually control the system as desired. Press the
“AUTO” button to change back to “FULL AUTO” mode.4 Air Conditioner Button: Press this button to activate or deactivate the air
conditioning.
5 MAX A/C Button: Press this button for quickest cooling.
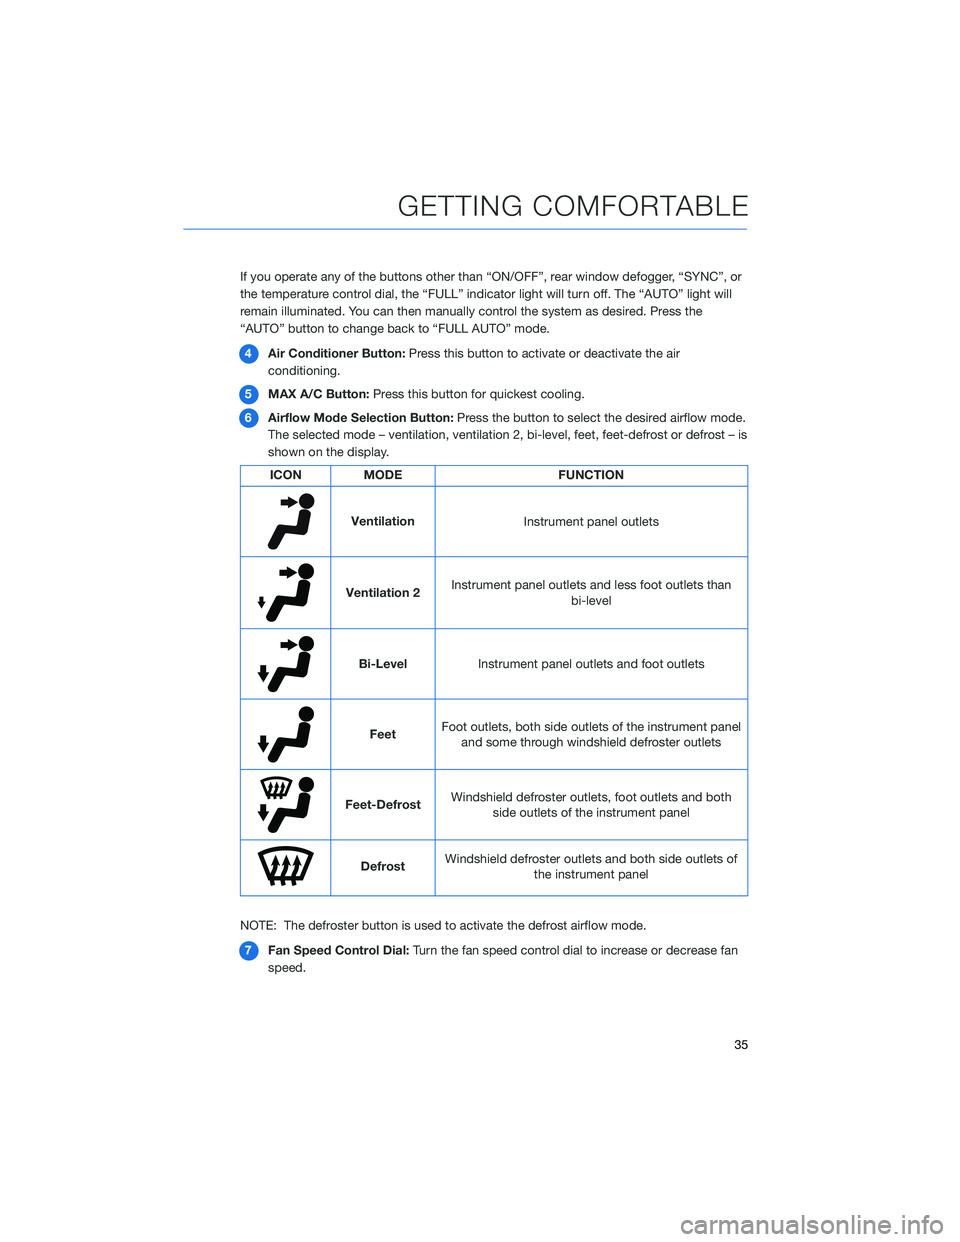
6 Airflow Mode Selection Button: Press the button to select the desired airflow mode.
The selected mode – ventilation, ventilation 2, bi-level, feet, feet-defrost or defrost – is
shown on the display.
ICON MODE FUNCTION
Ventilation
Instrument panel outlets
Ventilation 2Instrument panel outlets and less foot outlets than
bi-level
Bi-LevelInstrument panel outlets and foot outlets
FeetFoot outlets, both side outlets of the instrument panel
and some through windshield defroster outlets
Feet-Defrost Windshield defroster outlets, foot outlets and both
side outlets of the instrument panel
Defrost Windshield defroster outlets and both side outlets of
the instrument panel
NOTE: The defroster button is used to activate the defrost airflow mode. 7 Fan Speed Control Dial: Turn the fan speed control dial to increase or decrease fan
speed.
GETTING COMFORTABLE
35
Page 105 of 156
Lane Change Assist (LCA)
Lane Change Assist (LCA) provides an additional level of protection by warning you of
rapidly approaching vehicles in the neighboring lanes. If LCA detects a vehicle
approaching at a high speed in the neighboring lanes, the BSD/RCTA approach indicator
light in the corresponding side mirror frame illuminates. If you operate the turn signal lever
in the direction the BSD/RCTA approach indicator light is illuminated, the system rapidly
flashes the BSD/RCTA approach indicator light.
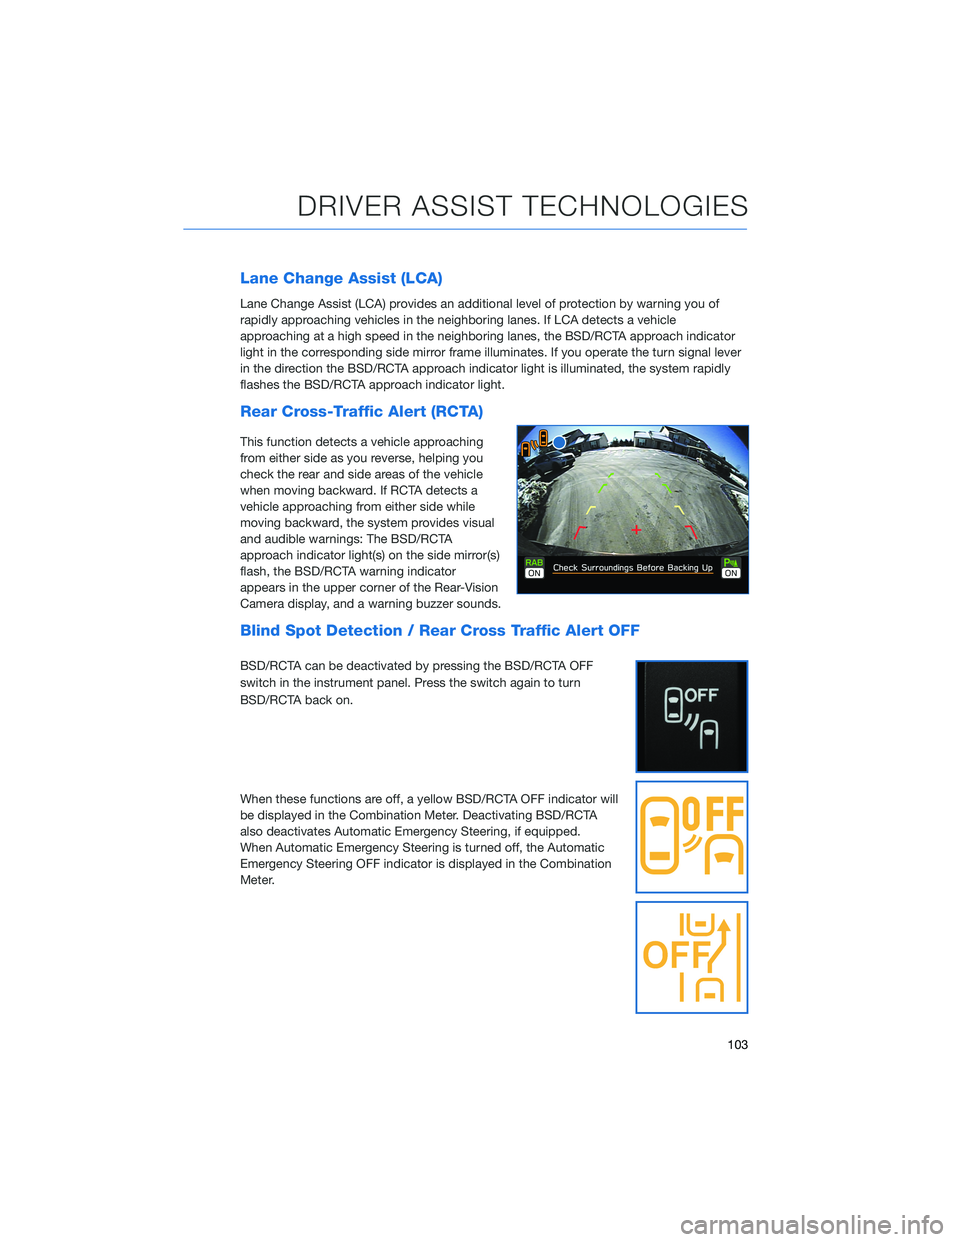
Rear Cross-Traffic Alert (RCTA)
This function detects a vehicle approaching
from either side as you reverse, helping you
check the rear and side areas of the vehicle
when moving backward. If RCTA detects a
vehicle approaching from either side while
moving backward, the system provides visual
and audible warnings: The BSD/RCTA
approach indicator light(s) on the side mirror(s)
flash, the BSD/RCTA warning indicator
appears in the upper corner of the Rear-Vision
Camera display, and a warning buzzer sounds.
Blind Spot Detection / Rear Cross Traffic Alert OFF
BSD/RCTA can be deactivated by pressing the BSD/RCTA OFF
switch in the instrument panel. Press the switch again to turn
BSD/RCTA back on.
When these functions are off, a yellow BSD/RCTA OFF indicator will
be displayed in the Combination Meter. Deactivating BSD/RCTA
also deactivates Automatic Emergency Steering, if equipped.
When Automatic Emergency Steering is turned off, the Automatic
Emergency Steering OFF indicator is displayed in the Combination
Meter.
DRIVER ASSIST TECHNOLOGIES
103
Page 111 of 156
DROWSY/INATTENTIVE WARNINGS
DriverFocus®detects when the driver is possibly not paying
attention or is becoming drowsy while driving. It works whether you
are a registered user or not. The system does not provide alerts
when the turn signals are operating or when the select lever is in the
“R” position.
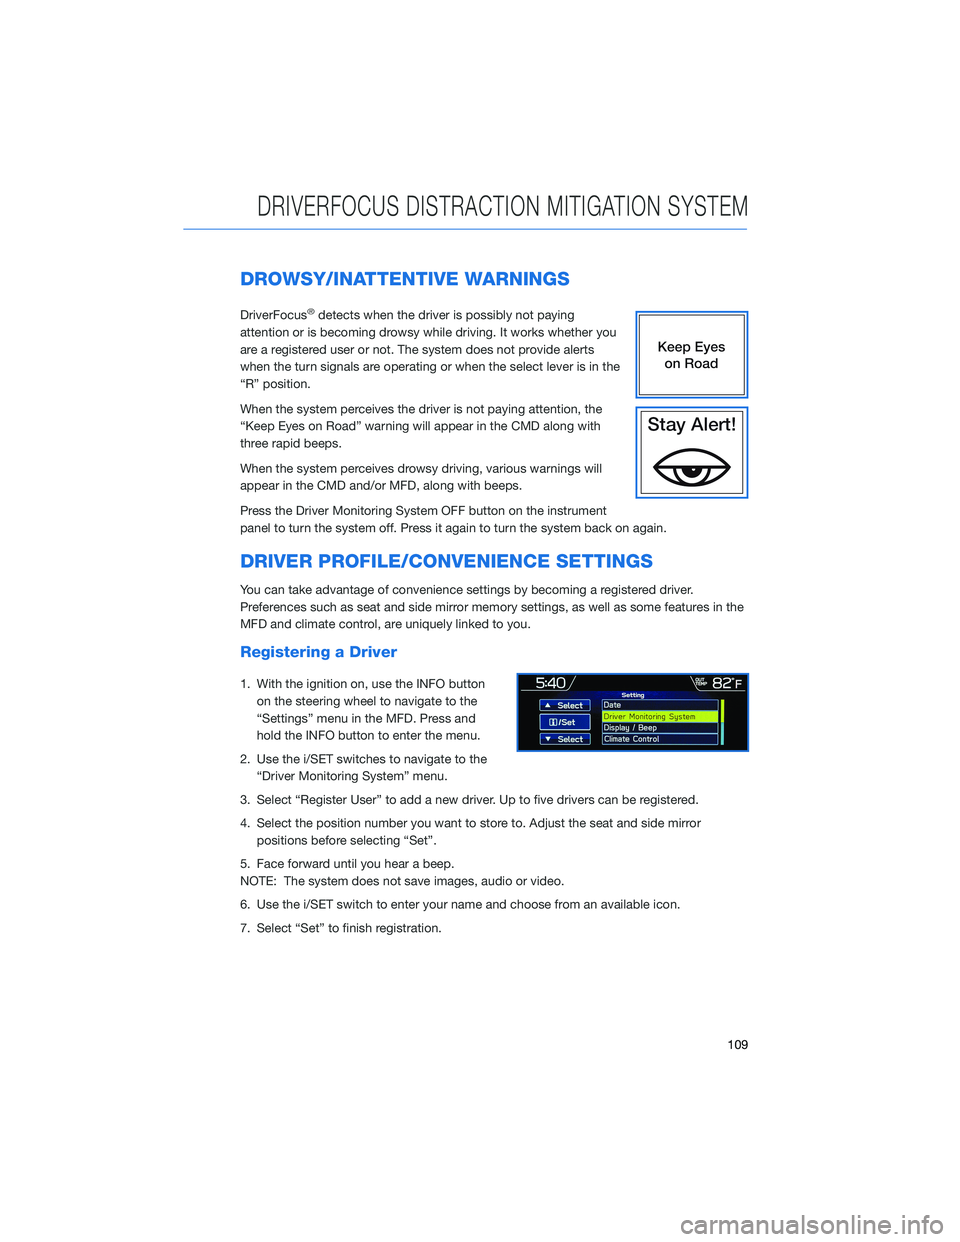
When the system perceives the driver is not paying attention, the
“Keep Eyes on Road” warning will appear in the CMD along with
three rapid beeps.
When the system perceives drowsy driving, various warnings will
appear in the CMD and/or MFD, along with beeps.
Press the Driver Monitoring System OFF button on the instrument
panel to turn the system off. Press it again to turn the system back on again.
DRIVER PROFILE/CONVENIENCE SETTINGS
You can take advantage of convenience settings by becoming a registered driver.
Preferences such as seat and side mirror memory settings, as well as some features in the
MFD and climate control, are uniquely linked to you.
Registering a Driver
1. With the ignition on, use the INFO button on the steering wheel to navigate to the
“Settings” menu in the MFD. Press and
hold the INFO button to enter the menu.
2. Use the i/SET switches to navigate to the “Driver Monitoring System” menu.
3. Select “Register User” to add a new driver. Up to five drivers can be registered.
4. Select the position number you want to store to. Adjust the seat and side mirror positions before selecting “Set”.
5. Face forward until you hear a beep.
NOTE: The system does not save images, audio or video.
6. Use the i/SET switch to enter your name and choose from an available icon.
7. Select “Set” to finish registration.
DRIVERFOCUS DISTRACTION MITIGATION SYSTEM
109
Page 113 of 156
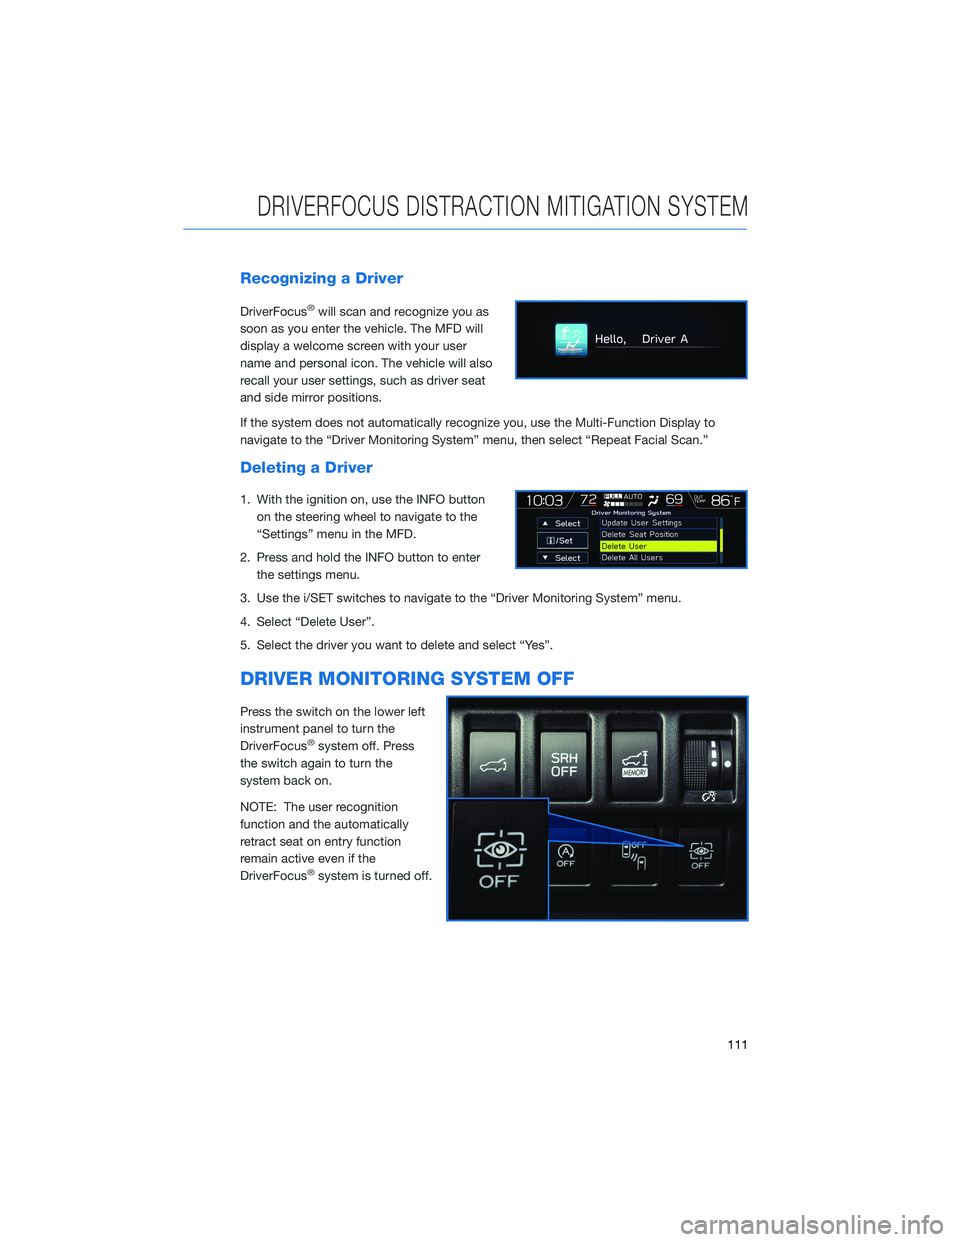
Recognizing a Driver
DriverFocus®will scan and recognize you as
soon as you enter the vehicle. The MFD will
display a welcome screen with your user
name and personal icon. The vehicle will also
recall your user settings, such as driver seat
and side mirror positions.
If the system does not automatically recognize you, use the Multi-Function Display to
navigate to the “Driver Monitoring System” menu, then select “Repeat Facial Scan.”
Deleting a Driver
1. With the ignition on, use the INFO button on the steering wheel to navigate to the
“Settings” menu in the MFD.
2. Press and hold the INFO button to enter the settings menu.
3. Use the i/SET switches to navigate to the “Driver Monitoring System” menu.
4. Select “Delete User”.
5. Select the driver you want to delete and select “Yes”.
DRIVER MONITORING SYSTEM OFF
Press the switch on the lower left
instrument panel to turn the
DriverFocus
®system off. Press
the switch again to turn the
system back on.
NOTE: The user recognition
function and the automatically
retract seat on entry function
remain active even if the
DriverFocus
®system is turned off.
DRIVERFOCUS DISTRACTION MITIGATION SYSTEM
111
Page 118 of 156

MEMORY HEIGHT(if equipped)
You can set where the rear gate stops when it opens. This is a great
feature to limit the upward travel of the rear gate to ensure you can
reach it or to prevent the rear gate from contacting a garage ceiling.
You can learn more about setting the Power Rear Gate Memory
Height from the how-to video linked in the QR code and the steps
below.
1 Make sure the Memory
Height Switch is the “OFF”
position (the switch is raised
and you can see a white line
on the top).
2 Open the rear gate using the
Power Rear Gate Button.
Pause the rear gate when it
reaches the desired height
by pressing the Power Rear
Gate Button on the rear
gate, instrument panel, or
key fob.
Memory Height Button
Power Rear Gate Button
HOW TO APPENDIX
116
Page 119 of 156

3Press the memory switch in
the instrument panel to
select the “ON” status
(switch is depressed and you
can no longer see the white
line on top).
4 With the rear gate at the
desired height, press and
hold the Power Rear Gate
Close Button on the inside
edge of the rear gate. A chirp
will sound and the hazard
warning lights will flash to
confirm the height is set.
When the memory switch is in the “ON” status, the rear gate will stop at the set memory
height when you use any of the Power Rear Gate buttons.
For more information, please refer to “Keys and Doors” in your Owner’s Manual.
Memory Height Button
Power Rear Gate Close Button
HOW TO APPENDIX
117
Page 146 of 156
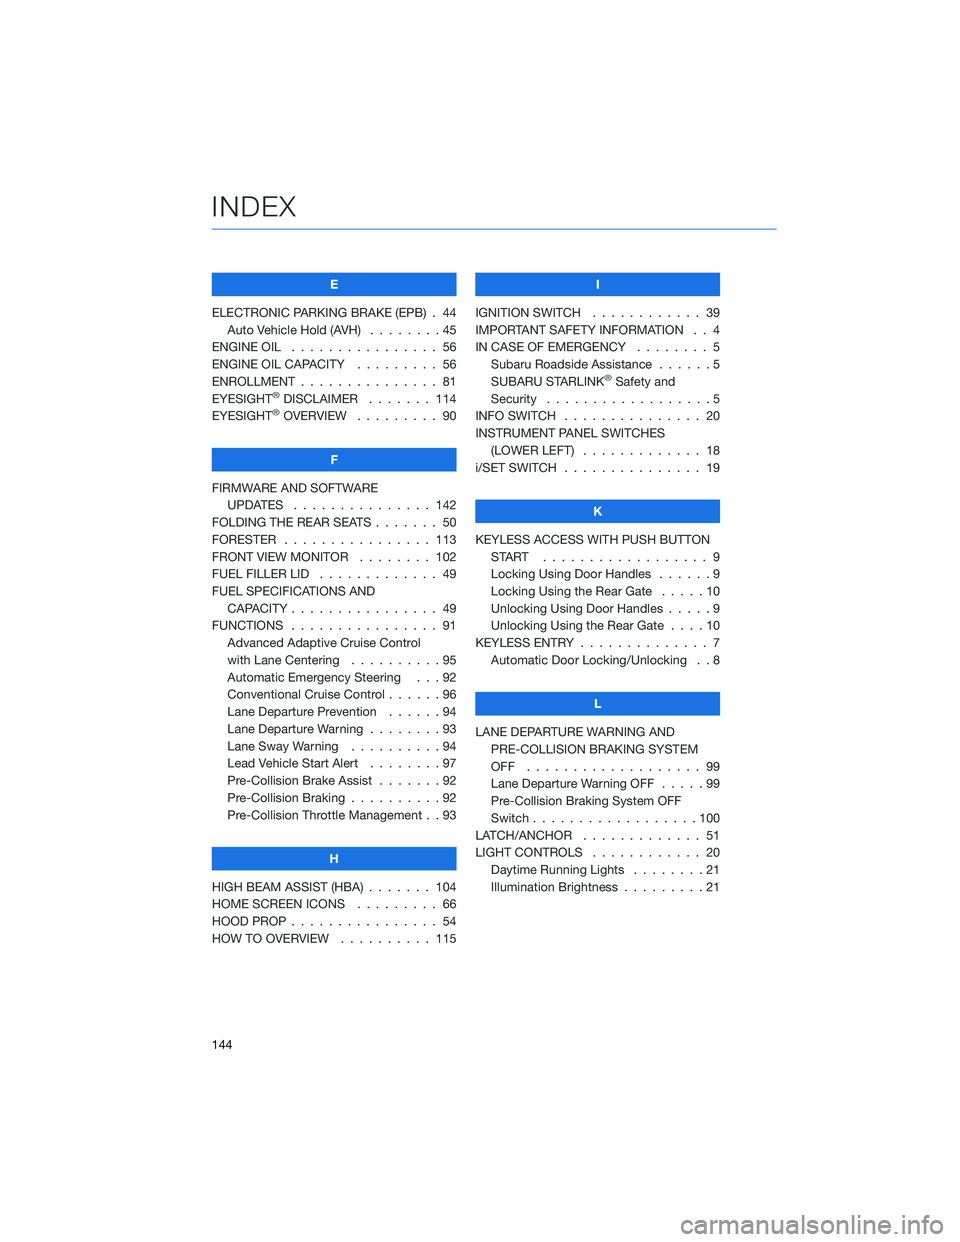
E
ELECTRONIC PARKING BRAKE (EPB) . 44 Auto Vehicle Hold (AVH) ........45
ENGINE OIL . . . . . . . . . ....... 56
ENGINE OIL CAPACITY . . . . . .... 56
ENROLLMENT . . . . . . . . . . . . . . . 81
EYESIGHT
®DISCLAIMER . ...... 114
EYESIGHT®OVERVIEW . . . . . . . . . 90
F
FIRMWARE AND SOFTWARE UPDATES . . . . . . . . . ...... 142
FOLDING THE REAR SEATS . . . . . . . 50
FORESTER . . . . . . . . . . ...... 113
FRONT VIEW MONITOR . . ...... 102
FUEL FILLER LID . . . . . . . . . .... 49
FUEL SPECIFICATIONS AND CAPACITY . . . . . . . . . ....... 49
FUNCTIONS . . . . . . . . . . . . . . . . 91 Advanced Adaptive Cruise Control
with Lane Centering . . . . . . ....95
Automatic Emergency Steering . . . 92
Conventional Cruise Control . .....96
Lane Departure Prevention . . . . . . 94
Lane Departure Warning . . . . . . . . 93
Lane Sway Warning . . . . . . . . . . 94
Lead Vehicle Start Alert ........97
Pre-Collision Brake Assist . . . ....92
Pre-Collision Braking . .........92
Pre-Collision Throttle Management . . 93
H
HIGH BEAM ASSIST (HBA) . . . . . . . 104
HOME SCREEN ICONS . ........ 66
HOOD PROP . . . . . . . . . ....... 54
HOW TO OVERVIEW . . . ....... 115 I
IGNITION SWITCH . ........... 39
IMPORTANT SAFETY INFORMATION . . 4
IN CASE OF EMERGENCY . . . . . . . . 5 Subaru Roadside Assistance . . . . . . 5
SUBARU STARLINK
®Safety and
Security . . . . . . . . . . . . . . . . . . 5
INFO SWITCH ............... 20
INSTRUMENT PANEL SWITCHES (LOWER LEFT) . . . . ......... 18
i/SET SWITCH . . . . . . . ........ 19
K
KEYLESS ACCESS WITH PUSH BUTTON START .................. 9
Locking Using Door Handles . . ....9
Locking Using the Rear Gate . . . . . 10
Unlocking Using Door Handles .....9
Unlocking Using the Rear Gate . . . . 10
KEYLESS ENTRY . . . . . . ........ 7
Automatic Door Locking/Unlocking . . 8
L
LANE DEPARTURE WARNING AND PRE-COLLISION BRAKING SYSTEM
OFF ................... 99
Lane Departure Warning OFF .....99
Pre-Collision Braking System OFF
Switch . . . . . . . . . . . .......100
LATCH/ANCHOR . . . . ......... 51
LIGHT CONTROLS . . .......... 20
Daytime Running Lights . . . . . . . . 21
Illumination Brightness . . . . . . . . . 21
INDEX
144