Page 43 of 148
IGNITION SWITCH
The ignition switch has four positions:
LOCK:You can only insert or remove the key in this position.
ACC (Accessory):Provides power to the audio system and accessory power outlets.
ON:All electrical systems are available. The key returns to this position after starting the
engine.
START:Turn the key to this position to start the engine.
PUSH-BUTTON IGNITION SWITCH(if equipped)
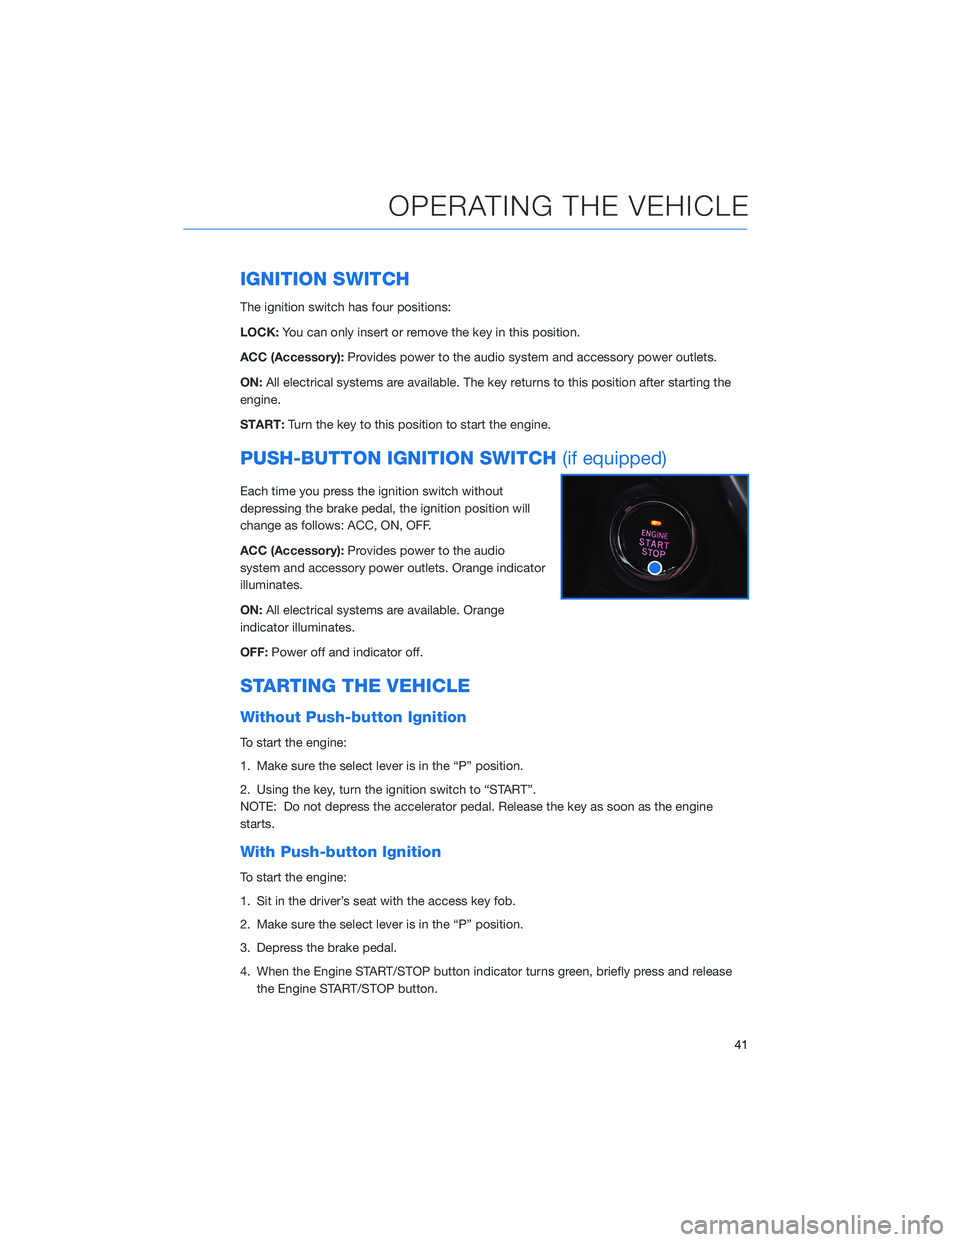
Each time you press the ignition switch without
depressing the brake pedal, the ignition position will
change as follows: ACC, ON, OFF.
ACC (Accessory):Provides power to the audio
system and accessory power outlets. Orange indicator
illuminates.
ON:All electrical systems are available. Orange
indicator illuminates.
OFF:Power off and indicator off.
STARTING THE VEHICLE
Without Push-button Ignition
To start the engine:
1. Make sure the select lever is in the “P” position.
2. Using the key, turn the ignition switch to “START”.
NOTE: Do not depress the accelerator pedal. Release the key as soon as the engine
starts.
With Push-button Ignition
To start the engine:
1. Sit in the driver’s seat with the access key fob.
2. Make sure the select lever is in the “P” position.
3. Depress the brake pedal.
4. When the Engine START/STOP button indicator turns green, briefly press and release
the Engine START/STOP button.
OPERATING THE VEHICLE
41
Page 59 of 148
NEW VEHICLE BREAK-IN
The performance and long life of your Subaru are dependent on how you handle and care
for your Subaru while it is new.
Follow these instructions during the first 1,000 miles:
• Do not race the engine.
• Do not allow the engine speed to exceed 4,000 rpm except in an emergency.
• Do not drive at one consistent engine or vehicle speed for a long time, either fast or
slow.
• Avoid starting suddenly and rapid acceleration, except in an emergency.
• Avoid hard braking, except in an emergency.
ENGINE OIL
Use 0W-20 synthetic, with one of the following specifications:
• API classification SN with the words “RESOURCE CONSERVING”, SN PLUS with the
words “RESOURCE CONSERVING”, or SP with the words “RESOURCE CONSERVING”.
• ILSAC GF-5 or GF-6A, which can be identified with the ILSAC certification mark
(Starburst mark).
ENGINE OIL CAPACITY
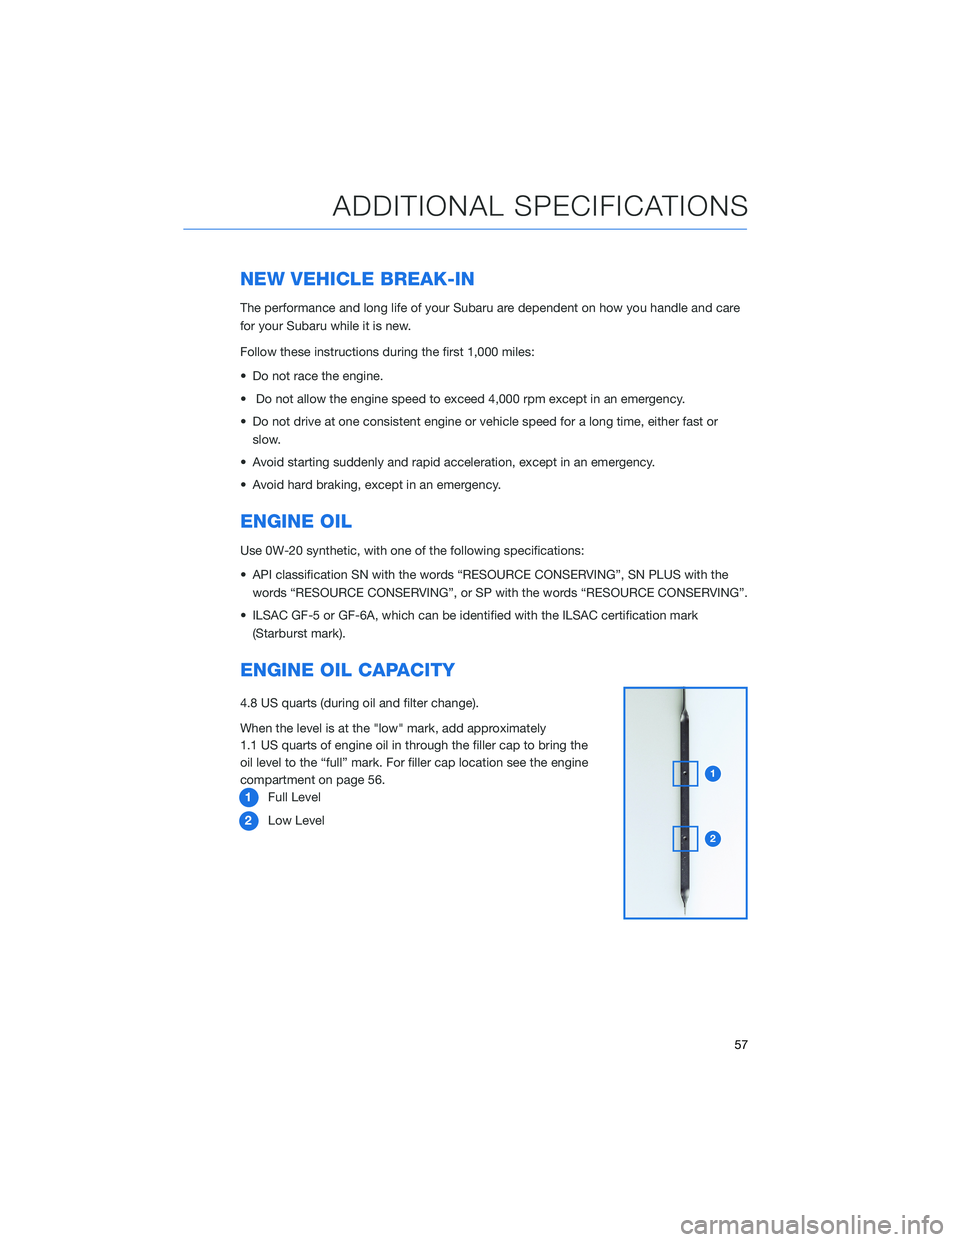
4.8 US quarts (during oil and filter change).
When the level is at the "low" mark, add approximately
1.1 US quarts of engine oil in through the filler cap to bring the
oil level to the “full” mark. For filler cap location see the engine
compartment on page 56.
1Full Level
2Low Level
ADDITIONAL SPECIFICATIONS
57
Page 63 of 148
OVERVIEW OF YOUR MULTIMEDIA SYSTEM
SUBARU STARLINK®Multimedia combines the radio along with the ability to connect your
phone* through Bluetooth®to the multimedia system for making calls, sending text
messages and listening to your favorite songs on your phone.
* Compatible smartphone and application required. For applications to operate, latest version of each
application required. Data provided by smartphone is displayed on the Touchscreen. Some state laws
prohibit the operation of handheld electronic devices while operating a vehicle. Smartphone apps
should only be launched when vehicle is safely parked. Your wireless carrier’s rates may apply.
Various Systems
Depending on your model and trim level there are several types of SUBARU STARLINK®
Multimedia systems. Some of the functions described in this guide will vary by system.
• 6.5-inch Multimedia Plus
• 8.0-inch Multimedia Plus
• 8.0-inch Multimedia Navigation
BUTTONS
Radio Functions
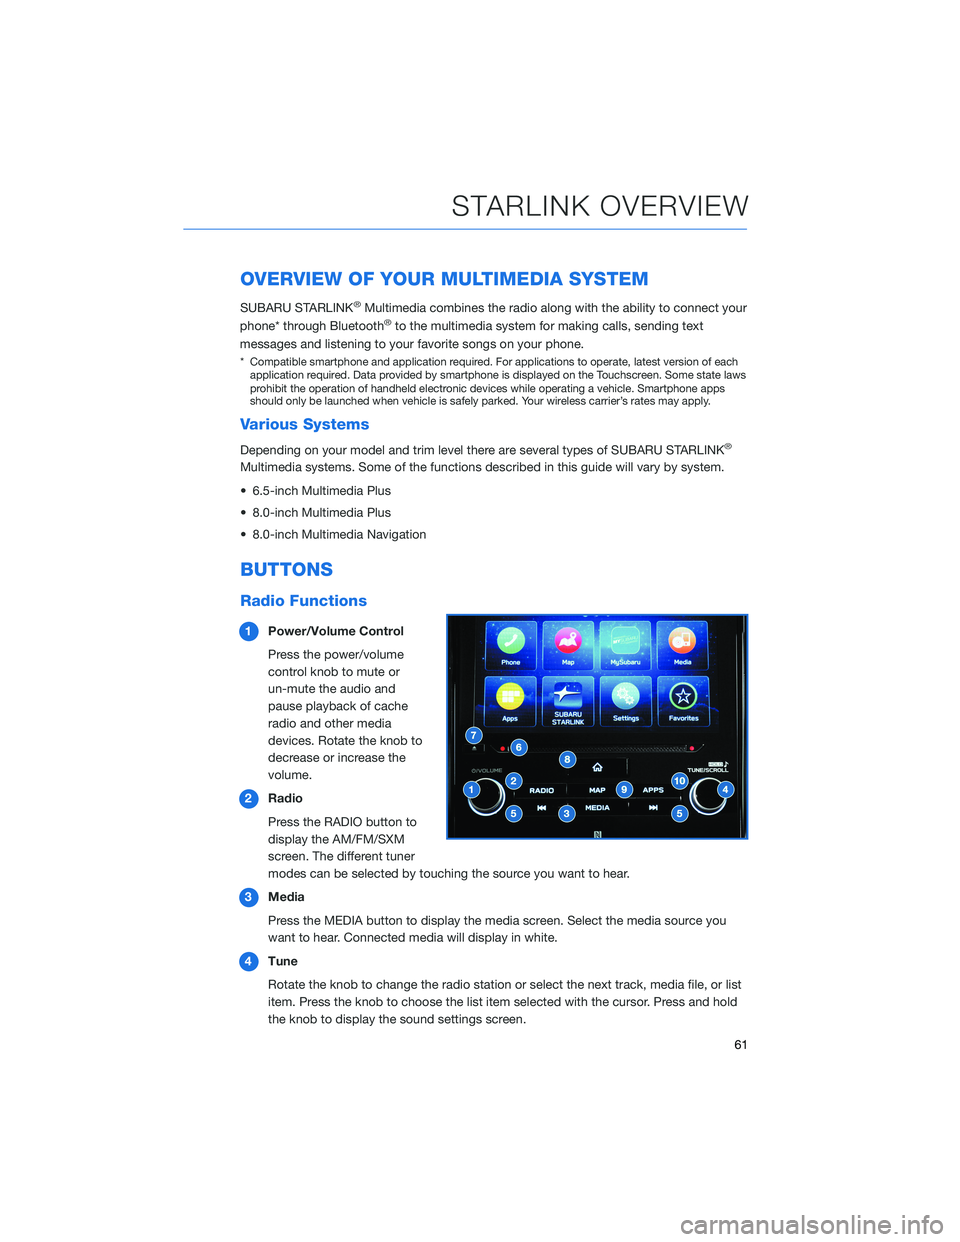
1Power/Volume Control
Press the power/volume
control knob to mute or
un-mute the audio and
pause playback of cache
radio and other media
devices. Rotate the knob to
decrease or increase the
volume.
2Radio
Press the RADIO button to
display the AM/FM/SXM
screen. The different tuner
modes can be selected by touching the source you want to hear.
3Media
Press the MEDIA button to display the media screen. Select the media source you
want to hear. Connected media will display in white.
4Tune
Rotate the knob to change the radio station or select the next track, media file, or list
item. Press the knob to choose the list item selected with the cursor. Press and hold
the knob to display the sound settings screen.
STARLINK OVERVIEW
61
Page 68 of 148
Common Commands
Below are examples of common commands that can be used with the voice recognition
system. Please refer to “Siri/Voice Recognition System” in your STARLINK®Owner’s
Manual for a complete list.
VOICE COMMAND FUNCTION EXAMPLE
Dial [Number]Places a call to the phone
numberDial 555-123-4567
Call [Name] [Phone Type]Places a call to the contact
name and phone type of the
contact from the phonebookCall John Doe mobile
Navigate to [House Number,
Street, City, State]
1Sets a destination to the
addressNavigate to 1234 Main
Street, Lincoln, Washington
Show Map
1Displays the map screen Show Map
Where am I
1Displays current location on
mapWhere am I
Tune to [Frequency]
(AM / FM)Switches to AM/FM and
tunes to spoken frequencyTune to 99.5 FM
Preset [Number]Switches to the preset
channelPreset 3
Satellite Channel [Name /
Channel Number]Switches to satellite channel
numberSatellite Channel Prime
Country 58
Set Fan Speed to [1-7]
2Sets the fan speed to the
spoken fan speedSet fan speed to 4
Set Temperature to
[Number]
2,3Sets the temperature to the
spoken temperatureSet temperature to 70
Help Changes to help screen Help
Phone HelpDisplays a list of voice
commands related to
controlling your phonePhone Help
Media HelpDisplays a list of commands
related to the mediaMedia Help
Radio HelpDisplays a list of commands
related to the radioRadio Help
Navigation Help
1Displays a list of voice
commands related to
navigationNavigation Help
1 8.0-inch Multimedia Navigation system only
2 8.0-inch Multimedia Plus and 8.0-inch Multimedia Navigation system only
3 When the A/C is off, the A/C setting will not change even if the voice command is accepted
STARLINK OVERVIEW
66
Page 72 of 148
4. Select a paired phone or pair a new phone
(see page 111 and page 115 in the How To
Appendix). Then select “Next”.
5. Enter a Home Address and Work Address
(if equipped with navigation). Then select
“Next”.
6. Select a wallpaper, and then select “Next”.
7. Select “Finish”.
Retrieving a Driver Profile
The system automatically retrieves the profile once you are in your Subaru with the
STARLINK®multimedia system on and your phone’s Bluetooth®active. You can also
manually retrieve or change the profile by following these steps:
1. Press the “Home” button and then select “Settings”.
2. In the General menu, select “Driver Profile”.
3. Select the profile you want to use, and then select “Activate”.
DRIVER PROFILE
70
Page 88 of 148
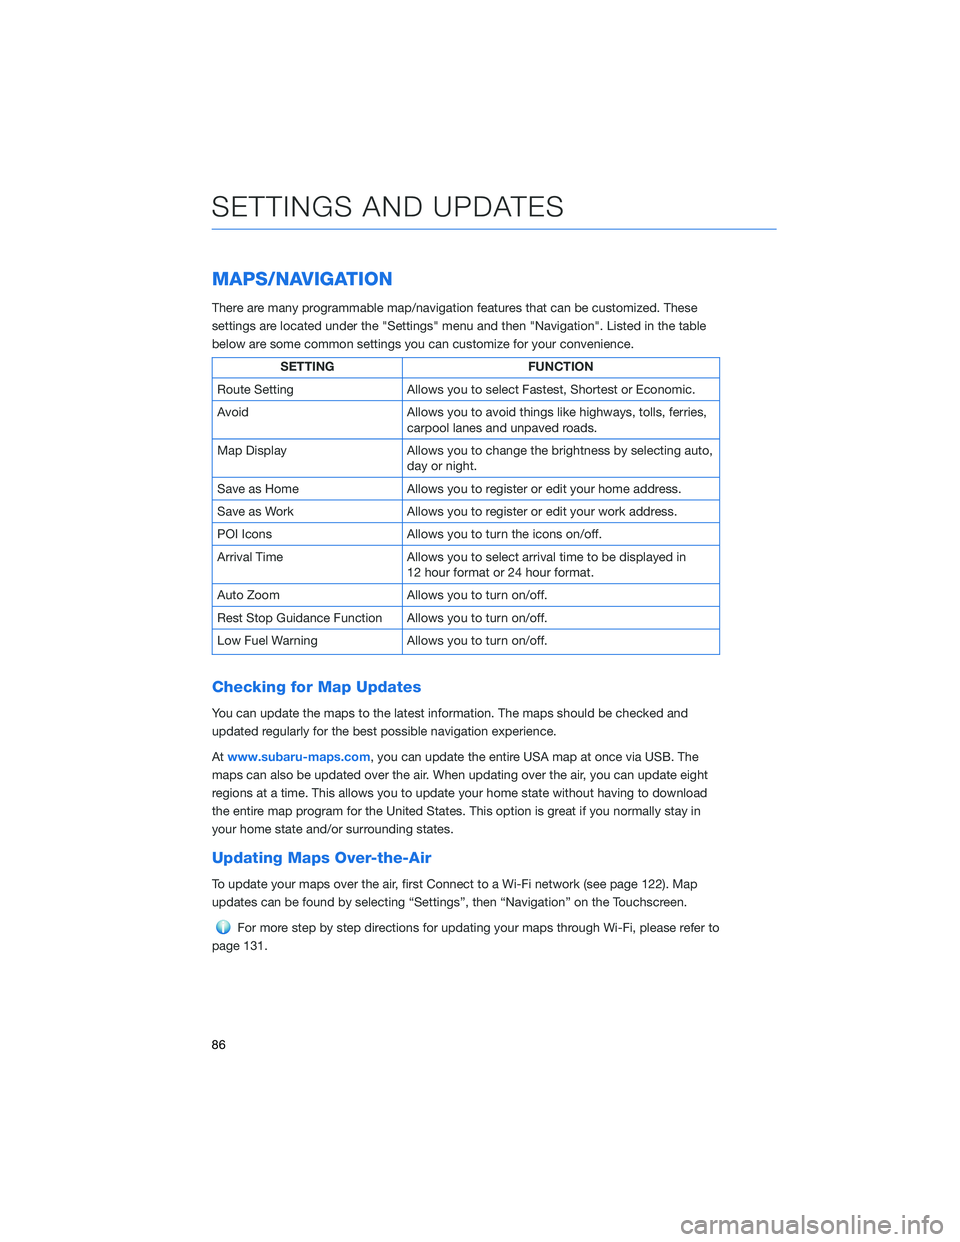
MAPS/NAVIGATION
There are many programmable map/navigation features that can be customized. These
settings are located under the "Settings" menu and then "Navigation". Listed in the table
below are some common settings you can customize for your convenience.
SETTING FUNCTION
Route Setting Allows you to select Fastest, Shortest or Economic.
Avoid Allows you to avoid things like highways, tolls, ferries,
carpool lanes and unpaved roads.
Map Display Allows you to change the brightness by selecting auto,
day or night.
Save as Home Allows you to register or edit your home address.
Save as Work Allows you to register or edit your work address.
POI Icons Allows you to turn the icons on/off.
Arrival Time Allows you to select arrival time to be displayed in
12 hour format or 24 hour format.
Auto Zoom Allows you to turn on/off.
Rest Stop Guidance Function Allows you to turn on/off.
Low Fuel Warning Allows you to turn on/off.
Checking for Map Updates
You can update the maps to the latest information. The maps should be checked and
updated regularly for the best possible navigation experience.
Atwww.subaru-maps.com, you can update the entire USA map at once via USB. The
maps can also be updated over the air. When updating over the air, you can update eight
regions at a time. This allows you to update your home state without having to download
the entire map program for the United States. This option is great if you normally stay in
your home state and/or surrounding states.
Updating Maps Over-the-Air
To update your maps over the air, first Connect to a Wi-Fi network (see page 122). Map
updates can be found by selecting “Settings”, then “Navigation” on the Touchscreen.
For more step by step directions for updating your maps through Wi-Fi, please refer to
page 131.
SETTINGS AND UPDATES
86
Page 101 of 148
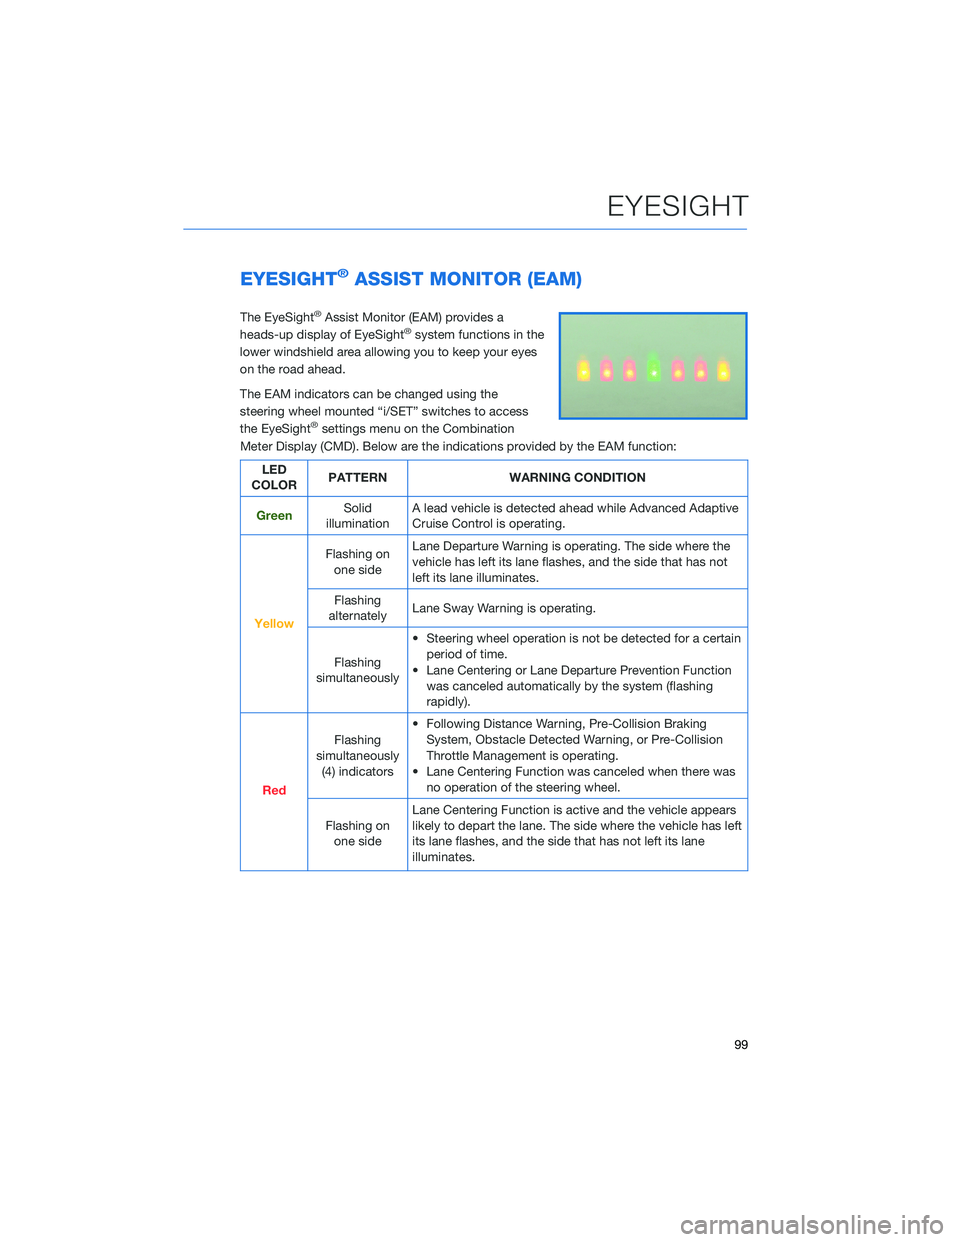
EYESIGHT®ASSIST MONITOR (EAM)
The EyeSight®Assist Monitor (EAM) provides a
heads-up display of EyeSight®system functions in the
lower windshield area allowing you to keep your eyes
on the road ahead.
The EAM indicators can be changed using the
steering wheel mounted “i/SET” switches to access
the EyeSight
®settings menu on the Combination
Meter Display (CMD). Below are the indications provided by the EAM function:
LED
COLORPATTERN WARNING CONDITION
GreenSolid
illuminationA lead vehicle is detected ahead while Advanced Adaptive
Cruise Control is operating.
Yellow
Flashing on
one sideLane Departure Warning is operating. The side where the
vehicle has left its lane flashes, and the side that has not
left its lane illuminates.
Flashing
alternatelyLane Sway Warning is operating.
Flashing
simultaneously• Steering wheel operation is not be detected for a certain
period of time.
• Lane Centering or Lane Departure Prevention Function
was canceled automatically by the system (flashing
rapidly).
Red
Flashing
simultaneously
(4) indicators• Following Distance Warning, Pre-Collision Braking
System, Obstacle Detected Warning, or Pre-Collision
Throttle Management is operating.
• Lane Centering Function was canceled when there was
no operation of the steering wheel.
Flashing on
one sideLane Centering Function is active and the vehicle appears
likely to depart the lane. The side where the vehicle has left
its lane flashes, and the side that has not left its lane
illuminates.
EYESIGHT
99
Page 131 of 148
Map View/Perspective
The perspective of the map can be changed
between 2D north-up, 2D heading-up, and 3D.
To change the view, select the icon at the
upper right of the screen. Each time the icon is
selected, the view will change as well as the
icon to match the map perspective.
Traffic Information
Road sections affected by traffic conditions are displayed in a different color on the map,
and a small icon representing the type of traffic condition is displayed above the road.
A subscription to the SiriusXM
®Satellite Radio Service is necessary to receive the data
service in the vehicle (3 years included).
HOW TO APPENDIX
129