2022 RAM CHASSIS CAB steering
[x] Cancel search: steeringPage 199 of 428

MULTIMEDIA197
Forward Collision Warning This setting will turn the Forward Collision Warning system on or off. The “Off”
setting will deactivate the FCW system. The “Warning Only” setting will provide
only an audible chime when a collision is detected. The “Warning + Active
Braking” setting will provide an audible chime and apply some brake pressure
when a collision is detected.
Pedestrian Emergency Braking This setting will turn the Pedestrian Emergency Braking system on or off.
LaneSense Warning This setting will change the distance at which the steering wheel will provide
lane departure feedback. The available settings are “Early”, “Medium”, and
“Late”.
LaneSense Strength This setting will change the strength of the steering wheel feedback during a
lane departure. The available settings are “Low”, “Medium”, and “High”.
ParkSense This setting will change the type of ParkSense alert when a close object is
detected and provide both an audible chime and a visual display.
Front ParkSense Volume This setting adjusts the volume of the Front ParkSense system. The available
settings are “Low”, “Medium”, and “High”.
Rear ParkSense Volume This setting adjusts the volume of the Rear ParkSense system. The available
settings are “Low”, “Medium”, and “High”.
Rear ParkSense Braking Assist This setting will turn the Rear ParkSense Braking Assist on or off.
Blind Spot Alert This setting will change the type of alert provided when an object is detected
in a vehicle’s blind spot. The “Off” setting will turn off Blind Spot Alert. The
“Lights” setting will activate the Blind Spot Alert lights on the outside mirrors.
The “Lights & Chime” setting will activate both the lights on the outside
mirrors and an audible chime.
Trailer Length For Blind Spot Alert This setting will auto detect the length of an attached trailer. The “Auto”
setting will have the system automatically set the trailer length. The “Max”
setting will always set the length to the maximum 39.5 ft (12 m).
Setting Name
Description
5
22_DPF_OM_EN_USC_t.book Page 197
Page 205 of 428

MULTIMEDIA203
Lights
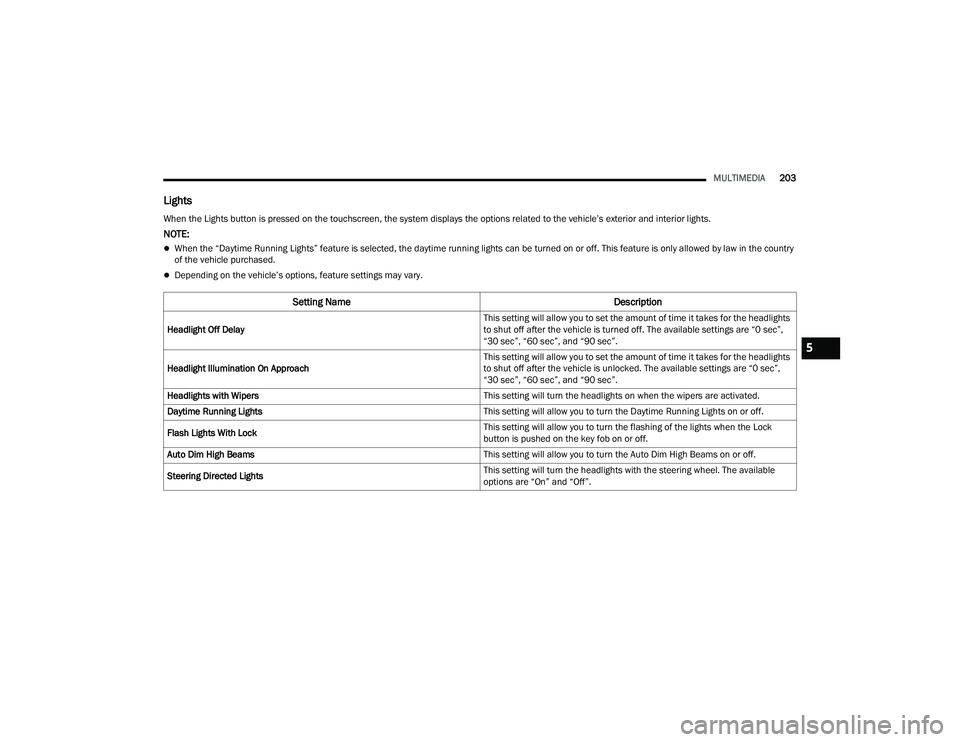
When the Lights button is pressed on the touchscreen, the system displays the options related to the vehicle’s exterior and interior lights.
NOTE:
When the “Daytime Running Lights” feature is selected, the daytime running lights can be turned on or off. This feature is only allowed by law in the country
of the vehicle purchased.
Depending on the vehicle’s options, feature settings may vary.
Setting Name Description
Headlight Off Delay This setting will allow you to set the amount of time it takes for the headlights
to shut off after the vehicle is turned off. The available settings are “0 sec”,
“30 sec”, “60 sec”, and “90 sec”.
Headlight Illumination On Approach This setting will allow you to set the amount of time it takes for the headlights
to shut off after the vehicle is unlocked. The available settings are “0 sec”,
“30 sec”, “60 sec”, and “90 sec”.
Headlights with Wipers This setting will turn the headlights on when the wipers are activated.
Daytime Running Lights This setting will allow you to turn the Daytime Running Lights on or off.
Flash Lights With Lock This setting will allow you to turn the flashing of the lights when the Lock
button is pushed on the key fob on or off.
Auto Dim High Beams This setting will allow you to turn the Auto Dim High Beams on or off.
Steering Directed Lights This setting will turn the headlights with the steering wheel. The available
options are “On” and “Off”.
5
22_DPF_OM_EN_USC_t.book Page 203
Page 207 of 428

MULTIMEDIA205
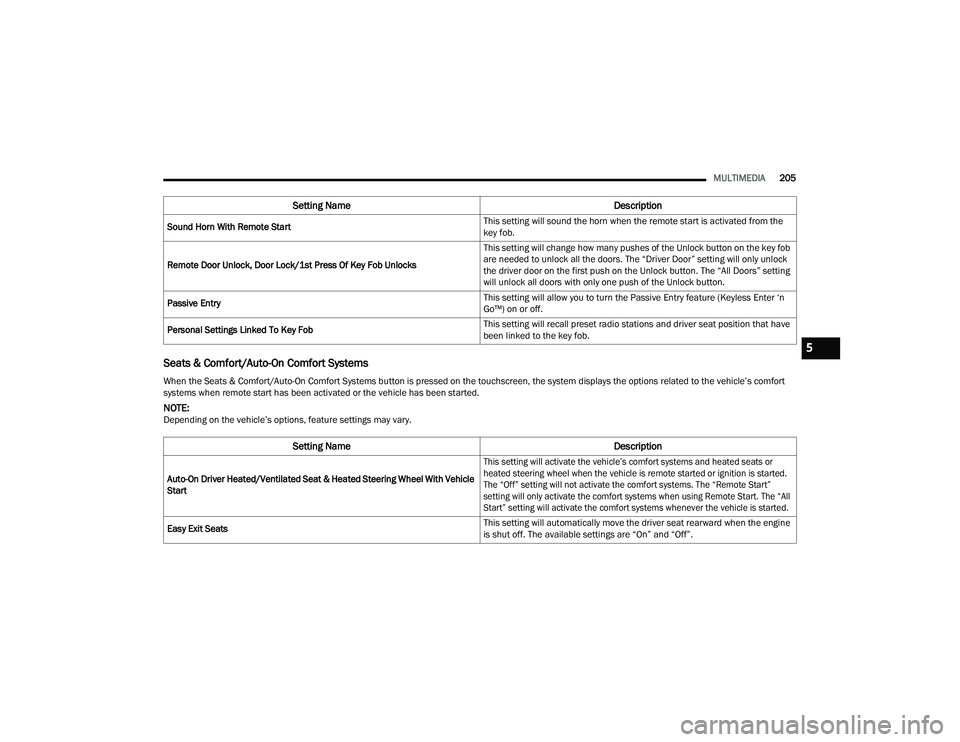
Seats & Comfort/Auto-On Comfort Systems
Sound Horn With Remote Start This setting will sound the horn when the remote start is activated from the
key fob.
Remote Door Unlock, Door Lock/1st Press Of Key Fob Unlocks This setting will change how many pushes of the Unlock button on the key fob
are needed to unlock all the doors. The “Driver Door” setting will only unlock
the driver door on the first push on the Unlock button. The “All Doors” setting
will unlock all doors with only one push of the Unlock button.
Passive Entry This setting will allow you to turn the Passive Entry feature (Keyless Enter ‘n
Go™) on or off.
Personal Settings Linked To Key Fob This setting will recall preset radio stations and driver seat position that have
been linked to the key fob.
When the Seats & Comfort/Auto-On Comfort Systems button is pressed on the touchscreen, the system displays the options related to the vehicle’s comfort
systems when remote start has been activated or the vehicle has been started.
NOTE:Depending on the vehicle’s options, feature settings may vary.
Setting Name Description
Auto-On Driver Heated/Ventilated Seat & Heated Steering Wheel With Vehicle
Start
This setting will activate the vehicle’s comfort systems and heated seats or
heated steering wheel when the vehicle is remote started or ignition is started.
The “Off” setting will not activate the comfort systems. The “Remote Start”
setting will only activate the comfort systems when using Remote Start. The “All
Start” setting will activate the comfort systems whenever the vehicle is started.
Easy Exit Seats This setting will automatically move the driver seat rearward when the engine
is shut off. The available settings are “On” and “Off”.
Setting Name
Description
5
22_DPF_OM_EN_USC_t.book Page 205
Page 215 of 428

MULTIMEDIA213
SAFETY AND GENERAL INFORMATION
Safety Guidelines
Please read this manual carefully before using the
system. It contains instructions on how to use the
system in a safe and effective manner.
Do NOT attach any object to the touchscreen.
Doing so can result in damage to the touchscreen.
Please read and follow these safety precautions.
Failure to do so may result in injury or property
damage.
Glance at the screen only when safe to do so. If
prolonged viewing of the screen is required,
park in a safe location and set the parking
brake.
Stop use immediately if a problem occurs.
Failure to do so may cause injury or damage to
the product. See an authorized dealer for repair.
Ensure the volume level of the system is set to a
level that still allows you to hear outside traffic
and emergency vehicles.
Safe Usage Of The Uconnect System
The Uconnect system is a sophisticated elec -
tronic device. Do not let young children use the
system.
Permanent hearing loss may occur if you play
your music or sound system at loud volumes.
Exercise caution when setting the volume on the
system.
Keep drinks, rain and other sources of moisture
away from the system. Besides damage to the
system, moisture can cause electric shocks as
with any electronic device.
NOTE:Many features of this system are speed
dependent. For your own safety, it is not possible to
use some of the touchscreen features while the
vehicle is in motion.
Care And Maintenance
Do not press the touchscreen with any hard or
sharp objects (pen, USB stick, jewelry, etc.),
which could scratch the surface.
Do not spray any liquid or chemicals directly on
the screen! Use a clean and dry microfiber lens
cleaning cloth in order to clean the touchscreen.
If necessary, use a lint-free cloth dampened
with a cleaning solution, such as isopropyl
alcohol or an isopropyl alcohol and water solu -
tion ratio of 50:50. Be sure to follow the solvent
manufacturer's precautions and directions
Ú page 412.
UCONNECT MODES
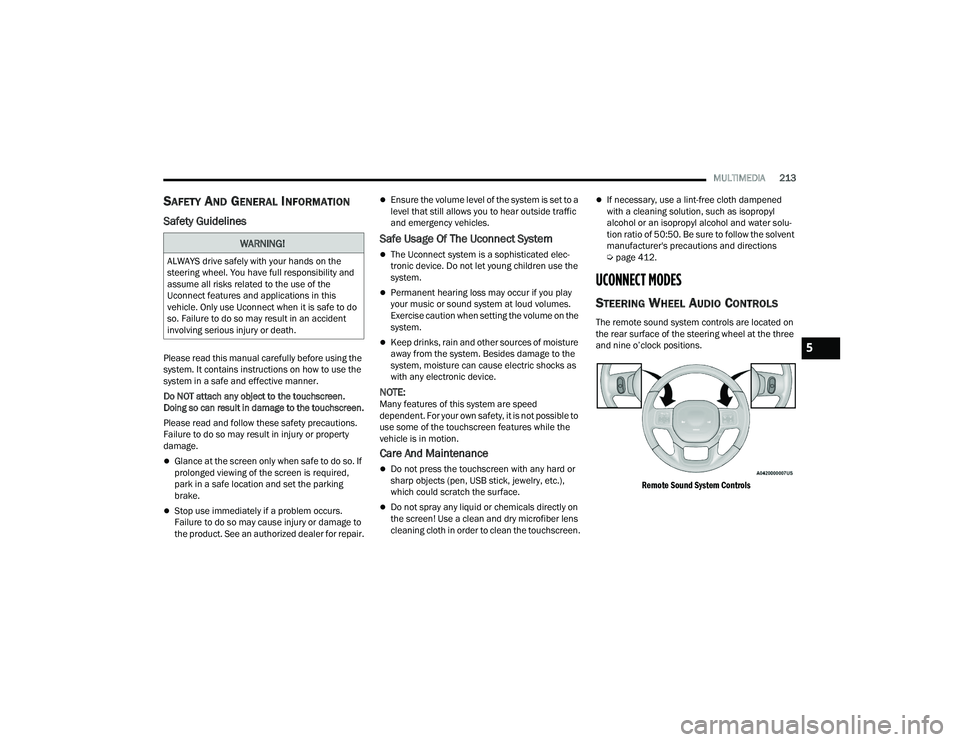
STEERING WHEEL AUDIO CONTROLS
The remote sound system controls are located on
the rear surface of the steering wheel at the three
and nine o’clock positions.
Remote Sound System Controls
WARNING!
ALWAYS drive safely with your hands on the
steering wheel. You have full responsibility and
assume all risks related to the use of the
Uconnect features and applications in this
vehicle. Only use Uconnect when it is safe to do
so. Failure to do so may result in an accident
involving serious injury or death.
5
22_DPF_OM_EN_USC_t.book Page 213
Page 217 of 428

MULTIMEDIA215
Tune/Scroll Control
Turn the rotary TUNE/SCROLL control knob
clockwise to increase or counterclockwise to
decrease the radio station frequency. Push the
ENTER/BROWSE button to choose a selection.
Seek
The Seek Up and Down functions are activated by
pressing the double arrow buttons on the
touchscreen to the right and left of the radio
station display or by pushing the left steering wheel
audio control button up or down.
Seek Up and Seek Down
Press and release the Seek Up or Seek
Down button to tune the radio to the next
available station or channel. During a Seek Up/
Down function, if the radio reaches the starting
station after passing through the entire band two
times, the radio will stop at the station where it
began.
Fast Seek Up and Fast Seek Down
Press and hold, and then release the Seek Up
or Seek Down button to advance the radio
through the available stations or channels at a
faster rate. The radio stops at the next available
station or channel when the button on the
touchscreen is released.
NOTE:
Pressing and holding either the Seek Up or
Seek Down button will scan the different
frequency bands at a slower rate.
Info — If Equipped
Press the Info button to display information related
to the currently playing song and radio station.
Direct Tune
Press the Tune button located at the bottom of the
radio screen to directly tune to a desired radio
station or channel.
Press the available number button on the
touchscreen to begin selecting a desired station.
Once a number has been entered, any numbers
that are no longer possible (stations that cannot be
reached) will become deactivated/grayed out.
Undo
You can backspace an entry by pressing the
Back button on the touchscreen.
GO
Once the last digit of a station has been entered,
press “Ok”. The Direct Tune screen will close, and
the system will automatically tune to that station.
RADIO VOICE COMMANDS
Use your voice to quickly get to the AM, FM, or
SiriusXM® Satellite Radio stations you would like
to hear. (Subscription or included SiriusXM®
Satellite Radio trial required.)
Push the VR button on the steering wheel and
wait for the beep to say a command. See an
example below:
“ Tune to ninety-five-point-five FM”
“Tune to Satellite Channel Hits 1”
Did You Know: At any time, if you are not sure of
what to say or want to learn a Voice Command,
push the VR button and say “ Help”. The system
provides you with a list of commands.
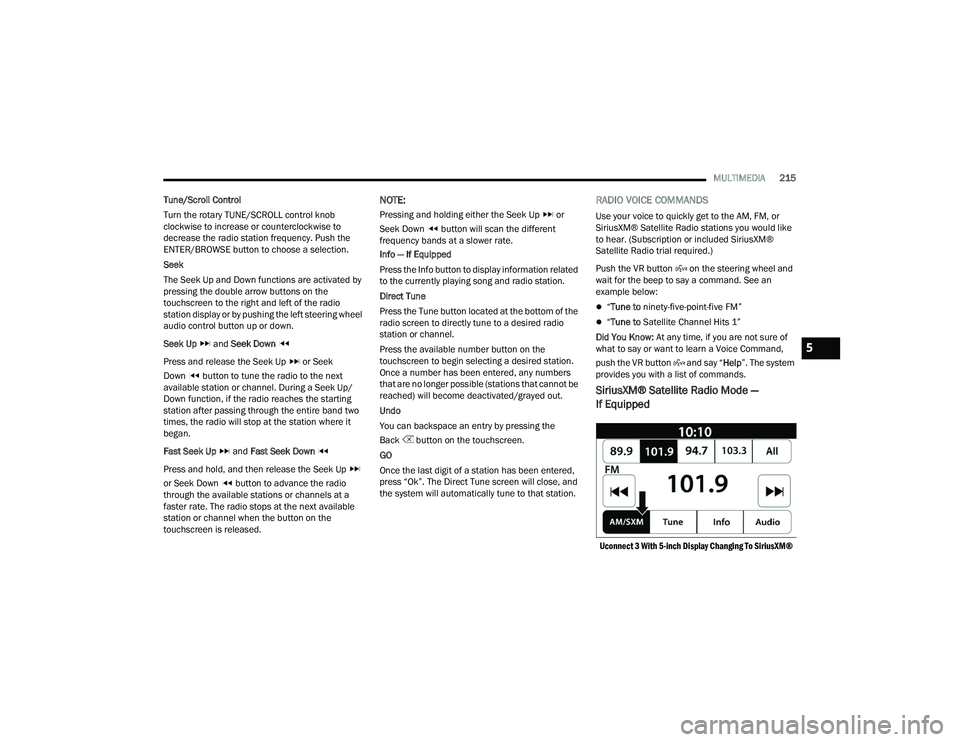
SiriusXM® Satellite Radio Mode —
If Equipped
Uconnect 3 With 5-inch Display Changing To SiriusXM®
5
22_DPF_OM_EN_USC_t.book Page 215
Page 225 of 428

MULTIMEDIA223
Info
In USB Mode, press the Info button on the
touchscreen to display the current track
information. Press the Info or X button on the
touchscreen a second time to cancel this feature.
Tracks
In USB Mode, press the Tracks button on the
touchscreen to display a pop-up with the Song List.
The song currently playing is indicated by an arrow
and lines above and below the song title. When in
the Tracks List screen you can rotate the TUNE/
SCROLL knob to highlight a track (indicated by the
line above and below the track name) and then
push the ENTER/BROWSE knob to start playing
that track.
In Bluetooth® Mode, if the Bluetooth® device
supports this feature, press the Tracks button on
the touchscreen to display a pop-up with the Song
List. The currently playing song is indicated by a red
arrow and lines above and below the song title.
Pressing the Tracks button on the touchscreen
while the pop-up is displayed will close the pop-up.
MEDIA VOICE COMMANDS
Uconnect offers connections via USB, Bluetooth®,
and auxiliary (AUX) ports. Voice operation is only
available for connected USB and AUX devices.
Push the VR button located on the steering
wheel. After the beep, say one of the following
commands and follow the prompts to switch your
media source or choose an artist:
“ Change source to Bluetooth®”
“Change source to AUX”
“Change source to USB”
“Play artist Beethoven”; “ Play album Greatest
Hits”; “ Play song Moonlight Sonata”; “ Play genre
Classical”
Did You Know: Press the Browse button on the
touchscreen to see all of the music on your USB
device. Your Voice Command must match exactly
how the artist, album, song, and genre information
is displayed.
PHONE MODE
Overview
Uconnect Phone is a voice-activated, hands-free,
in-vehicle communications system. It allows you to
dial a phone number with your mobile phone.
The feature supports the following:
Voice Activated Features
Hands-Free dialing via Voice (“Call John Smith
Mobile” or “Dial 248-555-1212”).
Hands-Free text-to-speech listening of your
incoming SMS messages.
Hands-Free Text Message Replying: Forward
one of 18 predefined SMS messages to
incoming calls/text messages.
Redialing last dialed numbers (“Redial”).
Calling Back the last incoming call number
(“Call Back”).
Viewing call logs on screen (“Show Incoming
Calls,” “Show Outgoing Calls,” “Show Missed
Calls,” or “Show Recent Calls”).
Searching Contacts phone number (“Search for
John Smith Mobile”).
5
22_DPF_OM_EN_USC_t.book Page 223
Page 226 of 428

224MULTIMEDIA
Screen Activated Features
Dialing via Keypad using touchscreen.
Viewing and Calling contacts from Phonebooks
displayed on the touchscreen.
Setting Favorite Contact phone numbers so they
are easily accessible on the Main Phone screen.
Viewing and Calling contacts from Recent Call
logs.
Reviewing your recent Incoming SMS
Messages.
Pairing up to 10 phones/audio devices for easy
access to connect to them quickly.
NOTE:Your phone must be capable of SMS messaging via
Bluetooth® for messaging features to work
properly.
Your mobile phone’s audio is transmitted through
your vehicle’s audio system; the system will
automatically mute your radio when using the
Uconnect Phone.
For Uconnect customer support:
US visit UconnectPhone.com or call
877-855-8400
Canada visit UconnectPhone.com or call
800-465-2001 (English) or (French) call
800-387-9983 Uconnect Phone allows you to transfer calls
between the system and your mobile phone as you
enter or exit your vehicle and enables you to mute
the system's microphone for private conversation.
The Phone feature is driven through your
Bluetooth® “Hands-Free Profile” mobile phone.
Uconnect features Bluetooth® technology — the
global standard that enables different electronic
devices to connect to each other without wires or a
docking station. Ensure you phone is turned on
with Bluetooth® active and has been paired to the
Uconnect system. Up to 10 mobile phones or audio
devices are allowed to be linked to the system.
Only one linked (or paired) mobile phone and one
audio device can be used with the system at a
time.
Phone Button
The Phone button on your steering wheel
is used to get into the Phone Mode and
make calls, show recent, incoming or
outgoing calls, view phonebook, etc.
When you push the button you will hear a BEEP.
The BEEP is your signal to give a command.
Voice Command Button
The Voice Command button on your
steering wheel is only used for “barge in”
and when you are already in a call or
want to make another call.
The button on your steering wheel is also used to
access the Voice Commands for the Uconnect
Voice Command features if your vehicle is
equipped.
Phone Operation
OPERATION
Voice commands can be used to operate the
Uconnect Phone and to navigate its menu
structure. Voice commands are required after
most Uconnect Phone prompts. There are two
general methods for how Voice Command works:
1. Say compound commands like “Call John Smith mobile”.
2. Say the individual commands and allow the system to guide you to complete the task.
WARNING!
ALWAYS drive safely with your hands on the
steering wheel. You have full responsibility and
assume all risks related to the use of the
Uconnect features and applications in this
vehicle. Only use Uconnect when it is safe to do
so. Failure to do so may result in an accident
involving serious injury or death.
22_DPF_OM_EN_USC_t.book Page 224
Page 227 of 428

MULTIMEDIA225
You will be prompted for a specific command and
then guided through the available options.
Prior to giving a voice command, one must wait
for the beep, which follows the “Listen” prompt
or another prompt.
For certain operations, compound commands
can be used. For example, instead of saying
“Call” and then “John Smith” and then “mobile”,
the following compound command can be said:
“Call John Smith mobile.”
For each feature explanation in this section,
only the compound command form of the voice
command is given. You can also break the
commands into parts and say each part of the
command when you are asked for it. For
example, you can use the compound command
form voice command “Search for John Smith,”
or you can break the compound command form
into two voice commands: “Search Contacts”
and when asked, “John Smith.” Please
remember, the Uconnect Phone works best
when you talk in a normal conversational tone,
as if speaking to someone sitting a few feet/
meters away from you.
NATURAL SPEECH
Your Uconnect Phone Voice system uses a Natural
Language Voice Recognition (VR) engine.
Natural speech allows the user to speak
commands in phrases or complete sentences. The system filters out certain non-word utterances and
sounds such as “ah” and “eh.” The system handles
fill-in words such as “I would like to”.
The system handles multiple inputs in the same
phrase or sentence such as “make a phone call”
and “to Kelly Smith”. For multiple inputs in the
same phrase or sentence, the system identifies
the topic or context and provides the associated
follow-up prompt such as “Who do you want to
call?” in the case where a phone call was
requested but the specific name was not
recognized.
The system utilizes continuous dialog. When the
system requires more information from the user, it
will ask a question to which the user can respond
without pushing the Voice Command button on the
steering wheel.
HELP COMMAND
If you need assistance at any prompt, or if you want
to know your options at any prompt, say “Help”
following the beep.
To activate the Uconnect Phone from idle, simply
push the Phone button (if active) on your steering
wheel and say a command or say “Help”. All Phone
sessions begin with a push of the VR button or the
Phone button.
CANCEL COMMAND
At any prompt, after the beep, you can say “Cancel”
and you will be returned to the main menu.
You can also push the VR button or Phone button
on your steering wheel when the system is listening
for a command and be returned to the main or
previous menu.
PAIR (LINK) UCONNECT PHONE TO A MOBILE
PHONE
Use this QR code to access your
digital experience.
To begin using your Uconnect
Phone, you must pair your
compatible Bluetooth®-enabled
mobile phone. Mobile phone
pairing is the process of
establishing a wireless connection between a
cellular phone and the Uconnect system.
To complete the pairing process, you will need to
reference your mobile phone’s manual. Please
visit UconnectPhone.com for complete mobile
phone compatibility information.
5
22_DPF_OM_EN_USC_t.book Page 225