2022 PEUGEOT 3008 change time
[x] Cancel search: change timePage 157 of 292

155
Driving
6Using one or two cameras, the close
surroundings of the vehicle are recorded whilst
manoeuvring at low speed.
An image from above your vehicle in its close
surroundings is reconstructed (represented
between the brackets) in real time and as the
manoeuvre progresses.
It facilitates the alignment of your vehicle when
parking and allows obstacles close to the vehicle
to be seen. It is automatically deleted if the
vehicle remains stationary for too long.
With Visiopark 2, the image is created using
both cameras, when going forward and when
reversing.
When the function is activated, it is possible
that the view from above is not displayed. If
the system is activated when the vehicle has
already moved, the view from above can be fully
displayed.Visiopark 1
Rear view
To activate the camera located on the tailgate,
engage reverse gear and do not exceed a speed
of 6 mph (10 km/h).
The system is deactivated:
–
Automatically
, at speeds above approximately
6 mph (10
km/h),
–
Automatically
, if the tailgate is opened.
–
Upon changing out of reverse gear (the image
remains displayed for 7
seconds).
–
By pressing the white arrow in the upper-left
corner of the touch screen.
AUTO mode
This mode is activated by default.
Using sensors in the rear bumper, the automatic
view changes from the rear view (standard) to
the view from above (zoom) as an obstacle is
approached at the level of the red line (less than
30
cm) during a manoeuvre.
Standard view
The area behind the vehicle is displayed on the
screen.
Page 181 of 292
179
Practical information
7If a telephone call is in progress at the
time, it will be maintained for around 10
minutes via the audio system’s hands-free
system.
Exiting the mode
These functions are automatically reactivated the
next time the vehicle is used.
To restore the use of these functions
immediately, start the engine and let it run:
–
For less than 10 minutes, to use the
equipment for approximately 5 minutes.
–
For more than 10 minutes, to use the
equipment for approximately 30 minutes.
Let the engine run for the specified duration to
ensure that the battery charge is sufficient.
T
o recharge the battery, avoid repeatedly or
continuously restarting the engine.
A flat battery prevents the engine from starting.
For more information on the 12
V battery,
refer to the corresponding section.
Load reduction mode
This system manages the use of certain
functions according to the level of charge
remaining in the battery.
When the vehicle is being driven, the load
reduction function temporarily deactivates certain
functions, such as the air conditioning and the
heated rear screen.
The deactivated functions are reactivated
automatically as soon as conditions permit.
Motorháztető
Stop & Start
Before doing anything under the bonnet,
you must switch off the ignition to avoid any
risk of injury resulting from an automatic
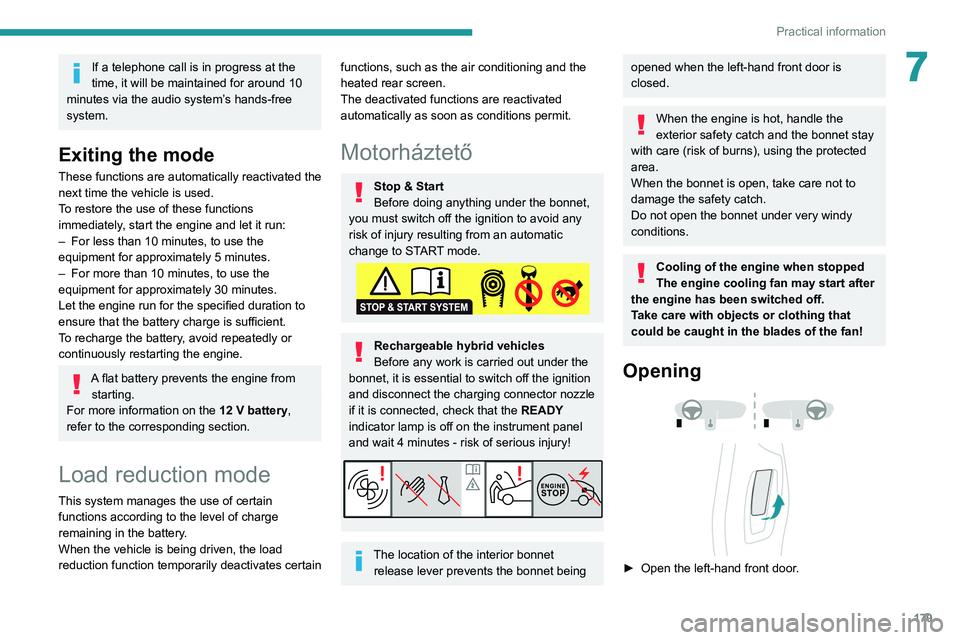
change to START mode.
Rechargeable hybrid vehicles
Before any work is carried out under the
bonnet, it is essential to switch off the ignition
and disconnect the charging connector nozzle
if it is connected, check that the READY
indicator lamp is off on the instrument panel
and wait 4 minutes - risk of serious injury!
The location of the interior bonnet release lever prevents the bonnet being
opened when the left-hand front door is
closed.
When the engine is hot, handle the
exterior safety catch and the bonnet stay
with care (risk of burns), using the protected
area.
When the bonnet is open, take care not to
damage the safety catch.
Do not open the bonnet under very windy
conditions.
Cooling of the engine when stopped
The engine cooling fan may start after
the engine has been switched off.
Take care with objects or clothing that
could be caught in the blades of the fan!
Opening
► Open the left-hand front door.
Page 183 of 292
181
Practical information
7Diesel fuel system
This system is under very high pressure.
All work must be carried out only by a
PEUGEOT dealer or a qualified workshop.
Checking levels
Check all of the following levels regularly in
accordance with the manufacturer's service
schedule. Top them up if required, unless
otherwise indicated.
If a level drops significantly, have the
corresponding system checked by a PEUGEOT
dealer or a qualified workshop.
The fluids must comply with the manufacturer's requirements and with
the vehicle's engine.
Take care when working under the bonnet, as certain areas of the engine
may be extremely hot (risk of burns) and the
cooling fan could start at any time (even with
the ignition off).
Used products
Avoid prolonged contact of used oil or fluids with the skin.
Most of these fluids are harmful to health and
very corrosive.
Do not discard used oil or fluids into
sewers or onto the ground.
Empty used oil into the containers reserved
for this purpose at a PEUGEOT dealer or a
qualified workshop.
Engine oil
The level is checked, with the engine having been switched off for at least 30
minutes and on level ground, either using the oil
level indicator in the instrument panel when the
ignition is switched on (for vehicles equipped
with an electric gauge), or using the dipstick.
It is normal to top up the oil level between two
services (or oil changes). It is recommended
that you check the level, and top up if necessary,
every 3,000 miles (5,000 km).
In order to maintain the reliability of the
engine and emissions control system,
never use additives in the engine oil.
Checking using the dipstick
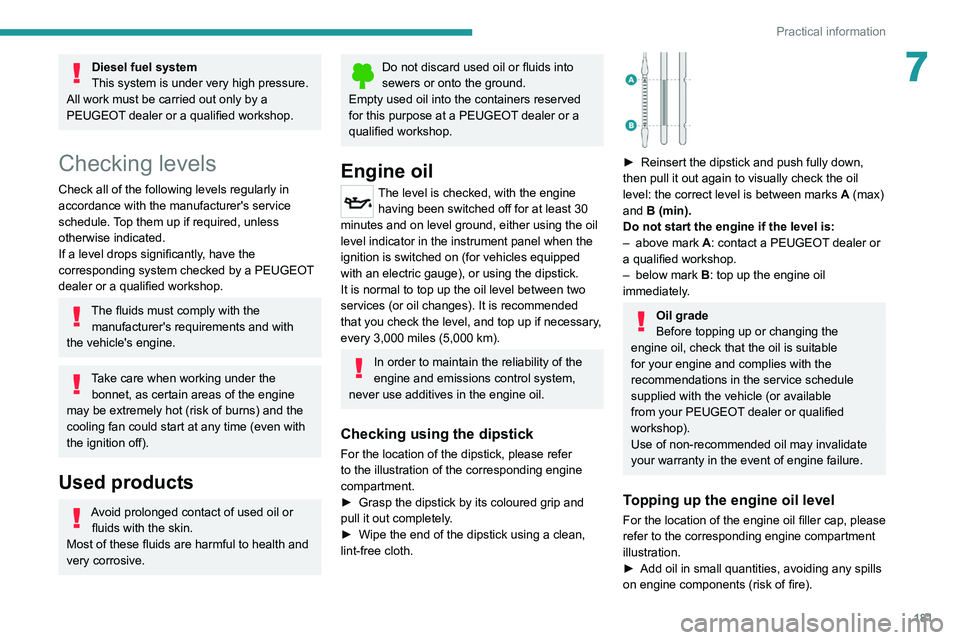
For the location of the dipstick, please refer
to the illustration of the corresponding engine
compartment.
►
Grasp the dipstick by its coloured grip and
pull it out completely
.
►
Wipe the end of the dipstick using a clean,
lint-free cloth.
► Reinsert the dipstick and push fully down,
then pull it out again to visually check the oil
level: the correct level is between marks A
(max)
and B (min).
Do not start the engine if the level is:
–
above mark
A: contact a PEUGEOT dealer or
a qualified workshop.
–
below mark B
: top up the engine oil
immediately.
Oil grade
Before topping up or changing the
engine oil, check that the oil is suitable
for your engine and complies with the
recommendations in the service schedule
supplied with the vehicle (or available
from your PEUGEOT dealer or qualified
workshop).
Use of non-recommended oil may invalidate
your warranty in the event of engine failure.
Topping up the engine oil level
For the location of the engine oil filler cap, please
refer to the corresponding engine compartment
illustration.
►
Add oil in small quantities, avoiding any spills
on engine components (risk of fire).
Page 185 of 292
183
Practical information
7Checks
Unless otherwise indicated, check these
components in accordance with the
manufacturer's service schedule and according
to your engine.
Otherwise, have them checked by a PEUGEOT
dealer or a qualified workshop.
Only use products recommended by
PEUGEOT or products of equivalent
quality and specification.
In order to optimise the operation of
components as important as those in the
braking system, PEUGEOT selects and offers
very specific products.
12 V battery
The battery does not require any maintenance.
Check regularly that the terminals are correctly
tightened (versions without quick-release
terminals) and that the connections are clean.
For more information on the precautions
to take before any work on the 12 V
battery, refer to the corresponding section.
Versions equipped with Stop & Start are
fitted with a 12 V lead-acid battery of
specific technology and specification.
Its replacement should be carried out only by
a PEUGEOT dealer or a qualified workshop.
Passenger compartment
filter
Depending on the environment and the
use of the vehicle (e.g. dusty atmosphere,
city driving), change it twice as often, if
necessary .
A clogged passenger compartment filter
can adversely affect air conditioning
system performance and generate
undesirable odours.
Air filter
Depending on the environment and the
use of the vehicle (e.g. dusty atmosphere,
city driving), change it twice as often, if
necessary .
Oil filter
Change the oil filter each time the engine
oil is changed.
Particle filter (Diesel)
The start of clogging of the particle filter is
indicated by the temporary lighting of this
warning lamp, accompanied by an alert
message.
As soon as the traffic conditions permit,
regenerate the filter by driving at a speed of at
least 37
mph (60 km/h) until the warning lamp
goes off.
If the warning lamp stays on, this
indicates a low Diesel additive level.
For more information on Checking levels,
refer to the corresponding section.
Following prolonged operation of the
vehicle at very low speed or at idle, you
may, in exceptional circumstances, notice
water vapour coming from the exhaust while
accelerating. These emissions have no
impact on the vehicle’s behaviour and the
environment.
New vehicle
During the first few particle filter
regeneration operations, you may notice a
"burning" smell. This is perfectly normal.
Manual gearbox
The gearbox does not require any maintenance (no oil change).
Automatic gearbox
The gearbox does not require any maintenance (no oil change).
Electric parking brake
This system does not require any routine servicing. However, in the event of a
problem, do not hesitate to have the system
Page 226 of 292
224
PEUGEOT Connect Radio
Telephone (long press): reject an incoming call,
end call; when no call is in progress, access
telephone menu.
Radio (rotate): automatic search for the
previous/next station.
Media (rotate): previous/next track, move in a
list.
Short press: confirm a selection; if nothing
selected, access to presets.
Radio: display the list of stations.
Media: display the list of tracks.
Radio (press and hold): update the list of
stations received.
Menus
Applications
Access configurable equipment.
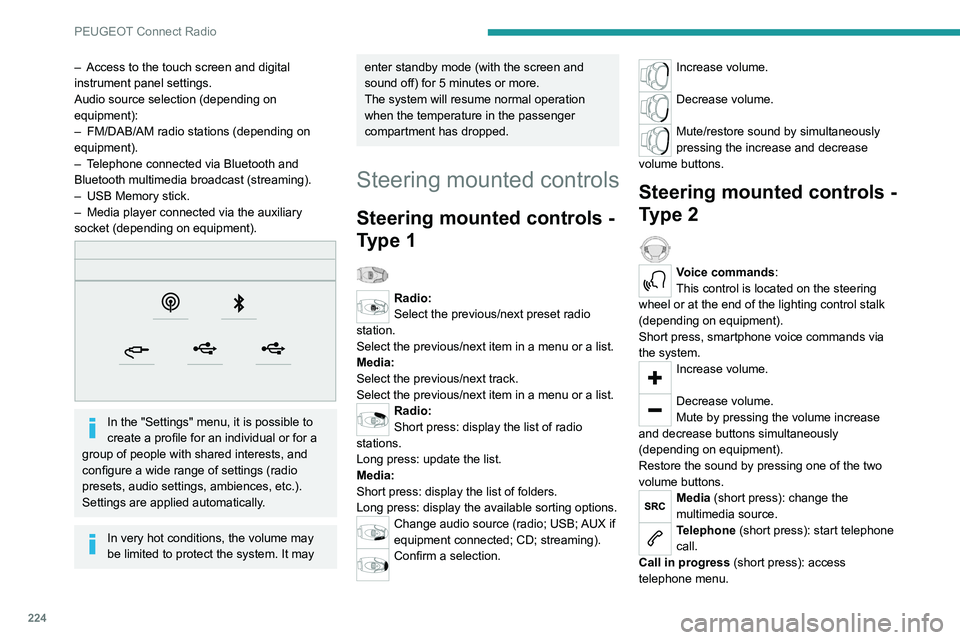
– Access to the touch screen and digital
instrument panel settings.
Audio source selection (depending on
equipment):
–
FM/DAB/AM radio stations (depending on
equipment).
–
T
elephone connected via Bluetooth and
Bluetooth multimedia broadcast (streaming).
–
USB Memory stick.
–
Media player connected via the auxiliary
socket (depending on equipment).
In the "Settings" menu, it is possible to
create a profile for an individual or for a
group of people with shared interests, and
configure a wide range of settings (radio
presets, audio settings, ambiences, etc.).
Settings are applied automatically.
In very hot conditions, the volume may
be limited to protect the system. It may
enter standby mode (with the screen and
sound off) for 5 minutes or more.
The system will resume normal operation
when the temperature in the passenger
compartment has dropped.
Steering mounted controls
Steering mounted controls -
Type 1
Radio:
Select the previous/next preset radio
station.
Select the previous/next item in a menu or a list.
Media:
Select the previous/next track.
Select the previous/next item in a menu or a list.
Radio:
Short press: display the list of radio
stations.
Long press: update the list.
Media:
Short press: display the list of folders.
Long press: display the available sorting options.
Change audio source (radio; USB; AUX if
equipment connected; CD; streaming).
Confirm a selection.
Increase volume.
Decrease volume.
Mute/restore sound by simultaneously
pressing the increase and decrease
volume buttons.
Steering mounted controls -
Type 2
Voice commands:
This control is located on the steering
wheel or at the end of the lighting control stalk
(depending on equipment).
Short press, smartphone voice commands via
the system.
Increase volume.
Decrease volume.
Mute by pressing the volume increase
and decrease buttons simultaneously
(depending on equipment).
Restore the sound by pressing one of the two
volume buttons.
Media (short press): change the
multimedia source.
Telephone (short press): start telephone
call.
Call in progress (short press): access
telephone menu.
Page 230 of 292
228
PEUGEOT Connect Radio
Playlists are updated whenever the ignition
is switched off or a USB memory stick is
connected. The audio system memorises these
lists, which will subsequently load faster if they
have not been changed.
Auxiliary (AUX) jack socket
Depending on equipmentConnect a portable device (MP3 player,
etc.) to the auxiliary jack socket using an
audio cable (not supplied).
This source is only available if "Auxiliary input"
has been selected in the audio settings.
First adjust the volume on the portable device
(to a high level). Then adjust the volume of the
audio system.
Controls are managed via the portable device.
Selecting the source
Press Radio Media to display the main
page.
Press the "SOURCES" button.
Select the source.
Bluetooth Streaming®
Streaming allows you to listen to the audio feed
from your smartphone.
The Bluetooth profile must be activated.
First adjust the volume on the portable device
(to a high level). Then adjust the volume of the
system.
Select the "Tone", "Balance", "Sound ",
"Voice" or "Ringtones" tab to configure
the sound settings.
Press the back arrow to confirm.
In the "Tone" tab, the Ambience, Bass ,
Medium and Treble sound settings are
different and independent for each audio
source.
In the "Balance” tab, the All passengers,
Driver and Front only settings are common
to all sources.
In the "Sound ” tab, activate or deactivate
"Volume linked to speed ", "Auxiliary input"
and "Touch tones ".
The balance/distribution (or spatialisation
with the Arkamys© system) uses audio
processing to adjust the sound quality
according to the number of passengers in the
vehicle.
Onboard audio: Arkamys Sound Staging©
optimises the sound distribution inside
the passenger compartment.
DAB (Digital Audio
Broadcasting) radio
Terrestrial Digital Radio
Digital radio provides higher quality sound.
The various "multiplexes/ensembles" offer a
choice of radio stations organised in alphabetical
order.
Press Radio Media to display the main
page.
Press the "OPTIONS " button to access the
secondary page.
Press "Band" to select "DAB band".
Press in the shaded area to confirm.
FM-DAB Follow-up
"DAB" does not cover 100 % of the country.
When the digital radio signal is poor , the
"FM-DAB Follow-up" enables you to continue
listening to the same station by automatically
switching to the corresponding "FM" analogue
station (if there is one).
Press Radio Media to display the main
page.
Press the "OPTIONS " button to access the
secondary page.
Activate/deactivate "FM-DAB Follow-up ".
Press in the shaded area to confirm.
If "FM-DAB Follow-up" is activated, there
may be a time offset of a few seconds
when the system switches to "FM" analogue
radio, and in some cases a change in volume.
When the digital signal quality is restored, the
system automatically changes back to "DAB".
If the "DAB" station being listened to is
not available on "FM", or if "FM-DAB
Follow-up" is not activated, the sound will cut
out while the digital signal is too weak.
Media
USB port
Insert the USB memory stick into the USB
port or connect the USB device to the
USB port using a suitable cable (not supplied).
To protect the system, do not use a USB hub.
The system builds playlists (in temporary
memory); this operation can take from a
few seconds to several minutes at the first
connection.
Reduce the number of non-music files and the
number of folders to reduce the waiting time.
Page 232 of 292
230
PEUGEOT Connect Radio
Press the "PHONE" button to display the
secondary page.
Press "Android Auto" to start the
application in the system.
Access to the different audio sources remains
available in the margin of the Android Auto
display, using the touch buttons located in the
upper bar.
Access to the menus for the system is possible
at any time using the dedicated buttons.
There may be a pause before applications become available,
depending on the quality of the network.
Pairing a Bluetooth®
telephone
The services available depend on the
network, the SIM card and the
compatibility of the Bluetooth devices used.
Consult the telephone user guide and the
service provider to check which services are
available.
The Bluetooth function must be activated and the telephone configured as "Visible
to all” (in the telphone settings).
To complete the pairing, whichever procedure is
used (from the telephone or from the system),
ensure that the code is the same in the system
and in the telephone.
Telephone
USB sockets
Depending on equipment, for more information
on the USB sockets compatible with CarPlay® or
Android Auto applications, refer to the "Ease of
use and comfort" section.
For the list of compatible smartphones,
visit the Manufacturer's website in your
country.
Synchronising a smartphone enables
users to display applications that support
the smartphone’s CarPlay
® or Android Auto
technology on the vehicle’s screen. For
CarPlay
® technology, the CarPlay® function
must first be activated on the smartphone.
Unlock the smartphone for the communication
process between the smartphone and the
system to work.
As principles and standards are constantly
changing, we recommend keeping the
smartphone's operating system up-to-
date, together with the date and time on
the smartphone and the system.
CarPlay® smartphone
connection
Depending on country.
On connecting the USB cable, the
CarPlay® function deactivates the
system's Bluetooth® mode.
The "CarPlay " function requires the use of
a compatible smartphone and compatible
applications.
Connect the USB cable. The smartphone
charges when connected by the USB
cable.
From the system, press Telephone to
display the CarPlay® interface.
Or
If the smartphone has already connected
by Bluetooth®.Connect the USB cable. The smartphone
charges when connected by the USB
cable.
From the system, press "Telephone" to
display the main page.
Press the "PHONE" button to go to the
secondary page.
Press "CarPlay" to display the CarPlay®
interface.
When the USB cable is disconnected
and the ignition is switched off then back
on, the system will not automatically switch to
Radio Media mode; the source must be
changed manually.
The CarPlay® navigation can be accessed
at any time by pressing the system's
Navigation button.
Android Auto smartphone connection
Depending on country.On the smartphone, download the
Android Auto application.
The "Android Auto" function requires the
use of a compatible smartphone and
applications.
Telephone not connected by
Bluetooth®
Connect a USB cable. The smartphone
charges when connected by a USB cable.
From the system, press "Telephone" to
display the main page.
Press "Android Auto" to start the
application in the system.
Depending on the smartphone, it may be
necessary to activate the "Android Auto"
function.
During the procedure, several screen
pages relating to certain features are
displayed.
Accept to start and complete the connection.
When connecting a smartphone to the
system, we recommend enabling
Bluetooth
® on the smartphone.
Telephone connected by Bluetooth®
From the system, press "Telephone" to
display the main page.
Page 235 of 292
233
PEUGEOT Connect Radio
10Settings
Configuring profiles
Press Settings to display the main page.
Press "Profiles".
Select "Profile 1", "Profile 2", "Profile 3” or
"Common profile ".
Press this button to enter a name for the
profile using the virtual keypad.
Press "OK" to save.
Press the back arrow to confirm.
Press this button to activate the profile.
Press the back arrow again to confirm.
Press this button to reset the selected
profile.
Adjusting the brightness
Press Settings to display the main page.
Press Brightness.
Move the slider to adjust the brightness of
the screen and/or the instrument panel
(depending on version).
Press in the shaded area to confirm.
Modifying system settings
Press Settings to display the main page.
Press "Configuration" to access the
secondary page.
Press "System configuration".
Press the "Units" tab to change the units of
distance, fuel consumption and temperature.
Press the "Factory settings" tab to restore the
initial settings.
Returning the system to factory settings
activates the English language by default
(depending on version).
Press the "System info" tab to display the
versions of the various modules installed in the
system.
Press the "Privacy " tab,
or
Press Settings to display the main page.
Press "Privacy" to activate or deactivate
the private data mode.
Activate or deactivate:
–
"No sharing (data, vehicle position) ".
–
"Only data sharing ”
–
"Data and vehicle position sharing "
Press the back arrow to confirm.
Press Settings to display the main page.
Press "Configuration" to access the
secondary page.
Press "Screen configuration".
Press "Brightness".
Move the slider to adjust the brightness of
the screen and/or the instrument panel
(depending on version).
Press the back arrow to confirm.
Press "Animation".
Activate or deactivate: “Automatic scrolling ”.
Select "Animated transitions".
Press the back arrow to confirm.
Selecting the language
Press Settings to display the main page.
Press "Configuration" to access the
secondary page.
Select "Language" to change the
language.
Press the back arrow to confirm.
Setting the time
Press Settings to display the main page.