2022 PEUGEOT 3008 roof
[x] Cancel search: roofPage 43 of 292
41
Access
2Reinitialisation
Following reconnection of the battery or in the
event of a fault or jerky movement of the sunroof
or blind, reinitialisation is required.
►
Check that nothing is interfering with the
sunroof or blind and that the seals are clean.
►
With the ignition on, fully close the sunroof
and blind.
►
Press and hold the front part of button
B, until
the sunroof and blind move slightly, then hold for
a further 1 second before releasing.
►
W
ait 2 seconds and then press and hold the
front part of button B. The blind and the sunroof
will open and close, one after the other. When
both are completely closed again, hold for a
further 2 seconds and release.
If there is an operating fault, restart the
whole procedure.
Page 44 of 292
42
Ease of use and comfort
Driving position
Correct seating position
Adopting a good driving position contributes to
improving driver comfort and protection.
It also optimises interior and exterior visibility as
well as access to controls.
Certain seat adjustments described in this
section depend on the trim level and the country
in which the vehicle is sold.
Driver’s side
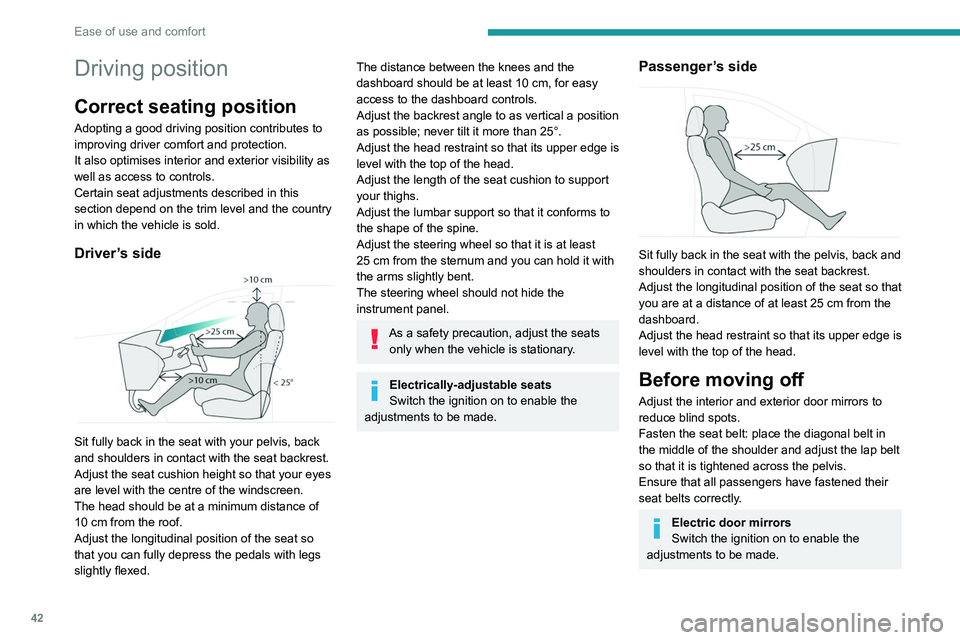
Sit fully back in the seat with your pelvis, back
and shoulders in contact with the seat backrest.
Adjust the seat cushion height so that your eyes
are level with the centre of the windscreen.
The head should be at a minimum distance of
10 cm from the roof.
Adjust the longitudinal position of the seat so
that you can fully depress the pedals with legs
slightly flexed.
The distance between the knees and the
dashboard should be at least 10 cm, for easy
access to the dashboard controls.
Adjust the backrest angle to as vertical a position
as possible; never tilt it more than 25°.
Adjust the head restraint so that its upper edge is
level with the top of the head.
Adjust the length of the seat cushion to support
your thighs.
Adjust the lumbar support so that it conforms to
the shape of the spine.
Adjust the steering wheel so that it is at least
25
cm from the sternum and you can hold it with
the arms slightly bent.
The steering wheel should not hide the
instrument panel.
As a safety precaution, adjust the seats only when the vehicle is stationary.
Electrically-adjustable seats
Switch the ignition on to enable the
adjustments to be made.
Passenger’s side
Sit fully back in the seat with the pelvis, back and
shoulders in contact with the seat backrest.
Adjust the longitudinal position of the seat so that
you are at a distance of at least 25
cm from the
dashboard.
Adjust the head restraint so that its upper edge is
level with the top of the head.
Before moving off
Adjust the interior and exterior door mirrors to
reduce blind spots.
Fasten the seat belt: place the diagonal belt in
the middle of the shoulder and adjust the lap belt
so that it is tightened across the pelvis.
Ensure that all passengers have fastened their
seat belts correctly.
Electric door mirrors
Switch the ignition on to enable the
adjustments to be made.
When driving
Maintain a good driving position and hold the
steering wheel with both hands at the 'quarter to
three' position, so that you can easily and quickly
reach the controls behind and near the steering
wheel.
Never adjust the seats or steering wheel
when driving.
Always keep your feet on the floor.
Front seats
Before moving the seat backwards,
ensure that there is no person or object
that might prevent the full travel of the seat.
There is a risk of trapping or pinching
passengers if present in the rear seats or of
jamming the seat if large objects are placed
on the floor behind the seat.
Page 72 of 292
70
Ease of use and comfort
Removal
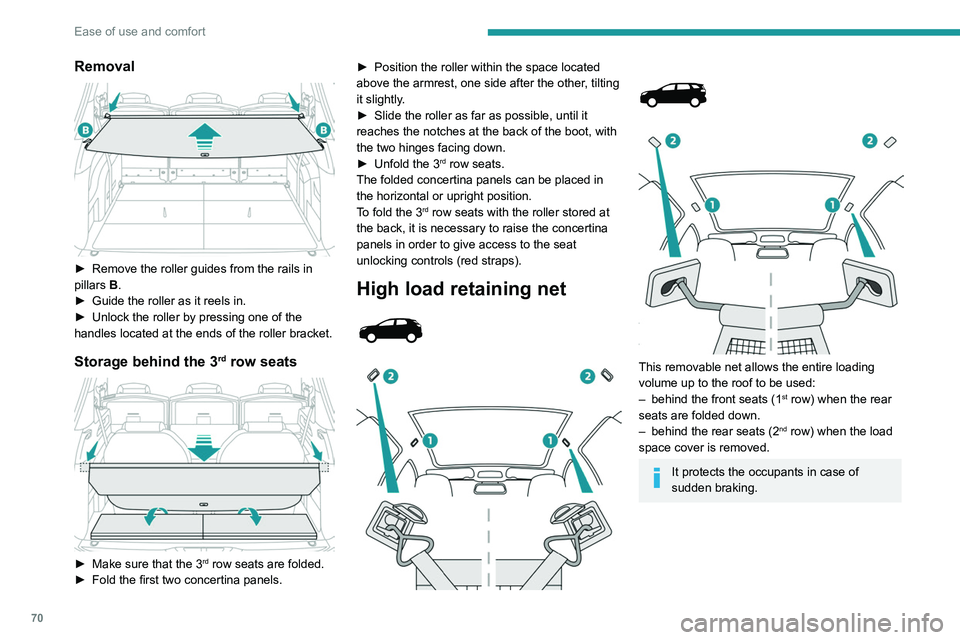
► Remove the roller guides from the rails in
pillars B
.
►
Guide the roller as it reels in.
►
Unlock the roller by pressing one of the
handles located at the ends of the roller bracket.
Storage behind the 3rd row seats
► Make sure that the 3rd row seats are folded.
►
Fold the first two concertina panels. ►
Position the roller within the space located
above the armrest, one side after the other
, tilting
it slightly.
►
Slide the roller as far as possible, until it
reaches the notches at the back of the boot, with
the two hinges facing down.
►
Unfold the 3rd row seats.
The folded concertina panels can be placed in
the horizontal or upright position.
To fold the 3
rd row seats with the roller stored at
the back, it is necessary to raise the concertina
panels in order to give access to the seat
unlocking controls (red straps).
High load retaining net
This removable net allows the entire loading
volume up to the roof to be used:
–
behind the front seats (1st row) when the rear
seats are folded down.
–
behind the rear seats (2nd row) when the load
space cover is removed.
It protects the occupants in case of
sudden braking.
Behind the front seats
(Depending on version)
► Fold down the rear seats.
► Remove the trim covers on each side,
located in the upper section in the roof.
► Position the net's upper hooks in the roof.
► Attach the net’s straps to the lower anchorage
points, located directly below the fixings of the
rear bench seat cushion.
► Pull on the straps to stretch the net.
Once fitted, the net does not prevent
tipping of the rear backrests.
Page 73 of 292
71
Ease of use and comfort
3
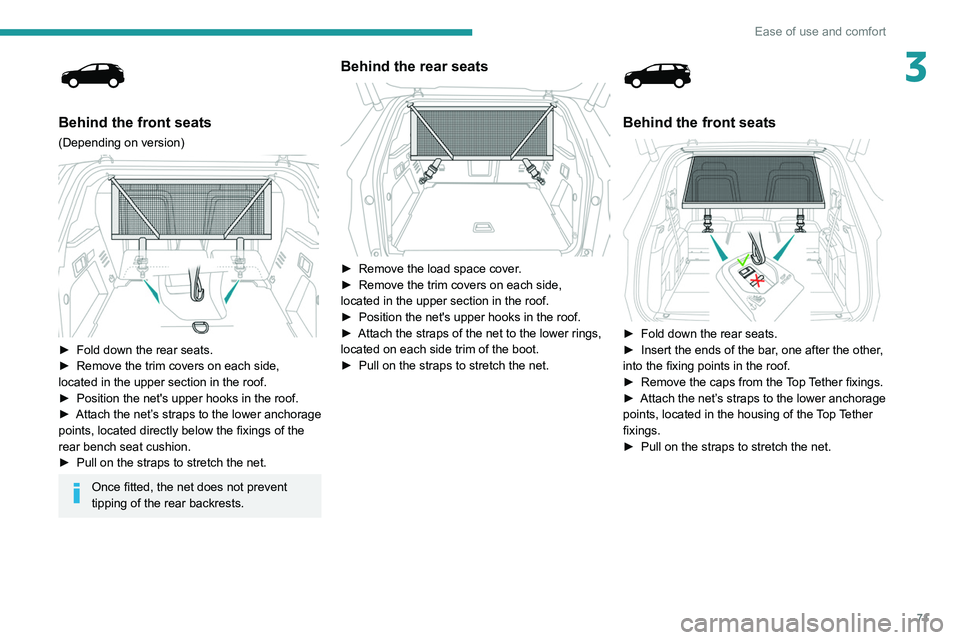
Behind the front seats
(Depending on version)
► Fold down the rear seats.
► Remove the trim covers on each side,
located in the upper section in the roof.
►
Position the net's upper hooks in the roof.
►
Attach
the net’s straps to the lower anchorage
points, located directly below the fixings of the
rear bench seat cushion.
►
Pull on the straps to stretch the net.
Once fitted, the net does not prevent
tipping of the rear backrests.
Behind the rear seats
► Remove the load space cover .
► Remove the trim covers on each side,
located in the upper section in the roof.
►
Position the net's upper hooks in the roof.
►
Attach the straps of the net to the lower rings,
located on each side trim of the boot.
►
Pull on the straps to stretch the net.
Behind the front seats
► Fold down the rear seats.
► Insert the ends of the bar , one after the other,
into the fixing points in the roof.
►
Remove the caps from the
Top Tether fixings.
►
Attach
the net’s straps to the lower anchorage
points, located in the housing of the Top Tether
fixings.
►
Pull on the straps to stretch the net.
Page 74 of 292
72
Ease of use and comfort
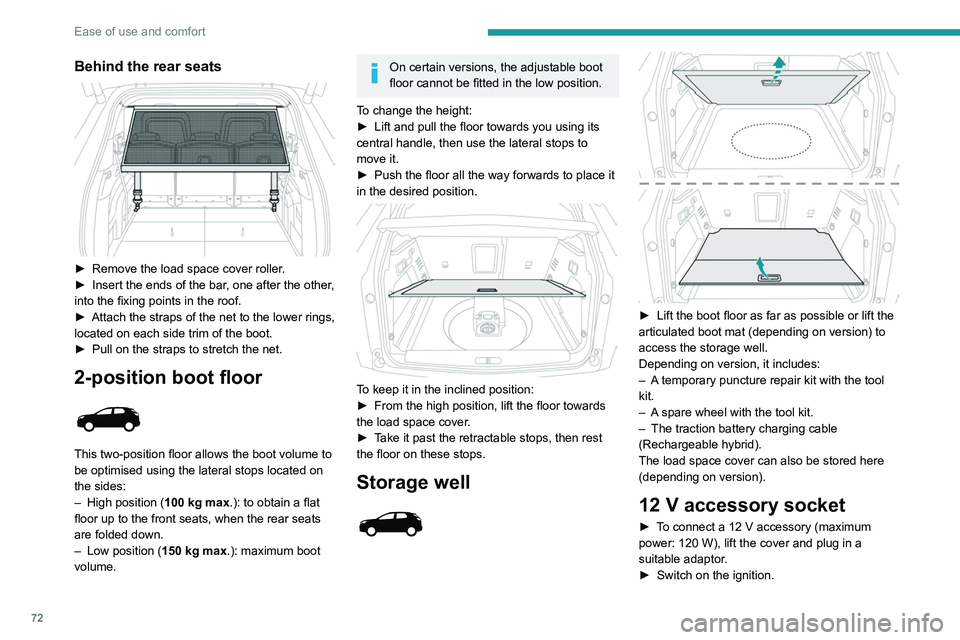
Behind the rear seats
► Remove the load space cover roller.
► Insert the ends of the bar , one after the other,
into the fixing points in the roof.
►
Attach the straps of the net to the lower rings,
located on each side trim of the boot.
►
Pull on the straps to stretch the net.
2-position boot floor
This two-position floor allows the boot volume to
be optimised using the lateral stops located on
the sides:
–
High position ( 100
kg max.): to obtain a flat
floor up to the front seats, when the rear seats
are folded down.
–
Low position ( 150
kg max.): maximum boot
volume.
On certain versions, the adjustable boot
floor cannot be fitted in the low position.
To change the height:
►
Lift and pull the floor towards you using its
central handle, then use the lateral stops to
move it.
►
Push the floor all the way forwards to place it
in the desired position.
To keep it in the inclined position:
► From the high position, lift the floor towards
the load space cover
.
►
T
ake it past the retractable stops, then rest
the floor on these stops.
Storage well
► Lift the boot floor as far as possible or lift the
articulated boot mat (depending on version) to
access the storage well.
Depending on version, it includes:
–
A
temporary puncture repair kit with the tool
kit.
–
A
spare wheel with the tool kit.
–
The traction battery charging cable
(Rechargeable hybrid).
The load space cover can also be stored here
(depending on version).
12 V accessory socket
► To connect a 12 V accessory (maximum
power: 120 W), lift the cover and plug in a
suitable adaptor.
►
Switch on the ignition.
The connection of an electrical device not approved by PEUGEOT, such as a
USB charger, may adversely affect the
operation of vehicle electrical systems,
causing faults such as poor radio reception or
interference with displays in the screens.
Boot lamp
It comes on automatically when the boot is
opened and goes off automatically when the
boot is closed.
The lighting time varies according to the
circumstances:
– When the ignition is off, approximately 10
minutes.
– In energy saving mode, approximately 30
seconds.
– With the engine running, unlimited.
Page 79 of 292
77
Lighting and visibility
4reason, the lighting will not come on
automatically.
The inner surface of the windscreen may become misted up and affect the proper
operation of the rain/sunshine sensor.
In humid and cold weather, demist the
windscreen regularly.
Guide-me-home and
welcome lighting
Guide-me-home lighting
With the ring of the lighting control stalk in the
"AUTO" position and when the light is poor, the
dipped beam headlamps come on automatically
when the ignition is switched off.
You can activate/deactivate this function and adjust the guide-me-home lighting
duration in the Driving/Vehicle touch screen
menu.
Welcome lighting
When the vehicle is unlocked, if the ambient
light is low and the "Automatic illumination of
headlamps" function is activated, this system
automatically turns on certain exterior lamps
as well as certain lamps in the passenger
compartment.
You can activate/deactivate this function and adjust the welcome lighting duration
in the Driving
/ Vehicle touch screen menu.
Door mirror spotlamps
These spotlamps facilitate access to the vehicle
by lighting the ground near the front doors.
When the front courtesy lamp switch is in
this position, the spotlamps come on
automatically:
–
when the vehicle is unlocked.
–
when a door is opened.
–
when a request to locate the vehicle is
received from the remote control.
Whatever the position of the front courtesy lamp
switch, they also come on with the welcome
lighting and guide-me-home lighting functions.
They go off automatically after 30 seconds.
Automatic lighting systems - General
recommendations
The automatic lighting systems use a detection
camera, located at the top of the windscreen.
Operating limits
The system may be disrupted or not work
correctly:
–
When visibility conditions are poor
(e.g.
snowfall, heavy rain).
– If the windscreen is dirty , misted-up or
masked (e.g. sticker) in front of the camera.
–
If the vehicle is facing highly reflective signs
or safety barrier reflectors.
The system is not able to detect:
–
Road users that do not have their own
lighting, such as pedestrians.
–
V
ehicles with hidden lighting (e.g. travelling
behind a safety barrier on the motorway).
–
V
ehicles at the top or bottom of a steep
slope, on winding roads, on crossroads.
Maintenance
Clean the windscreen regularly,
particularly the area in front of the camera.
The internal surface of the windscreen can
also become misted around the camera.
In humid and cold weather, demist the
windscreen regularly.
Do not allow snow to accumulate on the
bonnet or roof of the vehicle as this could
obstruct the camera.
Automatic headlamp dipping
For more information, refer to the
General recommendations for
automatic lighting systems.
Page 94 of 292
92
Safety
due to the activation of the pyrotechnic
cartridge incorporated in the system.
In all cases, the airbag warning lamp comes
on.
Following an impact, have the seat belt
system checked, and if necessary replaced,
by a PEUGEOT dealer or a qualified
workshop.
Front seat belts
The front seat belts are fitted with a pyrotechnic
pretensioning system and a force limiting
system.
Fastening
► Pull the strap, then insert the tongue into the
buckle.
►
Check that the seat belt is fastened correctly
by pulling on the strap.
Unfastening
► Press the red button on the buckle.
► Guide the seat belt as it is reeled in.
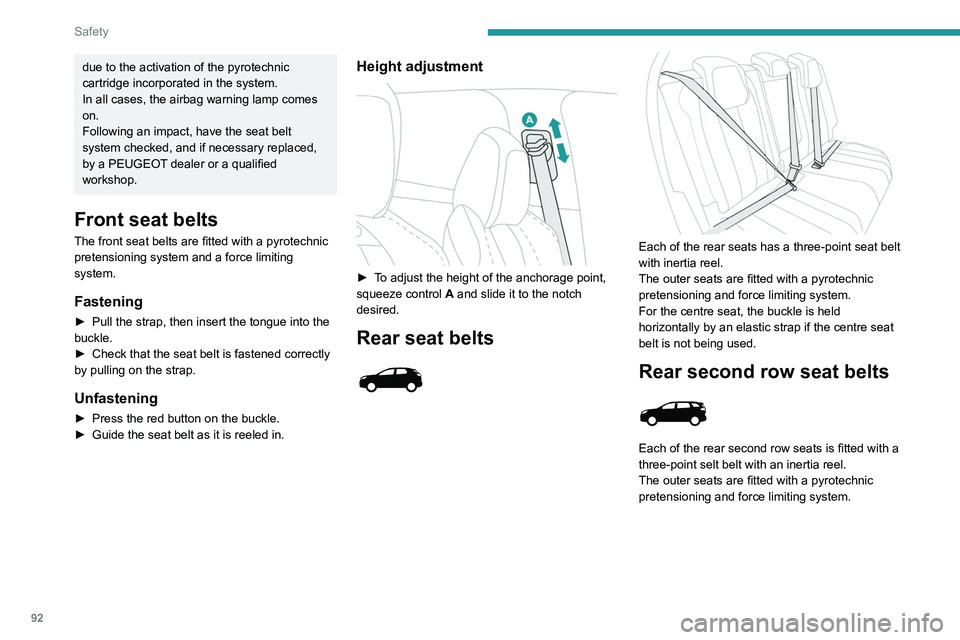
Height adjustment
► To adjust the height of the anchorage point,
squeeze control A and slide it to the notch
desired.
Rear seat belts
Each of the rear seats has a three-point seat belt
with inertia reel.
The outer seats are fitted with a pyrotechnic
pretensioning and force limiting system.
For the centre seat, the buckle is held
horizontally by an elastic strap if the centre seat
belt is not being used.
Rear second row seat belts
Each of the rear second row seats is fitted with a
three-point selt belt with an inertia reel.
The outer seats are fitted with a pyrotechnic
pretensioning and force limiting system.
Before performing any operations on the
rear seats, to avoid damage to the seat
belts, check that:
– the outer seat belts are properly tensioned.
– the central seat belt is completely reeled in.
Rear second row central
seat belt
The seat belt for the rear central seat is built into
the roof.
Page 95 of 292
93
Safety
5
Before performing any operations on the
rear seats, to avoid damage to the seat
belts, check that:
–
the outer seat belts are properly tensioned.
–
the central seat belt is completely reeled in.
Rear second row central
seat belt
The seat belt for the rear central seat is built into
the roof.
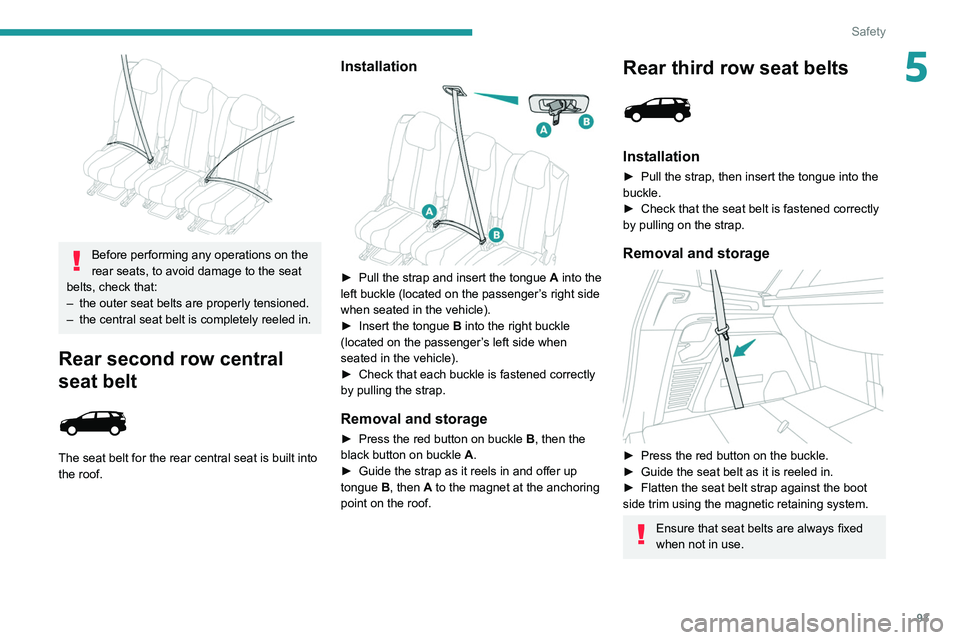
Installation
► Pull the strap and insert the tongue A into the
left buckle (located on the passenger’s right side
when seated in the vehicle).
►
Insert the tongue
B into the right buckle
(located on the passenger’s left side when
seated in the vehicle).
►
Check that each buckle is fastened correctly
by pulling the strap.
Removal and storage
► Press the red button on buckle B , then the
black button on buckle A.
►
Guide the strap as it reels in and offer up
tongue
B, then A to the magnet at the anchoring
point on the roof.
Rear third row seat belts
Installation
► Pull the strap, then insert the tongue into the
buckle.
►
Check that the seat belt is fastened correctly
by pulling on the strap.
Removal and storage
► Press the red button on the buckle.
► Guide the seat belt as it is reeled in.
►
Flatten the seat belt strap against the boot
side trim using the magnetic retaining system.
Ensure that seat belts are always fixed
when not in use.