2022 PEUGEOT 3008 check oil
[x] Cancel search: check oilPage 196 of 292

194
In the event of a breakdown
With a tyre repaired using this type of kit,
do not exceed a speed of 50 mph
(80 km/h) and do not drive more than
125 miles (200 km).
Contact a PEUGEOT dealer or a qualified
workshop to have the tyre changed.
Checking/adjusting tyre
pressures
The compressor can be used, without injecting
sealant, to check and, if necessary, adjust the
tyre pressures.
► Remove the valve cap from the tyre and keep
it in a clean place.
► Uncoil the pipe stowed under the compressor.
► Screw the pipe onto the valve and tighten
firmly.
► Check that the compressor switch is in
position " O".
► Fully uncoil the electric cable stowed under
the compressor.
► Connect the compressor's electric plug to the
vehicle's 12 V socket.
► Switch the ignition on.
► Start the compressor by placing the switch at
position " I" and adjust the pressure to the value
shown on the vehicle's tyre pressure label. To
deflate: press the black button located on the
compressor pipe, near the valve connection.
If after 7 minutes the pressure of 2 bar is
not reached, the tyre is damaged;
Connecting kit 2
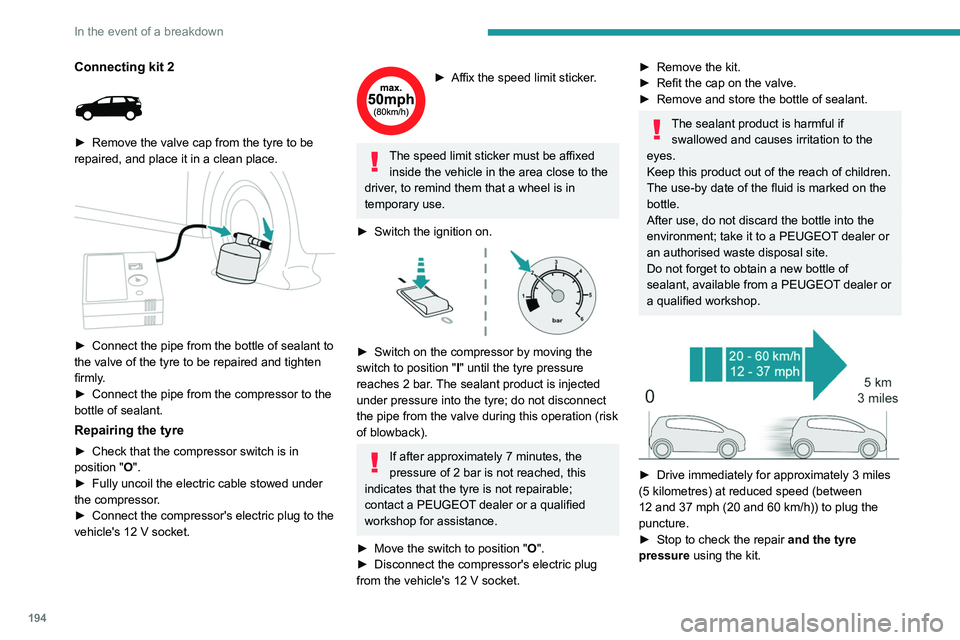
► Remove the valve cap from the tyre to be
repaired, and place it in a clean place.
► Connect the pipe from the bottle of sealant to
the valve of the tyre to be repaired and tighten
firmly
.
►
Connect the pipe from the compressor to the
bottle of sealant.
Repairing the tyre
► Check that the compressor switch is in
position "O".
►
Fully uncoil the electric cable stowed under
the compressor
.
►
Connect the compressor's electric plug to the
vehicle's 12
V socket.
► Affix the speed limit sticker .
The speed limit sticker must be affixed
inside the vehicle in the area close to the
driver, to remind them that a wheel is in
temporary use.
►
Switch the ignition on.
► Switch on the compressor by moving the
switch to position " I
" until the tyre pressure
reaches 2 bar. The sealant product is injected
under pressure into the tyre; do not disconnect
the pipe from the valve during this operation (risk
of blowback).
If after approximately 7 minutes, the
pressure of 2 bar is not reached, this
indicates that the tyre is not repairable;
contact a PEUGEOT dealer or a qualified
workshop for assistance.
►
Move the switch to position " O
".
►
Disconnect the compressor's electric plug
from the vehicle's 12
V socket.
► Remove the kit.
► Refit the cap on the valve.
►
Remove and store the bottle of sealant.
The sealant product is harmful if swallowed and causes irritation to the
eyes.
Keep this product out of the reach of children.
The use-by date of the fluid is marked on the
bottle.
After use, do not discard the bottle into the
environment; take it to a PEUGEOT dealer or
an authorised waste disposal site.
Do not forget to obtain a new bottle of
sealant, available from a PEUGEOT dealer or
a qualified workshop.
► Drive immediately for approximately 3 miles
(5 kilometres) at reduced speed (between
12 and 37 mph (20 and 60
km/h)) to plug the
puncture.
►
Stop to check the repair
and the tyre
pressure using the kit.
Page 197 of 292

195
In the event of a breakdown
8With a tyre repaired using this type of kit,
do not exceed a speed of 50 mph
(80
km/h) and do not drive more than
125
miles (200 km).
Contact a PEUGEOT dealer or a qualified
workshop to have the tyre changed.
Checking/adjusting tyre
pressures
The compressor can be used, without injecting
sealant, to check and, if necessary, adjust the
tyre pressures.
►
Remove the valve cap from the tyre and keep
it in a clean place.
►
Uncoil
the pipe stowed under the compressor.
►
Screw the pipe onto the valve and tighten
firmly
.
►
Check that the compressor switch is in
position " O
".
►
Fully uncoil the electric cable stowed under
the compressor
.
►
Connect the compressor's electric plug to the
vehicle's 12
V socket.
►
Switch the ignition on.
►
Start the compressor by placing the switch at
position " I
" and adjust the pressure to the value
shown on the vehicle's tyre pressure label. To
deflate: press the black button located on the
compressor pipe, near the valve connection.
If after 7 minutes the pressure of 2 bar is
not reached, the tyre is damaged;
contact a PEUGEOT dealer or a qualified
workshop for assistance.
►
Once the correct pressure is reached, put the
switch in position " O
".
►
Remove the kit and stow it.
►
Refit the cap on the valve.
Spare wheel
Scan the QR Code on page 3 to view
explanatory videos.
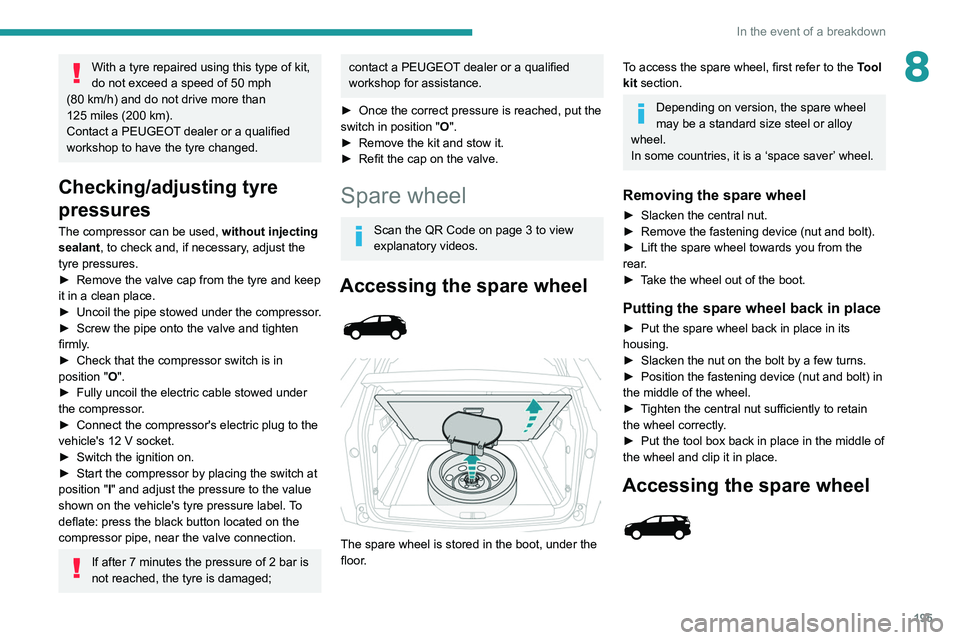
Accessing the spare wheel
The spare wheel is stored in the boot, under the
floor.
To access the spare wheel, first refer to the Tool
kit section.
Depending on version, the spare wheel
may be a standard size steel or alloy
wheel.
In some countries, it is a ‘space saver’ wheel.
Removing the spare wheel
► Slacken the central nut.
► Remove the fastening device (nut and bolt).
►
Lift the spare wheel towards you from the
rear
.
►
T
ake the wheel out of the boot.
Putting the spare wheel back in place
► Put the spare wheel back in place in its
housing.
►
Slacken the nut on the bolt by a few turns.
►
Position the fastening device (nut and bolt) in
the middle of the wheel.
►
T
ighten the central nut sufficiently to retain
the wheel correctly.
►
Put the tool box back in place in the middle of
the wheel and clip it in place.
Accessing the spare wheel
Page 264 of 292

262
Alphabetical index
Charger, induction 64
Charger, wireless
64
Charging cable
168
Charging cable (Rechargeable
hybrid)
166, 172
Charging connector (Rechargeable
hybrid)
166, 171–172
Charging flap (Rechargeable
hybrid)
166, 171–172
Charging the traction battery
(Rechargeable hybrid)
20, 165, 171–172
CHECK
21
Checking the engine oil level
17
Checking the levels
181–182
Checking tyre pressures (using the kit)
192, 195
Checks
181, 183–184
Checks, routine
183–184
Child lock
108–109
Children
94, 101–102, 105–106, 107
Children (safety)
108
Child seats
94, 97–98, 100–101, 107
Child seats, conventional
100–101
Child seats, i-Size
107
Child seats, ISOFIX
102, 104–105
Cleaning (advice)
165, 187–188
Closing the boot
29, 32
Closing the doors
29, 32
Collision Risk Alert
147–148
Configurations, seats
55
Configuration, vehicle
23, 25
Connected applications
248Connection, Bluetooth 231–232, 248–249,
253–254
Connection, Wi-Fi network
249
Connectivity
247
Consumption figures
24
Container, AdBlue®
185
Control, emergency boot release
33
Control, emergency door
30–31
Control, heated seats
46
Controls, steering mounted
116–118
Control stalk, lighting
74–75
Control stalk, wipers
80–82
Control unit
166, 168, 172
Courtesy lamps
66–67
Cover, load space
69
Cruise control
128, 130–131, 133–135
Cruise control, adaptive
135–136
Cruise control by speed limit
recognition
130–131
Cruise control, dynamic with Stop
function
130–131
Cup holder
62
D
DAB (Digital Audio Broadcasting) -
Digital radio
228, 251
Date (setting)
234, 256
Daytime running lamps
75, 200–201
Deactivating the passenger airbag
96, 99
Deadlocking
27, 29
Deferred charging 24–25, 173
Deferred charging (Rechargeable
hybrid)
24–25, 166, 171
Defrosting
47, 60
Defrosting, front
60
Demisting
47, 60
Demisting, front
60
Demisting, rear
61
Demisting, rear screen
61
Dials and gauges
9
Digital instrument panel
9–10
Dimensions
221
Dipstick
17, 181
Direction indicators
75, 200–201
Domestic charging
168
Domestic charging (Rechargeable hybrid)
172
Door pockets
62
Doors
32
Drive Assist Plus
135
Driver’s attention warning
150
Driving
42–43, 110
Driving aids camera (warnings)
127
Driving aids (recommendations)
126
Driving economically
7
Driving modes
89–90, 121–122
Driving positions (storing)
45–46
Dynamic stability control (DSC)
88, 90
E
EBFD 87
Page 266 of 292

264
Alphabetical index
Histogramme, fuel consumption 24–25
Horn
85
Hybrid
220
I
i-Cockpit® amplify function 46
Ignition
113, 254
Ignition on
11 3
Immobiliser, electronic
111
Indicator, AdBlue® range
18
Indicator, coolant temperature
18
Indicator, engine oil level
17, 21
Indicators, direction
75
Inflating tyres
184, 222
Inflating tyres and accessories
(using the kit)
192, 195
Infrared camera
79, 127
Instrument panel
9–10, 21–22, 127
Instrument panel (Rechargeable hybrid)
9
Intelligent Traction Control
87
Internet browser
245, 248
ISOFIX mountings
102
J
Jack 192, 195–197, 251
Jump starting
206
K
Key 26–27, 30–31
Key, electronic
28–29
Keyless Entry and Starting
28–29, 111–112
Key not recognised
11 3
Key with remote control
26, 111
Kit, hands-free
231, 253
Kit, puncture repair
190–192
Kit, temporary puncture repair
190–193, 195
L
Labels, identification 222
Lamp, boot
73
Lamps, parking
75
Lamps, rear
201
Lams with Full LED technology
76, 78
Lane assist
135, 140–141
Lane departure warning active
144, 152
Lane Departure Warning System
(LDWS)
143–144
Leather (care)
188
LEDs - Light-emitting diodes
75, 200–201
Level, AdBlue®
182
Level, brake fluid
182
Level, Diesel additive
182–183
Level, engine coolant
18, 182
Level, engine oil
17, 181
Levels and checks
181–183
Level, screenwash fluid
81, 182
Light-emitting diodes - LEDs 75, 200–201
Lighting, cornering
78–79
Lighting dimmer
21
Lighting, exterior
74, 77
Lighting, guide-me home
27, 77
Lighting, interior
66–67
Lighting, mood
21, 66
Lighting, welcome
77
Loading
70–71, 176–177
Load reduction mode
179
Locating your vehicle
27
Locking
27, 29
Locking from the inside
30
Locking the doors
30
Long objects, transporting
67
Low fuel level
163
M
Mains socket (domestic network) 166
Maintenance (advice)
165, 187
Maintenance, routine
127, 183–184
Manoeuvring aids (recommendations)
126
Map reading lamps
66
Markings, identification
222
Massage function
46
Massage, multi-point
46
Mat
65, 127
Memorising a speed
128
Menu
230
Menu, main
23