2022 NISSAN TITAN ECU
[x] Cancel search: ECUPage 236 of 635
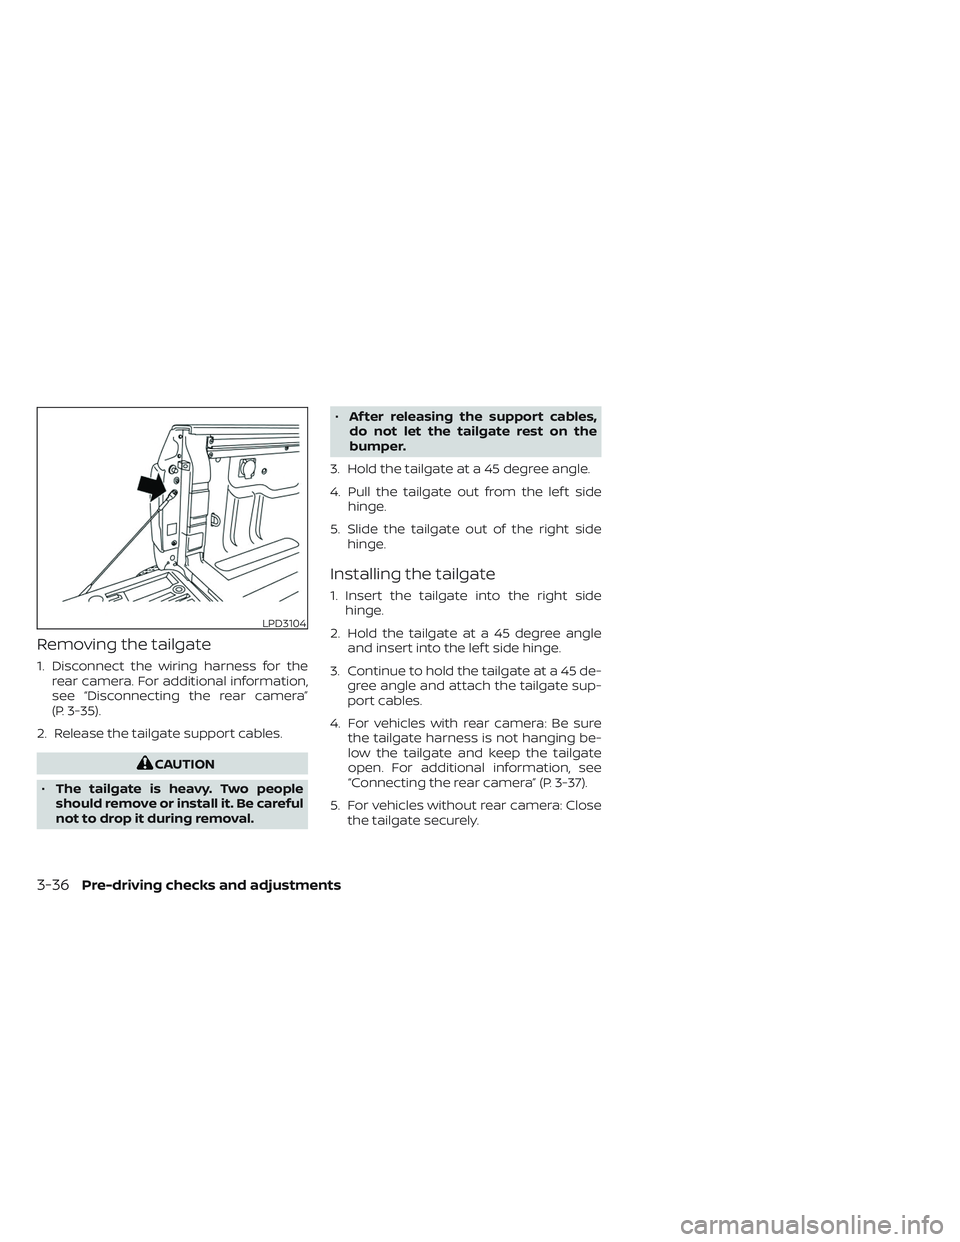
Removing the tailgate
1. Disconnect the wiring harness for therear camera. For additional information,
see “Disconnecting the rear camera”
(P. 3-35).
2. Release the tailgate support cables.
CAUTION
• The tailgate is heavy. Two people
should remove or install it. Be careful
not to drop it during removal. •
Af ter releasing the support cables,
do not let the tailgate rest on the
bumper.
3. Hold the tailgate at a 45 degree angle.
4. Pull the tailgate out from the lef t side hinge.
5. Slide the tailgate out of the right side hinge.
Installing the tailgate
1. Insert the tailgate into the right sidehinge.
2. Hold the tailgate at a 45 degree angle and insert into the lef t side hinge.
3. Continue to hold the tailgate at a 45 de- gree angle and attach the tailgate sup-
port cables.
4. For vehicles with rear camera: Be sure the tailgate harness is not hanging be-
low the tailgate and keep the tailgate
open. For additional information, see
“Connecting the rear camera” (P. 3-37).
5. For vehicles without rear camera: Close the tailgate securely.
LPD3104
3-36Pre-driving checks and adjustments
Page 237 of 635
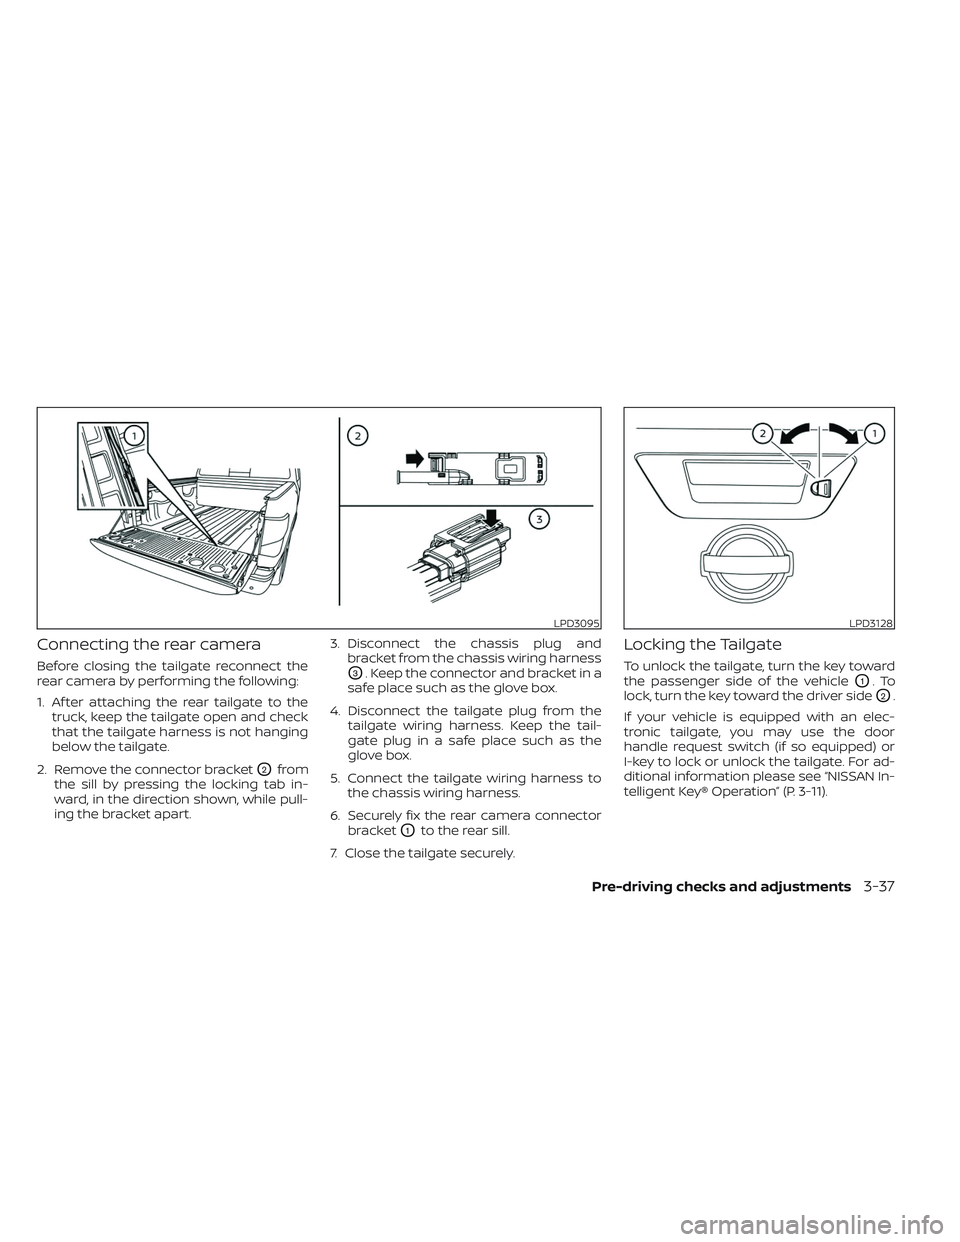
Connecting the rear camera
Before closing the tailgate reconnect the
rear camera by performing the following:
1. Af ter attaching the rear tailgate to thetruck, keep the tailgate open and check
that the tailgate harness is not hanging
below the tailgate.
2. Remove the connector bracket
O2from
the sill by pressing the locking tab in-
ward, in the direction shown, while pull-
ing the bracket apart. 3. Disconnect the chassis plug and
bracket from the chassis wiring harness
O3. Keep the connector and bracket in a
safe place such as the glove box.
4. Disconnect the tailgate plug from the tailgate wiring harness. Keep the tail-
gate plug in a safe place such as the
glove box.
5. Connect the tailgate wiring harness to the chassis wiring harness.
6. Securely fix the rear camera connector bracket
O1to the rear sill.
7. Close the tailgate securely.
Locking the Tailgate
To unlock the tailgate, turn the key toward
the passenger side of the vehicle
O1.To
lock, turn the key toward the driver side
O2.
If your vehicle is equipped with an elec-
tronic tailgate, you may use the door
handle request switch (if so equipped) or
I-key to lock or unlock the tailgate. For ad-
ditional information please see “NISSAN In-
telligent Key® Operation” (P. 3-11).
LPD3095LPD3128
Pre-driving checks and adjustments3-37
Page 238 of 635
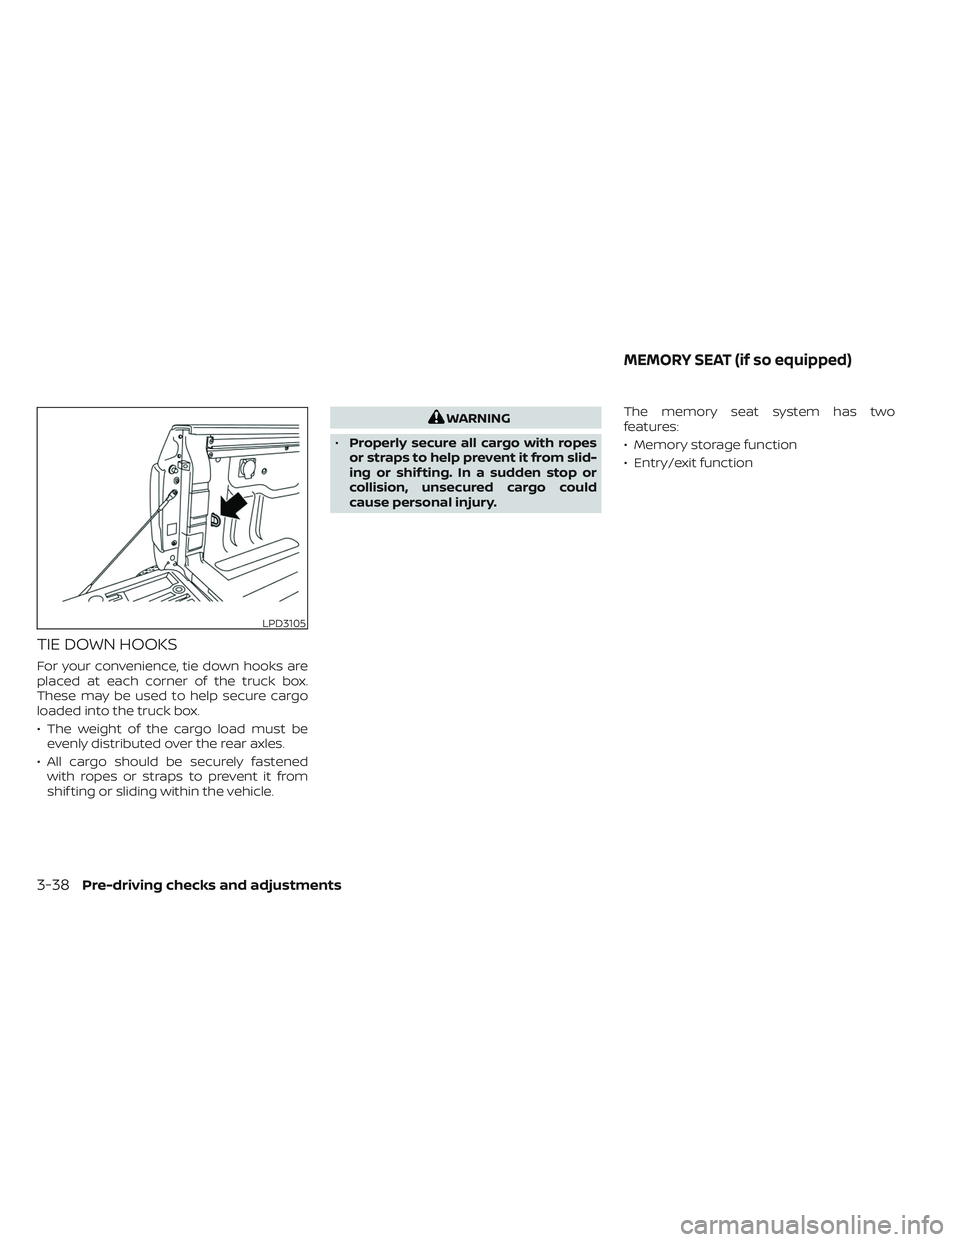
TIE DOWN HOOKS
For your convenience, tie down hooks are
placed at each corner of the truck box.
These may be used to help secure cargo
loaded into the truck box.
• The weight of the cargo load must beevenly distributed over the rear axles.
• All cargo should be securely fastened with ropes or straps to prevent it from
shif ting or sliding within the vehicle.
WARNING
• Properly secure all cargo with ropes
or straps to help prevent it from slid-
ing or shif ting. In a sudden stop or
collision, unsecured cargo could
cause personal injury. The memory seat system has two
features:
• Memory storage function
• Entry/exit function
LPD3105
MEMORY SEAT (if so equipped)
3-38Pre-driving checks and adjustments
Page 262 of 635
NOTE:
Do not adjust any of the display settings
of the Intelligent Around View® Monitor
while the vehicle is moving. Make sure
the parking brake is firmly applied.
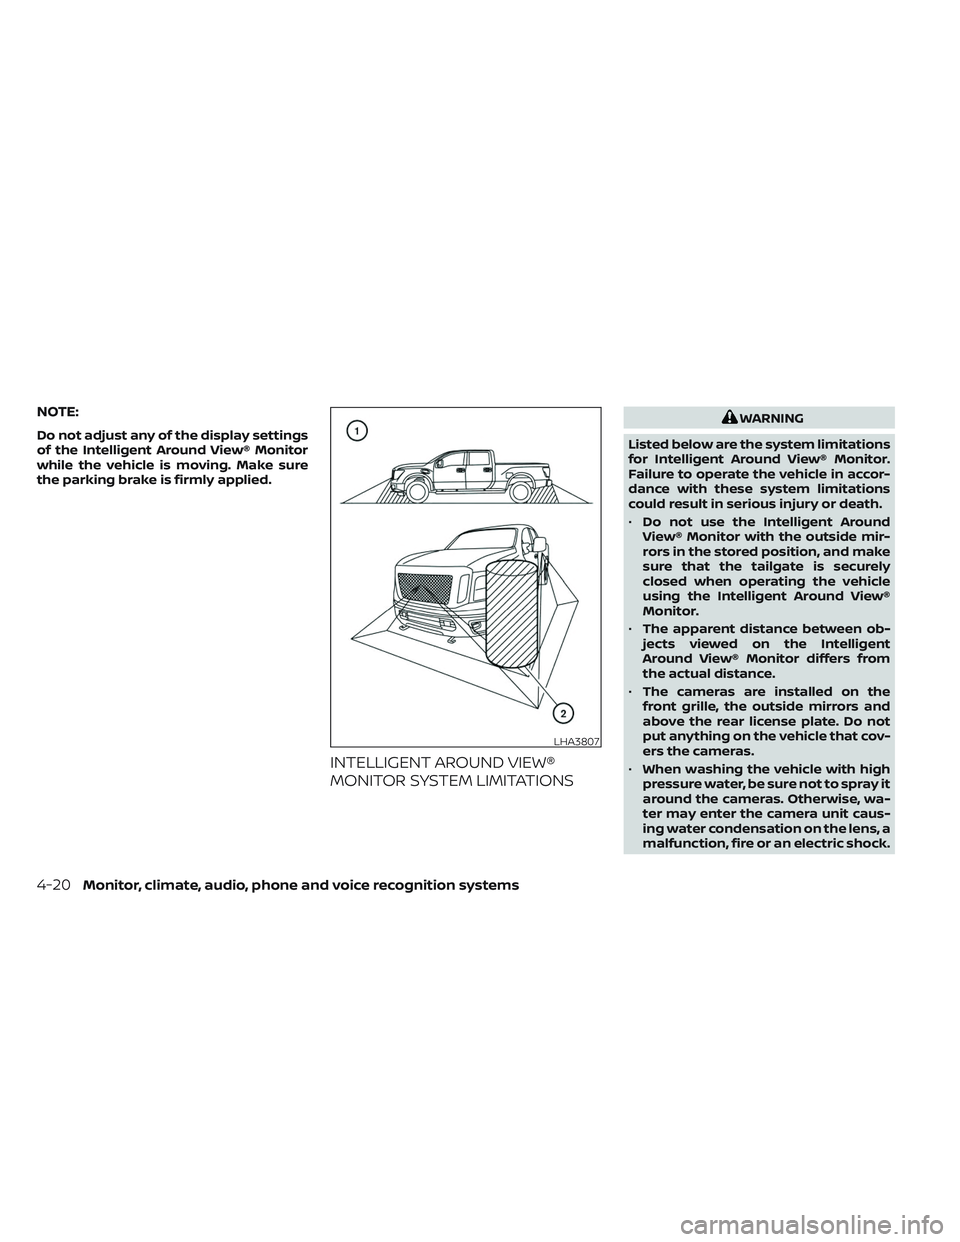
INTELLIGENT AROUND VIEW®
MONITOR SYSTEM LIMITATIONS
WARNING
Listed below are the system limitations
for Intelligent Around View® Monitor.
Failure to operate the vehicle in accor-
dance with these system limitations
could result in serious injury or death.
• Do not use the Intelligent Around
View® Monitor with the outside mir-
rors in the stored position, and make
sure that the tailgate is securely
closed when operating the vehicle
using the Intelligent Around View®
Monitor.
• The apparent distance between ob-
jects viewed on the Intelligent
Around View® Monitor differs from
the actual distance.
• The cameras are installed on the
front grille, the outside mirrors and
above the rear license plate. Do not
put anything on the vehicle that cov-
ers the cameras.
• When washing the vehicle with high
pressure water, be sure not to spray it
around the cameras. Otherwise, wa-
ter may enter the camera unit caus-
ing water condensation on the lens, a
malfunction, fire or an electric shock.
LHA3807
4-20Monitor, climate, audio, phone and voice recognition systems
Page 318 of 635

TROUBLESHOOTING
SymptomRemedy
Monitor does not power on Verif y the vehicle is in the ON or ACC position.
Verif y the battery is installed correctly in the remote control.
Verif y the in-line fuse protection is good. Refer to the RSI system installation instructions for vehicle-specific fuse location.
Monitor front panel controls
flash red For further diagnosis, it is recommended that you visit a NISSAN dealer.
System frozen - will not
respond Sof t reset the system by pressing and holding the power button on the top of the driver side monitor for 5 seconds.
Hard reset the system by turning the ignition off, then back on.
No picture Check that the signal source is connected.
Check the menu source setting. Match your monitor mode with the source correctly.
No sound or distorted sound Make sure that the external media device is connected properly, and all cables are securely inserted into the appropriate jacks.
Verif y that the batteries in the headphones are fresh.
If you are using the wireless headphones, make sure you turn on the power and select the correct monitor (A or B).
Verif y the volume is turned up on headphones and the system.
Verif y nothing is blocking the path between the monitor IR sensor and headphones.
When placing the headphones on your head, make sure to observe the Lef t and Right orientation.
The headphones must be oriented correctly (facing forward) to receive the audio signal.
Monitor feels warm When the monitor is in use for a long period of time, the surface will be warm. This is normal.
A Parental Setting message
is displayed, prohibiting
movie playback Enter the 4-digit Parental Password using the remote and then press
.
For additional information, see “Changing parental lock” (P. 4-75).
Cannot connect mobile
device to the internal RSI
Wi-Fi network Check to make sure Wi-Fi is enabled on the mobile device.
Check to make sure RSI is set to Access Point mode.
Check to make sure the correct password is used. For additional information, see “Using Wi-Fi” (P. 4-68).
Cannot connect RSI system
to an external Wi-Fi network Check to make sure RSI is set to Client Mode. Check to make sure the correct password is used.
For additional information, see “Using Wi-Fi” (P. 4-68).
4-76Monitor, climate, audio, phone and voice recognition systems
Page 330 of 635
WARNING
• Do not leave children or adults who
would normally require the assis-
tance of others alone in your vehicle.
Pets should also not be lef t alone.
They could accidentally injure them-
selves or others through inadvertent
operation of the vehicle. Also, on hot,
sunny days, temperatures in a closed
vehicle could quickly become high
enough to cause severe or possibly
fatal injuries to people or animals.
• Properly secure all cargo with ropes
or straps to help prevent it from slid-
ing or shif ting. Do not place cargo
higher than the seatbacks. In a sud-
den stop or collision, unsecured
cargo could cause personal injury.
EXHAUST GAS (carbon monoxide)
WARNING
• Do not breathe exhaust gases; they
contain colorless and odorless car-
bon monoxide. Carbon monoxide is
dangerous. It can cause uncon-
sciousness or death. •
If you suspect that exhaust fumes
are entering the vehicle, drive with all
windows fully open, and have the ve-
hicle inspected immediately.
• Do not run the engine in closed
spaces such as a garage.
• Do not park the vehicle with the en-
gine running for any extended length
of time.
• Keep the rear vent windows, lif t-
gates, doors and trunk lids (if so
equipped) closed while driving, oth-
erwise exhaust gases could be
drawn into the passenger compart-
ment. If you must drive with one of
these open, follow these precau-
tions:
1. Open all the windows.
2. Set the
air recirculation but-
ton to off and the fan control dial
to high to circulate the air.
• If electrical wiring or other cable con-
nections must pass to a trailer
through the seal on the lif tgate or the
body, follow the manufacturer's rec-
ommendation to prevent carbon
monoxide entry into the vehicle. •
The exhaust system and body should
be inspected by a qualified mechanic
whenever:
a. The vehicle is raised for service.
b. You suspect that exhaust fumes are entering into the passenger
compartment.
c. You notice a change in the sound of the exhaust system.
d. You have had an accident involv- ing damage to the exhaust sys-
tem, underbody, or rear of the
vehicle.
NOTE:
If the vehicle engine experiences exces-
sive fuel consumption or produces ex-
cessive smoke it is recommended that
you visit a NISSAN dealer for service.
THREE-WAY CATALYST (if so
equipped)
The three-way catalyst is an emission con-
trol device installed in the exhaust system.
Exhaust gases in the three-way catalyst
are burned at high temperatures to help
reduce pollutants.
PRECAUTIONS WHEN STARTING AND
DRIVING
5-4Starting and driving
Page 337 of 635
Remember, drinking and driving don't mix!
That is true for drugs (over-the-counter,
prescription) and illegal drugs, too. Don't
drive if your ability to operate your vehicle is
impaired by alcohol, drugs, or some other
physical condition.
DRIVING SAFETY PRECAUTIONS
Your NISSAN is designed for both normal
and off-road use. However, avoid driving in
deep water or mud as your NISSAN is
mainly designed for leisure use, unlike a
conventional off-road vehicle.
Remember that 2-Wheel Drive models are
less capable than 4-Wheel Drive (4WD)
models for rough road driving and extrica-
tion when stuck in deep snow or mud, or
the like.
Please observe the following precautions:
WARNING
• Drive carefully when off the road and
avoid dangerous areas. Every person
who drives or rides in this vehicle
should be seated with their seat belt
fastened. This will keep you and your
passengers in position when driving
over rough terrain. •
Do not drive across steep slopes. In-
stead drive either straight up or
straight down the slopes. Off-road
vehicles can tip over sideways much
more easily than they can forward or
backward.
• Many hills are too steep for any ve-
hicle. If you drive up them, you may
stall. If you drive down them, you may
not be able to control your speed. If
you drive across them, you may roll
over.
• Do not shif t gears while driving on
downhill grades as this could cause
loss of control of the vehicle.
• Stay alert when driving to the top of a
hill. At the top there could be a drop-
off or other hazard that could cause
an accident.
• If your engine stalls or you cannot
make it to the top of a steep hill,
never attempt to turn around. Your
vehicle could tip or roll over. Always
back straight down in R (Reverse)
gear and apply brakes to control your
speed. •
Heavy braking going down a hill
could cause your brakes to overheat
and fade, resulting in loss of control
and an accident. Apply brakes lightly
and use a low gear to control your
speed.
• Unsecured cargo can be thrown
around when driving over rough ter-
rain. Properly secure all cargo so it
will not be thrown forward and cause
injury to you or your passengers.
• Secure heavy loads in the cargo area
as far forward and as low as possible.
Do not equip the vehicle with tires
larger than specified in this manual.
This could cause your vehicle to roll
over.
• Do not grip the inside or spokes of
the steering wheel when driving off-
road. The steering wheel could move
suddenly and injure your hands. In-
stead drive with your fingers and
thumbs on the outside of the rim.
• Before operating the vehicle, ensure
that the driver and all passengers
have their seat belts fastened.
Starting and driving5-11
Page 339 of 635

WARNING
Do not operate the push-button igni-
tion switch while driving the vehicle ex-
cept in an emergency. (The engine will
stop when the ignition switch is pushed
three consecutive times in quick suc-
cession or the ignition switch is pushed
and held for more than 2 seconds.) If
the engine stops while the vehicle is
being driven, this could lead to a crash
and serious injury. When the ignition switch is pushed without
depressing the brake pedal, the ignition
switch position will illuminate as follows:
Push center:
• Once to change to ACC.
• Two times to change to ON.
• Three times to return to OFF.
The ignition switch will automatically re-
turn to the LOCK position when any door is
either opened or closed with the switch in
the OFF position.
The ignition lock is designed so that the
ignition switch position cannot be placed
in the OFF position until the shif t lever is
moved to the P (Park) position.
When the ignition switch cannot be pushed
toward the OFF position, proceed as fol-
lows:
1. Move the shif t lever into the P (Park)
position.
2. Push the ignition switch. The ignition switch position will change to the ON
position.
3. Push the ignition switch again to the OFF position. The shif t lever can be moved from the P
(Park) position if the ignition switch is in
the ON position and the brake pedal is
depressed.
If the battery of the vehicle is discharged,
the push-button ignition switch cannot
be moved from the LOCK position.
Some indicators and warnings for opera-
tion are displayed in the meter. For addi-
tional information, see “Vehicle information
display warnings and indicators” (P. 2-32).
LSD2014
PUSH-BUTTON IGNITION SWITCH
Starting and driving5-13