2022 NISSAN TITAN ignition
[x] Cancel search: ignitionPage 504 of 635
Under some driving or climate conditions,
occasional brake squeak, squeal or other
noise may be heard. Occasional brake
noise during light to moderate stops is nor-
mal and does not affect the function or
performance of the brake system.
Proper brake inspection intervals should
be followed.For additional information on
the appropriate maintenance schedule re-
garding brake inspections, see "Mainte-
nance schedules" (P. 9-7).
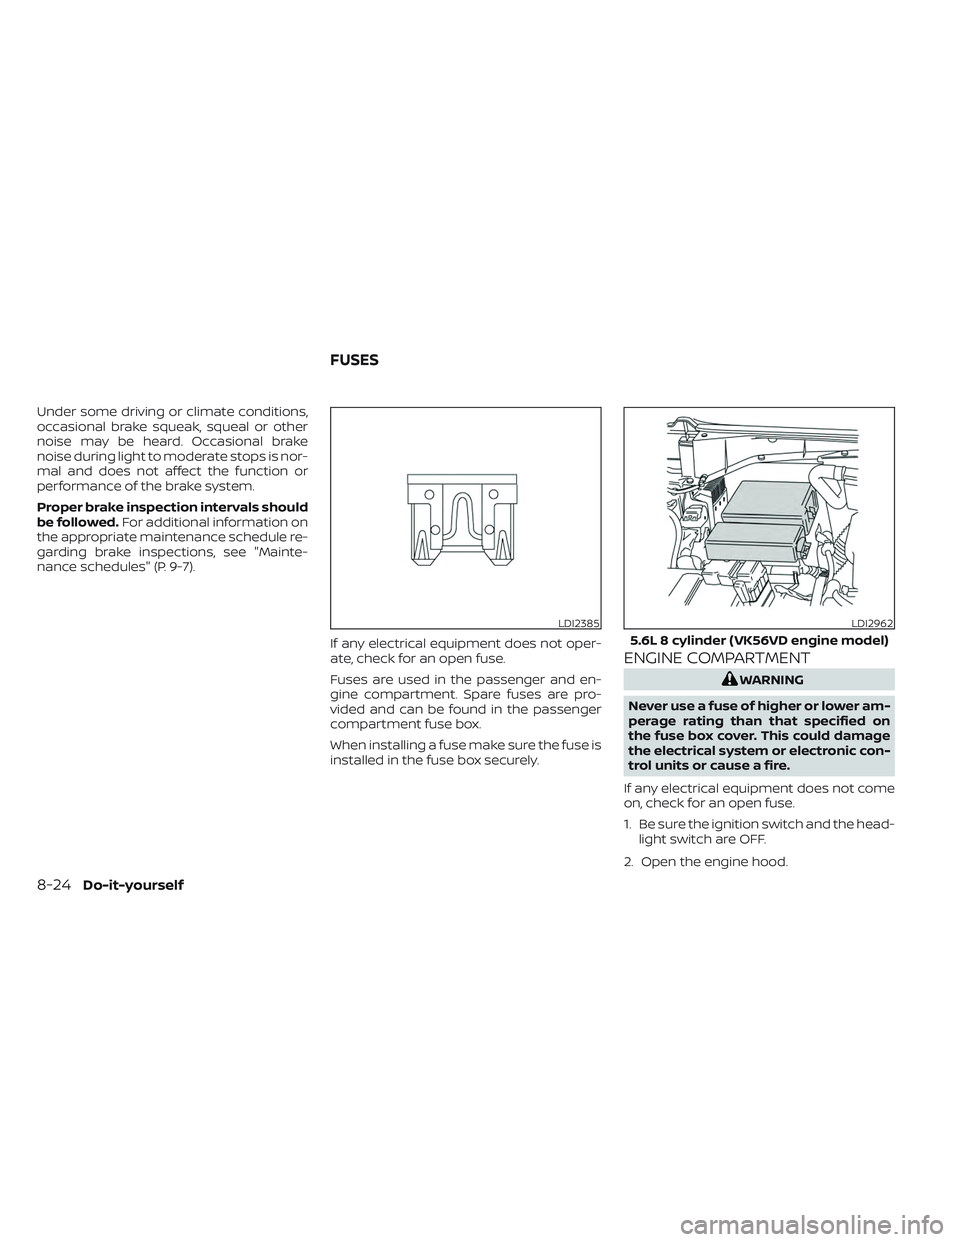
If any electrical equipment does not oper-
ate, check for an open fuse.
Fuses are used in the passenger and en-
gine compartment. Spare fuses are pro-
vided and can be found in the passenger
compartment fuse box.
When installing a fuse make sure the fuse is
installed in the fuse box securely.
ENGINE COMPARTMENT
WARNING
Never use a fuse of higher or lower am-
perage rating than that specified on
the fuse box cover. This could damage
the electrical system or electronic con-
trol units or cause a fire.
If any electrical equipment does not come
on, check for an open fuse.
1. Be sure the ignition switch and the head- light switch are OFF.
2. Open the engine hood.
LDI2385LDI2962
5.6L 8 cylinder (VK56VD engine model)
FUSES
8-24Do-it-yourself
Page 506 of 635
PASSENGER COMPARTMENT
WARNING
Never use a fuse of higher or lower am-
perage rating than that specified on
the fuse box cover. This could damage
the electrical system or electronic con-
trol units or cause a fire.
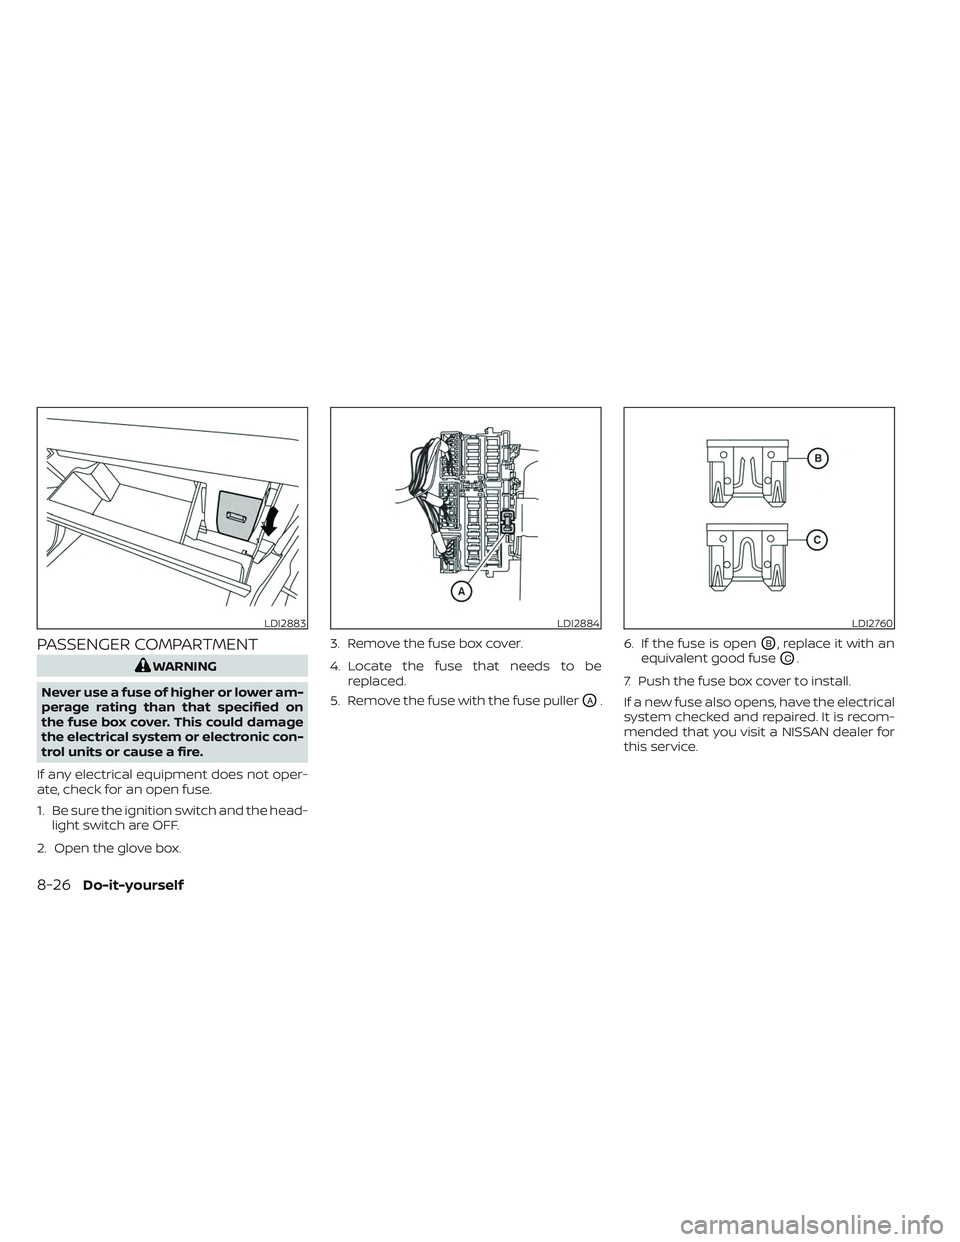
If any electrical equipment does not oper-
ate, check for an open fuse.
1. Be sure the ignition switch and the head- light switch are OFF.
2. Open the glove box. 3. Remove the fuse box cover.
4. Locate the fuse that needs to be
replaced.
5. Remove the fuse with the fuse puller
OA. 6. If the fuse is open
OB, replace it with an
equivalent good fuse
OC.
7. Push the fuse box cover to install.
If a new fuse also opens, have the electrical
system checked and repaired. It is recom-
mended that you visit a NISSAN dealer for
this service.
LDI2883LDI2884LDI2760
8-26Do-it-yourself
Page 568 of 635
Af termarket fuel additives
NISSAN does not recommend the use of
any af termarket fuel additives (for ex-
ample, fuel injector cleaner, octane
booster, intake valve deposit removers,
etc.) which are sold commercially. Many of
these additives intended for gum, varnish
or deposit removal may contain active sol-
vents or similar ingredients that can be
harmful to the fuel system and engine.
Octane rating tips
Using unleaded gasoline with an octane
rating lower than recommended can
cause persistent, heavy “spark knock.”
(“Spark knock” is a metallic rapping
noise.) If severe, this can lead to engine
damage. If you detect a persistent heavy
spark knock even when using gasoline
of the stated octane rating, or if you hear
steady spark knock while holding a
steady speed on level roads, it is recom-
mended that you have a NISSAN dealer
correct the condition. Failure to correct
the condition is misuse of the vehicle, for
which NISSAN is not responsible.Incorrect ignition timing may result in
spark knock, af ter-run and/or overheating,
which may cause excessive fuel consump-
tion or engine damage. If any of the above
symptoms are encountered, have your ve-
hicle checked. It is recommended that you
visit a NISSAN dealer for servicing.
However, now and then you may notice
light spark knock for a short time while
accelerating or driving up hills. This is not
a cause for concern, because you get the
greatest fuel benefit when there is light
spark knock for a short time under heavy
engine load.
10-6Technical and consumer information
Page 571 of 635
ENGINE
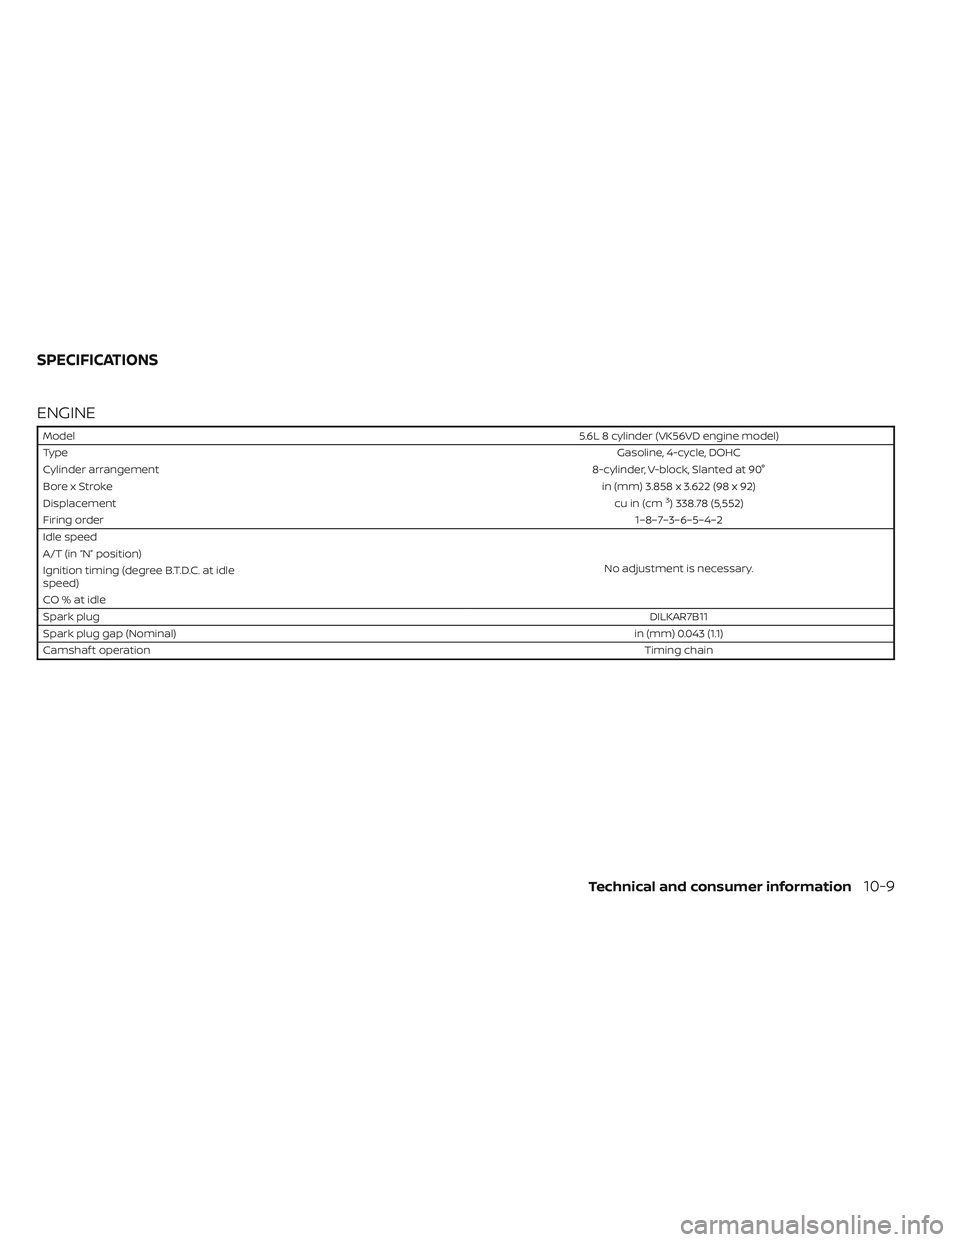
Model5.6L 8 cylinder (VK56VD engine model)
Type Gasoline, 4-cycle, DOHC
Cylinder arrangement 8-cylinder, V-block, Slanted at 90°
Bore x Stroke in (mm) 3.858 x 3.622 (98 x 92)
Displacement cu in (cm
3) 338.78 (5,552)
Firing order 1–8–7–3–6–5–4–2
Idle speed
No adjustment is necessary.
A/T (in “N” position)
Ignition timing (degree B.T.D.C. at idle
speed)
CO%atidle
Spark plug
DILKAR7B11
Spark plug gap (Nominal) in (mm) 0.043 (1.1)
Camshaf t operation Timing chain
SPECIFICATIONS
Technical and consumer information10-9
Page 601 of 635
NOTE:
A weight-distributing hitch system may
affect the operation of trailer surge
brakes. If you are considering use of a
weight-distributing hitch system with a
surge brake-equipped trailer, check with
the surge brake, hitch or trailer manufac-
turer to determine if and how this can be
done.
Follow the instructions provided by the
manufacturer for installing and using the
weight-distributing hitch system.
General set-up instructions are as follows:
1. Park unloaded vehicle on a level surface.With the ignition switch in the ON posi-
tion and the doors closed, allow the ve-
hicle to stand for several minutes so that
it can level.
2. Measure the height of a reference point on the front and rear bumpers at the
center of the vehicle.
3. Attach the trailer to the vehicle and ad- just the hitch equalizers so that the front
bumper height is within0-.5inches (0 –
13 mm) of the reference height mea-
sured in step 2. The rear bumper should
be no higher than the reference height
measured in step 2.
WARNING
Properly adjust the weight distributing
hitch so the rear of the bumper is no
higher than the measured reference
height when the trailer is attached. If
the rear bumper is higher than the
measured reference height when
loaded, the vehicle may handle unpre-
dictably which could cause a loss of ve-
hicle control and cause serious per-
sonal injury or property damage.
Sway control device
Sudden maneuvers, wind gusts, and buf-
feting caused by other vehicles can affect
trailer handling. Sway control devices may
be used to help control these affects. If you
choose to use one, contact a reputable
trailer hitch supplier to make sure the sway
control device will work with the vehicle,
hitch, trailer and the trailer's brake system.
Follow the instructions provided by the
manufacturer for installing and using the
sway control device.
Class I hitch
Class I trailer hitch equipment (receiver, ball
mount and hitch ball) can be used to tow
trailers of a maximum weight of 2,000 lbs.
(907 kg).
Class II hitch
Class II trailer hitch equipment (receiver,
ball mount and hitch ball) can be used to
tow trailers of a maximum weight of 3,500
lbs. (1,587 kg).
Class III hitch
Class III trailer hitch equipment (receiver,
ball mount and hitch ball) can be used to
tow trailers of a maximum weight of 5,000
lbs. (2,268 kg).
Class IV hitch
Class IV hitches are weight carrying (WC)
and weight distributing (WD) hitches de-
pending on the vehicle and hitch specifica-
tions. Not all Class IV hitches are rated to be
both. See the specific hitch for that infor-
mation. Class IV trailer hitch equipment (re-
ceiver, ball mount and hitch ball) used as
weight carrying are rated up to 10,000 lbs.
(4,535 kg) gross trailer weight (GTW) with a
maximum trailer tongue weight (TW) of
Technical and consumer information10-39
Page 615 of 635
• Use the Tow Mode or downshif t thetransmission to a lower gear for engine
braking when driving down steep or long
hills. This will help slow the vehicle without
applying the brakes.
• Avoid holding the brake pedal down too long or too frequently. This could cause
the brakes to overheat, resulting in re-
duced braking efficiency.
• Increase your following distance to allow for greater stopping distances while tow-
ing a trailer. Anticipate stops and brake
gradually.
• NISSAN recommends that the cruise control (if so equipped) not be used while
towing a trailer.
• While towing a trailer, do not use the fol- lowing systems (if so equipped):–– the Lane Departure Warning (LDW) system
–– the Blind Spot Warning (BSW) system
– – the Intelligent Cruise Control (ICC)
system
– – the Automatic Emergency Braking
(AEB) system
– – the Intelligent Forward Collision
Warning (I-FCW) system
– – the Rear Automatic Braking (RAB)
system –
– the Moving Object Detection (MOD)
system
– – the Cross Traffic Alert system
–– the Rear Sonar system
• Some states or provinces have specific regulations and speed limits for vehicles
that are towing trailers. Obey the local
speed limits.
• Check your hitch, trailer wiring harness connections, and trailer wheel lug nuts
af ter 50 miles (80 km) of travel and at
every break.
• When launching a boat, don't allow the water level to go over the exhaust tail
pipe or rear bumper.
• Make sure you disconnect the trailer lights before backing the trailer into the
water or the trailer lights may burn out.
When towing a trailer, final drive gear oil
should be replaced and transmission oil/
fluid should be changed more fre-
quently. For additional information, see
the “Do-it-yourself ” section of this
manual.Tow mode
Using tow mode is recommended when
pulling a heavy trailer or hauling a heavy
load. Press the TOW MODE switch to acti-
vate tow mode. The indicator light on the
TOW MODE switch illuminates when tow
mode is selected. Press the TOW MODE
switch again to turn tow mode off. Tow
mode is automatically canceled when the
ignition switch is turned off.
Tow mode includes the following features:
• Grade logic — Adjusts transmission shif ts when pulling a trailer or hauling a load up
a grade.
• Downhill Speed Control (DSC) — auto- matically downshif ts when driving down
a grade with a trailer or heavy load to help
control vehicle speed.
Driving the vehicle in the tow mode with no
trailer/load or light trailer/light load will not
cause any damage. However, fuel
economy may be reduced and the
transmission/engine driving characteris-
tics may feel unusual.
Technical and consumer information10-53
Page 620 of 635
To notif y NISSAN of any safety con-
cerns please contact our Consumer
Information Centre toll free at
1-800-387-0122.WARNING
A vehicle equipped with 4-Wheel Drive
(4WD) should never be tested using a
two wheel dynamometer (such as the
dynamometers used by some states
for emissions testing), or similar equip-
ment. Make sure you inform the test
facility personnel that your vehicle is
equipped with 4WD before it is placed
on a dynamometer. Using the wrong
test equipment may result in transmis-
sion damage or unexpected vehicle
movement which could result in seri-
ous vehicle damage or personal injury.
Due to legal requirements in some states
and Canadian Provinces, your vehicle may
be required to be in what is called the
“ready condition” for an Inspection/
Maintenance (I/M) test of the emission
control system.
The vehicle is set to the “ready condition”
when it is driven through certain driving
patterns. Usually, the ready condition can
be obtained by ordinary usage of the
vehicle. If a powertrain system component is re-
paired or the battery is disconnected, the
vehicle may be reset to a “not ready” condi-
tion. Before taking the I/M test, check the
vehicle's inspection/maintenance test
readiness condition. Place the ignition
switch in the ON position without starting
the engine. If the Malfunction Indicator
Light (MIL) comes on steady for 20 seconds
and then blinks for 10 seconds, the I/M test
condition is “not ready”. If the MIL does not
blink af ter 20 seconds, the I/M test condi-
tion is “ready”. It is recommended that you
visit a NISSAN dealer to set the “ready con-
dition” or to prepare the vehicle for testing.
READINESS FOR INSPECTION/
MAINTENANCE (I/M) TEST
10-58Technical and consumer information
Page 625 of 635
Power steering fluid............8-13Windshield-washer fluid.........8-15Fog light switch................2-52Forward Driving AidsSystem Temporarily
Unavailable
.......2-37, 5-67, 5-87, 5-99Front air bag system (See supplemental
restraint system)............1-60, 1-76Front and rear sonar system.......5-124Front power seat adjustment........1-6Front seats....................1-2Front-door pocket..............2-70FuelCapacities and recommended
fuel/lubricants
...............10-2Fuel economy...............5-107Fuel gauge................. .2-9Fuel octane rating.............10-6Fuel recommendation..........10-4Loose fuel cap warning..........2-33Fuel Cell Vehicle (FCV) System
Tire pressure................8-33Fuel efficient driving tips..........5-106Fuel gauge................... .2-9Fuel-filler door.................3-23Fuses......................8-24Fusible links..................8-25
G
Garage door opener, HomeLink® Universal
Transceiver........2-90, 2-91, 2-93, 2-94
Gauge
Automatic transmission fluid
temperature gauge
............2-10Engine coolant temperature gauge. . .2-8Engine oil pressure gauge........2-10Fuel gauge................. .2-9Odometer...................2-7Speedometer.................2-7Tachometer.................2-8Trip odometer................2-7Voltmeter..................2-10General maintenance.............9-2Glove box....................2-73Grocery hooks.................2-80
H
Hazard warning flasher switch........6-2Head restraints.................1-11Headlight aiming control..........2-50Headlight and turn signal switch.....2-45Headlight control switch..........2-45Headlights...................8-29Headlights, aiming control.........2-50Heated rear seats...............2-55Heated seats................. .2-54Heated steering wheel switch.......2-57Heater
Heater and air conditioner (automatic)
(if so equipped)
...............4-37Heater and air conditioner controls. .4-38Heater operation..........4-30, 4-39Heater and air conditioner (automatic). .4-37
Hill descent control switch.........2-59Hill descent control system........5-122Hill start assist system...........5-123HomeLink® Universal
Transceiver........2-90, 2-91, 2-93, 2-94Hood.......................3-23HookLuggage hook...............2-81Horn...................... .2-52
I
Ignition switch
Push-button ignition switch.......5-13Immobilizer system..........2-40, 5-16In-cabin microfilter..............8-21Increasing fuel economy..........5-107Inside automatic anti-glare mirror. . . .3-29Instrument brightness control.......2-51Instrument panel.............0-6, 2-4Instrument panel dimmer switch.....2-51Intelligent Around View Monitor.......4-11Intelligent Cruise Control...........5-51Intelligent Driver Alertness (I-DA).....5-102Intelligent Forward Collision Warning
(I-FCW)..................... .5-90Intelligent Key system
Key operating range............3-10Key operation................3-11Mechanical key................3-3Remote keyless entry operation. . . .3-15Troubleshooting guide..........3-19Warning signals...............3-19
11-3