2022 NISSAN SENTRA wheel
[x] Cancel search: wheelPage 279 of 528
Voice tag
A voice tag can be recorded for each of the
registered Quick Dial numbers and can be
used to dial the number by speaking it. On
the Quick Dial registration screen, touch
the “Voice Tag” key. Select a relationship
from the list or create a new voice tag. To
record a new voice tag touch the “Custom-
ize” key on the screen then touch the “Store”
key. Speak a name af ter the prompt, the
new tag will be stored. To edit or create a
new voice tag select the “Customize” key
again. Touch the “Play ” key to play the re-
corded voice tag, touch the “Restore” key to
edit the voice tag or “Delete” to delete the
current voice tag.
RECEIVING A CALL
When a call is received by the phone con-
nected to the vehicle’s Bluetooth® Hands-
Free Phone System, the call information is
displayed on the control panel display.
Press the
button on the steering
wheel or touch the “Answer” key on
the screen to accept the call. To reject the
call touch the “
Decline” key on the
screen. If the user is not able to answer the call
right away, touch the “Hold Call” key dis-
played on the screen. A message will be
played for the caller: “I’m not able to take a
call right now.” The user may then accept
the call when available or reject the call.
To reject a call, press and hold the
button on the steering wheel.
DURING A CALL
While a call is active the following options
will appear on the control panel display:
• Mute
Touch this key to mute or unmute the
system.
• Dial Number Touch this key to dial digits during the
phone call.
• Use Handset Touch this key to transfer the call to the
handset. To transfer the call back from
the handset to the Bluetooth® Hands-
Free Phone System, press the
but-
ton on the control panel then select the
“Transfer Hands-free” key on the screen.
• Switch Call This option will only be available when a
second call is active.
If supported by the phone, the
Bluetooth® Hands-Free Phone System
allows for call waiting functionality. If a
call is received while another call is al-
ready active, a message will be displayed
on the screen. Press the
button on
the steering wheel or touch the “
Answer” key on screen to accept the in-
coming call. Touch the “Decline” key
on the screen to reject the second call.
While a call is active, press the
button
on the steering wheel to access additional
options. Speak one of the following com-
mands:
• “Send Digits” Speak this command followed by the dig-
its to enter digits during the phone call.
• “Switch call” Speak this command to hold the second
call and switch back to the original call.
ENDING A CALL
To end an active call, press thebutton
on the steering wheel or touch the “
Hang up” key on the screen.
Monitor, climate, audio, phone and voice recognition systems4-77
Page 280 of 528
TEXT MESSAGING (if so equipped)
button on the
steering wheel for less than 1.5 seconds.
2. Say “Send Text” af ter the tone.
3. The system will provide a list of available commands in order to determine the
recipient of the text message. Choose
from the following:
• Phonebook
• Quick Dial
• Incoming Calls
4-78Monitor, climate, audio, phone and voice recognition systems
Page 281 of 528
• Outgoing Calls
• Missed Calls
• Dial
4. Once a recipient is chosen, the systemprompts for which message to send.
Nine predefined messages are avail-
able. To choose one of the predefined
messages, speak one of the following
af ter the tone:
• “Driving, can't text”
• “Call me”
• “On my way ”
• “Running late”
• “Okay ”
• “Yes”
• “No”
• “Where are you?”
• “When?”
Reading a received text message
1. Press and hold the
button on the
steering wheel for less than 1.5 seconds.
2. Say “Read Text” af ter the tone.
The display will show a list of 20 messages
with the sender and delivery time. Touch
the “Next” key on the screen to view all mes-
sages. To view a text message press the
button on the steering wheel and
speak the number item list on the screen.
The following options will be available:
• Play Speak this command to have the system
say the message.
• Reply Speak this command to send a text mes-
sage response to the sender of the text
message.
• Call Speak this command to call the sender.
• Previous Speak this command to move to the pre-
vious text message (if available).
•Next Speak this command to move to the next
text message (if available).
Siri® Eyes Free (if so equipped)
If a connected phone is equipped with Siri®,
it can also be used to create custom mes-
sages that are sent through the phone. For
additional information, refer to “Siri® Eyes
Free” in this section.
NOTE:
Text messages are only displayed if the
vehicle speed is less than 5 mph (8
km/h).
NOTE:
For Apple iPhones®, text messages can
only be sent through Siri.
Text messaging using the control
panel
Display received message list
1. Press the
button on the control
panel.
2. Touch the “Text Message” key on the screen
3. Touch an item on the list to read or reply to the message.
Up to 100 messages can be stored in the
message list.
Received message screen
Touching the “Read” key on the incoming
message notification screen or selecting a
message from the message list will show
the details of the received message on the
display.
Available actions:
•Prev. Touch this key to read the previous mes-
sage.
Monitor, climate, audio, phone and voice recognition systems4-79
Page 291 of 528
•Do not stop or park the vehicle over
flammable materials such as dry
grass, waste paper or rags. They may
ignite and cause a fire.
CAUTION
• Do not use leaded gasoline. Deposits
from leaded gasoline will seriously
reduce the three-way catalyst's abil-
ity to help reduce exhaust pollutants.
• Keep your engine tuned up. Malfunc-
tions in the ignition, fuel injection, or
electrical systems can cause overrich
fuel flow into the three-way catalyst,
causing it to overheat. Do not keep
driving if the engine misfires, or if no-
ticeable loss of performance or other
unusual operating conditions are de-
tected. Have the vehicle inspected
promptly. It is recommended that
you visit a NISSAN dealer for this
service.
• Avoid driving with an extremely low
fuel level. Running out of fuel could
cause the engine to misfire, damag-
ing the three-way catalyst.
• Do not race the engine while warm-
ing it up. •
Do not push or tow your vehicle to
start the engine.
TIRE PRESSURE MONITORING
SYSTEM (TPMS)
Each tire, including the spare (if provided),
should be checked monthly when cold and
inflated to the inflation pressure recom-
mended by the vehicle manufacturer on
the vehicle placard or tire inflation pressure
label. (If your vehicle has tires of a different
size than the size indicated on the vehicle
placard or tire inflation pressure label, you
should determine the proper tire inflation
pressure for those tires.)
As an added safety feature, your vehicle
has been equipped with a Tire Pressure
Monitoring System (TPMS) that illuminates
a low tire pressure telltale when one or
more of your tires is significantly under-
inflated. Accordingly, when the low tire
pressure telltale illuminates, you should
stop and check your tires as soon as pos-
sible, and inflate them to the proper pres-
sure. Driving on a significantly under-
inflated tire causes the tire to overheat and
can lead to tire failure. Under-inflation also
reduces fuel efficiency and tire tread life,
and may affect the vehicle’s handling and
stopping ability. Please note that the TPMS is not a substi-
tute for proper tire maintenance, and it is
the driver’s responsibility to maintain cor-
rect tire pressure, even if under-inflation
has not reached the level to trigger illumi-
nation of the TPMS low tire pressure telltale.
Your vehicle has also been equipped with a
TPMS malfunction indicator to indicate
when the system is not operating properly.
The TPMS malfunction indicator is com-
bined with the low tire pressure telltale.
When the system detects a malfunction,
the telltale will flash for approximately one
minute and then remain continuously illu-
minated. This sequence will continue upon
subsequent vehicle start-ups as long as
the malfunction exists. When the malfunc-
tion indicator is illuminated, the system
may not be able to detect or signal low tire
pressure as intended. TPMS malfunctions
may occur for a variety of reasons, includ-
ing the installation of replacement or alter-
nate tires or wheels on the vehicle that
prevent the TPMS from functioning prop-
erly. Always check the TPMS malfunction
telltale af ter replacing one or more tires or
wheels on your vehicle to ensure that the
replacement or alternate tires and wheels
allow the TPMS to continue to function
properly.
Starting and driving5-5
Page 292 of 528
Additional information:
• When replacing a wheel without theTPMS such as the spare tire, the TPMS
does not monitor the tire pressure of the
spare tire.
• The TPMS will activate only when the ve- hicle is driven at speeds above 16 mph (25
km/h). Also, this system may not detect a
sudden drop in tire pressure (for example,
a flat tire while driving).
• The low tire pressure warning light does not automatically turn off when the tire
pressure of all your tires is adjusted. Af ter
the tires are inflated to the recom-
mended pressure, the vehicle must be
driven at speeds above 16 mph (25 km/h)
to activate the TPMS and turn off the low
tire pressure warning light. Use a tire
pressure gauge to check the tire pres-
sure. • The “CHECK TIRE PRES” (TypeA-ifso
equipped) or the “Tire Pressure Low - Add
Air”(TypeB-ifsoequipped) warning mes-
sage is displayed in the odometer when
the low tire pressure warning light is illu-
minated and low tire pressure is de-
tected. The “CHECK TIRE PRES” (Typ eA-if
so equipped) or the “Tire Pressure Low -
AddAir”(TypeB-ifsoequipped) warning
message turns off when the low tire pres-
sure warning light turns off. The low tire
pressure warning light remains illumi-
nated until the tires are inflated to the
recommended COLD tire pressure. The
“CHECK TIRE PRES” (TypeA-ifso
equipped) or the “Tire Pressure Low - Add
Air”(TypeB-ifsoequipped) warning mes-
sage is displayed each time the ignition
switch is placed in the ON position as
long as the low tire pressure warning light
remains illuminated.
• The “CHECK TIRE PRES” (TypeA-ifso equipped) or the “Tire Pressure Low - Add
Air”(TypeB-ifsoequipped) warning is not
displayed if the low tire pressure warning
light illuminates to indicate a TPMS mal-
function. • Tire pressure rises and falls depending on
the heat caused by the vehicle’s opera-
tion and the outside temperature. Do not
reduce the tire pressure af ter driving be-
cause the tire pressure rises af ter driving.
Low outside temperature can lower the
temperature of the air inside the tire
which can cause a lower tire inflation
pressure. This may cause the low tire
pressure warning light to illuminate. If the
warning light illuminates, check the tire
pressure for all four tires.
• The Tire and Loading Information label is located in the driver's door opening.
For additional information, refer to “Check
tire pressure warning message” or “Low tire
pressure warning light” in the “Instruments
and controls” section and “Tire Pressure
Monitoring System (TPMS)” in the “In case of
emergency” section of this manual.
Page 293 of 528
•If the low tire pressure warning light
illuminates while driving, avoid sud-
den steering maneuvers or abrupt
braking, reduce vehicle speed, pull
off the road to a safe location and
stop the vehicle as soon as possible.
Driving with under-inflated tires may
permanently damage the tires and
increase the likelihood of tire failure.
Serious vehicle damage could occur
and may lead to an accident and
could result in serious personal in-
jury. Check the tire pressure for all
four tires. Adjust the tire pressure to
the recommended COLD tire pres-
sure shown on the Tire and Loading
Information label to turn the low tire
pressure warning light off. If you have
a flat tire, replace it with a spare tire
as soon as possible. (For additional
information on changing a flat tire,
refer to “Flat tire” in the “In case of
emergency ” section of this manual.) •
When replacing a wheel without the
TPMS such as the spare tire, when a
spare tire is mounted or a wheel is
replaced, the TPMS will not function
and the low tire pressure warning
light will flash for approximately 1
minute. The light will remain on af ter
1 minute. Have your tires replaced
and/or TPMS reset as soon as pos-
sible. It is recommended that you
visit a NISSAN dealer for this service.
• Replacing tires with those not origi-
nally specified by NISSAN could af-
fect the proper operation of the
TPMS.
• Do not inject any tire liquid or aerosol
tire sealant into the tires, as this may
cause a malfunction of the tire pres-
sure sensors.
CAUTION
Do not place metalized film or any
metal parts (antenna, etc.) on the win-
dows. This may cause poor reception of
the signals from the tire pressure sen-
sors, and the TPMS will not function
properly. Some devices and transmitters may tem-
porarily interfere with the operation of the
TPMS and cause the low tire pressure
warning light to illuminate.
Some examples are:
• Facilities or electric devices using similar
radio frequencies are near the vehicle.
• If a transmitter set to similar frequencies is being used in or near the vehicle.
• If a computer (or similar equipment) or a DC/AC converter is being used in or near
the vehicle.
The low tire pressure warning light may
illuminate in the following cases:
• If the vehicle is equipped with a wheel and tire without TPMS.
• If the TPMS has been replaced and the ID has not been registered.
• If the wheel is not originally specified by NISSAN.
FCC Notice:
For USA:
This device complies with Part 15 of the
FCC Rules. Operation is subject to the fol-
lowing two conditions: (1) This device
may not cause harmful interference, and
Starting and driving5-7
Page 296 of 528
Help prevent rapid air pressure loss by
maintaining the correct air pressure and
visually inspecting the tires for wear and
damage. For additional information, refer
to “Wheels and tires” in the “Do-it-yourself ”
section of this manual. If a tire rapidly loses
air pressure or “blows-out” while driving,
maintain control of the vehicle by following
the procedure below. Please note that this
procedure is only a general guide. The ve-
hicle must be driven as appropriate based
on the conditions of the vehicle, road and
traffic.
Page 306 of 528
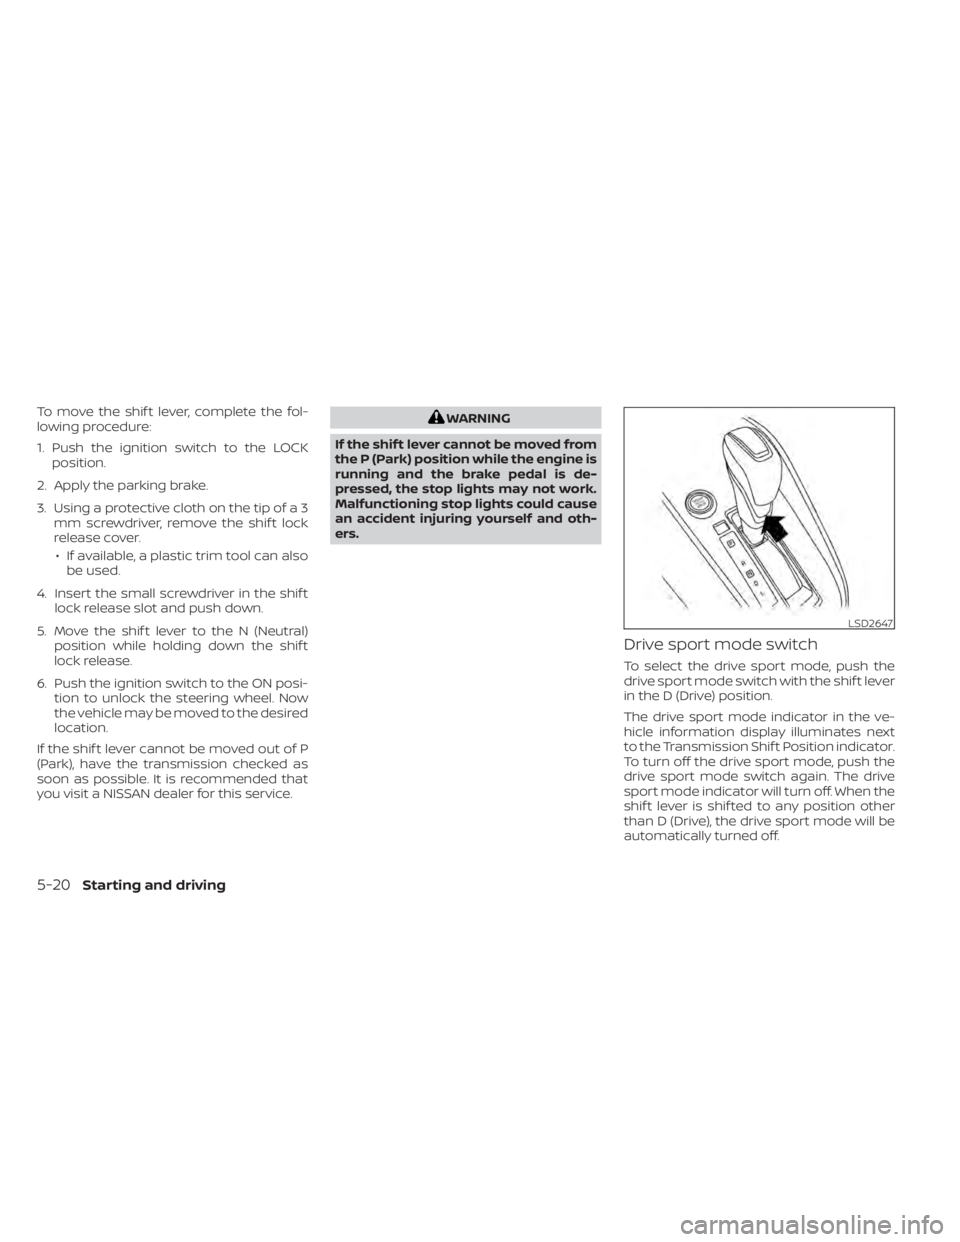
To move the shif t lever, complete the fol-
lowing procedure:
1. Push the ignition switch to the LOCKposition.
2. Apply the parking brake.
3. Using a protective cloth on the tip of a 3 mm screwdriver, remove the shif t lock
release cover.
• If available, a plastic trim tool can also be used.
4. Insert the small screwdriver in the shif t lock release slot and push down.
5. Move the shif t lever to the N (Neutral) position while holding down the shif t
lock release.
6. Push the ignition switch to the ON posi- tion to unlock the steering wheel. Now
the vehicle may be moved to the desired
location.
If the shif t lever cannot be moved out of P
(Park), have the transmission checked as
soon as possible. It is recommended that
you visit a NISSAN dealer for this service.
LSD2647
5-20Starting and driving