Page 150 of 528
If the parking brake is applied before the
engine is started, the LED DRL do not illumi-
nate. The LED DRL illuminate when the
parking brake is released. The LED DRL will
remain on until the ignition switch is placed
in the OFF position.
It is necessary at dusk to turn the headlight
switch on for interior controls and switches
to illuminate, as those remain off while the
switch is in the OFF position.
LIC3176LIC2638
2-60Instruments and controls
Page 189 of 528

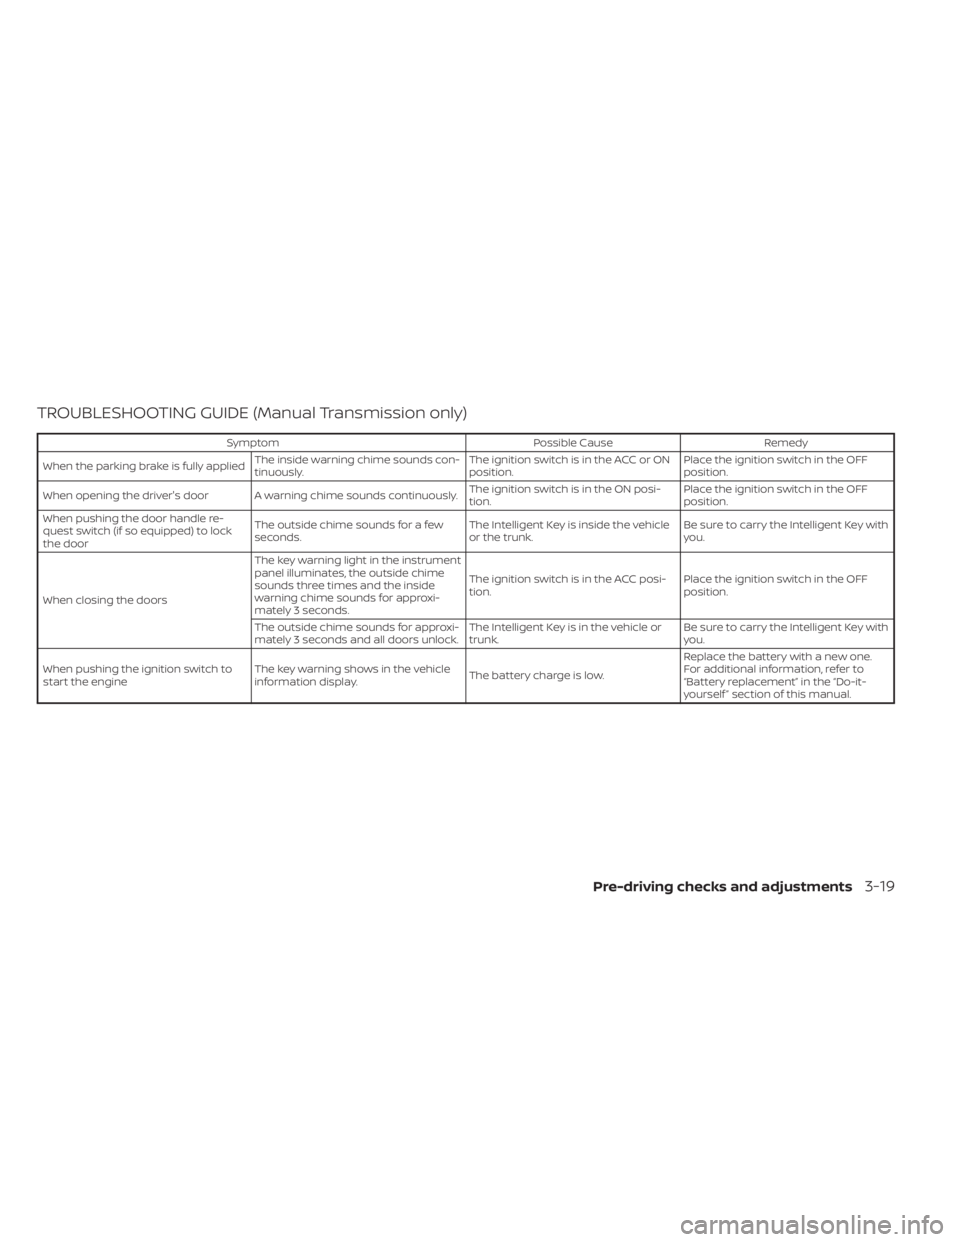
TROUBLESHOOTING GUIDE (Manual Transmission only)
SymptomPossible CauseRemedy
When the parking brake is fully applied The inside warning chime sounds con-
tinuously. The ignition switch is in the ACC or ON
position.Place the ignition switch in the OFF
position.
When opening the driver's door A warning chime sounds continuously. The ignition switch is in the ON posi-
tion.Place the ignition switch in the OFF
position.
When pushing the door handle re-
quest switch (if so equipped) to lock
the door The outside chime sounds for a few
seconds.
The Intelligent Key is inside the vehicle
or the trunk.Be sure to carry the Intelligent Key with
you.
When closing the doors The key warning light in the instrument
panel illuminates, the outside chime
sounds three times and the inside
warning chime sounds for approxi-
mately 3 seconds.
The ignition switch is in the ACC posi-
tion.
Place the ignition switch in the OFF
position.
The outside chime sounds for approxi-
mately 3 seconds and all doors unlock. The Intelligent Key is in the vehicle or
trunk.Be sure to carry the Intelligent Key with
you.
When pushing the ignition switch to
start the engine The key warning shows in the vehicle
information display.
The battery charge is low.Replace the battery with a new one.
For additional information, refer to
“Battery replacement” in the “Do-it-
yourself ” section of this manual.
Pre-driving checks and adjustments3-19
Page 191 of 528

The Remote Engine Start operating range
is approximately 197 f t (60 m) from the ve-
hicle.
REMOTE STARTING THE VEHICLE
To use the Remote Engine Start feature to
start the engine perform the following:
1. Aim the Intelligent Key at the vehicle.
2. Press the
button to lock all doors.
3. Within 5 seconds press and hold the
button until the turn signal lights
flash and the tail lamps turn on. If the
vehicle is not within view press and hold
the
button for at least 2 seconds.
The following events will occur when the
engine starts:
• The parking lights will turn on and remain on as long as the engine is running.
• The doors will be locked and the climate control system may come on.
• The engine will continue to run for 10 min- utes. Repeat the steps to extend the time
for an additional 10 minutes. For addi-
tional information, refer to “Extending en-
gine run time” in this section.
Depress and hold the brake then push the
push-button ignition switch to the ON po-
sition before driving. For additional infor- mation, refer to “Driving the vehicle” in the
“Starting and driving” section of this
manual.
EXTENDING ENGINE RUN TIME
The Remote Engine Start feature can be
extended one time by performing the
steps listed in “Remote starting the vehicle”
in this section. Run time will be calculated
as follows:
• The first 10 minute run time will start
when the Remote Engine Start function is
performed.
• The second 10 minutes will start immedi- ately when the Remote Engine Start
function is performed again. For example,
if the engine has been running for 5 min-
utes, and 10 minutes are added, the en-
gine will run for a total of 15 minutes.
• Extending engine run time will bring you to the two Remote Engine Start limit.
A maximum of two Remote Engine Starts,
or a single start with an extension, are al-
lowed between ignition cycles.
The ignition switch must be cycled to the
ON position and then back to the OFF po-
sition before the Remote Engine Start pro-
cedure can be used again.
CANCELING A REMOTE ENGINE
START
To cancel a Remote Engine Start, perform
one of the following:
• Aim the Intelligent Key at the vehicle and press
until the parking lights turn off.
• Turn on the hazard warning flashers.
• Cycle the ignition switch on and then off.
• The extended engine run time has ex- pired.
• The first 10 minute timer has expired.
• The engine hood has been opened.
• The shif t lever is moved out of park.
• The alarm sounds due to illegal entry into the vehicle.
• The ignition switch is pushed without an Intelligent Key in the vehicle.
• The ignition switch is pushed with an In- telligent Key in the vehicle but the brake
pedal is not depressed.
Pre-driving checks and adjustments3-21
Page 192 of 528

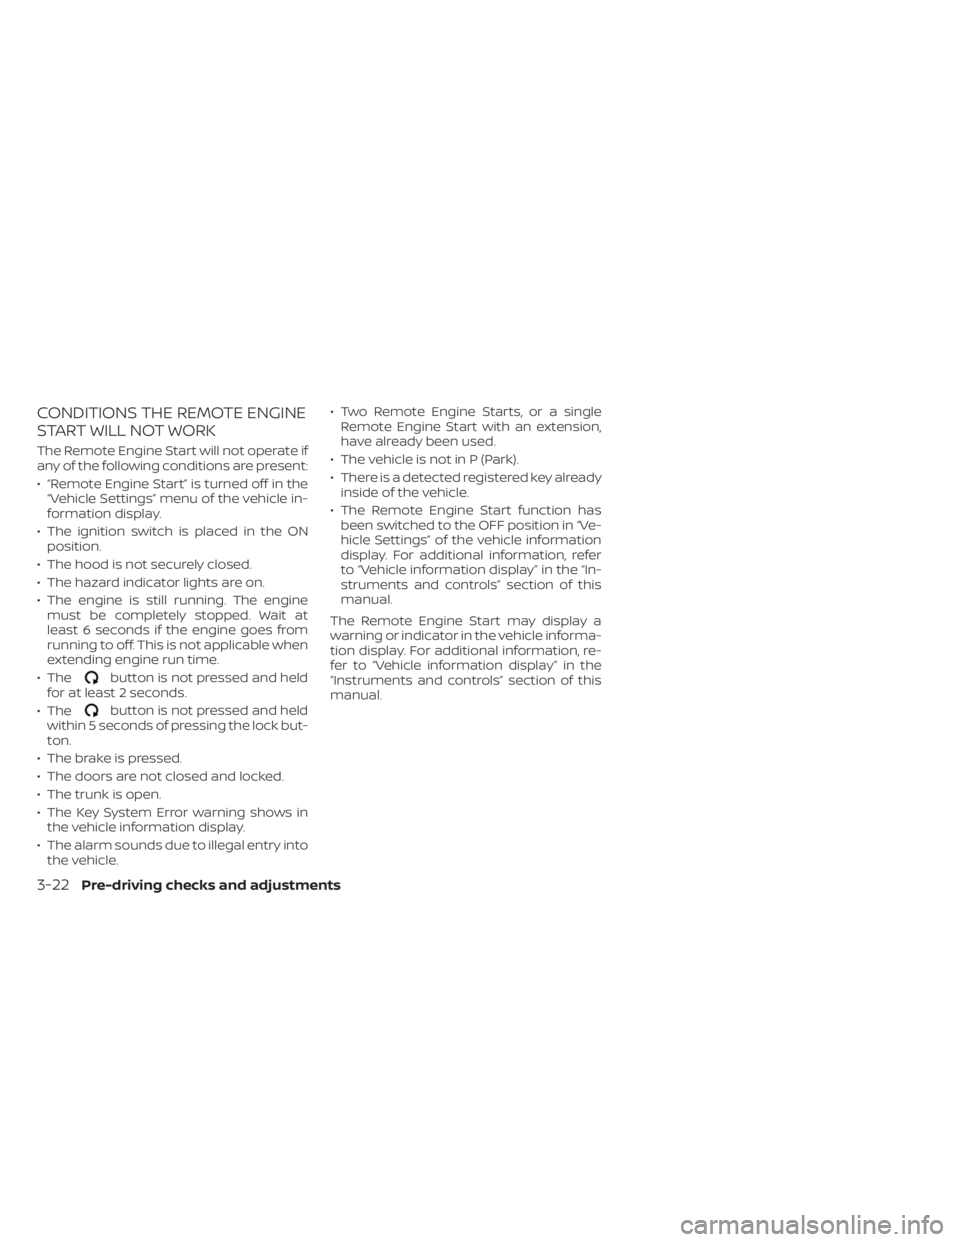
CONDITIONS THE REMOTE ENGINE
START WILL NOT WORK
The Remote Engine Start will not operate if
any of the following conditions are present:
• “Remote Engine Start” is turned off in the“Vehicle Settings” menu of the vehicle in-
formation display.
• The ignition switch is placed in the ON position.
• The hood is not securely closed.
• The hazard indicator lights are on.
• The engine is still running. The engine must be completely stopped. Wait at
least 6 seconds if the engine goes from
running to off. This is not applicable when
extending engine run time.
• The
button is not pressed and held
for at least 2 seconds.
• The
button is not pressed and held
within 5 seconds of pressing the lock but-
ton.
• The brake is pressed.
• The doors are not closed and locked.
• The trunk is open.
• The Key System Error warning shows in the vehicle information display.
• The alarm sounds due to illegal entry into the vehicle. • Two Remote Engine Starts, or a single
Remote Engine Start with an extension,
have already been used.
• The vehicle is not in P (Park).
• There is a detected registered key already inside of the vehicle.
• The Remote Engine Start function has been switched to the OFF position in “Ve-
hicle Settings” of the vehicle information
display. For additional information, refer
to “Vehicle information display” in the “In-
struments and controls” section of this
manual.
The Remote Engine Start may display a
warning or indicator in the vehicle informa-
tion display. For additional information, re-
fer to “Vehicle information display” in the
“Instruments and controls” section of this
manual.
3-22Pre-driving checks and adjustments
Page 215 of 528
1. Visually check that the parking space issafe before parking your vehicle.
2. The rear view of the vehicle is displayed on the screen
OAwhen the shif t lever is
moved to the R (Reverse) position. 3. Slowly back up the vehicle adjusting the
steering wheel so that the predicted
course lines
OBenter the parking space
OC. 4. Maneuver the steering wheel to make
the vehicle width guide lines
ODparallel
to the parking space
OCwhile referring
to the predicted course lines.
5. When the vehicle is parked in the space completely, move the shif t lever to the P
(Park) position and apply the parking
brake.
LHA4769LHA4770
Page 226 of 528

5. When the vehicle is parked in the spacecompletely, move the shif t lever to the P
(Park) position and apply the parking
brake.
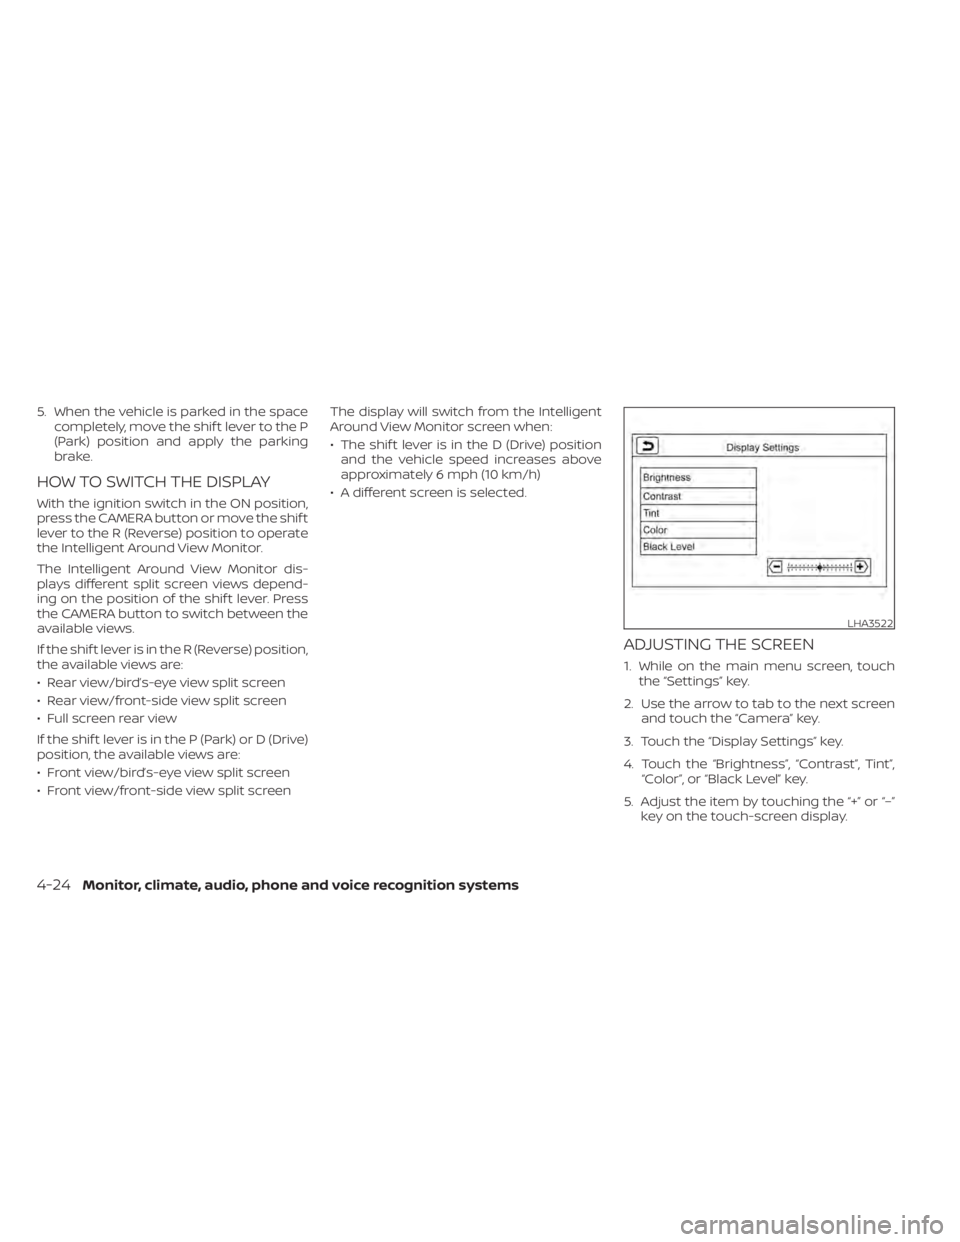
HOW TO SWITCH THE DISPLAY
With the ignition switch in the ON position,
press the CAMERA button or move the shif t
lever to the R (Reverse) position to operate
the Intelligent Around View Monitor.
The Intelligent Around View Monitor dis-
plays different split screen views depend-
ing on the position of the shif t lever. Press
the CAMERA button to switch between the
available views.
If the shif t lever is in the R (Reverse) position,
the available views are:
• Rear view/bird’s-eye view split screen
• Rear view/front-side view split screen
• Full screen rear view
If the shif t lever is in the P (Park) or D (Drive)
position, the available views are:
• Front view/bird’s-eye view split screen
• Front view/front-side view split screen The display will switch from the Intelligent
Around View Monitor screen when:
• The shif t lever is in the D (Drive) position
and the vehicle speed increases above
approximately 6 mph (10 km/h)
• A different screen is selected.
ADJUSTING THE SCREEN
1. While on the main menu screen, touch the “Settings” key.
2. Use the arrow to tab to the next screen and touch the “Camera” key.
3. Touch the “Display Settings” key.
4. Touch the “Brightness”, “Contrast”, Tint”, “Color”, or “Black Level” key.
5. Adjust the item by touching the “+” or “–” key on the touch-screen display.
LHA3522
4-24Monitor, climate, audio, phone and voice recognition systems
Page 227 of 528
NOTE:
Do not adjust any of the display settings
of the Intelligent Around View Monitor
while the vehicle is moving. Make sure
the parking brake is firmly applied.
INTELLIGENT AROUND VIEW
MONITOR SYSTEM LIMITATIONS
Page 289 of 528

Increasing fuel economy.......................5-111
Parking/parking on hills .......................5-112
Power steering ................................ 5-113
Brake system ................................. 5-114
Brake precautions .......................... 5-114
Anti-lock Braking System (ABS) .............5-114
Brake Assist ................................ 5-116
Vehicle Dynamic Control (VDC) system ........5-116
Rise-up and build-up ....................... 5-118
Brake force distribution ....................5-118
Chassis Control ............................... 5-119
Intelligent Trace Control (I-TC) ..............5-119
Active Ride Control (ARC) ...................5-119
Hill start assist system ........................ 5-119
Rear Sonar System (RSS) ......................5-120System operation
.......................... 5-121
How to enable/disable the sonar
system ..................................... 5-122
Sonar limitations ........................... 5-124
System temporarily unavailable ............5-124
System maintenance ......................5-125
Cold weather driving .......................... 5-125
Freeing a frozen door lock ..................5-125
Antifreeze .................................. 5-125
Battery..................................... 5-125
Draining of coolant water ..................5-126
Tire equipment ............................. 5-126
Special winter equipment ..................5-126
Driving on snow or ice ......................5-126
Engine block heater (if so equipped) ........5-127