2022 NISSAN SENTRA change wheel
[x] Cancel search: change wheelPage 255 of 528
Auxiliary (AUX) devices operation
Connecting auxiliary devices
Connect an AUX device into the AUX input
jack located on the center console below
the heater and air conditioner controls.
The AUX input jack accepts any standard
analog audio input such as from a portable
cassette player, CD player, MP3 player or
phone.
Insert a 1/8 in (3.5 mm) stereo mini plug in
the audio input jack. If a cable with a mono
plug is used, the audio output may not
function normally.
Activation and playing
Turn on the AUX device. Connect an AUX
cable to the AUX device and the AUX input
jack. Select AUX mode from the audio
source menu screen or by pressing the
Source button on the steering wheel.
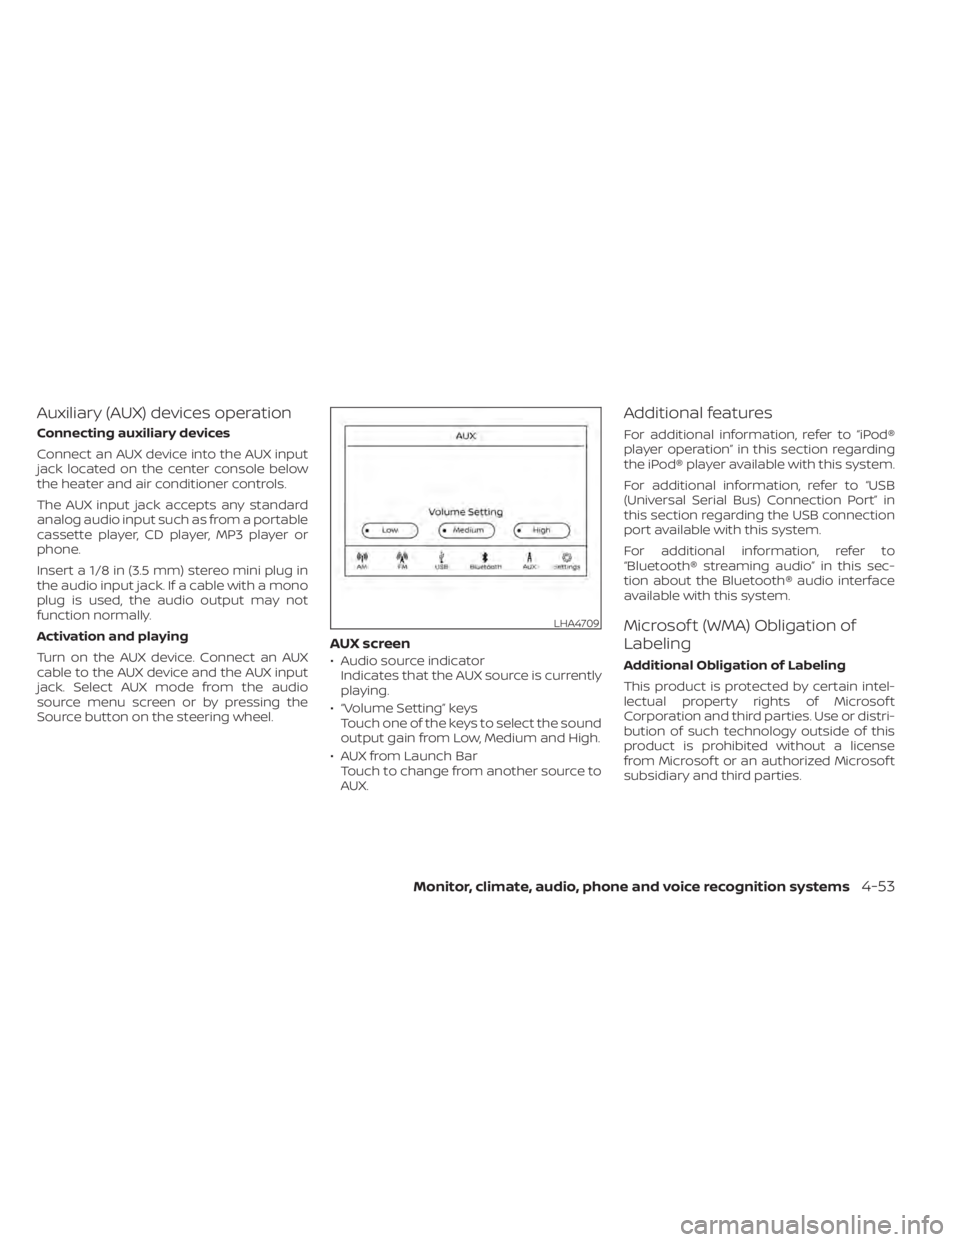
AUX screen
• Audio source indicatorIndicates that the AUX source is currently
playing.
• “Volume Setting” keys Touch one of the keys to select the sound
output gain from Low, Medium and High.
• AUX from Launch Bar Touch to change from another source to
AUX.
Additional features
For additional information, refer to “iPod®
player operation” in this section regarding
the iPod® player available with this system.
For additional information, refer to “USB
(Universal Serial Bus) Connection Port” in
this section regarding the USB connection
port available with this system.
For additional information, refer to
“Bluetooth® streaming audio” in this sec-
tion about the Bluetooth® audio interface
available with this system.
Microsof t (WMA) Obligation of
Labeling
Additional Obligation of Labeling
This product is protected by certain intel-
lectual property rights of Microsof t
Corporation and third parties. Use or distri-
bution of such technology outside of this
product is prohibited without a license
from Microsof t or an authorized Microsof t
subsidiary and third parties.
LHA4709
Page 263 of 528
Automatic Connecting Procedure
If no phone is connected to the system,
press and hold the
button on the
steering wheel for less than 1.5 seconds.
Af ter the prompt, speak “Add Phone”, the
system will announce “transferring to the
add phone settings menu”. The system will
start the pairing procedure. When a com-
patible phone is found, a message with a
PIN appears on the screen. Operate the
Bluetooth® phone to complete the con-
nection process. For additional informa-
tion, refer to “Bluetooth® connections
screen” in this section.
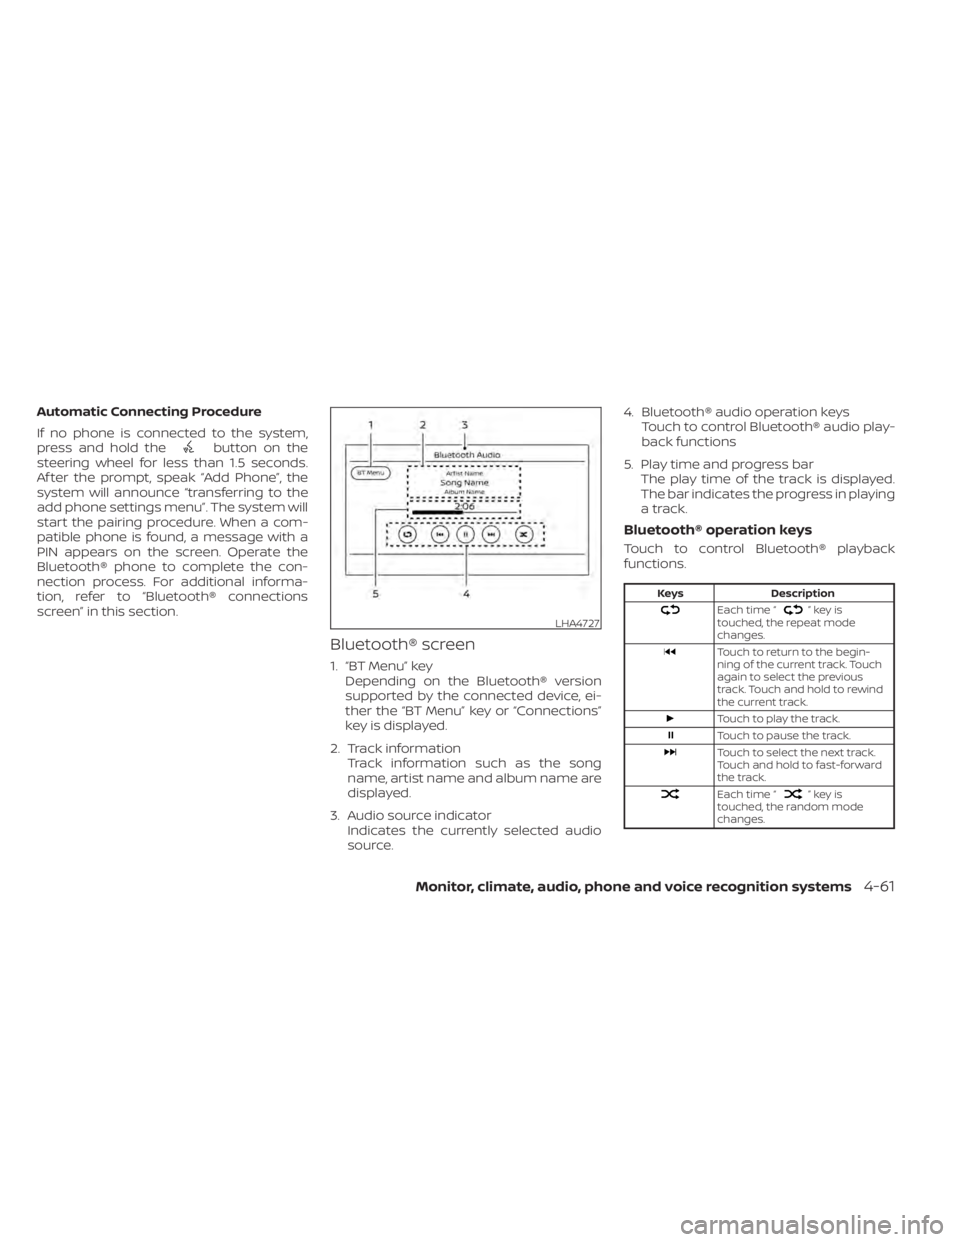
Bluetooth® screen
1. “BT Menu” key Depending on the Bluetooth® version
supported by the connected device, ei-
ther the “BT Menu” key or “Connections”
key is displayed.
2. Track information Track information such as the song
name, artist name and album name are
displayed.
3. Audio source indicator Indicates the currently selected audio
source. 4. Bluetooth® audio operation keys
Touch to control Bluetooth® audio play-
back functions
5. Play time and progress bar The play time of the track is displayed.
The bar indicates the progress in playing
a track.
Bluetooth® operation keys
Touch to control Bluetooth® playback
functions.
”keyis
touched, the repeat mode
changes.
Touch to return to the begin-
ning of the current track. Touch
again to select the previous
track. Touch and hold to rewind
the current track.
Touch to play the track.
Touch to pause the track.
Touch to select the next track.
Touch and hold to fast-forward
the track.
Each time “”keyis
touched, the random mode
changes.
LHA4727
Page 265 of 528
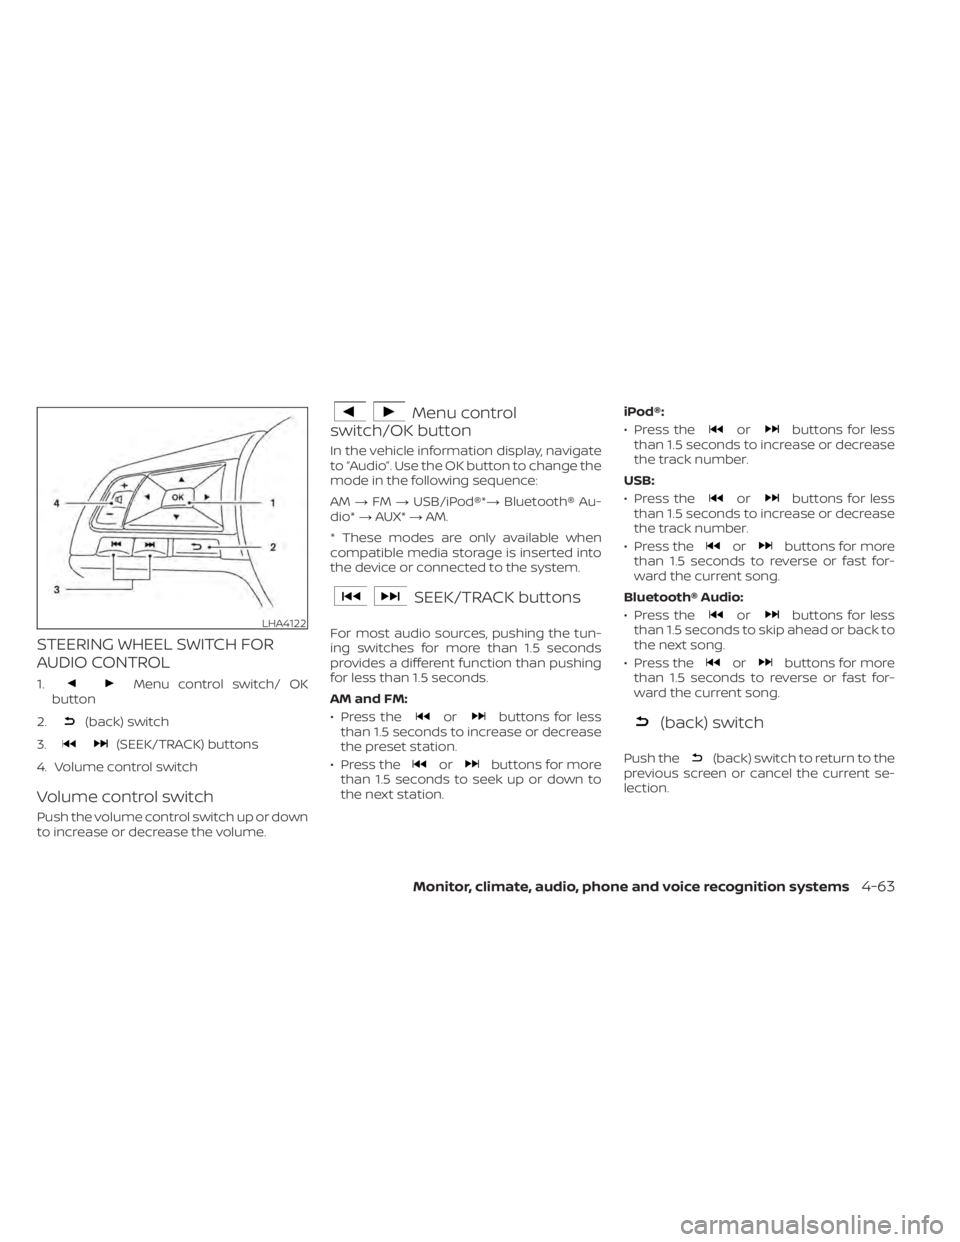
STEERING WHEEL SWITCH FOR
AUDIO CONTROL
1.Menu control switch/ OK
button
2.
(back) switch
3.
(SEEK/TRACK) buttons
4. Volume control switch
Volume control switch
Push the volume control switch up or down
to increase or decrease the volume.
Menu control
switch/OK button
In the vehicle information display, navigate
to “Audio”. Use the OK button to change the
mode in the following sequence:
AM →FM →USB/iPod®*→ Bluetooth® Au-
dio* →AUX* →AM.
* These modes are only available when
compatible media storage is inserted into
the device or connected to the system.
SEEK/TRACK buttons
For most audio sources, pushing the tun-
ing switches for more than 1.5 seconds
provides a different function than pushing
for less than 1.5 seconds.
AM and FM:
• Press the
orbuttons for less
than 1.5 seconds to increase or decrease
the preset station.
• Press the
orbuttons for more
than 1.5 seconds to seek up or down to
the next station. iPod®:
• Press the
orbuttons for less
than 1.5 seconds to increase or decrease
the track number.
USB:
• Press the
orbuttons for less
than 1.5 seconds to increase or decrease
the track number.
• Press the
orbuttons for more
than 1.5 seconds to reverse or fast for-
ward the current song.
Bluetooth® Audio:
• Press the
orbuttons for less
than 1.5 seconds to skip ahead or back to
the next song.
• Press the
orbuttons for more
than 1.5 seconds to reverse or fast for-
ward the current song.
(back) switch
Push the(back) switch to return to the
previous screen or cancel the current se-
lection.
LHA4122
Page 320 of 528
•The system may not function prop-
erly under the following conditions:
– On roads where there are multiple
parallel lane markers; lane mark-
ers that are faded or not painted
clearly; yellow painted lane mark-
ers; non-standard lane markers;
or lane markers covered with wa-
ter, dirt, snow, etc.
– On roads where the discontinued
lane markers are still detectable.
– On roads where there are sharp
curves.
– On roads where there are sharply
contrasting objects, such as shad-
ows, snow, water, wheel ruts,
seams or lines remaining af ter
road repairs. (The LDW system
could detect these items as lane
markers.)
– On roads where the traveling lane
merges or separates.
– When the vehicle’s traveling direc-
tion does not align with the lane
marker.
– When traveling close to the ve-
hicle in front of you, which ob-
structs the lane camera unit de-
tection range. –
When rain, snow, dirt or an object
adheres to the windshield in front
of the lane camera unit.
– When the headlights are not
bright due to dirt on the lens or if
the aiming is not adjusted
properly.
– When strong light enters the lane
camera unit. (For example, the
light directly shines on the front of
the vehicle at sunrise or sunset.)
– When a sudden change in bright-
ness occurs. (For example, when
the vehicle enters or exits a tunnel
or under a bridge.)
SYSTEM TEMPORARILY
UNAVAILABLE
If the vehicle is parked in direct sunlight
under high temperature conditions (over
approximately 104°F [40°C]) and then
started, the LDW system may be deacti-
vated automatically and the following
message will appear in the vehicle infor-
mation display: “Unavailable: High Cabin
Temperature.”
When the interior temperature is reduced,
the LDW system will resume operating au-
tomatically. The LDW system is not designed to warn
under the following conditions:
• When you operate the lane change signal
and change traveling lanes in the direc-
tion of the signal. (The LDW system will
become operable again approximately 2
seconds af ter the lane change signal is
turned off.)
• When the vehicle speed lowers to less than approximately 37 mph (60 km/h).
Af ter the above conditions have finished
and the necessary operating conditions
are satisfied, the LDW functions will resume.
SYSTEM MALFUNCTION
If the LDW system malfunctions, it will can-
cel automatically and “Not Available Sys-
tem Malfunction” will appear in the vehicle
information display. If “Not Available Sys-
tem Malfunction” appears in the vehicle in-
formation display, pull off the road to a safe
location and stop the vehicle. Place the
shif t lever in the P (Park) position and the
ignition switch in the OFF position and re-
start the engine/motor. If “Not Available
System Malfunction” continues to appear
in the vehicle information display, have the
system checked. It is recommended that
you visit a NISSAN dealer for this service.
5-34Starting and driving
Page 348 of 528
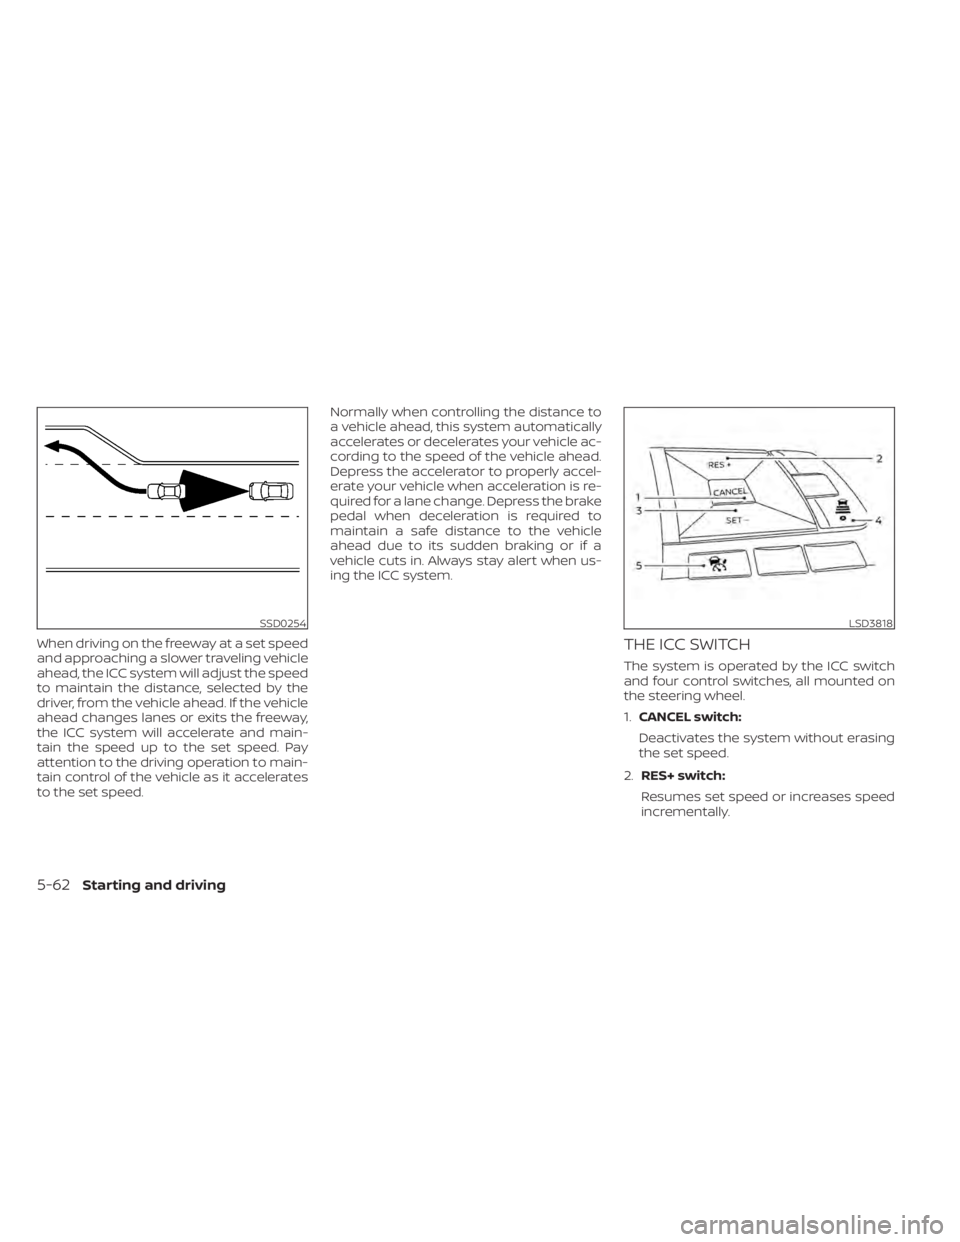
When driving on the freeway at a set speed
and approaching a slower traveling vehicle
ahead, the ICC system will adjust the speed
to maintain the distance, selected by the
driver, from the vehicle ahead. If the vehicle
ahead changes lanes or exits the freeway,
the ICC system will accelerate and main-
tain the speed up to the set speed. Pay
attention to the driving operation to main-
tain control of the vehicle as it accelerates
to the set speed.Normally when controlling the distance to
a vehicle ahead, this system automatically
accelerates or decelerates your vehicle ac-
cording to the speed of the vehicle ahead.
Depress the accelerator to properly accel-
erate your vehicle when acceleration is re-
quired for a lane change. Depress the brake
pedal when deceleration is required to
maintain a safe distance to the vehicle
ahead due to its sudden braking or if a
vehicle cuts in. Always stay alert when us-
ing the ICC system.THE ICC SWITCH
The system is operated by the ICC switch
and four control switches, all mounted on
the steering wheel.
1.
CANCEL switch:
Deactivates the system without erasing
the set speed.
2. RES+ switch:
Resumes set speed or increases speed
incrementally.
SSD0254LSD3818
5-62Starting and driving
Page 365 of 528

–Objects that suddenly appear
– Thin objects such as rope, wire,
chain, etc.
• The RAB system may not operate for
the following obstacles:
– Obstacles located high off the
ground
– Obstacles in a position offset from
your vehicle
– Obstacles, such as spongy materi-
als or snow, that have sof t outer
surfaces and can easily absorb a
sound wave
• The RAB system may not operate in
the following conditions:
– There is rain, snow, ice, dirt, etc.,
attached to the sonar sensors.
– A loud sound is heard in the area
around the vehicle.
– The surface of the obstacle is di-
agonal to the rear of the vehicle.
• The RAB system may unintentionally
operate in the following conditions:
– There is overgrown grass in the
area around the vehicle. –
There is a structure (e.g., a wall, toll
gate equipment, a narrow tunnel,
a parking lot gate) near the side of
the vehicle.
– There are bumps, protrusions, or
manhole covers on the road
surface.
– The vehicle drives through a
draped flag or a curtain.
– There is an accumulation of snow
or ice behind the vehicle.
– An ultrasonic wave source, such as
another vehicle’s sonar, is near
the vehicle.
• Once the automatic brake control
operates, it does not operate again if
the vehicle approaches the same
obstacle.
• The automatic brake control can only
operate for a short period of time.
Therefore, the driver must depress
the brake pedal.
• In the following situations, the RAB
system may not operate properly or
may not function sufficiently:
– The vehicle is driven in bad
weather (rain, fog, snow, etc.).
– The vehicle is driven on a steep
hill. –
The vehicle’s posture is changed
(e.g., when driving over a bump).
– The vehicle is driven on a slippery
road.
– The vehicle is turned sharply by
turning the steering wheel fully.
– Snow chains are used.
– Wheels or tires other than NISSAN
recommended are used.
– The brakes are cold at low ambi-
ent temperatures or immediately
af ter driving has started.
– The braking force becomes poor
due to wet brakes af ter driving
through a puddle or washing the
vehicle.
• Turn the RAB system off in the follow-
ing conditions to prevent the occur-
rence of an unexpected accident re-
sulting from sudden system
operation:
– The vehicle is towed.
– The vehicle is carried on a flatbed
truck.
– The vehicle is on the chassis
dynamometer.
– The vehicle drives on an uneven
road surface.
Starting and driving5-79
Page 373 of 528
–Pedestrians in wheelchairs or us-
ing mobile transport such as
scooters, child-operated toys, or
skateboards.
– Pedestrians who are seated or
otherwise not in a full upright
standing or walking position.
– Oncoming vehicles
– Crossing vehicles
– Obstacles on the roadside
• The AEB with Pedestrian Detection
system has some performance
limitations.
– If a stationary vehicle is in the ve-
hicle’s path, the AEB with Pedes-
trian Detection system will not
function when the vehicle is
driven at speeds over approxi-
mately 50 mph (80 km/h).
– For pedestrian detection, the AEB
with Pedestrian Detection system
will not function when the vehicle
is driven at speeds over approxi-
mately 37 mph (60 km/h) or below
approximately 6 mph (10 km/h).
• The AEB with Pedestrian Detection
system will not function for pedestri-
ans in darkness or in tunnels, even if
there is street lighting in the area. •
The AEB with Pedestrian Detection
system may not function if the ve-
hicle ahead is narrow (for example, a
motorcycle).
• The AEB with Pedestrian Detection
system may not function if the speed
difference between the two vehicles
is too small.
• The radar sensor AEB with Pedes-
trian Detection system may not
function properly or detect a vehicle
ahead in the following conditions:
– Poor visibility (conditions such as
rain, snow, fog, dust storms, sand-
storms, and road spray from other
vehicles)
– Driving on a steep downhill slope
or roads with sharp curves.
– Driving on a bumpy road surface,
such as an uneven dirt road.
– If dirt, ice, snow or other material
is covering the radar sensor area.
– Interference by other radar
sources.
– The camera area of the windshield
is fogged up, or covered with dirt,
water drops, ice, snow, etc. –
Strong light (for example, sunlight
or high beams from oncoming ve-
hicles) enters the front camera.
Strong light causes the area
around the pedestrian to be cast
in a shadow, making it difficult to
see.
– A sudden change in brightness
occurs. (For example, when the
vehicle enters or exits a tunnel or a
shaded area or lightning flashes.)
– The poor contrast of a person to
the background, such as having
clothing color or pattern which is
similar to the background.
– The pedestrian’s profile is partially
obscured or unidentifiable due to
the pedestrian transporting lug-
gage, wearing bulky or very loose-
fitting clothing or accessories.
• The system performance may de-
grade in the following conditions:
– The vehicle is driven on a slippery
road.
– The vehicle is driven on a slope.
– Excessively heavy baggage is
loaded in the rear seat or the trunk
room of your vehicle.
Starting and driving5-87
Page 478 of 528
•If the wheels are changed for any
reason, always replace with wheels
which have the same off-set dimen-
sion. Wheels of a different off-set
could cause premature tire wear, de-
grade vehicle handling characteris-
tics, affect the VDC system and/or in-
terference with the brake discs. Such
interference can lead to decreased
braking efficiency and/or early brake
pad/shoe wear. For additional infor-
mation on wheel-off set dimensions,
refer to “Wheels and tires” in the
“Technical and consumer informa-
tion” section of this manual.
• When replacing a wheel without the
TPMS such as the spare tire, the TPMS
will not function and the low tire
pressure warning light will flash for
approximately 1 minute. The light will
remain on af ter 1 minute. Have your
tires replaced and/or TPMS system
reset as soon as possible. It is recom-
mended that you visit a NISSAN
dealer for this service.
• Replacing tires with those not origi-
nally specified by NISSAN could af-
fect the proper operation of the
TPMS. •
The TPMS sensor may be damaged if
it is not handled correctly. Be careful
when handling the TPMS sensor.
• When replacing the TPMS sensor, the
ID registration may be required. Con-
tact a NISSAN dealer for ID
registration.
• Do not use a valve stem cap that is
not specified by NISSAN. The valve
stem cap may become stuck.
• Be sure that the valve stem caps are
correctly fitted. Otherwise the valve
may be clogged up with dirt and
cause a malfunction or loss of
pressure.
• Do not install a damaged or de-
formed wheel or tire even if it has
been repaired. Such wheels or tires
could have structural damage and
could fail without warning.
• The use of retread tires is not
recommended.
• For additional information regarding
tires, refer to “Important Tire Safety
Information” (US) or “Tire Safety In-
formation” (Canada) in the Warranty
Information Booklet.Wheel balance
Unbalanced wheels may affect vehicle
handling and tire life. Even with regular use,
wheels can get out of balance. Therefore,
they should be balanced as required.
Wheel balance service should be per-
formed with the wheels off the vehicle.
Spin balancing the wheels on the vehicle
could lead to mechanical damage.
• For additional information regarding
tires, refer to “Important Tire Safety In-
formation” (US) or “Tire Safety Informa-
tion” (Canada) in the Warranty Informa-
tion Booklet.
Care of wheels
• Wash the wheels when washing the ve- hicle to maintain their appearance.
• Clean the inner side of the wheels when the wheel is changed or the underside of
the vehicle is washed.
• Do not use abrasive cleaners when washing the wheels.
• Inspect wheel rims regularly for dents or corrosion. Such damage may cause loss
of pressure or poor seal at the tire bead.
• NISSAN recommends waxing the road wheels to protect against road salt in ar-
eas where it is used during winter.
8-38Do-it-yourself